background image

Français - 

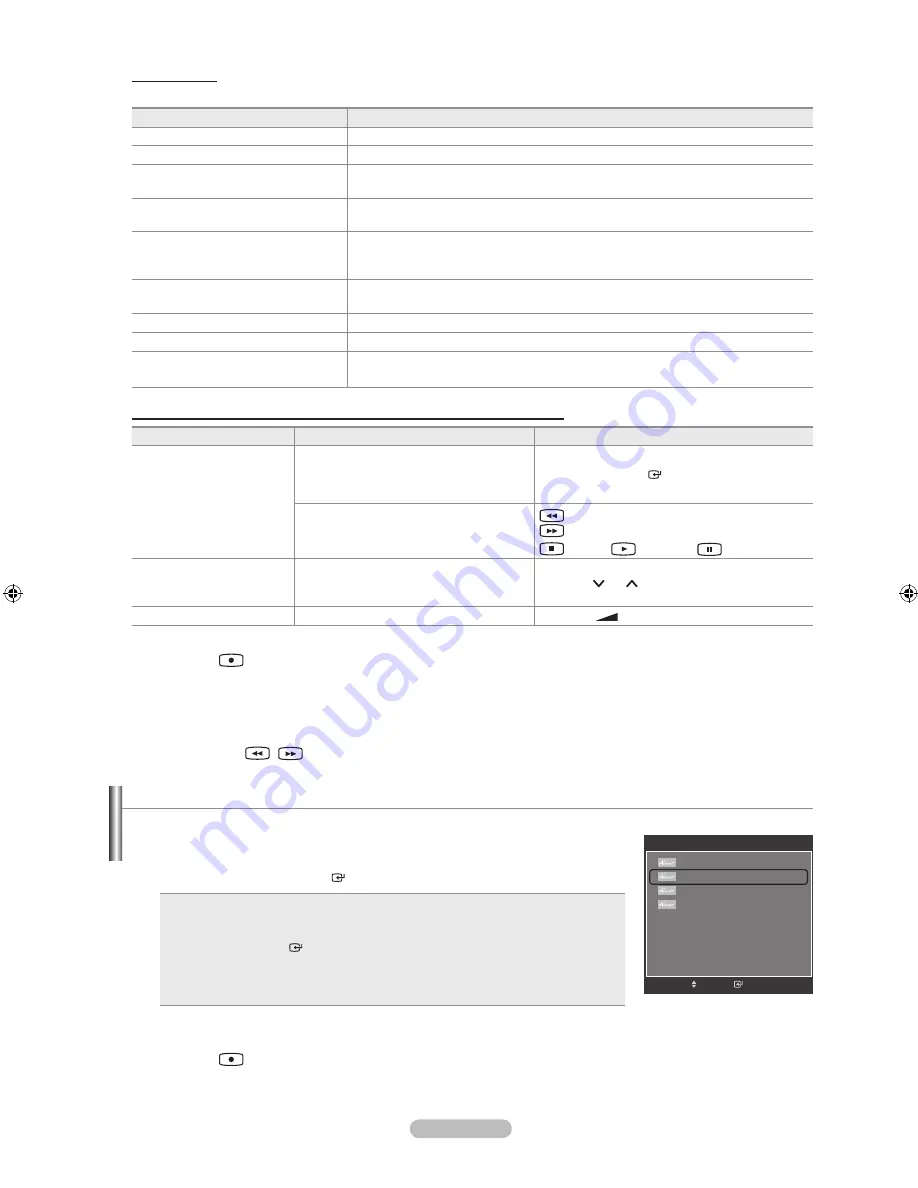
Menu Anynet

+

Le menu  varie selon le type et l’état des appareils  connectés au téléviseur.

Menu Anynet

+

Description

Voir télévision

Passe d’ au mode de diffusion TV.

Liste d’appareils

Affiche la liste des appareils .

Enregistrer

Démarre l’enregistrement (ce menu ne fonctionne qu’avec un appareil capable 

d’enregistrer).

Menu du Périphérique 

Affiche le menu de l’appareil connecté. 


Exemple : Si un enregistreur de DVD est connecté, son menu titre s’affiche.

Fonctionnement périph.

Affiche le menu de commande de l’appareil connecté. 


Exemple : Si un enregistreur de DVD est connecté, son menu de contrôle de 

lecture qui s’affiche.

Enr. Programmé

Permet de réserver un enregistrement. (Ce menu ne fonctionne qu’avec un 

appareil capable d’enregistrer.)

Arrêter Enr.

Arrête l’enregistrement.

Récepteur

Le son est émis par l’intermédiaire du récepteur.

Configuration 

Vous pouvez paramétrer les fonctions  (HDMI-CEC), Arrêt automatique et 

Recherche de connexions pour l’utilisation d’.

Boutons de la télécommande du téléviseur disponibles en mode Anynet

+

Type d’appareil

Mode de fonctionnem

Boutons disponibles

Appareil Anynet

+

Après le basculement vers cet appareil, 

lorsque son menu s’affiche à l’écran.

Touches numériques
▲/▼/◄/►/

ENTER


 Touches

Boutons de couleur / bouton 

EXIT

Après le basculement vers l’appareil, 

pendant la lecture d’un fichier

(Recherche vers l’arrière) /


(Recherche vers l’avant)
(Arrêt) / 

(Lecture) / 

(Pause)

Appareil à tuner intégré

Après le basculement vers l’appareil, 

lorsque vous regardez un programme 

télévisé

Bouton

 P 

 / 


Appareil audio

Lorsque le récepteur est activé

Bouton 

– 


  + 

MUTE

La fonction  est utilisable uniquement lorsque la source active sur la télécommande est définie sur TV.
Le bouton 

 ne fonctionne que lorsque l’appareil est dans un état où l’enregistrement est possible.

Il est impossible de commander des appareils  à l’aide des boutons situés sur le téléviseur. Les appareils 

 ne peuvent être commandés qu’au moyen de la télécommande du téléviseur.
Les fonctions d’ ne peuvent pas commander des produits d’autres fabricants.
En mode , les boutons de couleur peuvent ne pas fonctionner correctement.
Les opérations 

 peuvent varier en fonction de l’appareil.

Enregistrement

Vous pouvez enregistrer un programme télévisé à l’aide d’un enregistreur Samsung.

1.

  Appuyez sur le bouton 

TOOLS

.

2.

   Appuyez sur le bouton ▲ ou ▼ pour sélectionner “Recording Immediately”, puis 

appuyez sur le bouton 

ENTER


. L’enregistrement débute.

S’il existe plusieurs enregistreurs

Si plusieurs enregistreurs sont connectés, la liste de ces appareils s’affiche. 

Appuyez sur le bouton ▲ ou ▼ pour sélectionner un enregistreur, puis appuyez 

sur le bouton  

ENTER


. L’enregistrement débute.

Si l’enregistreur n’est pas affiché

Sélectionnez “Liste d’appareils” et appuyez sur le bouton rouge pour chercher des 

appareils.


Appuyez sur le bouton 

EXIT

 pour quitter.

Vous pouvez effectuer un enregistrement en sélectionnant “Enregistrer” après avoir appuyé sur le bouton 

TOOLS

.

Le bouton 

 permet d’enregistrer ce que vous êtes en train de regarder. Si vous regardez une vidéo provenant d’un 

autre appareil, cette vidéo est enregistrée.
Avant d’enregistrer, vérifiez la connexion de la prise d’antenne au périphérique d’enregistrement. Afin de connecter 

correctement une antenne à un périphérique d’enregistrement, reportez-vous à la documentation de ce dernier. 

Outils


Liste d’appareils


Enregistrer


Enr. Programmé


Récepteur 

Arrêt

Mode Image 

:  Standard

Mode Son 

Custom

Veille 

Arrêt

SRS TS XT 

Arrêt

e


Quitter

Entrer

Déplacer

BN68-01412J-Fre.indb   67

2008-04-28   ¿ÀÈÄ 1:32:38

Summary of Contents for LE32A676A1M

Page 1: ...864 0 10 Min www samsung com nl NORWAY 815 56 480 www samsung com no POLAND 0 801 801 881 022 607 93 33 www samsung com pl PORTUGAL 80820 SAMSUNG 726 7864 www samsung com pt SLOVAKIA 0800 SAMSUNG 726 7864 www samsung com sk SPAIN 902 10 11 30 www samsung com SWEDEN 0771 400 200 www samsung com se SWITZERLAND 0800 SAMSUNG 726 7864 www samsung com ch U K 0845 SAMSUNG 7267864 www samsung com TURKEY 4...

Page 2: ...n the left right and center of the screen caused by the difference of light emission on the screen Playing a DVD or a game console may cause a similar effect to the screen Damages caused by the above effect are not covered by the Warranty Displaying still images from Video games and PC for longer than a certain period of time may produce partial after images To prevent this effect reduce the brigh...

Page 3: ...34 Switching the Television On and Off Automatically 35 Function Description Selecting a Menu Language 36 Setting Up Your Personal ID Number PIN 36 Setting up the Parental Lock 37 Setting the Subtitle 38 Selecting a Teletext Language 39 Selecting a Preference Language 39 Melody Entertainment Energy Saving 40 Upgrading the Software 41 Viewing Common Interface 42 Selecting the CI Common Interface Me...

Page 4: ... at position 1 and then fasten two screw at position 2 Stand the product up and fasten the screws If you fasten the screws with the LCD TV placed down it may lean to one side The stand is installed for models with the screen size of 37 inch and above Installing the Wall Mount Kit Wall mount items sold separately allow you to mount the TV on the wall For detailed information on installing the wall ...

Page 5: ...n the remote control 2 MENU Press to see an on screen menu of your TV s features 3 Press to increase or decrease the volume In the on screen menu use the buttons as you would use the and buttons on the remote control 4 C P Press to change channels In the on screen menu use the C P buttons as you would use the and buttons on the remote control 5 POWER INDICATOR Blinks and turns off when the power i...

Page 6: ... should connect the Set Top Box to the DTV or DVD and connect the DTV or DVD to component connector PR PB Y on your set The PR PB and Y connectors on your component devices DTV or DVD are sometimes labeled Y B Y and R Y or Y Cb and Cr Connect RCA audio cables optional to R AUDIO L on the rear of your set and the other ends to corresponding audio out connectors on the DTV or DVD 3 HDMI IN 1 HDMI IN...

Page 7: ...ite network 5 SERVICE Connector for SERVICE only Connect this to the jack on the optional wall mount bracket This will allow you to adjust the TV viewing angle using your remote control 6 COMMON INTERFACE Slot When not inserting CI CARD in some channels Scrambled Signal is displayed on the screen The pairing information containing a telephone number CI CARD ID Host ID and other information will be...

Page 8: ...t the TV EXT 1 EXT 2 Connector Input Output Video Audio L R RGB Video Audio L R EXT 1 O O O Only TV or DTV output is available EXT 2 O O Output you can choose Inputs or outputs for external devices such as VCR DVD video game device or video disc players Kensington Lock depending on the model The Kensington Lock optional is a device used to physically fix the system when used in a public place If y...

Page 9: ... will reduce the battery usage time Previous channel Temporary sound switch off P Next channel P Previous channel Displays the main on screen menu This function enables you to view and play photo and music files from an external device Returns to the previous menu a Control the cursor in the menu b Exit the on screen menu c Use this when connecting a SAMSUNG DMA Digital Media Adapter device throug...

Page 10: ...on your set 2 Press the button on your set You also can press the POWER button or the TV DTV button on the remote control to turn the TV on The programme that you were watching last is reselected automatically 3 Press the numeric button 0 9 or channel up down button on the remote control or C P button on your set When you switch the set on for the very first time you will be asked to choose langua...

Page 11: ... Picture Mode see page 25 Sound Mode see page 30 Sleep Timer see page 34 SRS TS XT see page 30 Energy Saving see page 40 Dual l ll see page 32 PIP see page 29 Auto Adjustment see page 45 Plug Play Feature When the TV is initially powered on basic settings proceed automatically and subsequently 1 Press the POWER button on the remote control The message Les menus Langue Enr démo Canaux et Heure sero...

Page 12: ... button You can also set the Month Day Year Hour and Minute by pressing the number buttons on the remote control 8 The message Enjoy your viewing is displayed When you have finished press the ENTER button If you want to reset this feature 1 Press the MENU button to display the menu Press the or button to select Setup then press the ENTER button 2 Press the ENTER button again to select Plug Play 3 ...

Page 13: ...er or not to store each of the channels found The programme number of each stored channel which you wish to identify 1 Press the MENU button to display the menu Press the or button to select Channel then press the ENTER button 2 Press the or button to select Manual Store then press the ENTER button Digital Channel 3 Press the or button to select Digital Channel then press the ENTER button If a cha...

Page 14: ...tly by pressing the numeric buttons 0 9 If there is abnormal sound or no sound reselect the sound standard required Search When you do not know the channel numbers Press the or button to start the search The tuner scans the frequency range until the first channel or the channel that you selected is received on the screen Store When you store the channel and associated programme number Set to OK by...

Page 15: ...r part of the screen center Please click on INFO button for the detailed information Channel Number Running Time Status Bar Parental Level Video Quality Information HD SD Sound Modes Subtitle or Teletext languages of Subtitle or Teletext and brief summary of the highlighted programme are included on the detailed information will be appeared if the summary is long Toggle between the Mini Guide or F...

Page 16: ...press the ENTER button 3 Select Mini Guide or Full Guide using the or button and press the ENTER button 4 Press the EXIT button to exit You can select these options by simply pressing the GUIDE button on the remote control O Channel Full Guide Mini Guide Default Guide Mini Guide Channel List Channel Mode Added Ch Child Lock On Fine Tune Signal Information LNA Off Channel Full Guide Mini Guide Defa...

Page 17: ...l Type Toggle between your TV Radio Data Other and All Green Zoom Enlarges or shrinks a channel number Yellow Select Selects multiple channel lists TOOLS Option Displays the Delete or Add Add to Favourite or Delete from Favourite Lock Timer Viewing Edit Channel Name Sort Edit Channel Number Select All Deselect All or Auto Store menu The Options menus may differ depending on the situation A gray co...

Page 18: ...on 4 Press the or button to select a channel as a favourite channel Adding multiple channels to Favourites Press the or button to select the desired channel in the channel list Then press the yellow button Repeat the above operation to select multiple channels The mark appears to the left of the selected channels 5 Press the TOOLS button 6 Press the or button to select Add to Favourite then press ...

Page 19: ...ant to change PIN number refer to 36 page Unlocking channels 7 Press the or button to select the channels you want to Unlock then press the TOOLS button 8 Press the or button to select Unlock then press the ENTER button 9 Enter your 4 digit PIN number The channel is unlocked and the mark also disappears The default PIN number of a new TV set is 0 0 0 0 If you want to change PIN number refer to 36 ...

Page 20: ...on refer to page 19 Only memorized channels can be reserved You can set the channel month day year hour and minute directly by pressing the number buttons on the remote control Press the CH LIST button on the remote control to bring up the channel lists Digital Program Guide and Viewing Reservation When a digital channel is selected and you press the button the Program Guide for the channel appear...

Page 21: ...r button to select Cancel Schedules then press the ENTER button 6 Press the or button to select OK then press the ENTER button The viewing reservation has been canceled Press the EXIT button to exit Programmed Option Change Info Select to change a viewing reservation Cancel Schedules Select to cancel a viewing reservation Information Select to view a viewing reservation Select All Select all reser...

Page 22: ...ess the or button to select Channel then press the ENTER button Press the or button to select Channel List then press the ENTER button 2 Press the or button to select a channel then press the TOOLS button 3 Press the or button to select Sort then press the ENTER button 4 Press the or button to move to the position in which you would like to change and then press the ENTER button 5 Repeat steps 2 t...

Page 23: ... of the selected channels Storing Channels in Memory Auto Store 1 Press the MENU button Press the or button to select Channel then press the ENTER button Press the or button to select Channel List then press the ENTER button 2 Press the or button to select the channel to be assigned a new name then press the TOOLS button 3 Press the or button to select Auto Store then press the ENTER button For fu...

Page 24: ...pears when Auto Store or Plug Play is selected Setting the Channel Mode You can display either the added channels list or the favourite channels list when the CH LIST button on the remote control is pressed 1 Press the MENU button to display the menu Press the or button to select Channel then press the ENTER button 2 Press the or button to select Channel Mode then press the ENTER button 3 Press th...

Page 25: ...e ENTER button Only Analogue TV channels can be fine tuned Checking the Digital Signal Information You can get information about the signal status 1 Press the MENU button to display the menu Press the or button to select Channel then press the ENTER button 2 Press the or button to select Signal Information then press the ENTER button 3 Press the EXIT button to exit If the signal status is poor the...

Page 26: ...display the menu Press the or button to select Channel then press the ENTER button 2 Press the or button to select LNA then press the ENTER button 3 Press the or button to select Off or On Press the ENTER button 4 Press the EXIT button to exit While viewing an Analogue channel this function can be selected Channel Fine Tune Signal Information LNA On Off On Channel Fine Tune Signal Information LNA ...

Page 27: ...the EXIT button to exit When you make changes to Backlight Contrast Brightness Sharpness Colour or Tint G R the OSD will be adjusted accordingly In TV Ext AV S Video modes of the PAL system you cannot use the Tint Function In PC mode you can only make changes to Backlight Contrast and Brightness Settings can be adjusted and stored for each external device you have connected to an input of the TV T...

Page 28: ...Blue Yellow Cyan or Magenta Press the ENTER button Red Green Blue In Colour you can adjust the RGB values for the selected colour Press the or button to select Red Green or Blue to change it Press the ENTER button Press the or button to decrease or increase the value of a particular item Press the ENTER button Reset Resets the colour space to the default values White Balance R Offset G Offset B Of...

Page 29: ...urs Wide Zoom Press the button to Select Position then press the ENTER button Press the or button to move the screen up down Then press the ENTER button Zoom Press the button to Select Position then press the ENTER button Press the or button to move the picture up and down Then press the ENTER button Press the button to Select Size then press the ENTER button Press the or button to magnify or redu...

Page 30: ...e in Movie and Standard mode HDMI Black Level Normal Low You can directly select the black level on the screen to adjust the screen depth This function is active only when the external input connects to HDMI RGB signals Movie Plus Off Low Medium High Demo LE32A676 You can view more natural skin and clear text even in fast moving scenes Use this function when watching movies This function is not av...

Page 31: ...e PIP function Main picture Sub picture Component HDMI 1 HDMI DVI 2 HDMI 3 HDMI 4 PC TV Ext 1 Ext 2 AV Easy Setting 1 Press the TOOLS button on the remote control 2 Press the or button to select PIP then press the ENTER button 3 Press the or button to select On 4 Press the or button to select a particular item 5 Press the or button to select the required option 6 Press the EXIT or TOOLS button to ...

Page 32: ...annel content over two speakers TruSurround delivers a compelling virtual surround sound experience through any two speaker playback system including internal television speakers It is fully compatible with all multichannel formats Easy Setting 1 Press the TOOLS button on the remote control 2 Press the or button to select SRS TS XT 3 Press the or button to select the Off or On 4 Press the EXIT or ...

Page 33: ...as its own signal conditions and so it is not easy to adjust the volume every time the channel is changed This feature lets you automatically adjust the volume of the desired channel by lowering the sound output when the modulation signal is high or by raising the sound output when the modulation signal is low TV Speaker Off On If you want to hear the sound through separate speakers cancel the int...

Page 34: ...o Dual I II the current sound mode is displayed on the screen 1 Press the TOOLS button on the remote control 2 Press the or button to select Dual I II 3 Press the or button to select required option 4 Press the ENTER button Audio Type Dual 1 2 Default A2 Stereo Mono MONO Automatic change Stereo STEREO MONO Dual DUAL 1 DUAL 2 DUAL 1 NICAM Stereo Mono MONO Automatic change Stereo MONO STEREO Dual MO...

Page 35: ...select Clock Set then press the ENTER button 5 Press the or button to move to Day Month Year Hour or Minute Set the date and time you want by pressing the or button then press the ENTER button Press the EXIT button to exit The current time will appear every time you press the INFO button You can set the month day year hour and minute directly by pressing the number buttons on the remote control Ti...

Page 36: ...iving a digital signal 1 Press the MENU button to display the menu Press the or button to select Setup then press the ENTER button Press the or button to select Time then press the ENTER button 2 Press the ENTER button to select Clock 3 Press the ENTER button to select Clock Mode Press the or button to select Auto then press the ENTER button 4 Press the EXIT button to exit Setup Plug Play Language...

Page 37: ...l Music Select the folder containing MP3 files on the USB device Photo Select the folder containing JPEG files on the USB device Repeat Select Once Everyday Mon Fri Mon Sat Sat Sun or Manual When Manual is selected press the button to select the desired day of the week Press the ENTER button over the desired day and the mark will appear Press the EXIT button to exit You can set the hour minute and...

Page 38: ...N code by using the numeric buttons 0 9 The Enter New PIN is displayed 5 Enter your new PIN code by using the numeric buttons 0 9 The Confirm New PIN is displayed 6 Re enter your new PIN code to confirm by using the numeric buttons 0 9 The PIN is changed successfully message is displayed 7 Press the EXIT button to exit If you forget the PIN code press the remote control buttons in the following se...

Page 39: ... using the numeric buttons 0 9 The default PIN code for a new TV set is 0000 If you want to change PIN number refer to 36 page 5 Press the ENTER button 6 Press the or button to select the age rating you want to lock out Press the ENTER button The symbol will be displayed Allow All Press to unlock all TV ratings Block All Press to lock all TV ratings 7 Press the EXIT button to exit Parental Lock En...

Page 40: ...or Hard of hearing Press the ENTER button If the programme you are watching does not support the Hard of hearing function Normal automatically activates even though Hard of hearing mode is selected 7 Press the or button to select Subtitle Language then press the ENTER button 8 Select the appropriate language by pressing the or button Press the ENTER button to confirm your choice English is the def...

Page 41: ...on to select required menu Primary Audio Language Secondary Audio Language Primary Subtitle Language Secondary Subtitle Language Primary Teletext Language Secondary Teletext Language Press the ENTER button 4 Select the appropriate language by pressing the or button Press the ENTER button to confirm your choice 5 Press the EXIT button to exit If you change the language setting the Subtitle Language...

Page 42: ...nt modes to On the settings will be locked and can not be adjusted If you want to make Picture and Sound mode adjustments the Entertainment mode must be turned off If you set any of the three Entertainment modes to On SRS TruSurround XT function is not available The Entertainment settings are saved for each input source You can press the E MODE button on the remote control repeatedly to change the...

Page 43: ...e TV will turn off and turn on automatically after completing the firmware upgrade Please check the firmware version after the upgrades are complete When software is upgraded video and audio settings you have made will return to their default factory settings We recommend you write down your settings so that you can easily reset them after the upgrade BY Channel Upgrades the software using the bro...

Page 44: ...irection of the arrow right up to the end so that it is parallel with the slot 4 Check if you can see a picture on a scrambled signal channel Selecting the CI Common Interface Menu This enables the user to select from the CAM provided menu 1 Press the MENU button to display the menu Press the or button to select Setup then press the ENTER button 2 Press the or button to select Common Interface the...

Page 45: ...can be selected by pressing the TV DTV button number buttons 0 9 and the P button on the remote control O To Edit the Input Source Name Name the device connected to the input jacks to make your input source selection easier 1 Press the MENU button to display the menu Press the or button to select Input then press the ENTER button Press the or button to select Edit Name then press the ENTER button ...

Page 46: ...ecommended D Sub Input Mode Resolution Horizontal Frequency kHz Vertical Frequency Hz Pixel Clock Frequency MHz Sync Polarity H V IBM 640 x 350 720 x 400 31 469 31 469 70 086 70 087 25 175 28 322 VESA 640 x 480 640 x 480 640 x 480 800 x 600 800 x 600 800 x 600 1024 x 768 1024 x 768 1024 x 768 1280 x 1024 1280 x 1024 1360 x 768 1600 x 1200 31 469 37 861 37 500 37 879 48 077 46 875 48 363 56 476 60 ...

Page 47: ...e then adjust the frequency as best as possible coarse and Fine tune again After the noise has been reduced readjust the picture so that it is aligned on the center of screen Press the or button to select Coarse or Fine then press the ENTER button Press the or button to adjust the screen quality Press the ENTER button Position Adjust the PC s screen positioning if it does not fit the TV screen Pre...

Page 48: ...nnecting your device to the TV please back up your files to prevent them from damage or loss of data SAMSUNG is not responsible for any data file damage or data loss Do not disconnect the USB device while it is loading MSC supports MP3 and JPEG files while a PTP device supports JPEG files only The sequential jpeg format is supported Photo and audio files must be named in English French or Spanish ...

Page 49: ... files saved on an USB memory device Photo List 1 Press the W LINK button on the remote control to display the WISELINK menu 2 Press the or button to select Photo then press the ENTER button Photo files are displayed This menu only shows files whose file extension is jpg Files of other formats such as bmp or tiff will not be displayed Press the Play ENTER button to start the Slide Show To move to ...

Page 50: ...iew Groups Shows the sorting groups The sorting group including the currently selected photo is highlighted 5 Current Device Shows the currently selected device name Press the Red button to select a device 6 Item Selection Information Shows the number of photos that are selected by pressing the Yellow button 7 Help Items Red Device button Selects a connected device Green Favourites Setting button ...

Page 51: ... files grouped by Month To move to the previous next group press the REW or FF button 3 Press the TOOLS button Press the or button to select Play Current Group 4 Press ENTER to play the selected group of photo files from the sublist Timeline Sorts photos by time It sorts and shows photos by date It sorts by year and month from the earliest photo 1 Select Timeline as the sorting standard in the Pho...

Page 52: ...ss the or button to select Play Current Group 4 Press ENTER to play the selected group of photo files from the sublist Changing the composition information 1 Select Composition as the sorting standard in the Photo List and press the or button to select a photo Changing the information of multiple files Press the or button to select the desired photo in the Photo list Then press the yellow button R...

Page 53: ...tton to select Play Current Group 4 Press ENTER to play the selected group of photo files from the sublist Changing the Favourites setting 1 Press the or button to select the desired photo in the Photo list Changing the information of multiple files Press the or button to select the desired photo in the Photo list Then press the yellow button Repeat the above operation to select multiple photos Th...

Page 54: ...ot remove the read only files from the selected ones You cannot recover a deleted photo file Viewing the Photo Information The photo file information including the order of the file in the current directory the name the size the resolution the date modified and the path is displayed 1 Press the or button to select the desired photo in the Photo list 2 Press the TOOLS button 3 Press the or button t...

Page 55: ... files will be used for the Slide Show Playing current group 1 Press the or button to select a sorting standard Monthly Timeline Color Composition Folder Preference 2 Press the or button to select the desired photo in the Photo list To move to the previous next group press the REW or FF button 3 Press the TOOLS button 4 Press the or button to select Play Current Group then press the ENTER button O...

Page 56: ... also change the speed of the Slide Show by pressing the REW or FF button during the Slide Show Rotate You can rotate images in full screen mode Press the or button to select Rotate then press the ENTER button Press the or button repeatedly to rotate the photo by the desired amount Whenever you press the button it rotates by 270 180 90 and 0 Whenever you press the button it rotates by 90 180 270 a...

Page 57: ...n photo Slide Show Speed You can select the slide show speed Press the or button to select Slide Show Speed Press the or button to select the desired option Fast Slow Normal You can select the SlideShow speed only during a slide show Background Music If you set Background Music to On the background music will be played when viewing photos one by one or in a Slide Show Press the or button to select...

Page 58: ...select BGM Mood Then press or button to select the desired BGM mood Press the ENTER button BGM mode option Energetic Rhythmical Sad Exciting Calm WISELINK identifies the mood of the music files and groups them accordingly by analyzing the music files on the USB device Picture Mode You can set the Picture mode Refer to page 25 Sound Mode You can set the Sound mode Refer to page 30 Information The p...

Page 59: ... 3 2005 Pop Better than yesterday G H I J L P S T V 1File s Selected 4 5 2 3 1 6 1 Currently selected music Shows the currently selected music 2 Current Sort Standard Press the or button to change the standard for sorting music files Title Artist Mood Genre Folder Preference 3 View Groups Shows the sorting groups The sorting group including the currently selected music file is highlighted 4 Curren...

Page 60: ...ress the TOOLS button 4 Press the or button to select Play Current Group 5 Press ENTER to play the selected group of music files from the sublist 5 Item Selection Information Shows the number of music files that are selected by pressing the Yellow button 6 Help Items Red Device button Selects a connected device Green Favourites Setting button Changes the favourites setting for the selected music P...

Page 61: ... files and groups them accordingly by analyzing the music files on the USB device Mood information extracted from a music file may not always match the Mood option For example a file you think is Energetic may be extracted to the Exciting mood option 4 Press the or button to select the desired option then press the ENTER button The group information of the current file is updated and the file is m...

Page 62: ...y Current Group 5 Press ENTER to play the selected group of music files from the sublist Changing the Favourites setting 1 Press the or button to select the desired music in the music list Changing the information of multiple files Press the or button to select the desired music in the music list Then press the yellow button Repeat the above operation to select multiple musics The mark appears to ...

Page 63: ...leted music files Viewing the Information The music file information including the order of the file in the current directory the name the size the date modified and the path is displayed 1 Press the or button to select the desired music in the music list 2 Press the TOOLS button 3 Press the or button to select Information then press the ENTER button The information on the selected file appears Pr...

Page 64: ...he start of the file 4 To exit WISELINK mode press the W LINK button on the remote control Playing the music group 1 Press the W LINK button on the remote control to display the WISELINK menu 2 Press the or button to select Music then press the ENTER button To move to the previous next group press the REW or FF button 3 Press the or button to select the desired music file 4 Press the TOOLS button ...

Page 65: ...d Repeat Mode is On Music Once When all music files in the folder or the selected file are played once Repeat Mode is Off Music Play Pause When pressing the Play Pause ENTER button on the remote control while music is playing Repeating Music Play 1 While a Music file is playing press the TOOLS button 2 Press the or button to select Repeat Mode 3 Press the or button to select On or Off On Plays bac...

Page 66: ...ore the screen saver appears Press the or button to select Screen Saver Run Time Press the or button to select 1 min 3 min or 5 min Information Select to viewing the information of the connected device Press the or button to select Information then press the ENTER button Remove Safely You can remove the device safely from the TV Refer to page 56 To exit WISELINK mode press the W LINK button on the...

Page 67: ...DMI 2 HDMI 3 or HDMI 4 jack on the TV and the HDMI OUT jack of the corresponding Anynet device using an HDMI cable 2 Connect the HDMI IN jack of the home theater and the HDMI OUT jack of the corresponding Anynet device using an HDMI cable Connect the Optical cable between the Digital Audio Out Optical jack on your TV and the Digital Audio Input on the Home Theater When following the connection abo...

Page 68: ...ess the TOOLS button Press the or button to select Device List then press the ENTER button Anynet devices connected to the TV are listed If you cannot find a device you want press the red button to scan for devices 2 Press the or button to select to a particular device and press the ENTER button It is switched to the selected device Only when you set Anynet HDMI CEC to On in the Application menu t...

Page 69: ...UTE button The Anynet function only works when the active source on the TV remote control is set to TV The button works only while in the recordable state You cannot control Anynet devices using the buttons on the TV You can control Anynet devices only using the TV remote control The TV remote control may not work under certain conditions In this case reselect the Anynet device The Anynet function...

Page 70: ...ing channels Operating WISELINK Plug Play etc When connecting or removing the HDMI 1 3 cable please make sure to search devices again or turn your TV off and on again Check if the Anynet Function of Anynet device is set on I want to start Anynet Check if the Anynet device is properly connected to the TV and check if the Anynet HDMI CEC is set to On in the Anynet Setup menu Press the TV DTV button ...

Page 71: ...ng the teletext service Press it twice to overlap the teletext with the current broadcasting screen 7 1 sub page Used to display the available sub page 8 2 page up Used to display the next teletext page 9 3 page down Used to display the previous teletext page 0 0 mode Press to select the teletext mode LIST FLOF If you press it in the LIST mode it switches into the List save mode In the List save m...

Page 72: ...justment then press the ENTER button TV Rear Panel Auto Wall Mount SERVICE Cable Not supplied The teletext pages are organized according to six categories Part Contents A Selected page number B Broadcasting channel identity C Current page number or search indications D Date and time E Text F Status information FASTEXT information Teletext information is often divided between several pages displaye...

Page 73: ...Entering the menu 2 Pressing a Colour Red Green Yellow button moves the auto wall mount to the saved position You can move the wall mount to one of the 3 pre set positions by pressing the Red Position 1 Green Position 2 or Yellow Position 3 buttons If you adjust the Position after moving to a pre set position the position display will disappear For installation refer to the Installation Manual pro...

Page 74: ...facturer Refer to the manual provided with the Kensington Lock for proper use The locking device has to be purchased separately Optional Figure 2 Figure 1 Cable The location of the Kensington Lock may be different depending on its model 1 Insert the locking device into the Kensington slot on the LCD TV Figure 1 and turn it in the locking direction Figure 2 2 Connect the Kensington Lock cable 3 Fix...

Page 75: ...e purchase these additionally 2 Remove the screws from the center back of the TV put the screws into the clamps and then fasten the screws onto the TV again Screws may not be supplied with the product In this case please purchase the screws of the following specifications Screw Specifications For a 17 29 Inch LCD TV M4 X 15 For a 32 40 Inch LCD TV M6 X 15 3 Connect the clamps fixed onto the TV and...

Page 76: ...functions Replace the remote control batteries Clean the upper edge of the remote control transmission window Check the battery terminals Check signal cable message is displayed Check that the signal cable is firmly connected to the PC or video sources Check that the PC or video sources are turned on On PC mode Not Supported Mode message is displayed Check the maximum resolution and the frequency ...

Page 77: ...3 F 5 to 95 non condensing Stand Swivel Left Right 20 20 Model Name LE46A676 LE52A676 Screen Size Diagonal 46 inches 52 inches PC Resolution Optimum 1920 x 1080 60 Hz 1920 x 1080 60 Hz Sound Output 10W x 2 10W x 2 Dimensions WxDxH Body With stand 1131 x 95 x 714 mm 1131 x 280 x 775 mm 1276 x 105 x 806 mm 1276 x 326 x 866 mm Weight With Stand 27 kg 35 kg Environmental Considerations Operating Tempe...

Page 78: ...This page is intentionally left blank ...

Page 79: ...uche à droite et au centre de l écran à cause de la différence d émission de lumière sur l écran La lecture d un DVD ou l utilisation d une console de jeu peut avoir un effet similaire sur l écran Les dommages provoqués par les effets qui précèdent ne sont pas couverts par la garantie L affichage d images fixes de jeux vidéo et d ordinateurs pendant plus longtemps qu une période spécifique peut pr...

Page 80: ...tre téléviseur 35 Description des fonctions Sélection d une langue de menu 36 Réglage de votre numéro d identification personnel NIP 36 Configuration du contrôle parental 37 Configuration des sous titres 38 Sélection d une langue de télétexte 39 Sélection d une langue de préférence 39 Mélodie Divertissement Mode éco 40 Mise à jour du logiciel 41 Visualisation de l interface commune 42 Sélection du...

Page 81: ...puis deux autres à l emplacement 2 Mettez le produit à la verticale et serrez les vis Si vous serrez les vis alors que le téléviseur LCD est à l horizontale il est possible qu il penche d un côté Le socle est installé pour les modèles dont la taille de l écran est de 37 pouces ou plus Installation du support mural Les élements du support mural vendus séparément permettent de fixer le téléviseur au...

Page 82: ...mmande 2 MENU Permet d afficher le menu des fonctions de votre téléviseur sur l écran 3 Permet d augmenter ou de baisser le volume Dans le menu à l écran utiliser les boutons de la même façon que les boutons et de la télécommande 4 C P Permet de changer de canal Dans le menu à l écran utiliser les boutons C P de la même façon que les boutons et de la télécommande 5 Témoin d alimentation Clignote e...

Page 83: ...u lecteur DVD et le téléviseur numérique ou lecteur DVD au connecteur de composant PR PB Y de votre téléviseur Les connecteurs PR PB ou Y et de vos appareils composants téléviseur numérique ou lecteur DVD sont parfois désignés par les lettres Y B Y et R Y ou Y Cb et Cr Branchez les câbles audio RCA en option sur la prise R AUDIO L située à l arrière du téléviseur et leurs autres extrémités sur les...

Page 84: ... uniquement Connectez le à la prise du support de montage mural en option Cette fonction vous permet d ajuster l angle de visualisation du téléviseur à l aide de la télécommande 6 Emplacement pour COMMON INTERFACE Si vous n insérez pas la carte d interface commune dans certains canaux Signal brouillé s affiche sur l écran Les informations de pairage contenant un numéro de téléphone l ID de la CI C...

Page 85: ...rtie Vidéo Audio L R RGB Vidéo Audio L R EXT 1 O O O Seule la sortie TV ou DTV est disponible EXT 2 O O Sortie que vous pouvez sélectionner Entrées ou sorties pour périphériques tels que des magnétoscopes des lecteurs DVD des consoles de jeux vidéo ou des lecteurs de vidéodisques Verrouillage Kensington en fonction du modèle Le verrouillage Kensington en option est un dispositif utilisé pour fixer...

Page 86: ...ation de la pile Chaîne précédente Arrêt temporaire du son P chaîne suivante P chaîne précédente Pour afficher le menu principal à l écran Cette fonction vous permet de visualiser des photos et d écouter des fichiers musicaux à partir d un périphérique externe Revient au menu précédent a Permet de commander le curseur dans le menu b Permet de quitter le menu affiché à l écran c Utilisez ce paramèt...

Page 87: ...viseur Vous pouvez également appuyer sur le bouton POWER ou sur le bouton TV DTV de votre télécommande pour allumer le téléviseur Le dernier programme que vous avez regardé est automatiquement re sélectionné 3 Appuyez sur le bouton numérique de 0 à 9 ou le bouton canal suivant précédent de la télécommande ou sur le bouton C P de votre téléviseur Lorsque vous allumez le téléviseur pour la première ...

Page 88: ...ode Image Reportez vous aux pages 25 Mode Son Reportez vous aux pages 30 Veille Reportez vous aux pages 34 SRS TS XT Reportez vous aux pages 30 Mode éco Reportez vous aux pages 40 Dual l ll Reportez vous aux pages 32 PIP Reportez vous aux pages 29 Réglage Automatique Reportez vous aux pages 45 Fonction Plug Play Lorsque vous allumez le téléviseur pour la première fois des réglages de base s effect...

Page 89: ...r les paramètres Mois Date Année Heure et Minute à l aide du pavé numérique de la télécommande 8 Le message Profitez de votre visionnage s affiche Lorsque vous avez terminé appuyez sur le bouton ENTER Si vous souhaitez réinitialiser cette fonction 1 Appuyez sur le bouton MENU pour afficher le menu Appuyez sur le bouton ou pour sélectionner Configuration puis appuyez sur le bouton ENTER 2 Appuyez d...

Page 90: ... mémoriser ou non chaque canal trouvé le numéro du programme qui vous servira à identifier chaque canal mémorisé 1 Appuyez sur le bouton MENU pour afficher le menu Appuyez sur le bouton ou pour sélectionner Canal puis appuyez sur le bouton ENTER 2 Appuyez sur le bouton ou pour sélectionner Mémorisation Manuelle puis appuyez sur le bouton ENTER Chaîne numérique 3 Appuyez sur le bouton ou pour sélec...

Page 91: ...uyant sur le pavé numérique 0 9 S il n y a aucun son ou si le son est anormal re sélectionnez la norme son désirée Recherche lorsque vous ne connaissez pas les numéros de chaîne Appuyez sur le bouton ou pour démarrer la recherche Le syntoniseur balaie la plage de fréquences jusqu à ce que vous receviez la première chaîne ou la chaîne que vous avez sélectionnée à l écran Mémoriser permet de mémoris...

Page 92: ...centre de l écran Appuyez sur le bouton INFO pour plus d informations Numéro de canal temps de fonctionnement du programme barre d état niveau de contrôle parental informations sur la qualité vidéo HD SD modes sonores sous titres ou Teletext Langue des sous titres ou du Teletext et bref résumé du programme surligné font partie des informations supplémentaires apparaîtra si le résumé est long Chois...

Page 93: ...3 Sélectionnez Mini Guide ou Guide Complet à l aide du bouton ou puis sur le bouton ENTER 4 Appuyez sur le bouton EXIT pour quitter le menu Vous pouvez sélectionner ces options en appuyant sur le bouton GUIDE de votre télécommande O Canal Guide Complet Mini Guide Par défaut Mini Guide Liste des chaînes Mode Canal Chaînes ajoutées Verrouillage Enfant Marche Réglage fin Informations de signal LNA Ar...

Page 94: ...sation des boutons de couleur de la télécommande dans la liste des chaînes Rouge Type de canal Permet de basculer entre TV Radio Donn autre et Tous Vert Zoom Agrandit ou réduit une chaîne Jaune Sélection Sélectionne des listes de chaînes TOOLS Option Affiche le menu Supprimer ou Ajouter Ajouter aux favoris ou Supprimer des favoris Verrouil Ecoute programmée Modifi nom du chaîne Tri des canaux Modi...

Page 95: ...t disponibles Appuyez sur le bouton ENTER 4 Appuyez sur le bouton ou pour désigner une chaîne comme chaîne favorite Ajout de plusieurs chaînes aux favoris Appuyez sur le bouton ou pour sélectionner la chaîne voulue dans la liste des chaînes Appuyez ensuite sur le bouton jaune Répétez l opération ci dessus pour sélectionner plusieurs chaînes La marque s affiche à gauche des chaînes sélectionnées 5 ...

Page 96: ...de PIN reportez vous à la page 36 Déverrouillage de chaînes 7 Appuyez sur le bouton ou pour sélectionner les chaînes à déverrouiller puis appuyez sur le bouton TOOLS 8 Appuyez sur le bouton ou pour sélectionner Déverrouillé puis appuyez sur le bouton ENTER 9 Entrez votre code PIN à quatre chiffres La chaîne est alors déverrouillée et la marque correspondante disparaît Le code PIN par défaut d un n...

Page 97: ... vérifier une réservation reportez vous à la page 19 Seules des chaînes mémorisées peuvent être réservées Vous pouvez régler directement la chaîne le mois le jour l heure et les minutes à l aide du pavé numérique de la télécommande Appuyez sur le bouton CH LIST de la télécommande pour afficher les listes de chaînes Guide des programmes numérique et affichage des réservations Lorsqu une chaîne numé...

Page 98: ... ou pour sélectionner Annuler les programmations puis appuyez sur le bouton ENTER 6 Appuyez sur le bouton ou pour sélectionner OK puis appuyez sur le bouton ENTER La réservation de visionnage est annulée Appuyez sur le bouton EXIT pour quitter le menu Option programmée Infos sur les modifications Permet de modifier une réservation Annuler les programmations Permet d annuler une réservation Informa...

Page 99: ... le bouton ou pour sélectionner Canal puis appuyez sur le bouton ENTER Appuyez sur le bouton ou pour sélectionner Liste des chaînes puis appuyez sur le bouton ENTER 2 Appuyez sur le bouton ou pour sélectionner une chaîne puis appuyez sur le bouton TOOLS 3 Appuyez sur le bouton ou pour sélectionner Tri des canaux puis appuyez sur le bouton ENTER 4 Appuyez sur le bouton ou pour passer à la position ...

Page 100: ...istrement des chaînes dans la mémoire Mémorisation automatique 1 Appuyez sur le bouton MENU Appuyez sur le bouton ou pour sélectionner Canal puis appuyez sur le bouton ENTER Appuyez sur le bouton ou pour sélectionner Liste des chaînes puis appuyez sur le bouton ENTER 2 Appuyez sur le bouton ou pour sélectionner la chaîne à laquelle vous souhaitez attribuer un nouveau nom puis appuyez sur le bouton...

Page 101: ...re de saisie du code PIN s affiche lorsque Mémorisation Auto ou Plug Play est sélectionné Réglage du gestionnaire de chaînes Vous pouvez afficher soit la liste des chaînes ajoutées soit la liste des favoris lorsque vous appuyez sur le bouton CH LIST de la télécommande 1 Appuyez sur le bouton MENU pour afficher le menu Appuyez sur le bouton ou pour sélectionner Canal puis appuyez sur le bouton ENTE...

Page 102: ...z une chaîne analogique Vérification des informations relatives au signal numérique Vous pouvez obtenir des informations relatives à l état du signal 1 Appuyez sur le bouton MENU pour afficher le menu Appuyez sur le bouton ou pour sélectionner Canal puis appuyez sur le bouton ENTER 2 Appuyez sur le bouton ou pour sélectionner Informations de signal puis appuyez sur le bouton ENTER 3 Appuyez sur le...

Page 103: ...on ou pour sélectionner Canal puis appuyez sur le bouton ENTER 2 Appuyez sur le bouton ou pour sélectionner LNA puis appuyez sur le bouton ENTER 3 Appuyez sur le bouton ou pour sélectionner Arrêt ou Marche Appuyez sur le bouton ENTER 4 Appuyez sur le bouton EXIT pour quitter le menu Cette fonction peut être sélectionnée pendant que vous regardez une chaîne analogique ou numérique Canal Réglage fin...

Page 104: ... élément spécifique Appuyez sur le bouton ENTER Appuyez sur le bouton EXIT pour quitter le menu Lorsque vous modifiez les paramètres Rétroéclairage Contraste Luminosité Netteté Couleur ou Teinte V R l écran se modifie en conséquence En mode TV Ext AV et S Vidéo du système PAL vous ne pouvez pas utiliser la fonction Teinte En mode PC vous ne pouvez modifier que les options Rétroéclairage Contraste ...

Page 105: ...eu Jaune Cyan ou Magenta Appuyez sur le bouton ENTER Rouge Vert Bleu Dans Couleur vous pouvez régler les valeurs RVB pour la couleur sélectionnée Appuyez sur le bouton ou pour sélectionner la couleur Rouge Vert ou Bleu afin de la modifier Appuyez sur le bouton ENTER Appuyez sur le bouton ou pour réduire ou augmenter la valeur d un élément spécifique Appuyez sur le bouton ENTER Réinitialiser Rétabl...

Page 106: ...e bouton pour sélectionner Position puis appuyez sur le bouton ENTER Utilisez le bouton ou pour déplacer l écran vers le haut ou le bas Appuyez ensuite sur le bouton ENTER Zoom Appuyez sur le bouton pour sélectionner Position puis appuyez sur le bouton ENTER Appuyez le bouton ou pour déplacer l image en haut et en bas Appuyez ensuite sur le bouton ENTER Appuyez sur le bouton pour sélectionner Tail...

Page 107: ...as disponible dans les modes Film et Standard Niveau noir HDMI Normal Bas Vous pouvez directement choisir le niveau de noir sur l écran pour régler la profondeur de l écran Cette fonction n est active que lorsque l entrée externe se connecte à HDMI signaux RVB Movie Plus Arrêt Bas Moyen Elevé Démo LE32A676 Vous pourrez apprécier des images plus naturelles et des textes plus nets et ce même dans le...

Page 108: ...Image principale Image secondaire Composant HDMI 1 HDMI DVI 2 HDMI 3 HDMI 4 PC TV Ext 1 Ext 2 AV Réglage simple 1 Appuyez sur le bouton TOOLS de la télécommande 2 Appuyez sur le bouton ou pour sélectionner PIP puis appuyez sur le bouton ENTER 3 Appuyez sur le bouton ou pour sélectionner Marche 4 Appuyez sur le bouton ou pour sélectionner un élément spécifique 5 Appuyez sur le bouton ou pour sélect...

Page 109: ... disque multicanal 5 1 sur deux haut parleurs Le TurSurround produit un son surround virtuel fascinant au moyen de n importe quel système de lecture à deux haut parleurs dont les hautparleurs internes du téléviseur Il s adapte parfaitement à tous les formats multicanaux Réglage simple 1 Appuyez sur le bouton TOOLS de la télécommande 2 Appuyez sur le bouton ou pour sélectionner SRS TS XT 3 Appuyez ...

Page 110: ...tions de signal et il n est donc pas facile de régler le volume chaque fois que vous changez de chaîne Cette fonction vous permet de régler automatiquement le volume du canal désiré en réduisant la puissance sonore lorsque le signal de modulation est élevé ou en augmentant la puissance sonore lorsque le signal de modulation est faible TV Speaker Arrêt Marche Pour entendre le son par l intermédiair...

Page 111: ...us réglez cette option sur Dual I II le mode sonore actuel est affiché à l écran 1 Appuyez sur le bouton TOOLS de la télécommande 2 Appuyez sur le bouton ou pour sélectionner Dual I II 3 Appuyez sur le bouton ou pour sélectionner l option de votre choix 4 Appuyez sur le bouton ENTER Type Audio Dual 1 2 Par défaut Stéréo A2 Mono MONO Changement automatique Stéréo STEREO MONO Dual DUAL 1 DUAL 2 DUAL...

Page 112: ... pour sélectionner Réglage Horloge puis appuyez sur le bouton ENTER 5 Appuyez sur le bouton ou pour sélectionner Date Mois Année Heure ou Minute Réglez la date et l heure en appuyant sur le bouton ou puis appuyez sur le bouton ENTER Appuyez sur le bouton EXIT pour quitter le menu L heure actuelle s affiche à chaque fois que vous appuyez sur le bouton INFO Vous pouvez également définir l année les ...

Page 113: ...ue 1 Appuyez sur le bouton MENU pour afficher le menu Appuyez sur le bouton ou pour sélectionner Configuration puis appuyez sur le bouton ENTER Appuyez sur le bouton ou pour sélectionner Horloge puis appuyez sur le bouton ENTER 2 Appuyez sur le bouton ENTER pour sélectionner Horloge 3 Appuyez sur le bouton ENTER pour sélectionner Mode Horloge Appuyez sur le bouton ou pour sélectionner Auto puis ap...

Page 114: ... la chaîne désirée Musique Sélectionnez le dossier contenant des fichiers MP3 sur le périphérique USB Photo Sélectionnez le dossier contenant des fichiers JPEG sur le périphérique USB Répétition Choisissez Une fois Tous les jours Lun Ven Lun Sam Sam Dim ou Manuel Lorsque Manuel est sélectionné appuyez sur le bouton pour sélectionner le jour de la semaine Appuyez sur le bouton ENTER sur le jour de ...

Page 115: ...t les boutons numériques 0 à 9 Entrer Nouveau Code PIN s affiche 5 Entrez votre nouveau code PIN en utilisant les boutons numériques 0 à 9 Le message Confirmer Nouveau Code PIN s affiche 6 Entrez à nouveau le nouveau code PIN pour confirmer en utilisant les boutons numériques 0 à 9 Le message Code PIN modifié avec succès s affiche 7 Appuyez sur le bouton EXIT pour quitter le menu Si vous avez oubl...

Page 116: ...par défaut d un nouvel écran à plasma eszt 0000 Si vous souhaitez changer ce code PIN reportez vous à la page 36 5 Appuyez sur le bouton ENTER 6 Appuyez sur le bouton ou pour sélectionner l âge auquel vous souhaitez que le verrouillage s active Appuyez sur le bouton ENTER Le symbole s affiche Perm tout appuyez sur ce bouton pour déverrouiller toutes les évaluations TV Bloq tout appuyez sur ce bout...

Page 117: ...ou pour sélectionner Normal ou Malentendants Appuyez sur le bouton ENTER Si le programme que vous regardez ne prend pas en charge la fonction Malentendants la fonction Normal est activée automatiquement même si le mode Malentendants est sélectionné 7 Appuyez sur le bouton ou pour sélectionner Langue des sous titres puis appuyez sur le bouton ENTER 8 Sélectionnez la langue souhaitée en appuyant sur...

Page 118: ...nce puis appuyez sur le bouton ENTER 3 Appuyez sur le bouton ou pour sélectionner le menu souhaité Première Langue Audio Deuxième Langue Audio Première Langue de Sous titres Deuxième langue de Sous titres Première Langue Télétexte Deuxième Langue Télétexte Appuyez sur le bouton ENTER 4 Sélectionnez la langue souhaitée en appuyant sur le bouton ou Appuyez sur le bouton ENTER pour confirmer votre ch...

Page 119: ...les paramètres seront verrouillés empêchant toute modification Si vous souhaitez régler les modes Image et Son le mode Divertissement doit être désactivé Si on règle l un des trois modes Divertissement à Marche la fonction SRS TruSurround XT n est pas disponible Les réglages du mode Divertissement sont enregistrés pour chaque source d entrée Vous pouvez appuyer plusieurs fois sur le bouton E MODE ...

Page 120: ... à niveau du micrologiciel terminée le téléviseur se met automatiquement hors puis sous tension Vérifiez la version du micrologiciel une fois les mises à niveau terminées Lorsque le logiciel est mis à niveau les paramètres vidéo et audio définis reprennent leur valeur par défaut d usine Nous vous recommandons de noter vos réglages pour les rétablir facilement après la mise à niveau Canal Met à niv...

Page 121: ... indiquée par la flèche juste au dessus de l extrémité pour qu elle soit parallèle à la fente 4 Vérifiez si une image est visible sur un canal à signal brouillé Sélection du Menu CI Interface commune Cela aide l utilisateur à sélectionner un élément du menu pris en charge par CAM 1 Appuyez sur le bouton MENU pour afficher le menu Appuyez sur le bouton ou pour sélectionner Configuration puis appuye...

Page 122: ... en appuyant sur le bouton TV DTV les boutons numériques de 0 à 9 ou les boutons canal suivant précédent P de la télécommande O Modification du nom de la source d entrée Nommez le périphérique connecté aux prises d entrée pour rendre la sélection des sources d entrée plus facile 1 Appuyez sur le bouton MENU pour afficher le menu Appuyez sur le bouton ou pour sélectionner Entrée puis appuyez sur le...

Page 123: ... de sa résolution Les résolutions du tableau sont recommandées D Sub Entrée Mode Résolution Horizontale Fréquence kHz Verticale Fréquence kHz Horloge pixels Fréquence MHz Polarité synchronisée H V IBM 640 x 350 720 x 400 31 469 31 469 70 086 70 087 25 175 28 322 VESA 640 x 480 640 x 480 640 x 480 800 x 600 800 x 600 800 x 600 1024 x 768 1024 x 768 1024 x 768 1280 x 1024 1280 x 1024 1360 x 768 1600...

Page 124: ...tion fine Réglage précis réglez la fréquence du mieux que vous pouvez Réglage de base puis effectuez à nouveau une syntonisation plus fine Une fois les parasites réduits effectuez un nouveau réglage de l image pour l aligner au centre de l écran Appuyez sur le bouton ou pour sélectionner Réglage de Base ou Réglage Précis puis appuyez sur le bouton ENTER Appuyez sur le bouton ou pour régler la qual...

Page 125: ...poser Avant de connecter l appareil au téléviseur sauvegardez vos fichiers afin d éviter qu ils ne soient endommagés ou que des données ne soient perdues SAMSUNG ne saurait en aucun cas être tenu responsable de la perte de données ou de l endommagement d un fichier de données Ne déconnectez pas le périphérique USB en cours de chargement MSC prend en charge les fichiers MP3 et JPEG alors qu un péri...

Page 126: ...chiers photo enregistrés sur une unité de stockage USB Liste des photos 1 Appuyez sur le bouton W LINK de la télécommande pour afficher le menu WISELINK 2 Appuyez sur le bouton ou pour sélectionner Photo puis appuyez sur le bouton ENTER Les fichiers photo s affichent Ce menu contient uniquement les fichiers dotés de l extension jpg Les fichiers d un autre format tel que bmp ou tiff ne seront pas a...

Page 127: ...groupe de tri contenant la photo actuellement sélectionnée est mis en surbrillance 5 Périphérique actuel Indique le nom du périphérique actuellement sélectionné Appuyez sur le bouton rouge pour sélectionner un périphérique 6 Informations de sélection Indique le nombre de photos sélectionnées en appuyant sur le bouton Jaune 7 Options d aide Bouton rouge Périph Sélectionne un périphérique connecté B...

Page 128: ... dans la liste secondaire des fichiers groupés par mois Pour passer au groupe suivant précédent appuyez sur le bouton Retour arrière ou Avance rapide 3 Appuyez sur le bouton TOOLS Appuyez sur le bouton ou pour sélectionner Lire gp act 4 Appuyez sur le bouton ENTER pour lire le groupe de fichiers photo sélectionnés dans la liste secondaire Date Trie les photos par date Trie et affiche les photos pa...

Page 129: ... fichiers groupés par composition Pour passer au groupe suivant précédent appuyez sur le bouton Retour arrière ou Avance rapide 3 Appuyez sur le bouton TOOLS Appuyez sur le bouton ou pour sélectionner Lire gp act 4 Appuyez sur le bouton ENTER pour lire le groupe de fichiers photo sélectionnés dans la liste secondaire Modification des informations de composition 1 Sélectionnez Compo comme ordre de ...

Page 130: ...tour arrière ou Avance rapide 3 Appuyez sur le bouton TOOLS Appuyez sur le bouton ou pour sélectionner Lire gp act 4 Appuyez sur le bouton ENTER pour lire le groupe de fichiers photo sélectionnés dans la liste secondaire Modification du paramètre Favori 1 Appuyez sur le bouton ou pour sélectionner la photo voulue dans la Liste des photos Modification des informations de plusieurs fichiers Appuyez ...

Page 131: ...r la suppression est annulée 5 Pour quitter le mode WISELINK appuyez sur le bouton W LINK de la télécommande Vous ne pouvez pas retirer les fichiers en lecture seule de la sélection Vous ne pouvez pas récupérer un fichier photo supprimé Affichage des informations sur le PC Affiche des informations sur les fichiers photo dont l ordre du fichier dans le répertoire actuel le nom la taille la résoluti...

Page 132: ...nnés seront utilisés pour le diaporama Si vous avez sélectionné des fichiers seuls ces fichiers seront utilisés pour le diaporama Lecture du groupe actuel 1 Appuyez sur le bouton ou pour sélectionner un ordre de tri Mois Date Couleur Compo Dossier Préf 2 Appuyez sur le bouton ou pour sélectionner la photo voulue dans la Liste des photos Pour passer au groupe suivant précédent appuyez sur le bouton...

Page 133: ...s pouvez également modifier la vitesse du diaporama en appuyant sur la touche REW ou FF pendant le visionnage Rotat Vous pouvez faire pivoter les images lorsque vous êtes en mode Plein écran Appuyez sur le bouton ou pour sélectionner Rotat puis appuyez sur le bouton ENTER Appuyez plusieurs fois sur le bouton ou pour faire pivoter la photo à l angle voulu Chaque fois que vous appuyez sur le bouton ...

Page 134: ... la vitesse de défilement du diaporama Appuyez sur le bouton ou pour sélectionner Vitesse du diaporama Appuyez sur le bouton ou pour sélectionner l option de votre choix Rapide Lent Normal Vous ne pouvez sélectionner la vitesse du diaporama que pendant sa diffusion Fond musical Si vous définissez Fond musical sur Marche le fond musical sera lu lors de l affichage de photos individuelles ou en diap...

Page 135: ...z sur le bouton ou pour sélectionner Fond musical Appuyez sur le bouton ou pour sélectionner l humeur de fond musical souhaitée Appuyez sur le bouton ENTER Options du mode BGM fond musical Energique Rhytmique Triste Enivrante Calme WISELINK identifie l humeur des fichiers musicaux et les regroupe en conséquence en analysant les images qui se trouvent sur le périphérique USB Mode Image Vous pouvez ...

Page 136: ...Calme Catherine Album 3 2005 Pop Better than yesterday G H I J L P S T V 1Fich sél 4 5 2 3 1 6 1 Photo actuellement sélectionnée Affiche la photo actuellement sélectionnée 2 Ordre de tri actuel Appuyez sur le bouton ou pour modifier l ordre de tri des fichiers musicaux Titre Artiste Ambiance Genre Dossier Préf 3 Groupes Afficher les groupes de tri Le groupe de tri contenant le fichier musical actu...

Page 137: ...er au groupe suivant précédent appuyez sur le bouton Retour arrière ou Avance rapide 3 Appuyez sur le bouton TOOLS 4 Appuyez sur le bouton ou pour sélectionner Lire gp act 5 Appuyez sur le bouton ENTER pour lire le groupe de fichiers musicaux sélectionnés dans la liste secondaire 5 Informations de sélection Indique le nombre de fichiers musicaux sélectionnés en appuyant sur le bouton Jaune 6 Optio...

Page 138: ...sur le bouton TOOLS 3 Appuyez sur le bouton ou pour sélectionner Changer gp Appuyez sur le bouton ENTER Wiselink identifie l humeur des fichiers musicaux et les regroupe en conséquence en analysant les images qui se trouvent sur le périphérique USB Les informations d humeur extraites du fichier musical ne correspondent pas toujours à l option Ambiance Par exemple un fichier que vous estimez Energi...

Page 139: ...ez sur le bouton Retour arrière ou Avance rapide 3 Appuyez sur le bouton TOOLS 4 Appuyez sur le bouton ou pour sélectionner Lire gp act 5 Appuyez sur le bouton ENTER pour lire le groupe de fichiers musicaux sélectionnés dans la liste secondaire Modification du paramètre Favori 1 Appuyez sur le bouton ou pour sélectionner la musique voulue dans la liste des musiques Modification des informations de...

Page 140: ...ommande Vous ne pouvez pas retirer les fichiers en lecture seule de la sélection Vous ne pouvez récupérer les fichiers musicaux supprimés Affichage des informations Affiche des informations sur les fichiers musicaux dont l ordre du fichier dans le répertoire actuel le nom la taille la date de modification et le chemin d accès 1 Appuyez sur le bouton ou pour sélectionner la musique voulue dans la l...

Page 141: ...0 00 00 si les informations relatives au temps de lecture ne figurent pas au début du fichier 4 Pour quitter le mode WISELINK appuyez sur le bouton W LINK de la télécommande Lecture d un groupe de musiques 1 Appuyez sur le bouton W LINK de la télécommande pour afficher le menu WISELINK 2 Appuyez sur le bouton ou pour sélectionner Music puis appuyez sur le bouton ENTER Pour passer au groupe suivant...

Page 142: ...pétition est défini sur Marche Musique Une fois Lorsque tous les fichiers musicaux du dossier ou le fichier sélectionné sont lus une fois Le mode Mode Répétition est défini sur Arrêt Musique Lecture Pause Lorsque vous appuyez sur le bouton Lecture Pause ENTER de la télécommande pendant la lecture Lecture répétée 1 Pendant la lecture d un fichier appuyez sur le bouton TOOLS 2 Appuyez sur le bouton ...

Page 143: ...ai éco écran Sélectionnez cette option pour définir le délai avant l activation de l écran de veille Appuyez sur le bouton ou pour sélectionner Délai éco écran Appuyez sur le bouton ou pour sélectionner 1 min 3 min ou 5 min Information Affiche les informations de l appareil connecté Appuyez sur le bouton ou pour sélectionner Information puis appuyez sur le bouton ENTER Retrait sécurisé Vous pouvez...

Page 144: ...la prise HDMI OUT de l appareil Anynet correspondant 2 A l aide du câble HDMI reliez la prise HDMI IN du système Home Theater à la prise HDMI OUT de l appareil Anynet correspondant Connectez le câble optique entre la prise Digital Audio Out Optical de votre téléviseur et l entrée Digital Audio Audio numérique de votre système home cinéma En suivant les instructions de connexion ci avant la prise o...

Page 145: ...sculement entre des appareils 1 Appuyez sur le bouton TOOLS Appuyez sur le bouton ou pour sélectionner Liste d appareils puis appuyez sur le bouton ENTER La liste des appareils Anynet connectés au téléviseur s affiche Si l appareil désiré est introuvable appuyez sur le bouton rouge pour chercher des appareils 2 Appuyez sur le bouton ou pour sélectionner un appareil puis appuyez sur le bouton ENTER...

Page 146: ...la source active sur la télécommande est définie sur TV Le bouton ne fonctionne que lorsque l appareil est dans un état où l enregistrement est possible Il est impossible de commander des appareils Anynet à l aide des boutons situés sur le téléviseur Les appareils Anynet ne peuvent être commandés qu au moyen de la télécommande du téléviseur Les fonctions d Anynet ne peuvent pas commander des produ...

Page 147: ...ug Play etc Lorsque vous branchez ou de retirez le câble HDMI 1 3 veillez à relancer une recherche de périphérique ou à redémarrer votre téléviseur Vérifiez que la fonction Anynet du périphérique Anynet est activée Je veux démarrer Anynet Assurez vous que l appareil AV est bien connecté au téléviseur et assurez vous que la fonction Anynet HDMI CEC est réglée sur Marche dans le menu Configuration d...

Page 148: ...ois sur ce bouton pour superposer le télétexte à l émission diffusée 7 1 page secondaire Permet d afficher la page télétexte suivante 8 2 haut page Permet d afficher la page télétexte suivant 9 3 bas page Permet d afficher la page télétexte précédente 0 0 mode Permet de sélectionner le mode Télétexte LIST FLOF Si vous appuyez sur ce bouton en mode LISTE vous accédez au mode d enregistrement de lis...

Page 149: ...ppuyez sur le bouton ENTER Les pages télétexte sont organisées en six catégories Catégorie Sommaire A Numéro de la page sélectionnée B Identité du canal émetteur C Numéro de la page actuelle ou indications de recherche D Date et heure E Texte F Informations sur l état Informations FASTEXT Les informations télétexte sont souvent réparties sur plusieurs pages qui s affichent l une après l autre Ces ...

Page 150: ... section Entrer dans le menu 2 Appuyez sur un bouton de couleur Rouge Vert ou Jaune pour déplacer le support mural automatique vers la position enregistrée Vous pouvez déplacer le support mural sur l une des trois positions prédéfinies en appuyant sur le bouton Rouge Position 1 Vert Position 2 ou Jaune Position 3 Si vous réglez la position après avoir accédé à une position prédéfinie l écran de po...

Page 151: ...tez vous au manuel fourni avec le verrouillage Kensington pour une utilisation correcte Le dispositif de verrouillage doit être acheté séparément Optionnel Figure 2 Figure 1 Câble L emplacement du verrou Kensington peut varier en fonction du modèle 1 Insérez le dispositif de verrouillage dans figure 1 la fente Kensington de la télévision LCD et tournez le dans le sens de verrouillage figure 2 2 Br...

Page 152: ...rez les vis situées sur la partie centrale arrière du téléviseur placez les vis dans les bagues puis fixez les à nouveau sur le téléviseur Il est possible que les vis ne soient pas fournies avec le produit Dans ce cas veuillez acheter des vis aux caractéristiques suivantes Caractéristiques des vis Pour un téléviseur LCD 17 à 29 pouces M4 X 15 Pour un téléviseur LCD 32 à 40 pouces M6 X 15 3 Reliez ...

Page 153: ...la télécommande Nettoyez la partie supérieure de la télécommande fenêtre de transmission Vérifiez les bornes des piles Le message Vérifiez le câble de signal s affiche Assurez vous que le câble de signal est bien branché au PC ou aux sources vidéo Assurez vous que les sources vidéo ou le PC sont allumés En mode PC le message Mode non pris en charge s affiche Vérifiez la résolution maximale et la f...

Page 154: ...s condensation Support pivotant gauche droite 20 20 Nom du modèle LE46A676 LE52A676 Taille de l écr diagonale 46 pouces 52 pouces Résolution PC Optimum 1920 x 1080 60 Hz 1920 x 1080 60 Hz Son Sortie 10W x 2 10W x 2 Dimensions L x P x H Corps Avec pied 1131 x 95 x 714 mm 1131 x 280 x 775 mm 1276 x 105 x 806 mm 1276 x 326 x 866 mm Poids avec support 27 kg 35 kg Considérations environnementales Tempé...

Page 155: ...Cette page est laissée intentionnellement en blanc ...

Page 156: ...be mixed with other commercial wastes for disposal Comment éliminer ce produit déchets d équipements électriques et électroniques Applicable dans les pays de l Union Européen et aux autres pays européens disposant de systémes de collecte sélective Ce symbole sur le produit ou sa documentation indique qu il ne doit pas être éliminé en fin de vie avec les autres déchets ménagers L élimination incont...

Reviews: