background image

18

English

Advanced Features

Media Play

MEDIA.P

Enjoy photos and/or music files saved on a USB 
Mass Storage Class (MSC) device.

MENU


O

m


Application


Media Play 

(USB)

 →


ENTER

E

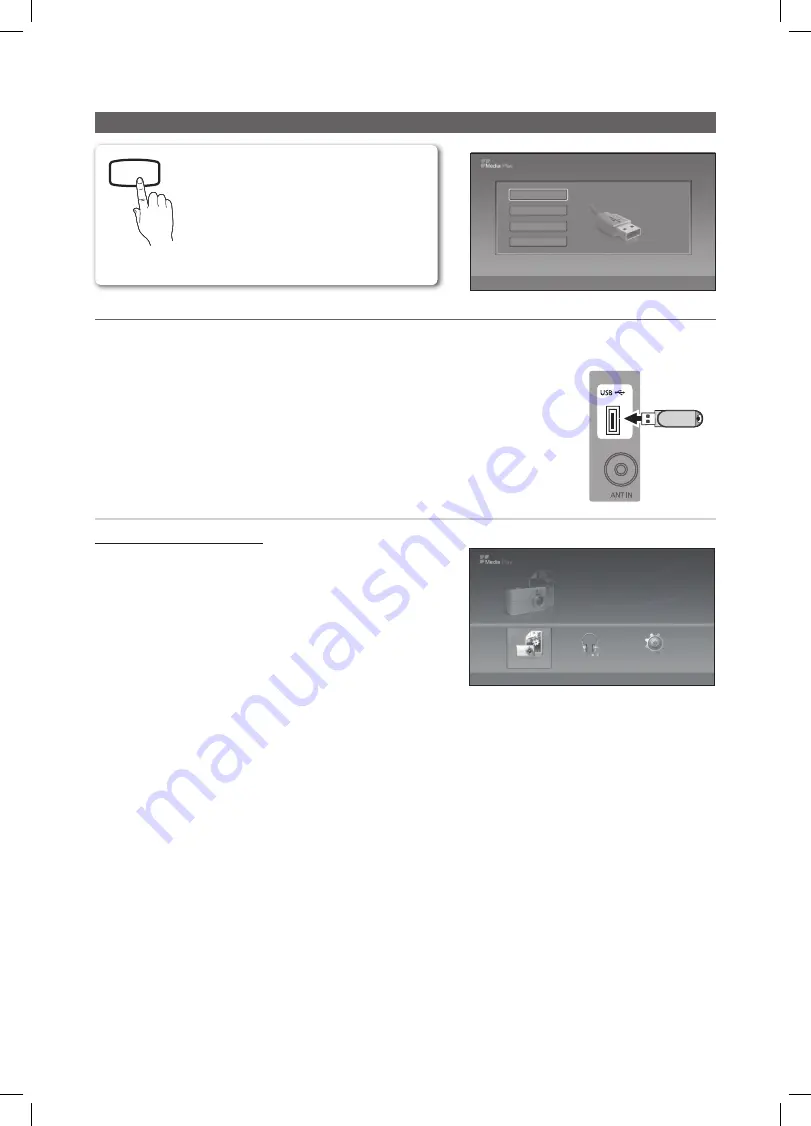
Connecting a USB Device


¦

1. 

Turn on your TV.

2. 

Connect a USB device containing photo and/or music files to the 

USB

 jack on the 

side of the TV.

3. 

When the 

Input

 selection screen is displayed, press the 

 button to select 

Media 

Play (USB)

, then press the 

ENTER

E

 button.

Using the Media Play Menu

Viewing a Photo (or Slide Show)
1. 

Press the 

MENU

 button. Press the 

 or 

 button to select 

Application, then press the 

ENTER

E

 button.

2. 

Press the 

 or 

 button to select 

Media Play (USB)

, then press the 

ENTER

E

 button.

3. 

Press the 

 or 

 button to select the corresponding USB Memory 

Device, then press the 

ENTER

E

 button.

The Media Play menu differs depending on the USB Memory 


Device connected to TV.
Some devices may not be supported due to compatibility 


problems.

4. 

Press the 

 or 

 button to select an icon (

Photo, Music, Setup

), 

then press the 

ENTER

E

 button.

It might not work properly with unlicensed multimedia files.


Need-to-Know List before using 


Media Play (USB)

Only alphanumeric characters must be used as a folder name or file name (photo, music).


x

The file system only supports FAT16/32 (The NTFS file system is not supported) Certain types of USB Digital camera 


x

and audio devices may not be compatible with this TV.
Media Play (USB) only supports the USB Mass Storage Class device (MSC). MSC is a Mass Storage Class Bulk-Only 


x

Transport device. Examples of MSC are Thumb drives and Flash Card Readers (USB HDD and HUB and any usb 
device more than 16Giga byte are not supported.)
Before connecting your device to the TV, please back up your files to prevent them from damage or loss of data. 


x

SAMSUNG is not responsible for any data file damage or data loss.
Please connect directly to the 


x

USB

 port of your TV. If you are using a separate cable connection, there may be a USB 

Compatibility problem.

Photo

Photo

Music

Setup

SUM

307.2MB/973.7MB

Music

Photo

Music

Setup

SUM

307.2MB/973.7MB

DSC_0558.JPG

580 


 440

78.0KB

03 / 14

SUM

*

Photo

307.2MB/973.7MB

File.....jpg

File.....jpg

File.....jpg

File.....jpg

File.....jpg

File.....jpg

File.....jpg

File.....jpg

File.....jpg

File.....jpg

File.....jpg

File.....jpg

File.....jpg

Music

4.3MB

2 / 31

06-I Will Carry You.mp3

00:00:00

01-The Way.mp3   


00:03:25

02-Run To Me.mp3 


00:03:25

03-No More Sad Songs.mp3 

00:03:25

04-Interference-gold.mp3 

00:03:25

05-marketa_irglova-The_hill.mp3 

00:03:25

06-I Will Carry You.mp3 

00:03:25

07-marketa_irglova.mp3 

00:03:25

08-Super World.mp3   

00:03:25

SUM

307.2MB/973.7MB

Setup

USB

E

 Enter     

e

 Exit

SUM

315.0MB/495.0MB Free

Device Name

Photo

Photo

Music

Setup

SUM

307.2MB/973.7MB

Music

Photo

Music

Setup

SUM

307.2MB/973.7MB

DSC_0558.JPG

580 


 440

78.0KB

03 / 14

SUM

*

Photo

307.2MB/973.7MB

File.....jpg

File.....jpg

File.....jpg

File.....jpg

File.....jpg

File.....jpg

File.....jpg

File.....jpg

File.....jpg

File.....jpg

File.....jpg

File.....jpg

File.....jpg

Music

4.3MB

2 / 31

06-I Will Carry You.mp3

00:00:00

01-The Way.mp3   


00:03:25

02-Run To Me.mp3 


00:03:25

03-No More Sad Songs.mp3 

00:03:25

04-Interference-gold.mp3 

00:03:25

05-marketa_irglova-The_hill.mp3 

00:03:25

06-I Will Carry You.mp3 

00:03:25

07-marketa_irglova.mp3 

00:03:25

08-Super World.mp3   

00:03:25

SUM

307.2MB/973.7MB

Setup

USB

L

 Move     

E

 play     

R

 Return

TV Side Panel

USB Drive

BN68-02683A_NEW.indb   18

2010-03-03   �� 5:59:55

Summary of Contents for LA32C350D1

Page 1: ...800 266 8282 www samsung com INDONESIA 0800 112 8888 021 5699 7777 www samsung com JAPAN 0120 327 527 www samsung com Jordan 800 22273 KSA 9200 21230 www samsung com MALAYSIA 1800 88 9999 www samsung com NEW ZEALAND 0800 SAMSUNG 0800 726 786 www samsung com PHILIPPINES 1 800 10 SAMSUNG 726 7864 1 800 3 SAMSUNG 726 7864 1 800 8 SAMSUNG 726 7864 02 5805777 www samsung com Qatar 800 2255 SINGAPORE 18...

Page 2: ...rightness and contrast values to minimum required to achieve desired picture quality exceeded values may speed up the burnout process Frequently use all TV features designed to reduce image retention and screen burnout refer to proper user manual section for details Securing the Installation Space Keep the required distances between the product and other objects e g walls to ensure proper ventilat...

Page 3: ...ic Features 10 10 How to Navigate Menus 10 Channel Menu 11 Picture Menu 13 Sound Menu 14 Setup Menu Advanced Features 16 16 Connecting to a PC LA26C350 LA32C350 16 Connecting to a PC LA19C350 LA22C350 18 Media Play Other Information 22 22 Analogue Channel Teletext Feature 23 Installing the Wall Mount 24 Anti Theft Kensington Lock 24 Securing the TV to the Wall 25 Troubleshooting 28 Specifications ...

Page 4: ...ights up in standby mode SOURCEE Toggles between all the available input sources In the on screen menu use this button as you would use the ENTERE button on the remote control MENU Displays an on screen menu the OSD on screen display of your TV s features VOL Adjusts the volume In the OSD use the VOL buttons as you would use the and buttons on the remote control z Changes the channels In the OSD u...

Page 5: ...and off Have direct access to channels Selects the HDMI mode directly Changes channels Quickly selects frequently used functions Displays information on the TV screen Displays the main on screen menu P 10 Adjusts the volume Returns to the previous channel Buttons in the Media Play menu etc Cut off the sound temporarily Returns to the previous menu P 10 Selects on screen menu items and changes menu...

Page 6: ...Use mode Store Demo Mode is for retail environments Return the unit s settings from y y Store Demo to Home Use standard Press the volume button on the TV When the OSD volume is displayed press and hold MENU for 5 sec 3 Selecting an area Press the or button then press the ENTERE button Select the appropriate area 4 Selecting a channel Press the ENTERE button then the channel search will start autom...

Page 7: ... y a HDMI versions older than 1 3 is connected the TV may operate abnormally e g no screen display no sound annoying flicker abnormal colour When connecting an HDMI cable and there is no sound check the HDMI version of the external device If y y the version is not 1 3 contact the provider of the corresponding device to confirm the HDMI version and request to upgrade It is recommended you purchase ...

Page 8: ...g flicker abnormal colour When connecting an HDMI cable and there is no sound check the HDMI version of the external device If y y the version is not 1 3 contact the provider of the corresponding device to confirm the HDMI version and request to upgrade It is recommended you purchase an HDMI certified cable Otherwise the screen may appear blank or a y y yyconnection error may occur DVD R AUDIO L L...

Page 9: ... Y AUDIO IN Headphones H You can connect your headphones to the headphones output on your set While the headphones are connected the sound from the built in speakers will be disabled Sound function may be restricted when connecting headphones to the TV x x Headphone volume and TV volume are adjusted separately x x AUDIO OUT Connects to the audio input jacks on your amplifier DVD home theatre When ...

Page 10: ...e c symbol next to the channel disappears and the channel is not added Locking Unlocking channels This feature allows you to prevent unauthorized users such as children from watching unsuitable programmes by muting out video and audio Move to the field by pressing the buttons select a channel to be locked and press the ENTERE button This function is available only when the Child Lock is set to On ...

Page 11: ...ial broadcasting station or cable channel Other Features Sort This operation allows you to change the programme numbers of the stored channels This operation may be necessary after using the auto store Name Channel names will be assigned automatically when channel information is broadcast These names can be changed allowing you to assign new names Fine Tune If the signal is weak or distorted fine ...

Page 12: ...s well However we highly recommend you use 16 9 mode most of the time 16 9 Adjusts the picture size to 16 9 for DVDs or wide broadcasting Wide Zoom Magnifies the picture size more than 4 3 Adjusts the Position by using buttons Zoom Magnifies the 16 9 wide pictures vertically to fit the screen size Adjusts the Position or Size by using button 4 3 The default setting for a movie or normal broadcasti...

Page 13: ...sets the image to default settings Using Your TV as a Computer PC Display Setting Up Your PC Software Based on Windows XP Depending on the version of Windows and the video card the actual screens on your PC may differ in which case the same basic set up information will almost always be applied If not contact your computer manufacturer or Samsung Dealer 1 Click on Control Panel on the Windows star...

Page 14: ...tomatic change Stereo Mono Stereo Dual Mono Dual I Dual II Dual I If the stereo signal is weak and an automatic switching occurs then switch to the mono Only activated in stereo sound signal Only available when the Input source is set to TV Setup Menu Setting the Time Time Clock Setting the clock is for using various timer features of the TV The current time will appear every time you press the IN...

Page 15: ...ture mode is set to Standard and Sound mode is set to Movie Game Mode is only for playing the game x x Melody Off Low Medium High Set so that a melody plays when the TV is turned on or off Energy Saving Off Low Medium High Auto This feature adjusts the brightness of the TV in order to reduce power consumption When watching TV at night set the Energy Saving mode option to High to reduce eye fatigue...

Page 16: ... a PC LA19C350 LA22C350 Using an HDMI DVI Cable a D sub Cable R AUDIO L PR PB Y AUDIO OUT R AUDIO L PR PB Y DVI OUT R AUDIO L PR PB Y AUDIO OUT R AUDIO L PR PB Y DVI OUT R AUDIO L PR PB Y AUDIO OUT R AUDIO L PR PB Y PC OUT R AUDIO L PR PB Y AUDIO OUT R AUDIO L PR PB Y PC OUT BN68 02683A_NEW indb 16 2010 03 03 5 59 51 ...

Page 17: ... selected y y Separate and Composite modes are supported SOG Sync on Green is not supported y y Display Modes D Sub and HDMI DVI Input Optimal resolution is 1360X768 60Hz Mode Resolution Horizontal Frequency KHz Vertical Frequency Hz Pixel Clock Frequency MHz Sync Polarity H V IBM 640 x 350 31 469 70 086 25 175 720 x 400 31 469 70 087 28 322 MAC 640 x 480 35 000 66 667 30 240 832 x 624 49 726 74 5...

Page 18: ...f MSC are Thumb drives and Flash Card Readers USB HDD and HUB and any usb device more than 16Giga byte are not supported Before connecting your device to the TV please back up your files to prevent them from damage or loss of data x x SAMSUNG is not responsible for any data file damage or data loss Please connect directly to the x x USB port of your TV If you are using a separate cable connection ...

Page 19: ...s run use the Empty the Recycle Bin function on the PC x x to permanently delete the file Photo Viewing a Photo or Slide Show 1 Press the INFO button to display the option View Start Slide Show Delete Delete All Deselect All 2 Press the or button to select Start Slide Show then press the ENTERE button During the slide show files are displayed in order from the currently shown file MP3 files can be...

Page 20: ...n the Sound menu An over modulated MP3 file may cause a sound problem Music function information icons y y Repeat Mode is On Repeat Mode is Off Photo Photo Music Setup SUM 307 2MB 973 7MB Music Photo Music Setup SUM 307 2MB 973 7MB DSC_0558 JPG 580 440 78 0KB 03 14 SUM Photo 307 2MB 973 7MB File jpg File jpg File jpg File jpg File jpg File jpg File jpg File jpg File jpg File jpg File jpg File jpg ...

Page 21: ...saver appears The screensaver will appear when no button is pressed for 4 hour 8 hour 10 hour Playing the selected photos music files Press the Yellow button y y Repeat the above operation to select desired photos music files y y Selected photos or files are marked with the symbol c To cancel a selection press the Yellow button again Press the y y ENTERE button to play the selected photos or files...

Page 22: ...es 4 6 index Display the index contents page at any time while you are viewing Teletext 5 4 size Display the double size letters on the upper half of the screen For the lower half of the screen press it again To display the normal screen press it once again 6 5 reveal Display the hidden text answers to quiz games for example To display the normal screen press it again 1 sub page Display the availa...

Page 23: ...x parts necessary for assembly are provided Do not use screws longer than the standard dimension as they may cause x x damage to the inside of the TV set For wall mounts that do not comply with the VESA standard screw x x specifications the length of the screws may differ depending on their specifications Do not use screws that do not comply with the VESA standard screw specifications x x Do not f...

Page 24: ...fety precautions provided on the included Safety Flyer For added stability install the anti fall device for safety purposes as follows To avoid the TV from falling Since the necessary clamps screws and string are not supplied please purchase these additionally 1 Drive the screws into the clamps and firmly fasten them onto the wall Make sure the screws are firmly fixed into the wall Screw Specifica...

Page 25: ...s Adjust Energy Saving option in the TV menu go to MENU Setup Energy Saving P 15 Try resetting the picture to view the default picture settings go to MENU Picture Picture Reset There is a dotted line on the edge of the screen If the picture size is set to Screen Fit change it to 16 9 P 12 Change cable set top box resolution The picture is black and white If you are using an AV composite input conn...

Page 26: ...cause picture distortion This is not a TV issue PC Connection A Not Supported Mode message appears Set your PC s output resolution and frequency so they match the resolutions supported by the TV P 17 PC is always shown on the source list even if a PC is not connected This is normal PC is always shown on the source list regardless of whether a PC is connected The video is OK but there is no audio I...

Page 27: ...efect The PIP menu is not available PIP functionality is only available when you are using a HDMI PC or components source P 15 There are recurrent picture sound issues Check and change the signal source A reaction may occur between the rubber cushion pads on the base stand and the top finish of some furniture To prevent this use felt pads on any surface of the TV that comes in direct contact with ...

Page 28: ...l 19 inch 22 inch 26 inch 32 inch Sound Output 3W X 2 5W X 2 Dimensions WxDxH Body With stand 461 2 x 64 4 x 322 2 mm 461 2 x 161 0 x 364 0 mm 535 3 x 85 5 x 365 8 mm 535 3 x 171 8 x 420 9 mm 673 3 x 84 0 x 456 0 mm 673 3 x 222 2 x 513 4 mm 795 3 x 84 0 x 525 8 mm 795 3 x 247 2 x 585 3 mm Weight With Stand Without Stand 4 1 kg 3 9 kg 4 2 kg 3 9 kg 6 1 kg 5 7 kg 7 6 kg 7 1 kg Design and specificati...

Page 29: ...zer 13 H HDMI 7 8 I Input Cables 9 L License 27 M Manual Store 11 Media Play 18 Melody 15 Menu Language 15 MP3 Play 20 O Optimal resolution 17 P PIP 15 Power Indicator 4 R Remote Control 5 Retuning channels 11 S Sleep Timer 14 Slide Show 19 Source List 10 Speaker Select 14 Standby mode 4 T Teletext 22 Timer 14 U USB 18 V Volume 4 5 W Wall Mount 23 BN68 02683A_NEW indb 29 2010 03 03 6 00 01 ...

Page 30: ...This page is intention ally left blank BN68 02683A_NEW indb 30 2010 03 03 6 00 01 ...

Reviews: