background image

11

English

03

Basic Featur

es

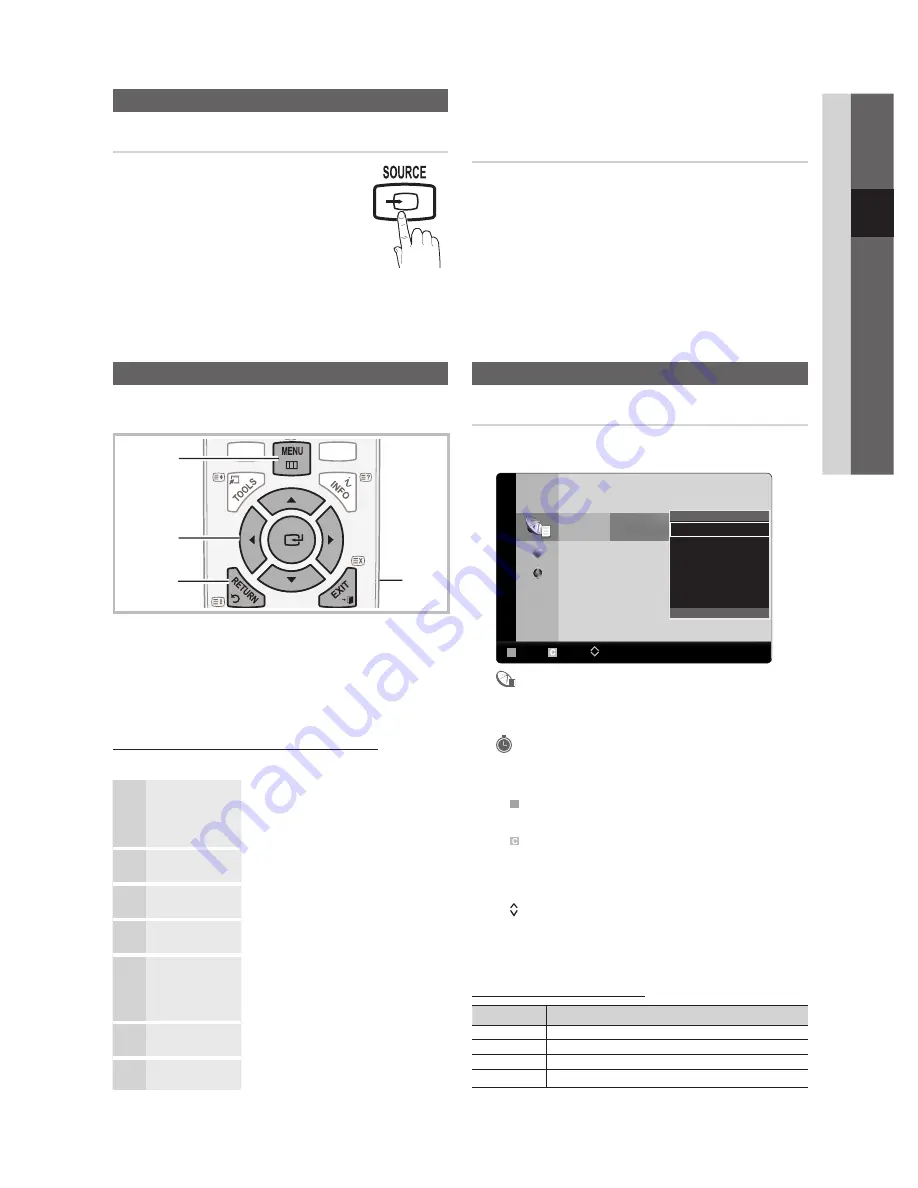
How to Navigate Menu

Before using the TV, follow the steps below to learn how to 
navigate the menu and select and adjust different functions.

ENTER

E

 / Direction button: Move the cursor and 

select an item. Confirm the setting.

RETURN

 button: Returns to the previous menu.

MENU

 button: Displays the main on-screen menu.

EXIT

 button: Exits the on-screen menu.

How to Operate the OSD (On Screen Display)

The access step may differ depending on the selected menu.

1

MENU


m

The main menu options appears on 
the screen:

Picture, Sound, Channel, Setup, 
Input, Application, Support

.

2

 / 

Select an icon with the 

 or 


button.

3

ENTER

E

Press 

ENTER

E

 to access the 

sub-menu.

4

 / 

Select the desired submenu with 
the 

 or 

 button.

5

 / 

Adjust the value of an item with the 

 or 

 button. The adjustment in 

the OSD may differ depending on 
the selected menu.

6

ENTER

E

Press 

ENTER

E

 to complete the 

configuration.

7

EXIT


e

Press 

EXIT

.

Channel Menu

Channel Manager

Delete or set favourites channels. Select a channel in the 

Channels

My Channels

 or 

Scheduled

 screen.

Channels

6    C --

*

 C --

  8 

*

 C --

  9 


C --

  10    C --

  12    C --

  13    C --

B


Zoom  


Select     Page   

T

 Tools

All

Edit My Channels

Lock

Timer Viewing

Edit Channel Name

Sort

Delete


 Channels

: Shows the channel list according to 

channel type.

*


My Channels

: Shows the group of the channel.


Scheduled

:  Shows all the currently reserved 

programmes.

Using the colour buttons with the 


Channel Manager

B


x


Green (

Zoom

): Enlarges or shrinks a channel 

number.


x


Yellow (

Select

): Select desired channels and press 

the Yellow button to set all the selected channels at 
the same time. The 

c

 mark appears to the left of 

the selected channels.  


x

 (

Page

): Move to next or previous page.

T


x

 (

Tools

): Displays the 

Channel Manager

 option 

menu. (The Options menus may differ depending on 
the situation.)

Channel Status Display Icons

Icons

Operations

c

A channel selected.

*

A channel set as a Favourite.

\

A locked channel.

)

A reserved programme.

Basic Features

Changing the Input Source

Source List

Use to select TV or other external input 
sources such as DVD / Blu-ray players / 
Cable Box / Satellite receivers (Set-Top Box) 
connected to the TV.  

22” : TV, AV1, AV2, Component , PC, 


HDMI/DVI, USB
26”/32” : TV, AV1, AV2, Component1, 


Component2, PC, HDMI1/DVI, HDMI2, HDMI3, USB

In the 


Source List

, connected inputs will be 

highlighted.

Edit Name

VCR / DVD / Cable STB / Satellite STB / PVR STB / 


AV Receiver / Game / Camcorder / PC / DVI PC / DVI 
Devices / TV / IPTV / Blu-ray / HD DVD / DMA

: Name 

the device connected to the input jacks to make your 
input source selection easier.

When connecting an HDMI/DVI cable to the 


HDMI IN 

1(DVI)

 or 

HDMI (DVI) IN

  port, you should set to 

DVI 

PC 

or 

DVI


Devices

 mode under 

Edit Name.

P

POWER

MEDIA.P

SLEEP

E.SAVING

DUAL

I-II

4

MEDIA.P

A

B

C

D

HDMI

P.MODE

S.MODE

SLEEP

DUAL

E.SAVING

3

1

2

BN68-02927A_Eng.indd   11

2010-04-06   �� 7:17:04

Summary of Contents for LA22C480

Page 1: ...LCD TV user manual imagine the possibilities Thank you for purchasing this Samsung product To receive more complete service please register your product at www samsung com register Model Serial No ...

Page 2: ...ssible match Reduce brightness and contrast values to minimum required to achieve desired picture quality exceeded values may speed up the burnout process Frequently use all TV features designed to reduce image retention and screen burnout refer to proper user manual section for details Securing the Installation Space Keep the required distances between the product and other objects e g walls to e...

Page 3: ... 11 11 How to Navigate Menu 11 Channel Menu 13 Picture Menu 15 Sound Menu 17 Setup Menu 19 Support Menu Advanced Features 20 20 Connecting to a PC LA26C480 LA32C480 20 Connecting to a PC LA22C480 22 Media Play 28 Anynet Other Information 31 31 FM Transmitter Setup 33 Analogue Channel Teletext Feature 34 Installing the Wall Mount 35 Anti Theft Kensington Lock 35 Securing the TV to the Wall 36 Troub...

Page 4: ...ts up in standby mode SOURCEE Toggles between all the available input sources In the on screen menu use this button as you would use the ENTERE button on the remote control MENU Displays an on screen menu the OSD on screen display of your TV s features VOL Adjusts the volume In the OSD use the VOL buttons as you would use the and buttons on the remote control z Changes the channels In the OSD use ...

Page 5: ...nctions Displays information on the TV screen P 17 Displays the main on screen menu P 11 Adjusts the volume Returns to the previous channel Buttons in the Channel Manager Media Play menu etc Use these buttons in the Media Play and Anynet modes controls recording on Samsung recorders with the Anynet feature Cut off the sound temporarily Returns to the previous menu P 11 Exit the menu P 11 S MODE Se...

Page 6: ...n the unit s settings from y y Store Demo to Home Use standard Press the volume button on the TV When the OSD volume is displayed press and hold MENU for 5 sec 3 Selecting an area Press the or button then press the ENTERE button Select the appropriate area 4 Selecting a channel The channel search will start automatically For more information refer to Channel Auto Store Press the ENTERE button at a...

Page 7: ... no screen display no sound annoying flicker abnormal colour If there is no sound after connecting an HDMI cable check the HDMI version of the external device y y If the version is older than 1 3 contact the provider of the corresponding device to confirm the HDMI version and request an upgrade It is recommended you purchase an HDMI certified cable Otherwise the screen may appear blank or a y y co...

Page 8: ...und to the home theatre receiver When the source is a digital component such as a DVD Blu ray player cable box satellite receiver Set Top Box and is connected to the TV via HDMI only 2 CH audio will be heard from the home theatre receiver If you want to hear 5 1 CH audio connect the digital audio out jack from your DVD Blu ray player Cable Box Satellite receiver Set Top Box directly to an amplifie...

Page 9: ...te abnormally e g no screen display no sound annoying flicker abnormal colour If there is no sound after connecting an HDMI cable check the HDMI version of the external device y y If the version is older than 1 3 contact the provider of the corresponding device to confirm the HDMI version and request an upgrade It is recommended you purchase an HDMI certified cable Otherwise the screen may appear ...

Page 10: ...receiver Set Top Box and is connected to the TV via HDMI only 2 CH audio will be heard from the home theatre receiver If you want to hear 5 1 CH audio connect the digital audio out jack from your DVD Blu ray player Cable Box Satellite receiver Set Top Box directly to an amplifier or home theatre AUDIO OUT Connects to the audio input jacks on your amplifier DVD home theatre When connecting use the ...

Page 11: ...ows the group of the channel Scheduled Shows all the currently reserved programmes Using the colour buttons with the Channel Manager B x x Green Zoom Enlarges or shrinks a channel number x x Yellow Select Select desired channels and press the Yellow button to set all the selected channels at the same time The c mark appears to the left of the selected channels x x Page move to next or previous pag...

Page 12: ...modes allow you to select a channel by entering the assigned number for each aerial broadcasting station or cable channel Editing channels Channel Manager Option Menu in Channel Manager 1 Select a channel and press the TOOLS button 2 Edit the channel name using the Edit Channel Name menu respectively Edit Channel Name Assign your own channel name Other Features Channel Manager Option Menu in Chann...

Page 13: ... Colour Tint G R Your television has several setting options for picture quality control NOTE In analogue x x TV AV modes of the PAL system the Tint G R function is not available In PC mode you can only make changes to x x Backlight Contrast and Brightness Settings can be adjusted and stored for each x x external device connected to the TV Economical Solutions ECO Solution Energy Saving Off Low Me...

Page 14: ...tection Time Colour Tone Cool Normal Warm1 Warm2 Warm1 or Warm2 will be deactivated when the picture mode is Dynamic Settings can be adjusted and stored for each external device connected to an input on the TV Size Your cable box satellite receiver may have its own set of screen sizes as well However we highly recommend you use 16 9 mode most of the time 16 9 Adjusts the picture size to 16 9 for D...

Page 15: ... Adjustment t Adjust frequency values positions and fine tune the settings automatically Not available when connecting through HDMI DVI cable Screen Coarse Fine Removes or reduces picture noise If the noise is not removed by Fine tuning alone then adjust the frequency as best as possible Coarse and Fine tune again After the noise has been reduced readjust the picture so that it is aligned to the c...

Page 16: ...lect is set to TV Speaker you should use these settings TV speaker On External speaker On x x If there is no video signal both speakers will be mute SPDIF Output SPDIF Sony Philips Digital Interface is used to provide digital sound reducing interference going to speakers and various digital devices such as a DVD player Audio Format During the reception of a digital TV broadcast you can select the ...

Page 17: ...s no music file on the USB device or the folder containing a music file is not selected the Timer function does not operate correctly When there is only one photo file in the USB device the Slide Show will not play If a folder name is too long the folder cannot be selected Each USB you use is assigned its own folder When using more than one of the same type of USB make sure the folders assigned to...

Page 18: ...u Transparency Bright Dark Set the Transparency of the menu Melody Off Low Medium High Set so that a melody plays when the TV is turned on or off Picture In Picture PIP PIP t Watches simultaneously the TV tuner and one external video source PIP Picture in Picture does not function in the same mode NOTE If you turn the TV off while watching in x x PIP mode the PIP window will disappear You may noti...

Page 19: ... Software is represented as Year Month Day_Version Installing the Latest Version By USB Insert a USB drive containing the firmware upgrade file downloaded from www samsung com into the TV Please be careful not to disconnect the power or remove the USB drive until upgrades are complete The TV will be turned off and on automatically after completing the firmware upgrade When software is upgraded vid...

Page 20: ...ble R AUDIO L PR PB Y AUDIO OUT R AUDIO L PR PB Y AUDIO OUT R AUDIO L PR PB Y DVI OUT R AUDIO L PR PB Y PC OUT Connecting to a PC LA26C480 LA32C480 Using an HDMI DVI Cable a D sub Cable R AUDIO L PR PB Y AUDIO OUT R AUDIO L PR PB Y AUDIO OUT R AUDIO L PR PB Y DVI OUT R AUDIO L PR PB Y PC OUT ...

Page 21: ...7 500 75 000 31 500 800 x 600 37 879 60 317 40 000 48 077 72 188 50 000 46 875 75 000 49 500 1024 x 768 48 363 60 004 65 000 56 476 70 069 75 000 60 023 75 029 78 750 1360 x 768 47 712 60 015 85 500 720 x 576 35 910 59 950 32 750 VESA CVT 1280 x 720 56 456 74 777 95 750 44 772 59 855 74 500 VESA GTF 1280 x 720 52 500 70 000 89 040 NOTE For HDMI DVI cable connection you must use the y y HDMI IN 1 D...

Page 22: ...1000 files can be displayed in each folder x x MP3 files with DRM that have been downloaded from a non free site cannot be played Digital Rights Management x x DRM is a technology that supports the creation distribution and management of the content in an integrated and comprehensive way including the protection of the rights and interests of the content providers the prevention of the illegal cop...

Page 23: ...d text ttxt XML SAMI smi HTML SubRip srt string based SubViewer sub string based Micro DVD sub or txt string based Movie 01 avi 1 1 Movie 01 avi SUM Movie 03 avi Movie 05 avi Movie 07 avi Movie 09 avi Movie 02 avi Movie 04 avi Movie 06 avi Movie 08 avi Movie 10 avi A Change Device C Select D Sorting T Tools Videos Page File List Section You can confirm the files and groups that is sorted by each c...

Page 24: ... 30 mpg mpeg PS MPEG1 1920x1080 24 25 30 30 AC3 MPEG LPCM AAC MPEG2 1920x1080 24 25 30 30 H 264 1920x1080 6 30 25 ts tp trp TS MPEG2 1920x1080 24 25 30 30 AC3 AAC MP3 DD HE AAC H 264 1920x1080 6 30 25 VC1 1920x1080 6 30 25 Other Restrictions NOTE If there are problems with the contents of a codec the codec will not be supported x x If the information for a Container is incorrect and the file is in...

Page 25: ...hey are saved on the same USB device If the sound is abnormal when playing MP3 files adjust the Equalizer in the Sound menu An over modulated MP3 file may cause a sound problem Photos Viewing a Photo or Slide Show 1 Press the or button to select Photos then press the ENTERE button in the Media Play menu 2 Press the button to select the desired photo in the file list 3 Press the ENTERE button or Pl...

Page 26: ...ays the whole folder You can view the photo by selecting the folder Title Sorts and displays the file title in Symbol Number Alphabet Special order Preference Sorts and displays the file by preference You can change the file preference in the file list section using the Green button Latest Date Sorts and shows files by the latest date Earliest Date Sorts and shows files by the earliest date Artist...

Page 27: ...n set and select background music when watching a Slide Show Zoom You can zoom into images in full screen mode Rotate You can rotate images in full screen mode Information You can see detailed information about the played file Settings Using the Setup Menu Cont movie play help Resume Play On Off Select to display the help pop up message for continuous movie playback Get DivX VOD registration code ...

Page 28: ...on your TV and the Digital Audio Input on the Home Theatre When following the connection above the Optical jack only outputs 2 channel audio You will only hear sound x x from the Home Theatre s Front Left and Right speakers and the subwoofer If you want to hear 5 1 channel audio connect the DIGITAL AUDIO OUT OPTICAL jack on the DVD satellite box i e Anynet Device 1 or 2 directly to the Amplifier o...

Page 29: ...nal device is still recording it may turn off Switching between Anynet Devices 1 Anynet devices connected to the TV are listed If you cannot find a device you want press the red button to refresh the list 2 Select a device and press the ENTERE button You can switch to the selected device Only when you set Anynet HDMI CEC to On in the Application menu the Device List menu appears Switching to the s...

Page 30: ...Media Play or Plug Play Initial setup etc When connecting or removing the HDMI cable please make sure to search devices again or turn your TV off and on again Check if the Anynet Function of Anynet device is set on I want to start Anynet Check if the Anynet device is properly connected to the TV and check if the Anynet HDMI CEC is set to On in the Anynet Setup menu Press the TOOLS button to displa...

Page 31: ...e FM transmitter s y y frequency range is automatically displayed If there is no TV channel frequency within the FM frequency range 83MHz to 108MHz the entire range from 88 0MHz to y y 107 9MHz is available for use FM Transmitter Installation Guide The FM transmitter module features an integrated antenna Antenna signal strength will vary depending on where the antenna is installed and on the perfo...

Page 32: ...tion or location Only use the FM transmitter supplied as an accessory Otherwise you may damage the product x x Do not use the FM transmitter supplied as an accessory with other products x x Match the TV s FM transmitter frequency with the FM receiver s e g a radio or a home theater frequency x x If the FM receiver s e g a radio or a home theater frequency does not match you will not be able to hea...

Page 33: ... again 4 9 hold Hold the display on a given page if the selected page is linked with several secondary pages which follow on automatically To resume press it again 5 0 mode Select the Teletext mode LIST FLOF If you press this button in the LIST mode the mode is switched into the List save mode In the List save mode you can save a Teletext page into list using the 8 store button 6 1 sub page Displa...

Page 34: ...etailed installation manual and all x x parts necessary for assembly are provided Do not use screws longer than the standard dimension as they may cause x x damage to the inside of the TV set For wall mounts that do not comply with the VESA standard screw x x specifications the length of the screws may differ depending on their specifications Do not use screws that do not comply with the VESA stan...

Page 35: ...tip over resulting in serious injuries or death Follow all safety precautions provided on the included Safety Flyer For added stability install the anti fall device for safety purposes as follows To avoid the TV from falling Since the necessary clamps screws and string are not supplied please purchase these additionally 1 Drive the screws into the clamps and firmly fasten them onto the wall Make s...

Page 36: ...e Picture options in the TV menu go to Picture mode Colour Brightness Sharpness Adjust Energy Saving option in the TV menu go to MENU Picture ECO solution Energy Saving P 13 Try resetting the picture to view the default picture settings go to MENU Picture Picture Reset There is a dotted line on the edge of the screen If the picture size is set to Screen Fit change it to 16 9 P 14 Change cable set ...

Page 37: ...ovies A low signal can cause picture distortion This is not a TV issue PC Connection A Not Supported Mode message appears Set your PC s output resolution and frequency so they match the resolutions supported by the TV P 21 PC is always shown on the source list even if a PC is not connected This is normal PC is always shown on the source list regardless of whether a PC is connected The video is OK ...

Page 38: ...me furniture To prevent this use felt pads on any surface of the TV that comes in direct contact with furniture This TFT LCD panel uses a panel consisting of sub pixels which require sophisticated technology to produce However there may be a few bright or dark pixels on the screen These pixels will have no impact on the performance of the product License Manufactured under license from Dolby Labor...

Page 39: ... Model Name LA22C480 LA26C480 LA32C480 Screen Size Diagonal 22 inch 26 inch 32 inch Sound Output 15W x 2 15W x 2 20W x 2 Dimensions WxDxH Body With stand 530 5 X 68 0 X 358 0 mm 530 5 X 171 5 X 403 0 mm 644 6 76 6 441 mm 644 6 437 2 477 3 mm 782 3 85 3 523 4 mm 782 3 247 4 560 4 mm Weight Without Stand With Stand 4 9 kg 5 3 kg 6 6 kg 7 0 kg 10 5 kg 11 kg Design and specifications are subject to ch...

Page 40: ...e 15 Frequency 21 H HDMI 5 7 9 Home Theatre 8 28 I Installation Space 2 L License 37 Language 18 Lock 12 M Media Play 22 Melody 18 Music 25 Menu Transparency 18 N Navigate 11 O Optimal resolution 21 P Photos 25 PIP Picture in Picture 18 Power Indicator 4 Plug Play 6 Picture Size 14 27 R Remote Control 5 RGB Only Mode 14 Receiver 30 Recording 29 Rotate 27 Repeat Mode 27 S Sleep Timer 17 Slide Show ...

Page 41: ...1800 110011 1800 3000 8282 1800 266 8282 www samsung com INDONESIA 0800 112 8888 021 5699 7777 www samsung com JAPAN 0120 327 527 www samsung com Jordan 800 22273 MALAYSIA 1800 88 9999 www samsung com NEW ZEALAND 0800 SAMSUNG 0800 726 786 www samsung com PHILIPPINES 1 800 10 SAMSUNG 726 7864 1 800 3 SAMSUNG 726 7864 1 800 8 SAMSUNG 726 7864 02 5805777 www samsung com SINGAPORE 1800 SAMSUNG 726 786...

Reviews: