background image

English - 

RECOMMENDATIONS

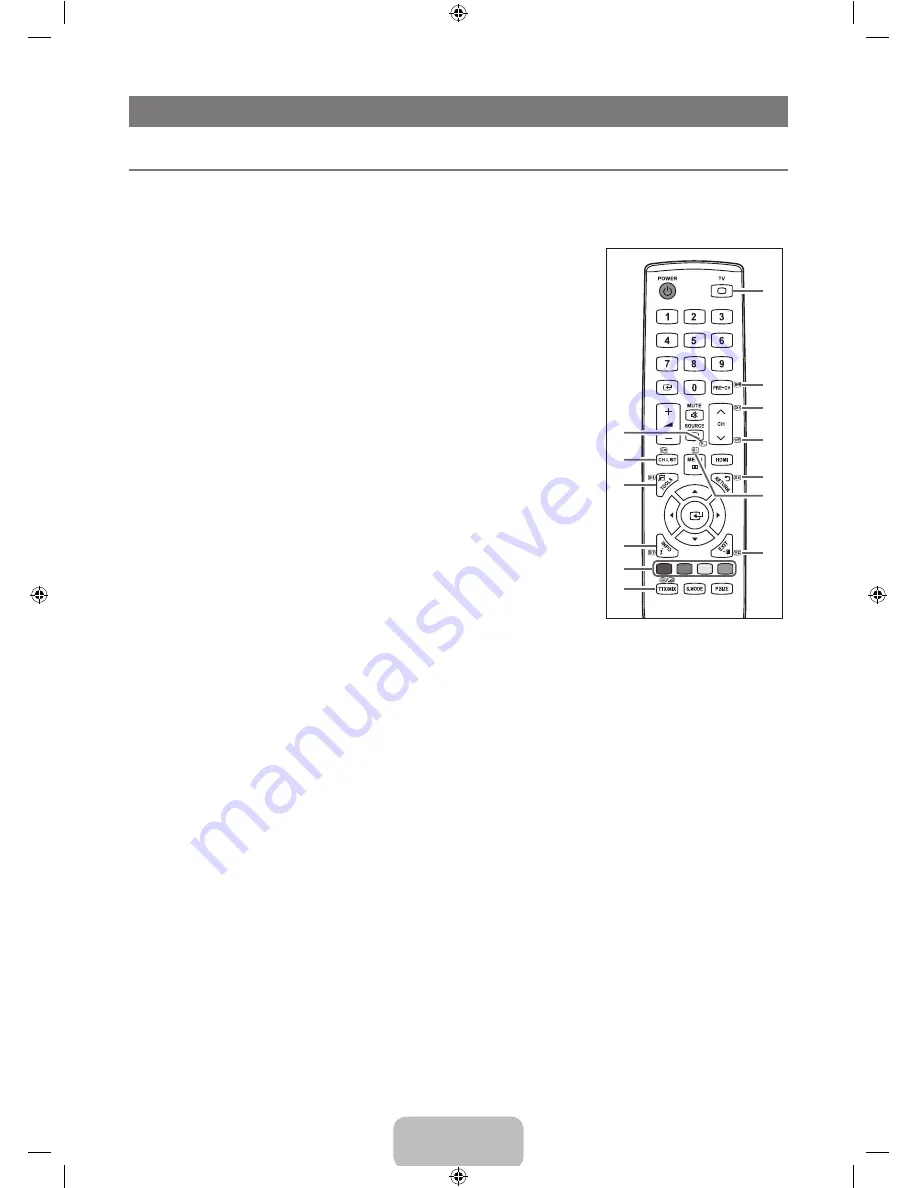
Teletext Feature

Most television stations provide written information services via Teletext. The index page of the Teletext service gives you 

information on how to use the service. In addition, you can select various options to suit your requirements by using the remote 

control buttons.

For Teletext information to be displayed correctly, channel reception must be stable. Otherwise, information may be missing or 

some pages may not be displayed.

1


0

 (mode)

Press to select the Teletext mode (LIST/ FLOF). If you press it in the LIST mode, it 

switches into the List save mode. In the List save mode, you can save Teletext page 

into list using the 

8

(store) button.

2


8

 (store)

Used to store the Teletext pages.

3


4

 (size)

Press to display the double-size letters in the upper half of the screen. For lower half 

of the screen, press it again. To display normal screen, press it once again.

4


5

 (reveal)

Used to display the hidden text (answers to quiz games, for example). To display 

normal screen, press it again.

5


Colour buttons (red/green/yellow/blue)

If the FASTEXT system is used by a broadcasting company, the different topics 

covered on a Teletext page are colour-coded and can be selected by pressing 

the coloured buttons. Press one of them corresponding to the required. The page 

is displayed with other coloured information that can be selected in the same 

way. To display the previous or next page, press the corresponding coloured 

button.

6


/

 (Teletext on/mix)

Press to activate Teletext mode after selecting the channel providing the Teletext 

service. Press it twice to overlap the Teletext with the current broadcasting screen.

7


:

 (exit)

Exit from the Teletext display.

8


1

 (sub-page)

Used to display the available sub-page.

9


2

 (page up)

Used to display the next Teletext page.

0


3

 (page down)

Used to display the previous Teletext page.

!


9

 (hold)

Used to hold the display on a given page if the selected page is linked with several 

secondary pages which follow on automatically. To resume, press it again.

@


6

 (index)

Used to display the index (contents) page at any time while you are viewing Teletext.

#


7

 (cancel)

Used to display the broadcast when searching for a page.

You can change Teletext pages by pressing the numeric buttons on the remote control. 

¦

N

N

2

1

7

8

9

0

!

@

#

3

4

5

6

BN68-02101Z-00Eng.indb   21

2009-08-04   �� 8:57:16

Summary of Contents for LA22B352

Page 1: ...om my NEW ZEALAND 0800 SAMSUNG 0800 726 786 www samsung com nz PHILIPPINES 1 800 10 SAMSUNG 726 7864 1 800 3 SAMSUNG 726 7864 02 5805777 www samsung com ph SINGAPORE 1800 SAMSUNG 726 7864 www samsung com sg THAILAND 1800 29 3232 02 689 3232 www samsung com th TAIWAN 0800 329 999 www samsung com tw VIETNAM 1 800 588 889 www samsung com vn SOUTH AFRICA 0860 SAMSUNG 726 7864 www samsung com za U A E ...

Page 2: ...ast of the screen when displaying a still image Watching the LCD TV in 4 3 format for a long period of time may leave traces of borders displayed on the left right and centre of the screen caused by the difference of light emission on the screen Playing a DVD or a game console may cause a similar effect to the screen Damages caused by the above effect are not covered by the Warranty Displaying sti...

Page 3: ... 9 PICTURE Configuring the Picture Menu 11 Viewing Picture in Picture 14 Using Your TV as a Computer PC Display 15 SOUND Configuring the Sound Menu 16 Setting up the TV with your PC 16 Selecting the Sound Mode 17 SETUP Configuring the Setup Menu 18 INPUT Input Menu 20 RECOMMENDATIONS Teletext Feature 21 Installing the Stand 22 Disconnecting the Stand 23 Anti Theft Kensington Lock 23 Securing the I...

Page 4: ...V 2 SOURCE E Toggles between all the available input sources In the on screen menu use this button as you would use the ENTERE button on the remote control 3 y Press to increase or decrease the volume In the on screen menu use the y buttons as you would use the and buttons on the remote control 4 P POWER Press to turn the TV on and off 5 POWER INDICATOR Blinks and turns off when the power is on an...

Page 5: ...ety Guide Registration Cards Please make sure the following items are included with your LCD TV If any items are missing contact your dealer Warranty card Safety Guide Registration Cards Not available in all locations The items colour and shape may vary depending on the model N N N M4 X L16 BN68 02101Z 00Eng indb 3 2009 08 04 8 57 12 ...

Page 6: ...eature installed Use the HDMI PC IN HDMI DVI jack for DVI connection to an external device Use a DVI to HDMI cable or DVI HDMI adapter DVI to HDMI for video connection and the HDMI PC IN AUDIO jacks for audio When using an HDMI DVI cable connection you must use the HDMI PC IN HDMI DVI jack HDMI PC IN AUDIO Connect to the audio output jack on your PC DVI audio outputs for external devices HDMI PC I...

Page 7: ...eo cable to the COMPONENT IN Y VIDEO jack and the audio cable to the COMPONENT IN R AUDIO L jacks 5 H HEADPHONE Headphone may be connected to the headphone output on your set While the head phone is connected the sound from the built in speakers will be disabled Using the sound function is restricted when connecting headphones to the TV Prolonged use of headphones at a high volume may damage your ...

Page 8: ...y used functions 8 INFO Press to display information on the TV screen TV Selects the TV mode directly PRE CH Enables you to return to the previous channel you were watching MUTE M Press to temporarily cut off the sound P Press to change channels MENU Displays the main on screen menu HDMI Selects the HDMI mode directly RETURN Returns to the previous menu UP DOWN LEFT RIGHT ENTERE Use to select on s...

Page 9: ...menu appears on the screen The menu s left side has icons Picture Sound Channel Setup Input 3 Press the or button to select one of the icons 4 Then press the ENTERE button to access the icon s sub menu 5 Press the or button to select the icon s submenu 6 Press the or button to decrease or increase the value of a particular item The adjustment OSD may differ depending on the selected menu 7 Press t...

Page 10: ...onds 4 The message Check antenna input is displayed with OK selected Press the ENTERE button Please check that the antenna cable is connected correctly 5 Select the appropriate area by pressing the or button Press the ENTERE button to confirm your choice 6 The Auto Store menu is displayed with the Start selected Press the ENTERE button The channel search will start and end automatically Press the ...

Page 11: ...ng tuning the broadcasting stations in your area have been assigned to position numbers from P00 to P99 You can select a channel by entering the position number in this mode C Air channel mode You can select a channel by entering the assigned number to each air broadcasting station in this mode S Cable channel mode You can select a channel by entering the assigned number for each cable channel in ...

Page 12: ...vailable Letters of the alphabet A Z Numbers 0 9 Special characters space Fine Tune If the reception is clear you do not have to fine tune the channel as this is done automatically during the search and store operation If the signal is weak or distorted you may have to fine tune the channel manually Fine tuned channels that have been saved are marked with an asterisk on the right hand side of the ...

Page 13: ...ess Adjusts the brightness level of the picture Sharpness Adjusts the edge definition of the picture Colour Adjusts colour saturation of the picture Tint G R Adjusts the colour tint of the picture In TV AV modes of the PAL system you cannot use the Tint G R Function When you make changes to Backlight Contrast Brightness Sharpness Colour or Tint G R the OSD will be adjusted accordingly In PC mode y...

Page 14: ...y adjusts to the most natural colour tone based on programme sources Native Native Colour Space offers deep and rich colour tone White Balance You can adjust the colour temperature for more natural picture colours R Offset Adjusts the red colour darkness G Offset Adjusts the green colour darkness B Offset Adjusts the blue colour darkness R Gain Adjusts the red colour brightness G Gain Adjusts the ...

Page 15: ...et for more than two hours Wide Zoom Move the screen up down using the or button after selecting the by pressing the or ENTERE button Zoom Select by pressing the or button Use the or button to move the picture up and down After selecting use the or button to magnify or reduce the picture size in the vertical direction After selecting Screen Fit in HDMI 1080i or Component 1080i mode Select by press...

Page 16: ...n the PIP window becomes slightly unnatural when you use the main screen to view a game or karaoke PIP Off On You can activate or deactivate the PIP function Source You can select a source of the sub picture Size à À Œ You can select a size of the sub picture If main picture is in HDMI mode Size is available Position à œ You can select a position of the sub picture In Double Œ À mode Position cann...

Page 17: ...he dialog box Display Modes Both screen position and size will vary depending on the type of PC monitor and its resolution The resolutions in the table are recommended D Sub and HDMI DVI Input Mode Resolution Horizontal Frequency KHz Vertical Frequency Hz Pixel Clock Frequency MHz Sync Polarity H V IBM 640 x 350 31 469 70 086 25 175 720 x 400 31 469 70 087 28 322 MAC 640 x 480 35 000 66 667 30 240...

Page 18: ...ns by simply pressing the S MODE button on the remote control Standard Selects the normal sound mode Music Emphasizes music over voices Movie Provides the best sound for movies Clear Voice Emphasizes voice over other sounds Custom Recalls your customized sound settings Equalizer The sound settings can be adjusted to suit your personal preferences Balance L R Adjusts the balance between the right a...

Page 19: ...is set to On Press the TOOLS button to display the Tools menu You can also set the sound of the sub picture by selecting Tools PIP Sound Select Selecting the Sound Mode You can set the sound mode in the Tools menu When you set to Dual l ll the current sound mode is displayed on the screen Audio Type Dual 1 2 Default A2 Stereo Mono MONO Automatic change Stereo STEREO MONO Dual DUAL 1 DUAL 2 DUAL 1 ...

Page 20: ... to Activated Repeat Select Once Everyday Mon Fri Mon Sat or Sat Sun Volume Select the desired turn on volume level Programme When the On Timer is active you can turn on a specific channel You can set the hour minute and channel by pressing the number buttons on the remote control Auto Power Off When you set the timer On the television will eventually turn off if no controls are operated for 3 hou...

Page 21: ... mode is automatically changed to Standard and cannot be changed Sound mode is automatically changed to Custom and cannot be changed Adjust the sound using the equalizer The Reset Sound function is activated Selecting the Reset function after settings the equalizer resets the equalizer settings to the factory defaults Melody Off Low Medium High A melody sound can be set to come on when the TV is p...

Page 22: ...ntrol TV AV Component PC HDMI DVI PC always stays activated Edit Name VCR DVD Cable STB Satellite STB PVR STB AV Receiver Game Camcorder PC DVI PC DVI TV IPTV Blu ray HD DVD DMA Name the device connected to the input jacks to make your input source selection easier When connecting an HDMI DVI cable to the HDMI DVI port you should set the HDMI DVI mode to DVI or DVI PC in the Edit Name of the Input...

Page 23: ...If the FASTEXT system is used by a broadcasting company the different topics covered on a Teletext page are colour coded and can be selected by pressing the coloured buttons Press one of them corresponding to the required The page is displayed with other coloured information that can be selected in the same way To display the previous or next page press the corresponding coloured button 6 Teletext...

Page 24: ...ying additional graphics or text Depending upon the transmission blank side panels can occur when displaying Teletext In these cases additional graphics or text is not transmitted Older TV s which do not support version 2 5 are not capable of displaying any additional graphics or text regardless of the Teletext transmission Press the TV button to exit from the Teletext display Installing the Stand...

Page 25: ...king method may differ from the illustration depending on the manufacturer Refer to the manual provided with the Kensington Lock for proper use The locking device has to be purchased separately The location of the Kensington Lock may be different depending on its model 1 Insert the locking device into the Kensington slot on the LCD TV 1 and turn it in the locking direction 2 2 Connect the Kensingt...

Page 26: ...d on the included Safety Flyer For added stability install the anti fall device for safety purposes as follows To avoid the TV from falling 1 Put the screws into the clamps and firmly fasten them onto the wall Confirm that the screws have been firmly installed onto the wall You may need additional material such as an anchor depending on the type of wall Since the necessary clamps screws and string...

Page 27: ...lour Brightness Sharpness Adjust Energy Saving option in Setup menu Try picture reset to view the default picture setting Go to MENU Picture Picture Reset Dotted line on the edge of screen If picture size is set to Screen Fit change to 16 9 Change cable set top box resolution Picture is black and white with AV Composite input only Confirm Composite yellow cable is in yellow jack in source as well ...

Page 28: ...device s output HDMI TV s input HDMI Make sure your connected device is powered on Make sure to select the TV s correct source by pressing the SOURCE button on the TV remote RF Cable Antenna Connection Cannot receive all channels Make sure Antenna cable is connected securely Please try Plug Play to add available channels to the channel list Go to MENU Setup Plug Play and wait for all available cha...

Page 29: ...face If can not remove screws from TV please use magnetized screw driver Channel menu is grey out unavailable Channel menu is only available when TV source is selected Antenna or Cable Your settings are lost after 30 minutes or every time TV is turned off If TV is in the Store Demo mode it will reset audio and picture settings every 30 minutes Please change from Store Demo mode to Home Use mode in...

Page 30: ...ations Operating Temperature Operating Humidity Storage Temperature Storage Humidity 10 C to 40 C 50 F to 104 F 10 to 80 non condensing 20 C to 45 C 4 F to 113 F 5 to 95 non condensing Stand Swivel Left Right 0 Design and specifications are subject to change without prior notice This device is a Class B digital apparatus For the power supply and Power Consumption refer to the label attached to the...

Page 31: ...This page is intentionally left blank BN68 02101Z 00Eng indb 29 2009 08 04 8 57 17 ...

Reviews: