background image

ITA - 6

ITA - 7

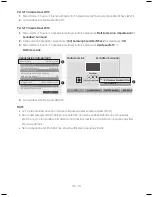
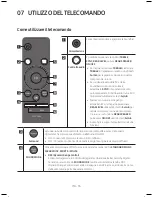
3. 

Premere il tasto 

Sinistra

 del telecomando per 5 secondi per attivare o 

disattivare Auto Power Link.


• Per impostazione predefinita, la funzione Auto Power Link è impostata su 

ON. (Per disattivare questa funzione, utilizzare la Soundbar.)


• A seconda del dispositivo collegato, Auto Power Link potrebbe non 

funzionare.


• Questa funzione è disponibile solamente nel modo “

D.In

”.

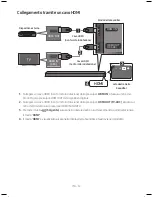
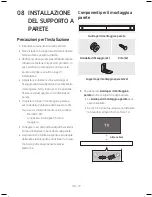
Collegamento di una TV tramite un cavo HDMI

HDMI IN

HDMI OUT

(TV-ARC)

HDMI IN

(ARC)

Cavo HDMI


(non fornito in 

dotazione)

Fondo della Soundbar

Collegarsi alla porta HDMI IN 

(ARC) della TV.

Collegarsi alla porta HDMI OUT (TV-ARC) 

dell'unità principale della Soundbar.

Lato destro della 

Soundbar

TV  

arc

1. 

Con la Soundbar e la TV accese, collegare il cavo HDMI (non fornito in dotazione) come illustrato 
nella figura.

2. 

TV arc

” compare nella finestra di visualizzazione dell’unità principale della Soundbar e la 

Soundbar riproduce l’audio della TV.


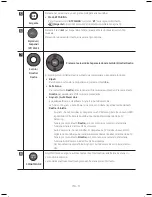
• Se l’audio della TV è impercettibile, premere il tasto 


(Sorgente)

 sul telecomando o sul lato 

destro della Soundbar per passare al modo “

D.In

”. Sullo schermo vengono visualizzati “

D.In

” e 

TV arc

” n sequenza e viene riprodotto l’audio della TV.


• Se “

TV arc

” non compare nella finestra di visualizzazione dell’unità principale della Soundbar, 

verificare che il cavo sia collegato alla porta corretta.


• Utilizzare i tasti del volume del telecomando della TV per regolare il volume della Soundbar.

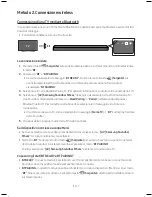
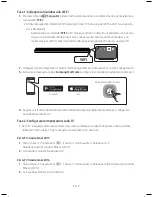
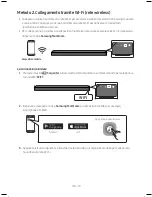
Metodo 2. Connessione wireless

Connessione di una TV mediante Bluetooth

In caso di connessione di una TV mediante Bluetooth, è possibile percepire l’audio stereo senza i fastidi 
dovuti al cablaggio.


• È possibile connettere solo una TV alla volta.

La connessione iniziale

1. 

Premere il tasto 


(Sorgente)

 sul pannello laterale destro o sul telecomando, quindi selezionare 

il modo “

BT

”.

2. 

Passare da “

BT

” a “

BT PaIrInG

”.


• Se viene visualizzato il messaggio “

BT reaDY

”, tenere premuto il tasto 


(Sorgente)

 sul 

pannello laterale destro della Soundbar o sul telecomando per almeno 5 secondi per 
visualizzare “

BT PaIrInG

”.

3. 

Selezionare il modo Bluetooth sulla TV. (Per ulteriori informazioni, consultare il manuale della TV.)

4. 

Selezionare “

[AV] Samsung Soundbar MSxxx

” dall’elenco visualizzato nella schermata della TV. 

Una Soundbar disponibile è indicata con “

Need Pairing

” o “

Paired

” nell’elenco dei dispositivi 

Bluetooth della TV. Per connettersi alla Soundbar, selezionare il messaggio e stabilire una 
connessione.


• Una volta connessa la TV, viene visualizzato il messaggio [

Nome TV

] → “

BT

” sul display frontale 

della Soundbar.

5. 

Ora è possibile percepire l’audio della TV dalla Soundbar.

Se il dispositivo non riesce a connettersi


• Se la voce relativa alla Soundbar precedentemente connessa (ad es. “

[AV] Samsung Soundbar 

MSxxx

”) compare nell’elenco, cancellatela.


• Nel modo “

BT

”, tenere premuto il tasto 


(Sorgente)

 per almeno 5 secondi sul pannello laterale 

destro della Soundbar o sul telecomando per passare al modo “

BT PaIrInG

”. 


Quindi, selezionare “

[AV] Samsung Soundbar MSxxx

” ell’elenco di ricerca della TV.

Cosa sono gli stati BT READY e BT PAIRING?


BT reaDY

 : In questo modo, è possibile cercare TV precedentemente connesse o connettersi alla 

Soundbar da un dispositivo mobile precedentemente connesso.


BT PaIrInG

 : In questo modo, è possibile connettersi a un nuovo dispositivo. (Mentre si è nel modo 

BT

”, tenere premuto per almeno 5 secondi il tasto 


(Sorgente)

 sul lato destro della Soundbar o 

sul telecomando.)

Summary of Contents for HW-MS650

Page 1: ...HW MS650 HW MS651 USER MANUAL...

Page 2: ...tes that the rated voltage marked with the symbol is DC voltage Caution Consult instructions for use This symbol instructs the user to consult the user manual for further safety related information WA...

Page 3: ...e unit malfunctions Your product is not intended for industrial use It is for personal use only Condensation may occur if your product has been stored in cold temperatures If transporting the unit dur...

Page 4: ...4 04 ConnectingtoyourTV 5 Method 1 Connecting with a Cable 5 Connecting using an Optical Cable 5 Connecting a TV using an HDMI Cable 6 Method 2 Connecting Wirelessly 7 Connecting a TV via Bluetooth 7...

Page 5: ...trol 18 08 InstallingtheWallMount 19 Installation Precautions 19 Wallmount Components 19 Assembling the Holder Cable 21 Installing the Holder Foot 22 09 SoftwareUpdate 22 10 Troubleshooting 23 11 Lice...

Page 6: ...ponents see page 19 See page 21 for instructions on how to use the Holder Cable To purchase additional components or optional cables contact a Samsung Service Centre or Samsung Customer Care Inserting...

Page 7: ...put mode D IN AUX HDMI WIFI BT To turn on BTPAIRING mode change the source to BT mode and then press and hold the Source button for more than 5 seconds POWEROUT ForTV Connect the power cord of a Samsu...

Page 8: ...barMainUnit PowerCord Connecting ElectricalPower Connect the supplied power cable to the POWERIN jack HDMI IN HDMI OUT TV ARC WIRELESS AUX IN DIGITAL AUDIO IN OPTICAL POWER IN POWER OUT For TV POWER I...

Page 9: ...t is recommended to change the setting to Dolby Digital When the setting is changed you can experience better sound quality The menu may differ depending on the TV manufacturer ConnectingusinganOptica...

Page 10: ...MIOUT TV ARC portoftheSoundbarmainunit RightSideofthe Soundbar TV ARC 1 With the Soundbar and TV turned on connect the HDMI cable not supplied as shown in the figure 2 TVARC appears in the display win...

Page 11: ...evice list To connect to the Soundbar select the message and establish a connection When the TV is connected TVName BT appears on the Soundbar s front display 5 You can now hear TV sound from the Soun...

Page 12: ...generate electromagnetic waves must be kept away from the Soundbar main unit e g microwaves wireless LAN devices etc DisconnectingtheSoundbarfromtheTV Press the Source button on the right side panel...

Page 13: ...o the Wi Fi network the TV is connected to 3 Install and launch the SamsungMultiroom app on your mobile device smartphone tablet etc iOS Android Samsung Multiroom app 4 Follow the instructions in the...

Page 14: ...List Add New Device On Multiroom Link Settings Soundbar Surround Bluetooth Headphone Bluetooth Headphone List SpeakerSettings TV Sound Output Multiroom Link OK MultiroomLink OK VolumeLevel SpeakerTest...

Page 15: ...oundbar BD DVDplayer Set topbox Gameconsole RightSideoftheSoundbar OpticalCable X X Connect DIGITALAUDIOIN OPTICAL on the main unit to the OPTICAL OUT jack of the Source Device using a digital optical...

Page 16: ...MI cable not supplied from the HDMIIN jack on the back of the product to the HDMI OUT jack on your digital device 2 Connect an HDMI cable not supplied from the HDMIOUT TV ARC jack on the back of the p...

Page 17: ...5 seconds to display BTPAIRING 3 Select AV SamsungSoundbarMSxxx from the list When a Soundbar is connected to the Bluetooth device BluetoothDeviceName BT appears in the front display 4 Play music fil...

Page 18: ...to a mobile device via a wireless network Wi Fi the SamsungMultiroom app is required Mobiledevice Theinitialconnection 1 Press the Source button on the right side of the Soundbar or on the remote con...

Page 19: ...e audio device and one Soundbar X X Touch to go to the list of all speakers Y Y Touch on the right of the Soundbar model name Z Z Touch SurroundSetup Select Done after dragging the speaker to the desi...

Page 20: ...Down buttons to adjust the volume within the 6 to 6 range The REARSPEAKER function can be turned ON OFF by using the Up Down buttons Audio Sync is only supported in some functions Surround Surround V...

Page 21: ...Press the Left button to select the previous music file Anynet AutoPowerLink You can turn Anynet and Auto Power Link on or off Anynet and Auto Power Link are controlled by the Right and Left buttons...

Page 22: ...control UsetheTVmenutosettheTVspeakeronaSamsungTVtoexternalspeakers Formoreinformation seetheTV susermanual After installing the Soundbar you can adjust the Soundbar s volume using the IR remote contr...

Page 23: ...into wall studs Purchase wall mounting screws according to the type and thickness of the wall you want to mount the Soundbar on Diameter M5 Length 35 mm or longer recommended Connect cables from the...

Page 24: ...n the wall at each marking If the markings do not correspond to the positions of studs make sure you insert appropriate anchors or mollies into the holes before you insert the support screws If you us...

Page 25: ...Wall Mounts down so that Bracket Wall Mounts rest securely on the Holder Screws AssemblingtheHolder Cable As shown in the image use the supplied Screw to fix the Holder Cable to the Soundbar and then...

Page 26: ...Soundbar on the legs of the stand WIRELESS AUX IN DIGITAL AUDIO IN OPTICAL POWER IN POWER OUT For TV HDMI IN HDMI OUT TV ARC Wi Fi SETUP SPK ADD PlaceSoundbar 09 Software Update When the Soundbar is...

Page 27: ...toofar Move the remote control closer to the Soundbar main unit CannotconnecttotheTV Ifconnectedviaawirednetwork Check if the cable is connected correctly Check the port name to make sure that the cab...

Page 28: ...ttp patents dts com Manufactured under license from DTS Licensing Limited DTS the Symbol DTS in combination with the Symbol and DTS Digital Surround are registered trademarks or trademarks of DTS Inc...

Page 29: ...cations GENERAL Weight 6 2 kg Dimensions WxHxD 1060 0 x 78 0 x 130 5 mm OperatingTemperatureRange 5 C to 35 C OperatingHumidityRange 10 75 HDMI Video 1080p 1080i 720p 576p 480p 2160p 24 25 30Hz 4 4 4...

Page 30: ...tionmethod Press SPKADD button on the product for 30 seconds to turn Bluetooth On Off Hereby Samsung Electronics declares that this equipment is in compliance with Directive 2014 53 EU The full text o...

Page 31: ...ries or literature indicates that the product and its electronic accessories e g charger headset USB cable should not be disposed of with other household waste at the end of their working life To prev...

Page 32: ...dass es sich bei der mit diesem Symbol gekennzeichneten Nennspannung um eine Gleichspannung handelt Achtung Gebrauchsanweisung beachten Dieses Symbol weist den Benutzer an weitere sicherheitsrelevante...

Page 33: ...erblichen Einsatz vorgesehen Verwenden Sie dieses Produkt nur f r den privaten Bereich Wenn Ihr Produkt oder die CD bei kalten Temperaturen aufbewahrt wurden kann Kondensation auftreten Wenn Sie das G...

Page 34: ...r t 5 Methode 1 Verbindung mit einem Kabel 5 Verbindung mit einem optischen Kabel 5 Einen Fernseher ber ein HDMI Kabel verbinden 6 Methode 2 Drahtlose Verbindung 7 Verbindung eines Fernsehers per Blue...

Page 35: ...halterung 19 Vorsichtsma nahmen f r die Installation 19 Komponenten f r die Anbringung an der Wand 19 Zusammenbau des Kabelhalters 21 Installieren des Halterfu es 22 09 Softwareaktualisierung 22 10 Fe...

Page 36: ...Seite 21 f r Anweisungen zur Verwendung des Kabelhalter Wenden Sie sich f r den Kauf von zus tzlichen Komponenten oder optionalen Kabeln an ein Servicezentrum oder den Kundendienst von Samsung Einlege...

Page 37: ...Modus BTPAIRING schalten Sie die Quelle auf den Modus BT um und halten Sie dann die taste Quelle l nger als 5 Sekunden lang gedr ckt POWEROUT ForTV Schlie en Sie das Stromkabel eines Samsung Fernsehe...

Page 38: ...abel an die POWERIN Buchse an HDMI IN HDMI OUT TV ARC WIRELESS AUX IN DIGITAL AUDIO IN OPTICAL POWER IN POWER OUT For TV POWER IN POWER OUT For TV Unterseitedes Soundbar Hauptger ts Die POWEROUT Buchs...

Page 39: ...f PCM gestellt ist wird empfohlen die Einstellung auf Dolby Digital zu ndern Nach dem ndern der Einstellung k nnen Sie eine bessere Soundqualit t genie en Das Men kann je nach Fernsehhersteller variie...

Page 40: ...andenHDMIOUT TV ARC PortamSoundbar Hauptger t RechteSeiteder Soundbar TV ARC 1 Bei eingeschalteter Soundbar und eingeschaltetem Fernseher das HDMI Kabel nicht mitgeliefert wie in der Abbildung gezeigt...

Page 41: ...angezeigt Zum Verbinden der Soundbar w hlen Sie die Meldung und stellen Sie eine Verbindung her Wenn der Fernseher verbunden ist erscheint NamedesFernsehers BT auf der vorderen Anzeige des Fernsehers...

Page 42: ...Soundbar Hauptger t ferngehalten werden z B Mikrowellen WLAN Ger te etc TrennenderSoundbarvomFernseher Dr cken Sie die Taste Quelle auf der rechten Seite oder der Fernbedienung und schalten Sie zu ein...

Page 43: ...Fernseher verbunden ist 3 Installieren und starten Sie die SamsungMultiroom App auf Ihrem Mobilger t Smartphone Tablet etc iOS Android Samsung Multiroom App 4 Folgen Sie den Anweisungen auf dem App Bi...

Page 44: ...r Surround c AV SamsungSoundbarMSxxx Nichtverwenden Namebea 1 3 2 TV Tonausgabe Multiroom Link TV Lautsprecher Fernseh Installationstyp Standfu TV SoundConnect Samsung Audioger teliste Neues Ger t hin...

Page 45: ...r BD DVD Player Set Top Box Spielkonsole RechteSeitederSoundbar OptischesKabel X X Verbinden Sie den Anschluss DIGITALAUDIOIN OPTICAL am Hauptger t ber ein optisches Digitalkabel mit dem Anschluss OPT...

Page 46: ...kseite des Ger ts ber ein HDMI Kabel nicht enthalten mit dem Anschluss HDMI OUT Ihres Digitalger ts 2 Verbinden Sie den Anschluss HDMIOUT TV ARC auf der R ckseite des Ger ts ber ein HDMI Kabel nicht e...

Page 47: ...W hlen Sie AV SamsungSoundbarMSxxx aus der Liste aus Wenn eine Soundbar mit dem Bluetooth Ger t verbunden ist wird Bluetooth Ger tename BT in der vorderen Anzeige angezeigt 4 Geben Sie Musikdateien a...

Page 48: ...r Soundbar mit einem Mobilger t ber ein Drahtlosnetzwerk Wi Fi wird die SamsungMultiroom App ben tigt Mobilger t DieersteVerbindung 1 Dr cken Sie die Taste Quelle auf der rechten Seite der Soundbar od...

Page 49: ...einrichten X X Ber hren Sie um zur Liste aller Lautsprecher zu gelangen Y Y Ber hren Sie auf der rechten Seite des Modellnamens der Soundbar Z Z Ber hren Sie SurroundSetup Nachdem Sie den Lautspreche...

Page 50: ...verwenden Sie die Oben Unten Tasten zum Einstellen der Lautst rke im Bereich von 6 bis 6 Die REARSPEAKER Funktion kann unter Verwendung der Oben Unten Taste auf ON OFF gestellt werden Audio Sync wird...

Page 51: ...s um die n chste Musikdatei auszuw hlen Dr cken Sie die Taste Links um die vorherige Musikdatei auszuw hlen Anynet AutoPowerLink Sie k nnen Anynet und Auto Power Link ein oder ausschalten Anynet und A...

Page 52: ...esFernsehersaufexterne Lautsprechereinzustellen WeitereInformationenfindenSieimBenutzerhandbuchdes Fernsehers Nach der Installation der Soundbar k nnen Sie die Lautst rke der Soundbar mit der IR Fernb...

Page 53: ...ndmontage entsprechend der Art und der Dicke der Wand an der Sie die Soundbar montieren wollen Durchmesser M5 L nge 35 mm oder l nger empfohlen Schlie en Sie die Kabel vom Ger t an externe Ger te an b...

Page 54: ...rer an jeder Markierung ein Loch in die Wand Wenn die Markierungen nicht den Positionen der Halterungsbolzen entsprechen achten Sie darauf geeignete D bel oder Molly D bel in die L cher einzuf hren be...

Page 55: ...halterung nach unten sodass die Wandhalterung sicher auf den Aufh ngungsschraube ruhen ZusammenbaudesKabelhalters Verwenden Sie wie in der Abbildung gezeigt die mitgelieferten Schraube um den Kabelhal...

Page 56: ...des St nders WIRELESS AUX IN DIGITAL AUDIO IN OPTICAL POWER IN POWER OUT For TV HDMI IN HDMI OUT TV ARC Wi Fi SETUP SPK ADD PlatzierenderSoundbar 09 Softwareaktualisierung Wenn die Soundbar mit dem I...

Page 57: ...an das Soundbar Hauptger t heran DerFernseherkannnichtverbundenwerden BeiVerbindungmiteinemkabelgebundenen Netzwerk berpr fen Sie ob das Kabel richtig angeschlossen ist berpr fen Sie den Portnamen um...

Page 58: ...atents see http patents dts com Manufactured under license from DTS Licensing Limited DTS the Symbol DTS in combination with the Symbol and DTS Digital Surround are registered trademarks or trademarks...

Page 59: ...Technischedaten ALLGEMEIN Gewicht 6 2 kg Abmessungen B H T 1060 0 x 78 0 x 130 5 mm Betriebstemperatur 5 C bis 35 C Zul ssigeLuftfeuchtigkeit 10 75 HDMI Video 1080p 1080i 720p 576p 480p 2160p 24 25 3...

Page 60: ...gsmethode Halten Sie dieSPKADDTaste am Ger t 30 Sekunden lang gedr ckt um Bluetooth ein oderauszuschalten Samsung Electronics erkl rt hiermit dass dieses Ger t der Richtlinie 2014 53 EU entspricht Der...

Page 61: ...dazugeh rigen Dokumentation gibt an dass das Produkt und Zubeh rteile z B Ladeger t Kopfh rer USB Kabel nach ihrer Lebensdauer nicht zusammen mit dem normalen Haushaltsm ll entsorgt werden d rfen Ents...

Page 62: ...indiqu e par le symbole est une tension CC Mise en garde Consulter le mode d emploi ce symbole avertit l utilisateur qu il doit consulter le manuel d utilisation pour en savoir plus sur les informatio...

Page 63: ...n est pas pr vu pour un usage industriel Ce produit ne peut tre utilis qu des fins personnelles Une condensation peut se former si le produit ou un disque a t stock basse temp rature Si vous devez tr...

Page 64: ...Connexion votreT l viseur 5 M thode 1 Connexion avec un c ble 5 Connexion l aide d un c ble optique 5 Connexion d un t l viseur l aide d un c ble HDMI 6 M thode 2 Connexion sans fil 7 Connexion un t l...

Page 65: ...l viseur 18 08 InstallationduSupportMural 19 Pr cautions d installation 19 Composants de fixation au mur 19 Montage du porte c ble 21 Installation du pied de support 22 09 Mise jourduLogiciel 22 10 D...

Page 66: ...9 Reportez vous la page 21 pour les instructions sur l utilisation du Porte c ble Pour l achat de composants suppl mentaires ou de c bles optionnels contactez un Centre de service Samsung ou le Servic...

Page 67: ...UX HDMI WIFI BT Pour activer le mode BTPAIRING changez la source sur le mode BT puis appuyez et maintenez enfonc e la touche Source pendant plus de 5 secondes POWEROUT ForTV Connect the power cord of...

Page 68: ...alimentation lectrique Connectez le c ble d alimentation fourni la prise jack POWERIN HDMI IN HDMI OUT TV ARC WIRELESS AUX IN DIGITAL AUDIO IN OPTICAL POWER IN POWER OUT For TV POWER IN POWER OUT For...

Page 69: ...sortie num rique est PCM sur votre t l viseur il est recommand de modifier le r glage sur Dolby Digital Une fois le r glage modifi vous pouvez profiter d une meilleure qualit sonore Le menu peut vari...

Page 70: ...branchersurleportHDMIOUT TV ARC del unit principaleSoundbar C t droitdela Soundbar TV ARC 1 Avec la Soundbar et le t l viseur allum s connectez le c ble HDMI non fourni tel qu illustr 2 TVARC appara t...

Page 71: ...ter la Soundbar s lectionnez le message et tablissez la connexion Lorsque le t l viseur est connect Nomdut l viseur BT appara t sur l affichage avant de la Soundbar 5 Vous pouvez maintenant entendre l...

Page 72: ...de l unit principale Soundbar par ex des micro ondes des appareils LAN sans fil etc D connexiondelaSoundbar partirdut l viseur Appuyez sur la touche Source sur le panneau c t droit ou la t l commande...

Page 73: ...uquel le t l viseur est connect 3 Installez et lancez l application SamsungMultiroom sur votre appareil mobile smartphone tablette etc iOS Android Application Samsung Multiroom 4 Suivez les instructio...

Page 74: ...Samsung Ajouter nv p riph Activ Multiroom Link Param tres Soundbar Surround Casque Bluetooth Liste Casque Bluetooth Param treshaut parleur OK MultiroomLink OK Niveauduvolume Testhaut parleurs Soundba...

Page 75: ...D Bo tierd codeur Consoledejeu C t droitdelaSoundbar OU C bleoptique X X Raccordez DIGITALAUDIOIN OPTICAL de l unit principale la prise OPTICAL OUT de l appareil source l aide d un c ble optique num r...

Page 76: ...ble HDMI non fourni de la prise HDMIIN au dos du produit la prise HDMI OUT de votre appareil num rique 2 Raccordez un c ble HDMI non fourni de la prise HDMIOUT TV ARC au dos du produit la prise HDMI I...

Page 77: ...G 3 S lectionnez AV SamsungSoundbarMSxxx dans la liste Lorsqu une Soundbar est connect e l appareil Bluetooth Nomdel appareilBluetooth BT appara t sur l affichage avant 4 Lisez des fichiers musicaux p...

Page 78: ...l mobile via un r seau sans fil Wi Fi l application SamsungMultiroom est n cessaire Appareilmobile Connexioninitiale 1 Appuyez sur la touche Source droite de la Soundbar ou sur la t l commande pour s...

Page 79: ...en utilisant un appareil audio et une Soundbar X X Touchez pour vous rendre sur la liste de toutes les enceintes Y Y Touchez droite du nom de mod le de la Soundbar Z Z Touchez SurroundSetup S lectionn...

Page 80: ...s la plage de 6 6 La fonction REARSPEAKER peut tre ON OFF en utilisant les touches Haut Bas La synchronisation audio n est prise en charge que par certaines fonctions Surround Surround VOL BASS SOUND...

Page 81: ...vant Appuyez sur la touche Gauche pour s lectionner le fichier musical pr c dent Anynet AutoPowerLink Vous pouvez activer ou d sactiver Anynet et le Auto Power Link Les fonctions Anynet et de Auto Pow...

Page 82: ...ons reportez vousaumanueld utilisateurdut l viseur Apr s avoir install la Soundbar vous pouvez r gler le volume de la Soundbar l aide de la t l commande IR fournie avec le t l viseur Samsung Si vous n...

Page 83: ...les poteaux Achetez les vis de support mural selon le type et l paisseur du mur sur lequel vous souhaitez monter la Soundbar Diam tre M5 Longueur 35 mm ou plus recommand s Connectez les c bles depuis...

Page 84: ...iveau de chaque marque Si les marques ne correspondent pas aux positions des poteaux muraux veillez ins rerles ancrages ou les chevilles Molly appropri es dans les trous avant d ins rer lesvis portant...

Page 85: ...aites glisser les Supportde fixationmurale vers le bas afin que les Supportdefixationmurale reposent de mani re s re sur les Visdefixation Montageduporte c ble Comme illustr sur l image utilisez la Vi...

Page 86: ...ar sur les pieds du socle WIRELESS AUX IN DIGITAL AUDIO IN OPTICAL POWER IN POWER OUT For TV HDMI IN HDMI OUT TV ARC Wi Fi SETUP SPK ADD Mettezla Soundbarenplace 09 Mise jourdu Logiciel Lorsque la Sou...

Page 87: ...ommande de l unit principale Soundbar Connexionaut l viseurimpossible Encasdeconnexionviaunr seauc bl V rifiez que le c ble est connect correctement V rifiez le nom de port pour vous assurer que le c...

Page 88: ...atories For DTS patents see http patents dts com Manufactured under license from DTS Licensing Limited DTS the Symbol DTS in combination with the Symbol and DTS Digital Surround are registered tradema...

Page 89: ...Sp cifications et Guide Sp cifications G N RAL Poids 6 2 kg Dimensions LxHxP 1060 0 x 78 0 x 130 5 mm Plagedetemp raturesen fonctionnement de 5 35 C Plaged humidit enfonctionnement de 10 75 HDMI Vid...

Page 90: ...port Appuyez sur le bouton SPKADD sur le produit pendant 30 secondes pour activer d sactiver le Bluetooth Samsung Electronics d clare par la pr sente que cet quipement est conforme la directive 2014 5...

Page 91: ...uit ses accessoires ou sa documentation indique que ni le produit ni ses accessoires lectroniques usag s chargeur casque audio c ble USB etc ne peuvent tre jet s avec les autres d chets m nagers La mi...

Page 92: ...indica che la tensione contrassegnata con questo simbolo di tipo CC Attenzione consultare le Istruzioni per l uso Questo simbolo indica all utente la necessit di consultare il manuale dell utente per...

Page 93: ...rente Il prodotto non destinato all uso industriale Questo prodotto destinato esclusivamente all uso personale Se il prodotto o il disco vengono conservati a basse temperature potrebbe formarsi della...

Page 94: ...egamentoallaTV 5 Metodo 1 Collegamento mediante un cavo 5 Collegamento tramite un cavo ottico 5 Collegamento di una TV tramite un cavo HDMI 6 Metodo 2 Connessione wireless 7 Connessione di una TV medi...

Page 95: ...llazionedelsupportoaparete 19 Precauzioni per l installazione 19 Componenti per il montaggio a parete 19 Assemblaggio del supporto cavi 21 Montaggio del supporto con piedini 22 09 Aggiornamentodelsoft...

Page 96: ...ultare pagina 21 per istruzioni su come utilizzare il Supportocavi Per acquistare componenti aggiuntivi o cavi opzionali contattare un Centro servizi Samsung o l Assistenza clienti Samsung Inserimento...

Page 97: ...i ingresso della sorgente D IN AUX HDMI WIFI BT Per attivare il modo BTPAIRING cambiare la sorgente passando al modo BT quindi tenere premuto il tasto Sorgente per almeno 5 secondi POWEROUT ForTV Coll...

Page 98: ...reteelettrica Collegare il cavo di alimentazione fornito nella porta POWERIN HDMI IN HDMI OUT TV ARC WIRELESS AUX IN DIGITAL AUDIO IN OPTICAL POWER IN POWER OUT For TV POWER IN POWER OUT For TV Fondo...

Page 99: ...gitale impostato su PCM si raccomanda di modificare l impostazione passando a Dolby Digital Una volta modificata l impostazione possibile godere di una qualit audio pi elevata Il menu potrebbe variare...

Page 100: ...it principaledellaSoundbar Latodestrodella Soundbar TV ARC 1 Con la Soundbar e la TV accese collegare il cavo HDMI non fornito in dotazione come illustrato nella figura 2 TVARC compare nella finestra...

Page 101: ...ispositivi Bluetooth della TV Per connettersi alla Soundbar selezionare il messaggio e stabilire una connessione Una volta connessa la TV viene visualizzato il messaggio NomeTV BT sul display frontale...

Page 102: ...ettromagnetiche come ad esempio forni a microonde LAN wireless e cos via devono essere tenuti lontano dall unit principale della Soundbar DisconnessionedellaSoundbardallaTV Premere il tasto Sorgente s...

Page 103: ...Wi Fi a cui collegata la TV 3 Installare ed eseguire la App SamsungMultiroom sul dispositivo mobile smartphone tablet ecc iOS Android App Samsung Multiroom 4 Seguire le istruzioni riportate sulla sche...

Page 104: ...SoundbarMSxxx Soundbar Surround c AV SamsungSoundbarMSxxx Nonutilizzare ModificaN 1 3 2 Uscita audio TV Multiroom Link Altoparlante TV Tipo di installazioneTV Piedistallo TV SoundConnect Elenco dispos...

Page 105: ...bar LettoreBD DVD Decoder Consolepervideogiochi LatodestrodellaSoundbar Cavoottico X X Collegare il DIGITALAUDIOIN OPTICAL ell unit principale alla presa jack OPTICAL OUT del dispositivo sorgente util...

Page 106: ...tazione dalla presa jack HDMIIN situata sul retro del prodotto alla presa jack HDMI OUT del dispositivo digitale 2 Collegare un cavo HDMI non fornito in dotazione dalla presa jack HDMIOUT TV ARC situa...

Page 107: ...are BTPAIRING 3 Selezionare AV SamsungSoundbarMSxxx all elenco visualizzato Quando una Soundbar connessa al dispositivo Bluetooth nel display frontale viene visualizzato il messaggio NomedispositivoBl...

Page 108: ...positivo mobile tramite una rete wireless Wi Fi necessario utilizzare la App SamsungMultiroom Dispositivomobile Laconnessioneiniziale 1 Premere il tasto Sorgente sul lato destro della Soundbar o sul t...

Page 109: ...e una Soundbar X X Toccare per aprire la lista degli altoparlanti Y Y Toccare sulla destra del nome del modello della Soundbar Z Z Toccare SurroundSetup Selezionare Done dopo aver trascinato l altopar...

Page 110: ...zzando i tasti i Su Gi per regolare il volume in un valore compreso tra 6 e 6 La funzione REARSPEAKER pu essere ON OFF usando i tasti Su Gi Audio Sync supportato soltanto in alcune funzioni Surround S...

Page 111: ...er selezionare il file musicale precedente Anynet AutoPowerLink possibile attivare o disattivare Anynet e Auto Power Link Le funzioni Anynet e Auto Power Link sono controllate rispettivamente dai tast...

Page 112: ...mazioni consultareil manualeutentedellaTV Dopo aver installato la Soundbar possibile regolare il volume della Soundbar utilizzando il telecomando a infrarossi fornito in dotazione con una TV Samsung S...

Page 113: ...arete Acquistare viti per il montaggio a parete a seconda della tipologia e dello spessore del muro su cui si intende montare la Soundbar Diametro M5 Lunghezza si consiglia 35 mm o maggiore Collegare...

Page 114: ...corrispondenza di ciascun segno Se i segni non corrispondono alle posizioni di montanti assicurarsi di inserire ancoraggi o tasselli appropriati nei fori prima di inserire leviti di supporto Se si uti...

Page 115: ...permontaggioaparete verso il basso in modo che le Supportoper montaggioaparete si appoggino saldamente sulle Rondelladifissaggio Assemblaggiodelsupportocavi Come mostrato nell immagine utilizzare la V...

Page 116: ...le gambe del supporto WIRELESS AUX IN DIGITAL AUDIO IN OPTICAL POWER IN POWER OUT For TV HDMI IN HDMI OUT TV ARC Wi Fi SETUP SPK ADD PosizionarelaSoundbar 09 Aggiornamento delsoftware Quando la Soundb...

Page 117: ...mpossibilecollegarsiallaTV Incasodicollegamentotramiteretecablata Verificare che il cavo sia stato collegato correttamente Leggere nuovamente il nome della porta per assicurarsi che il cavo sia colleg...

Page 118: ...D symbol are trademarks of Dolby Laboratories For DTS patents see http patents dts com Manufactured under license from DTS Licensing Limited DTS the Symbol DTS in combination with the Symbol and DTS D...

Page 119: ...un eventuale intervento di manutenzione 14 Specificheeguida Specifiche GENERALE Peso 6 2 kg Dimensioni LxAxP 1060 0 x 78 0 x 130 5 mm Temperaturadiesercizio 5 C e 35 C Umidit diesercizio 10 e 75 HDMI...

Page 120: ...ivazione dellaporta Premere il tasto SPKADD sul prodotto per 30 secondi per acceso spento Bluetooth Samsung Electronics dichiara che questa apparecchiatura conforme alla Direttiva 2014 53 UE Il testo...

Page 121: ...n devono essere smaltiti con altri rifiuti al termine del ciclo di vita Per evitare eventuali danni all ambiente o alla salute causati dallo smaltimento dei rifiuti non corretto si invita l utente a s...

Page 122: ...ort POLAND 801 172 678 lub 4822607 93 33 kosztpo czeniawed ugtaryfy operatora www samsung com pl support HUNGARY 0680SAMSUNG 0680 726 7864 www samsung com hu support Country Contact Centre Web Site AU...

Reviews: