background image

Description

Front Panel

2

3

1

4

5

8

9

6

7

1.  TREBLE level control

2.  Power LED Lighting 

•  The Power LED lights up when the power of the 

unit turned on.

•  The Power LED turns off when the power of the 

unit turned off.

3. POWER button

•  Turns the Multimedia Speaker on and off.

4.  BACKWARD SKIP button

5. PLAY/PAUSE button

6. VOLUME control 

7.  FORWARD SKIP button

8. USB port

•  Connect USB devices such as MP3 players here 

to the play files on the devices.

9.  BASS level control

 · 4 · English  

HW-K20_XP_160812.indd   4

HW-K20_XP_160812.indd   4

2016-08-12     4:55:20

2016-08-12     4:55:20

Summary of Contents for HW-K20

Page 1: ...For further information refer to the Web Manual Web manual www Samsung com Support Product name search HW K20 User Manual HW K20 Design and specifications are subject to change without prior notice ...

Page 2: ...sult instructions for use This symbol instructs the user to consult the user manual for further safety related information WARNING To reduce the risk of fire or electric shock do not expose this appliance to rain or moisture CAUTION TO PREVENT ELECTRIC SHOCK MATCH WIDE BLADE OF PLUG TO WIDE SLOT FULLY INSERT This apparatus shall always be connected to a AC outlet with a protective grounding connec...

Page 3: ...ion Protect the product from moisture and excess heat and equipment creating strong magnetic or electric fields i e speakers Disconnect the power cable from the AC supply if the product malfunctions This product is for personal use only It is not intended for industrial use Maintain an open space of approximately 15 cm on the sides and rear of the system for ventilation purposes Place the loudspea...

Page 4: ...unit turned on The Power LED turns off when the power of the unit turned off 3 POWER button Turns the Multimedia Speaker on and off 4 BACKWARD SKIP button 5 PLAY PAUSE button 6 VOLUME control 7 FORWARD SKIP button 8 USB port Connect USB devices such as MP3 players here to the play files on the devices 9 BASS level control 4 English ...

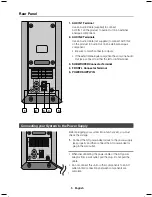
Page 5: ...left or right terminal 3 SUBWOOFER Connector Terminal 4 FRONT L Connector Terminal 5 POWER SUPPLY IN 1 2 3 4 5 Connecting your System to the Power Supply Before plugging your system into a main socket you must check the voltage 1 Connect the AC power adaptor jack to the power supply jack properly and then connect the AC power adaptor plug in the wall outlet When disconnecting the power cable of th...

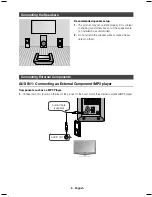
Page 6: ... not installed as recommended 2 Do not stretch the speaker wires or place a heavy object on them Connecting External Components AUX IN 1 Connecting an External Component MP3 player Components such as an MP3 Player 1 Connect AUX IN 1 Audio on the rear of the product to the Audio Out of the external component MP3 player AUDIO OUT Audio Cable supplied 6 English ...

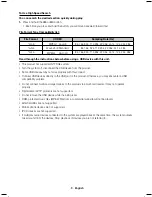
Page 7: ... played automatically 3 Adjust the volume by tuning the VOLUME control on the product To adjust the low tone Adjust the bass level by tuning the BASS level control on the product Set the bass volume to an undistorted level to prevent system damage To adjust the high tone Adjust the treble level by tuning the TREBLE level control on the product If the source device has a bass boost function or equa...

Page 8: ...Adjust the bass level by tuning the BASS level control on the product Set the bass volume to an undistorted level to prevent system damage To adjust the high tone Adjust the treble level by tuning the TREBLE level control on the product To Select a Track from a USB Device You can select the music file during play If you want to move to the previous next track press the buttons briefly To play the ...

Page 9: ...nect the USB device from the product Some USB devices may not work properly with this product Connect USB devices directly to the USB port of the product Otherwise you may encounter a USB compatibility problem Do not connect multiple storage devices to the product via a multi card reader It may not operate properly Digital camera PTP protocols are not supported Do not remove the USB device while i...

Page 10: ...t turn on Is the power cord plugged into the outlet Connect the power plug to the outlet A function does not work when the button is pressed Is there static electricity in the air Disconnect the power plug and connect it again Sound is not produced Is this product connected only TV Is the volume set to minimum Connect it correctly Adjust the volume The sound from the left right channels are revers...

Page 11: ...ange 5 C to 35 C Operating humidity range 10 to 75 AMPLIFIER Rated output power Front Speaker L R 10W x 2 6 OHM THD 15 Subwoofer 20W 3 OHM THD 20 Nominal specification Samsung Electronics Co Ltd reserves the right to change the specifications without notice Weight and dimensions are approximate For more information about the power supply and power consumption refer to the label attached to the pro...

Page 12: ...26 786 www samsung com nz support VIETNAM 1800 588 889 www samsung com vn support THAILAND 0 2689 3232 1800 29 3232 www samsung com th support MYANMAR 95 1 2399 888 MALAYSIA 1800 88 9999 603 77137477 Overseas contact www samsung com my support INDONESIA 021 56997777 08001128888 www samsung com id support PHILIPPINES 1 800 10 726 7864 PLDT Toll Free 1 800 8 726 7864 Globe Landline and Mobile 02 422...

Reviews: