background image

English


23

03

Setup

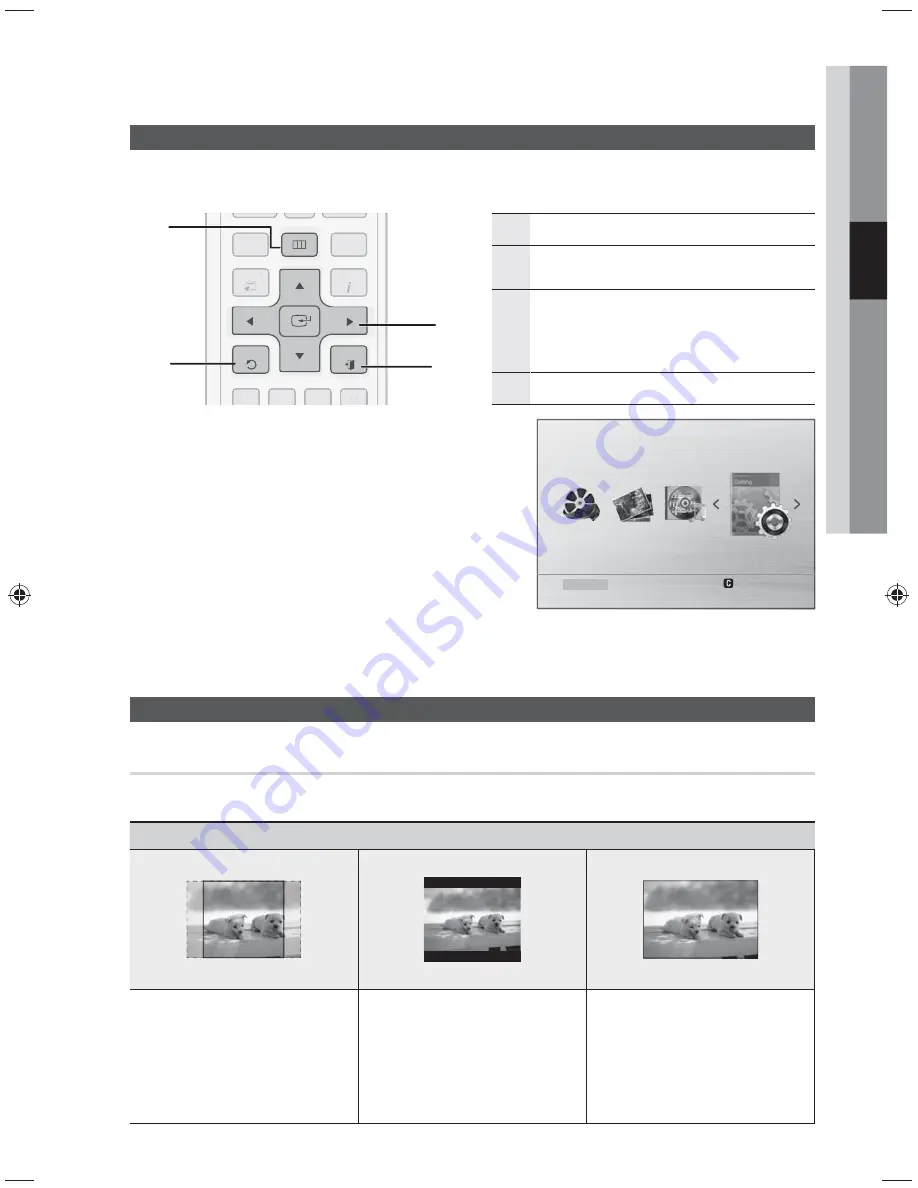
Setting the Setup menu

The access step may differ depending on the selected menu. The GUI (Graphical User Interface) in this 
manual may differ, depending on the firmware version.

1

MENU 

BUTTON : Display the home menu.

2

RETURN

 BUTTON : Return to the previous 

setup menu.

3

ENTER / DIRECTION

 BUTTON

Move the cursor and select an item.
Select the currently selected item.

Confirm the setting.

4

EXIT

 BUTTON : Exit the setup menu.

1. 

Press the 

POWER

 button.

2. 

Press the 

MENU 

button on the remote control.

3. 

Press the 

◄►

 buttons to select 

Settings

, then press the 

ENTER

 button.

4. 

Press the 

▲▼

 buttons to select the desired menu, then 

press the 

ENTER

 button.

5. 

Press the 

▲▼

 buttons to select the desired sub-menu, 

then press the 

ENTER

 button.

6. 

Press the 

▲▼

 buttons to select the desired item, then press the 

ENTER

 button.

7. 

Press the 

EXIT

 button to exit the setup menu.

Display

TV Aspect (USB Playback only)

Depending on the type of television you have, you may want to adjust the screen setting.

• 

4:3 Pan-Scan

• 

4:3 Letter Box

• 

16:9 Wide

Select when you connect the product 
to a 4:3 TV screen. 16:9 content will 
have the extreme left and right portions 
cut off.

Select when you connect the product 
to a 4:3 TV screen. The product will 
display all content in its original aspect 
ratio. Content formatted in 16:9 will be 
displayed with black bars on the top 
and bottom.

Select when you connect the product 
to a 16:9 TV screen. All content will fill 
the full screen. Content formatted in 
4:3 will be stretched.

DISC MENU

MENU

TITLE MENU

RETURN

EXIT

INFO

TOOLS

A

B

C

D

DISC MENU

MENU

TITLE MENU

INFO

TOOLS

A

B

C

D

1

2

3

4

Function    USB      

Settings


Remove USB

Summary of Contents for HW-E6500

Page 1: ...AV Receiver System user manual imagine the possibilities Thank you for purchasing this Samsung product To receive more complete service please register your product at www samsung com register HW E6500 ...

Page 2: ... dripping or splashing and no objects filled with liquids such as vases shall be placed on the apparatus The Mains plug is used as a disconnect device and shall stay readily operable at any time This apparatus shall always be connected to an AC outlet with a protective grounding connection To disconnect the apparatus from the mains the plug must be pulled out from the mains socket therefore the ma...

Page 3: ...he wall outlet Voltage peaks due to lightning could damage the product Do not expose the product to direct sunlight or other heat sources This could lead to overheating and malfunction of the product Protect the product from moisture and excess heat or equipment creating strong magnetic or electric fields i e speakers Disconnect the power cable from the AC supply if the product malfunctions Your p...

Page 4: ...ting a DVD or BD Blu ray Player 19 Connecting the FM Antenna 19 Connecting AUX Components 20 Connecting the USB SETUP 21 21 Before Using the AV Receiver 21 Home Menu 22 Selecting Digital HDMI Analog 23 Setting the Setup menu 23 Display 23 TV Aspect USB Playback only 24 BD Wise Samsung products only 24 Resolution 24 HDMI Format 24 Video Out Signal 25 Audio 25 Simple Setup 25 Speaker Setting 26 DRC ...

Page 5: ... Presetting Radio Stations 32 Convenient Functions 32 Sleep Timer Function 32 Mute Function 32 Adjust the Display 33 Reset Function 34 Software Upgrade MISCELLANEOUS 35 35 Operating your TV with the Remote Control 36 Operating your DVD or BD Player with the Remote Control OTHER INFORMATION 37 37 Troubleshooting 38 Product Protection Function 38 Licence 39 Specifications Figures and illustrations i...

Page 6: ...io signal for both music and movie contents and uses less compression than Dolby Digital for richer sound Anynet HDMI CEC Function Anynet is a function that can be used to operate this AV Receiver with a Samsung TV remote control by connecting the receiver to a SAMSUNG TV using an HDMI Cable This function is available only in connection with Samsung TV and DVD player supporting Anynet HDMI CEC Get...

Page 7: ...input status listening mode etc 7 DSP EQ BUTTON Select the desired DSP EQ audio mode 8 DIMMER BUTTON Adjust the brightness of Display 9 TUNING MODE BUTTON Used to select the Manual or Preset mode for FM radio 10 MEMORY BUTTON Used to set a preset radio frequency 11 TUNING CONTROL Used to change the radio frequency 12 MASTER VOLUME CONTROL Adjusts the volume level 13 USB PORT Connect the USB storag...

Page 8: ...ER LEVEL INDICATOR Displays the speaker level 3 AUDIO INPUT INDICATORS Displays the audio input signal type of the currently connected external audio source 4 MESSAGE DISPLAY Informs you of the status of the receiver 5 RADIO FREQUENCY INDICATORS Displays the current radio frequency range 1 3 5 4 2 ...

Page 9: ...io signal AUX 5 VIDEO OUT JACK Outputs the video signal to a monitors TV Projector etc 6 AUDIO IN JACKS Receives the audio signal from a video player BD DVD TV 7 VIDEO IN JACKS Receives the video signal from a video player BD DVD TV 8 FM ANTENNA JACK Connect the FM antenna 9 HDMI OUT JACKS Outputs digital video and audio signals simultaneously using an HDMI cable 10 HDMI IN JACKS Receives digital ...

Page 10: ...ISC MENU MENU TITLE MENU MUTE REPEAT VOL TUNING CH RETURN EXIT INFO MO ST TUNER MEMORY DIMMER SLEEP DSP EQ V SURROUND 1 2 3 4 5 6 7 8 0 9 P BASS S W LEVEL AUDIO ASSIGN 3D SOUND AVR TV BD DVD TOOLS A B C D 1 3 4 5 6 7 8 9 10 11 12 13 14 22 20 21 2 15 17 19 18 34 35 23 24 25 26 28 27 29 30 31 16 32 33 ...

Page 11: ...ess to use the Tools menu 13 UP DOWN LEFT RIGHT BUTTONS Used to navigate the menus 14 RETURN BUTTON Used to return to the previous menu from the SETUP menu 15 FUNCTION BUTTONS Allow access to common functions of the product 16 SLEEP BUTTON Used to set the Sleep Timer 17 DIMMER BUTTON Adjusts the brightness of the display 18 3D SOUND BUTTON Press to apply 3D Sound effect 19 P BASS BUTTON Select the...

Page 12: ...e precautions to avoid leaking or cracking cells Place batteries in the remote control so they match the polarity to and to Assuming typical AVR usage the batteries last for about one year Use the correct type of batteries Batteries that look similar may differ in voltage Always replace both batteries at the same time Do not expose the batteries to heat or a flame Operation Range of the Remote Con...

Page 13: ...he front face of the front speakers with the front face of the center speaker or place them slightly in front of the center speaker Center Speaker It is best to install it at the same height as the front speakers You can also install it directly over or under the TV Surround Speakers Place these speakers behind your listening position If there isn t enough room place these speakers so they face ea...

Page 14: ...ab 3 Connect the speaker wire plugs to the back of the product by matching the Colors of the speaker plugs to the speaker jacks Model HW E6500 AV Receiver HW E6500 FRONT SPEAKER PS FE6500 CENTER SPEAKER PS CE6500 SURROUND SPEAKER PS SE6500 SUBWOOFER PS WE6500 NOTE Speakers are provided with model HW E6500 only Keep the subwoofer speaker out of reach of children to prevent them from inserting their...

Page 15: ...V must support High bandwidth Digital Content Protection System HDCP This product supports HDCP Compatibility with a TV Supporting HDMI A TV with an HDMI jack Video Audio A TV with a DVI D jack TV supporting HDCP Video A TV with a DVI D jack TV not supporting HDCP NOTE Audio from SACD discs will not be heard with this connection To play a DVD disc whose copyright is protected by CPPM use a player ...

Page 16: ...on your TV See the TV instructions manual for more information You can operate the volume on the AV receiver by using Volume buttons on the TV remote control NOTE If you use an HDMI cable to connect a Samsung TV to your AV Receiver you can operate the AV receiver using the TV s remote control This function is available only in connection with Samsung TV and DVD player supporting Anynet HDMI CEC Pl...

Page 17: ...from the VIDEO OUT jack on the back of your AV Receiver to the Video Input jack on your TV Audio Connection Connect the Digital Input OPTICAL TV on your AV Receiver to the Digital Output of the TV OR Connect AUDIO IN TV on your AV Receiver to the Audio Out of the TV OPTICAL OUT AUDIO OUT VIDEO IN or ...

Page 18: ...IO IN BD DVD on your AV Receiver to the Audio Out of the DVD BD player NOTE Disconnect the power plug from the outlet if you will not use this unit for a long period of time If the cable set top box has only one audio output jack connect it to either the right or left audio input jack of the main unit Connect the audio cable s red plug to the red jack and white cable to the white jack If no button...

Page 19: ...od then fasten it to a wall or other rigid surface NOTE Do not place the antenna cable close to the power cord Keep it as far away as possible If you experience poor FM reception use an external antenna Connecting AUX Components You can connect external devices you use for a short time camcorder game console mobile equipment etc to the front of this unit for convenience FM antenna supplied AUDIO O...

Page 20: ...and video file should have their names in English or Korean Otherwise the file may not played 6 Connect directly to the product s USB port Connecting through another cable may raise problems with USB compatibility 7 Inserting more than one memory device to a multi card reader may not operate properly 8 PTP protocol for digital camera is not supported 9 Do not disconnect USB device during a Reading...

Page 21: ...ou can operate your AMP this AV receiver TV and BD Samsung only DVD player with this remote control See pages 35 36 for more details To Select a Function Press the INPUT SELECT button on the remote control Each time you press this button USB FM DVD AUX TV will be selected in turn Home Menu Press the MENU button to return to USB FUNCTION from any other functions Then you will see the Home Menu scre...

Page 22: ...D DVD function For AUX function For TV function OGGGGGP For USB function NOTE You can also change the input mode by turning the AUDIO ASSIGN button on the front of your AV Receiver You can enjoy Dolby Digital or DTS if you connect the digital audio output jack of an external audio component to the optical or coaxial digital audio input jack on the main unit For the TV function the TV ARC menu will...

Page 23: ... the ENTER button 6 Press the buttons to select the desired item then press the ENTER button 7 Press the EXIT button to exit the setup menu Display TV Aspect USB Playback only Depending on the type of television you have you may want to adjust the screen setting 4 3 Pan Scan 4 3 Letter Box 16 9 Wide Select when you connect the product to a 4 3 TV screen 16 9 content will have the extreme left and ...

Page 24: ...ou want to change the resolution in BD Wise mode you must set BD mode to Off in advance BD Wise will be disabled if the product is connected to a device that does not support BD Wise Resolution Sets the output resolution of the HDMI video signal The number in 576p 480p 720p 1080i and 1080p indicates the number of lines of video The i and p indicate interlace and progressive scan respectively 576p ...

Page 25: ...Select this when using the speakers None Select this when no speaker is connected NOTE The speaker mode may vary depending on the Dolby Pro Logic and Stereo settings Sound Edit You can adjust the balance and level for each speaker Press the buttons to select and adjust the desired speaker Press the buttons to adjust the settings Adjusting Front Surround Bal You can select between 0 and 6 The volum...

Page 26: ...ion to enjoy Dolby Digital sound when watching movies at low volume at night You can select either Full 6 8 4 8 2 8 off Audio Sync Video and audio sync may not match with digital TV If this occurs adjust the audio delay time to match the video You can set the audio delay time between 0 ms and 300 ms Set it to the optimal status Speaker Selection The audio signals transmitted over the HDMI Cable ca...

Page 27: ...signal for more than 25 minutes the product will automatically turn off System DivX R Registration View DivX R VOD Registration Code to purchase and play DivX R VOD content NOTE This option is not activated if you select OK To activate this option please activate the DivX R Deactivation Even after you reset the system the settings of DivX Registration will not be reset DivX R Deactivation Select t...

Page 28: ...te control NOTE The menu may vary depending on the region The DSP EQ function is only available in Stereo mode The DSP EQ function is not available while playing AC3 signal in 2 1 channel mode Dolby Pro Logic II Mode Press the PL II button Each time you press this button STEREO MUSIC MOVIE PROLOGIC MATRIX will be selected in turn NOTE You cannot use Dolby Pro Logic ll mode for Analog multi channel...

Page 29: ...nge 2 channel Audio Source to 4 1 channel Sound and there is output Each time you press the V SURROUND button on the remote control Virtual Surround on Virtual Surround off Virtual Surround on change 2 channel audio to 4 1 channel and there is Sound output by 4 1 channel Center speaker is no sound output Virtual Surround off Output of 2 channel Audio is Sound output by 2 channel Original Sound Aud...

Page 30: ...g the slideshow mode Rotate Function Press the GREEN B or YELLOW C button during the PAUSE mode GREEN B Button Rotate 90 counterclockwise YELLOW C Button Rotate 90 clockwise NOTE The maximum resolutions supported by this product are 5120 x 3480 or 19 0 MPixel for standard JPEG files and 2048 x 1536 or 3 0 MPixel for progressive image files Repeat Playback USB PLAYBACK DivX Repeat You can repeat th...

Page 31: ...step by step To Listen in Mono Stereo Press the MO ST button on the remote control Each time you press this button STEREO or MONO will be selected in turn If you select MONO in an area with weak reception it will help to reduce noise This function works only with the remote control Presetting Radio Stations You can preset up to 15 FM stations E g Setting station FM 89 10 in preset 2 1 Press the IN...

Page 32: ...MUTE appears on the display To output sound again Press the MUTE button again or press the Volume button MUTE will disappear and sound will output Adjust the Display You can adjust the brightness of the display Press the DIMMER button Each time you press this button the brightness changes as follows Dark Light on Bright Light off Dark Light off Bright Light on NOTE SLEEP Mute can only be operated ...

Page 33: ...ton to reset the system INIT appears on the display The unit will turn off after 5 seconds NOTE Using the RESET function will erase all stored settings Do not use this unless necessary The product will automatically turn off from no USB and Stop mode for more than 25 minutes Function USB Settings No USB ...

Page 34: ...leting the firmware upgrade 5 Remove the USB drive from the front USB port 6 Turn the power on switch to USB mode and wait until No USB appears on the front display 7 Press the STOP button for 5 seconds on the remote control or the front panel while in No USB is displayed 8 The set automatically powers off and initialization is finished NOTE Please be careful not to disconnect the power or remove ...

Page 35: ...6 59 67 86 JVC 70 KTV 59 61 87 88 KEC 03 15 40 KMC 15 LG Goldstar 01 15 16 17 37 38 39 40 41 42 43 44 Luxman 18 LXI Sears 19 54 56 59 60 62 63 65 71 Magnavox 15 17 18 48 54 59 60 62 72 89 Marantz 40 54 Matsui 54 MGA 18 40 Mitsubishi MGA 18 40 59 60 75 MTC 18 NEC 18 19 20 40 59 60 Nikei 03 Onking 03 Onwa 03 Panasonic 06 07 08 09 54 66 67 73 74 Penney 18 Philco 03 15 17 18 48 54 59 62 69 90 Philips ...

Page 36: ... use DVD BD POWER PLAY PAUSE STOP SKIP MENU and Numeric buttons 0 9 NOTE The remote control may not work on some brands of DVD Also some operations may not be possible depending on your brand of DVD The remote control will work with Samsung DVD BD by default DVD Brand Code List Brand Code Number Brand Code Number Brand Code Number DENON 003 032 ONKYO 004 014 TOSHIBA 004 018 DOONOON 019 OPTIMUS 011...

Page 37: ...ries drained Is the distance between remote control and main unit too great Replace with new batteries Operate at close distance The sound from the left right channels is reversed Are the left right speaker or left right input output cables connected properly Check the left right channel and connect it them correctly Can t receive radio broadcasts Is FM antenna connected properly Connect the anten...

Page 38: ...e tools to convert your files into DivX video ABOUT DIVX VIDEO ON DEMAND This DivX Certified device must be registered in order to play purchased DivX Video on Demand VOD movies To obtain your registration code locate the DivX VOD section in your device setup menu Go to vod divx com for more information on how to complete your registration DivX Certified to play DivX video including premium conten...

Page 39: ... 150W CH Double subwoofer 4 Ω 150W CH Input sensitivity impedance 550mV 47kΩ S N ratio analog input 65dB Separation 1kHz 55dB FREQUENCY RESPONSE Analog input 20Hz 20kHz 3dB Digital input 96kHz PCM 20Hz 44kHz 3dB HDMI Input Compatible 1080p Output Compatible 1080p VIDEO OUTPUT TV format NTSC PAL Input level impedance 1Vp p 75 Ω Output level impedance 1Vp p 75 Ω Video frequency response 5Hz to 10kHz...

Page 40: ...Area Contact Center Web Site Serbia 0700 Samsung 0700 726 7864 www samsung com Slovakia 0800 SAMSUNG 726 7864 www samsung com Spain 902 1 SAMSUNG 902 172 678 www samsung com Sweden 0771 726 7864 SAMSUNG www samsung com Switzerland 0848 SAMSUNG 7267864 CHF 0 08 min www samsung com ch www samsung com ch_fr French U K 0330 SAMSUNG 7267864 www samsung com Eire 0818 717100 www samsung com Lithuania 8 8...

Page 41: ...Code No AH68 02625H ...

Page 42: ...do receptor de AV manual do usuário Imagine as possibilidades Obrigado por adquirir este produto Samsung Para receber um atendimento mais completo registre seu produto no site www samsung com register HW E6500 ...

Page 43: ... deve ser exposto a goteiras ou respingos e não deve servir de base para recipientes com líquido como vasos O plugue da fonte de alimentação é usado como um dispositivo de desconexão e deve estar prontamente acessível a qualquer momento Este aparelho deve estar sempre conectado a uma tomada CA com uma conexão terra de proteção Para desconectar o aparelho da fonte de alimentação principal o plugue ...

Page 44: ...arede Os picos de energia decorrentes de relâmpagos poderiam danificar o produto Não exponha o produto à luz direta do sol ou outras fontes de calor Isso poderia levar ao superaquecimento e a problemas de funcionamento do produto Proteja o produto contra umidade e excesso de calor ou equipamento que crie campos elétricos ou magnéticos fortes ou seja alto falantes Desconecte o cabo de alimentação d...

Page 45: ...e DVD ou BD Blu ray 19 Conectando a antena FM 19 Conectando componentes AUX 20 Conectando o USB CONFIGURAÇÃO 21 21 Antes de usar o receptor de AV 21 Menu inicial 22 Selecionando Digital HDMI Analógico 23 Menu de configuração 23 Visor 23 Aspecto da TV Apenas reprodução USB 24 BD Wise Produtos Samsung apenas 24 Resolução 24 Formato HDMI 24 Saída de Vídeo 25 Áudio 25 Config Simples 25 Configuração do...

Page 46: ...amando estações de rádio 32 Funções convenientes 32 Função de temporizador para dormir 32 Função Mudo 32 Ajuste do visor 33 Função Redefinir 34 Atualização do software OUTROS 35 35 Operando a TV com o controle remoto 36 Operando o leitor de DVD ou BD com o controle remoto OUTRAS INFORMAÇÕES 37 37 Solução de problemas 38 Função de proteção do produto 38 Licença 39 Especificações As figuras e ilustr...

Page 47: ...de áudio digital discreto de 5 1 canais para conteúdo de música e filme e usa menos compressão em relação ao Dolby Digital para um som mais rico Função Anynet HDMI CEC Anynet é uma função que pode ser usada para operar este receptor de AV com um controle remoto de TV Samsung conectando o receptor a uma TV SAMSUNG usando um cabo HDMI Esta função fica disponível apenas em conjunto com a TV Samsung e...

Page 48: ...ão etc 7 BOTÃO DSP EQ Selecione o modo de áudio DSP EQ desejado 8 BOTÃO DE INTENS LUZ Ajusta o brilho do Visor 9 BOTÃO DO MODO DE SINTONIA Usado para selecionar o modo Manual ou Programado para rádio FM 10 BOTÃO DE MEMÓRIA Usado para configurar uma frequência de rádio programada 11 CONTROLE DEAJUSTE Usado para alterar a frequência de rádio 12 CONTROLE DE VOLUME PRINCIPAL Ajusta o nível de volume 1...

Page 49: ...R DO NÍVEL DO ALTO FALANTE Exibe o nível do alto falante 3 INDICADORES DE ENTRADA DE ÁUDIO Exibe o tipo de sinal de entrada de áudio da fonte de áudio externa atualmente conectada 4 VISOR DE MENSAGENS Informa o status do receptor 5 INDICADORES DE FREQUÊNCIA DE RÁDIO Exibe a atual faixa de frequência de rádio 1 3 5 4 2 ...

Page 50: ...l digital AUX 5 CONECTOR DE SAÍDA DE VÍDEO Transmite o sinal de vídeo para um monitor TV projetor etc 6 CONECTORES DE ENTRADA DE ÁUDIO Recebe o sinal de áudio de um leitor de vídeo BD DVD TV 7 CONECTORES DE ENTRADA DE VÍDEO Recebe o sinal de vídeo de um leitor de vídeo BD DVD TV 8 CONECTOR DE ANTENA FM Conecte a antena FM 9 CONECTORES DE SAÍDA HDMI Transmite sinais de áudio e vídeo digitais simult...

Page 51: ... DISC MENU MENU TITLE MENU MUTE REPEAT VOL TUNING CH RETURN EXIT INFO MO ST TUNER MEMORY DIMMER SLEEP DSP EQ V SURROUND 1 2 3 4 5 6 7 8 0 9 P BASS S W LEVEL AUDIO ASSIGN 3D SOUND AVR TV BD DVD TOOLS A B C D 1 3 4 5 6 7 8 9 10 11 12 13 14 22 20 21 2 15 17 19 18 34 35 23 24 25 26 28 27 29 30 31 16 32 33 ...

Page 52: ...ra usar o menu Ferramentas 13 BOTÕES PARA CIMA PARA BAIXO PARA A ESQUERDA PARA A DIREITA Usado para navegar pelos menus 14 BOTÃO RETORNAR Usado para retornar ao menu anterior do menu de CONFIGURAÇÃO 15 BOTÕES DE FUNÇÃO Concede acesso a funções comuns do produto 16 BOTÃO DORMIR Usado para configurar o Temporizador para dormir 17 BOTÃO DE INTENS LUZ Ajusta o brilho do visor 18 BOTÃO DE SOM 3D Pressi...

Page 53: ...talando as pilhas no controle remoto Siga estas precauções para evitar vazamento ou rachaduras nas células Coloque as pilhas no controle remoto correspondendo as polaridades com e com Pressupondo um uso normal da AVR as pilhas duram aproximadamente um ano Use o tipo correto de pilhas As pilhas que parecem semelhantes podem ter voltagens diferentes Sempre troque as pilhas ao mesmo tempo Não exponha...

Page 54: ... face frontal dos alto falantes frontais com a face frontal do alto falante central ou posicione os ligeiramente na frente dos alto falantes centrais Alto falante central É melhor instalá lo na mesma altura dos alto falantes frontais Você também pode instalá lo diretamente acima ou abaixo da TV Alto falantes traseiros Coloque esses alto falantes por trás da posição de audição Se não houver espaço ...

Page 55: ...falante atrás do produto combinando as Cores dos plugues do alto falante com os conectores do alto falante Modelo HW E6500 Receptor de AV HW E6500 ALTO FALANTE FRONTAL PS FE6500 ALTO FALANTE CENTRAL PS CE6500 COLUNAS SURROUND PS SE6500 SUBWOOFER PS WE6500 NOTA Os alto falantes são fornecidos apenas com o modelo HW E6500 Mantenha o alto falante do subwoofer fora do alcance de crianças para evitar q...

Page 56: ...anto a TV devem suportar o sistema HDCP Proteção de conteúdo digital de largura de banda alta Este produto suporta HDCP Compatibilidade com uma TV que suporta HDMI Uma TV com um conector HDMI Vídeo Áudio Uma TV com um conector DVI D TV que suporta HDCP Vídeo Uma TV com um conector DVI D TV que não suporta HDCP NOTA O áudio de discos SACD não será ouvido com esta conexão Para reproduzir um disco DV...

Page 57: ... manual de instruções da TV para obter mais informações Você pode operar o volume do receptor de AV usando os botões de volume no controle remoto da TV NOTA Se você usar um cabo HDMI para conectar uma TV Samsung ao receptor de AV poderá operar o receptor de AV usando o controle remoto da TV Esta função fica disponível apenas em conjunto com a TV Samsung e o leitor de DVD com suporte para Anynet HD...

Page 58: ...nector de SAÍDA DE VÍDEO atrás do receptor de AV no conector de entrada de vídeo em sua TV Conexão de áudio Conecte a entrada digital TV ÓTICA no receptor de AV à saída digital da TV OU Conecte a entrada de áudio AUDIO IN TV no receptor de AV à saída de áudio da TV OPTICAL OUT AUDIO OUT VIDEO IN OU ...

Page 59: ...a de áudio do leitor de DVD BD NOTA Desconecte o cabo de alimentação da parede se não pretende usar esta unidade por um longo período de tempo Se o cabo decodificador set top box tiver apenas um conector de saída de áudio conecte o ao conector de entrada de áudio direito ou esquerdo da unidade principal Conecte o plugue vermelho do cabo de áudio ao conector vermelho e o cabo branco ao conector bra...

Page 60: ...u outra superfície rígida NOTA Não coloque o cabo da antena perto do cabo de alimentação Mantenha o o mais longe possível Se você perceber uma recepção de FM ruim use uma antena externa Conectando componentes AUX É possível conectar os dispositivos externos que você usa por um curto período câmera de vídeo console de jogos equipamento móvel etc à parte frontal desta unidade por conveniência Antena...

Page 61: ...WMA e vídeo devem ter seus nomes em coreano ou inglês Do contrário o arquivo pode não ser reproduzido 6 Conecte diretamente à porta USB do produto Conectar com outro cabo pode ocasionar problemas de compatibilidade com USB 7 A inserção de mais de um dispositivo de memória em um leitor de múltiplos cartões pode não funcionar corretamente 8 Não há suporte para protocolos PTP para câmeras digitais 9 ...

Page 62: ...o Você pode operar o seu AMP este receptor de AV TV e BD Samsung apenas leitor de DVD com este controle remoto Consulte as páginas 35 a 36 para obter mais detalhes Para selecionar uma função Pressione o botão de INPUT SELECT do controle remoto Sempre que você pressionar esse botão USB FM DVD AUX TV será selecionado também Menu inicial Pressione o botão MENU para voltar à USB FUNCTION de qualquer o...

Page 63: ...inte maneira Para função BD DVD Para função AUX Para função TV Para função USB NOTA Também é possível mudar o modo de entrada girando o botão de AUDIO ASSIGN na frente do receptor de AV Você pode usufruir do Dolby Digital ou DTS se encaixar o conector de saída de áudio digital de um componente de áudio externo ao conector de entrada de áudio digital coaxial ou óptico na unidade principal Para a fu...

Page 64: ...guida pressione o botão ENTER 6 Pressione os botões para selecionar o item desejado e em seguida pressione o botão ENTER 7 Pressione o botão EXIT para sair do menu de configuração Visor Aspecto da TV Apenas reprodução USB Dependendo do tipo de televisão você talvez queira ajustar a configuração da tela 4 3 convertido 4 3 normal 16 9 panorâm selecione quando conectar o produto a uma tela de TV 4 3 ...

Page 65: ...ar a resolução no modo BD Wise será preciso definir o modo BD como Desl antes BD Wise será desativado se o produto for conectado a um dispositivo que não ofereça suporte a BD Wise Resolução Define a resolução de saída do sinal de vídeo HDMI O número em 576p 480p 720p 1080i e 1080p indica o número de linhas do vídeo O i e p indicam a procura intercalada e progressiva respectivamente 576p 480p Envia...

Page 66: ...urround pode alternar entre o modo Pequenas ou Nenhumas Pequ Selecione ao usar os alto falantes Nenh Selecione quando nenhum alto falante estiver conectado NOTA O modo do alto falante pode variar dependendo das configurações de Dolby Pro Logic e Estéreo BAL Diant Você pode ajustar o equilíbrio e o nível para cada alto falante Pressione os botões para selecionar e ajustar o alto falante desejado Pr...

Page 67: ...pode usar essa função para apreciar sons Dolby Digital ao assistir filmes em volume baixo à noite Pode Selecionar Completo 6 8 4 8 2 8 desligado Sincronização de áudio A sincronização de áudio e vídeo pode não corresponder com a TV digital Se isso acontecer ajuste o tempo de atraso do áudio para que corresponda ao vídeo Você pode configurar o tempo de atraso do áudio entre 0 ms e 300 ms Configure ...

Page 68: ...ível se o televisor for compatível com ARC Se não for enviado qualquer sinal de ARC durante mais de 25 minutos a alimentação desliga se automaticamente Sistema Registo de DivX R Visualize o código de registro do DivX R VOD para comprar e reproduzir o conteúdo do DivX R VOD NOTA Esta opção não é activada se Selecionar OK Para activar esta opção active opção DivX R Deactivation Desactivação DivX R M...

Page 69: ...tão DSP EQ no controle remoto NOTA O menu pode variar conforme a região A função DSP EQ está disponível apenas em modo Estéreo A função DSP EQ não está disponível ao reproduzir um sinal AC3 no modo de 2 1 canais Modo Dolby Pro Logic II Pressione o botão de PL II Sempre que pressionar este botão STEREO MUSIC MOVIE PROLOGIC MATRIX será selecionado também NOTA Não é possível usar o modo Dolby Pro Log...

Page 70: ... o som será reproduzido Sempre que premir o botão V SURROUND no controlo remoto SURROUND VIRTUAL DESLIG SURROUND VIRTUAL LIGADO Activar Surround Virtual Altera o áudio de 2 canais para 4 1 canais e o som será reproduzido por 4 1 canais Desactivar Surround Virtual A reprodução de áudio de 2 canais corresponde à reprodução de som de 2 canais Som original Reprodução USB de áudio MP3 WMA 1 Conecte o d...

Page 71: ...ante o modo de apresentação de imagens Função Girar Pressione o botão VERDE B ou AMARELO C durante o modo PAUSA Botão VERDE B girar 90 em sentido anti horário Botão AMARELO C girar 90 em sentido horário NOTA As resoluções máximas suportadas por este produto são 5120 x 3480 ou 19 0 MPixel para arquivos JPEG padrão e 2048 x 1536 ou 3 0 MPixel para arquivos de imagem progressiva Repetir Reprodução Pl...

Page 72: ...ssione o botão MO ST do controle remoto Sempre que pressionar este botão STEREO ou MONO será selecionado Se selecionar MONO em uma área com fraca recepção isso ajudará a reduzir o ruído Esta função só serve com o controle remoto Programando estações de rádio Você pode programar até 15 estações FM Por exemplo configurando a estação FM 89 10 na programação 2 1 Pressione o botão de INPUT SELECT no co...

Page 73: ...ampainha Pressione o botão MUTE MUTE é exibido no visor Para transmitir o som novamente Pressione o botão MUTE novamente ou pressione o botão Volume MUTE desaparecerá e o som será transmitido Ajuste do visor Você pode ajustar o brilho do visor Pressione o botão DIMMER Sempre que pressionar este botão o brilho mudará da seguinte maneira Escuro luz acesa Brilhante luz apagada Escuro luz apagada Bril...

Page 74: ...finir o sistema INIT é exibido no visor A unidade será desligada após 5 segundos NOTA Usar a função REDEFINIR apagará todas as configurações armazenadas Não faça isso a não ser que seja necessário O produto desliga se automaticamente se os modos USB e Parar estiverem activados durante mais de 25 minutos Function USB Settings No USB ...

Page 75: ... após a conclusão da atualização do firmware 5 Remova a unidade USB da porta USB frontal 6 Ligue a energia alterne para o modo USB e aguarde até que No USB apareça no visor frontal 7 Pressione o botão STOP por 5 segundos no controle remoto ou painel frontal enquanto No USB for exibido 8 O conjunto desliga automaticamente e a inicialização é concluída NOTA Cuidado para não desconectar a alimentação...

Page 76: ... 59 61 87 88 KEC 03 15 40 KMC 15 LG Goldstar 01 15 16 17 37 38 39 40 41 42 43 44 Luxman 18 LXI Sears 19 54 56 59 60 62 63 65 71 Magnavox 15 17 18 48 54 59 60 62 72 89 Marantz 40 54 Matsui 54 MGA 18 40 Mitsubishi MGA 18 40 59 60 75 MTC 18 NEC 18 19 20 40 59 60 Nikei 03 Onking 03 Onwa 03 Panasonic 06 07 08 09 54 66 67 73 74 Penney 18 Philco 03 15 17 18 48 54 59 62 69 90 Philips 15 17 18 40 48 54 62 ...

Page 77: ... PLAY PAUSE STOP SKIP MENU NOTA O controle remoto talvez não funcione em algumas marcas de DVD Além disso algumas operações talvez não sejam possíveis dependendo da sua marca de DVD O controle remoto funcionará com DVD BD Samsung por padrão Lista de códigos de marcas de DVD Marca Número do código Marca Número do código Marca Número do código DENON 003 032 ONKYO 004 014 TOSHIBA 004 018 DOONOON 019 ...

Page 78: ...ito grande Troque por pilhas novas Opere a uma distância próxima O som dos canais da esquerda direita está invertido Os cabos do alto falante direito esquerdo ou de entrada saída esquerda direita estão corretamente conectados Verifique o canal da esquerda direita e conecte o conecte os corretamente Não é possível receber transmissões de rádio A antena FM está conectada corretamente Conecte a anten...

Page 79: ...are para converter os arquivos em vídeo DivX SOBRE O VÍDEO DIVX DivX é um formato de vídeo digital criado por DivX LLC uma subsidiária da Rovi Corporation Este é um dispositivo DivX Certified oficial que reproduz o vídeo DivX Visite o site www divx com para obter mais informações e ferramentas de software para converter os arquivos em vídeo DivX DivX Certified para reproduzir vídeo DivX incluindo ...

Page 80: ...Subwoofer duplo 4 Ω 150W CH Sensibilidade impedância de entrada 550mV 47kΩ Relação de S R entrada analógica 65dB Separação 1kHz 55dB RESPOSTA DE FREQUÊNCIA Entrada analógica 20Hz 20kHz 3dB Entrada digital 96kHz PCM 20Hz 44kHz 3dB HDMI Entrada Compatível com 1080p Saída Compatível com 1080p SAÍDA DE VÍDEO Formato de TV NTSC PAL Nível impedância de entrada 1Vp p 75 Ω Nível impedância de saída 1Vp p ...

Page 81: ...a Contact Center Web Site Serbia 0700 Samsung 0700 726 7864 www samsung com Slovakia 0800 SAMSUNG 726 7864 www samsung com Spain 902 1 SAMSUNG 902 172 678 www samsung com Sweden 0771 726 7864 SAMSUNG www samsung com Switzerland 0848 SAMSUNG 7267864 CHF 0 08 min www samsung com ch www samsung com ch_fr French U K 0330 SAMSUNG 7267864 www samsung com Eire 0818 717100 www samsung com Lithuania 8 800 ...

Page 82: ...Code No AH68 02625H ...

Reviews: