background image

10

ENG

11

Description

(Con’t)

Remote Control

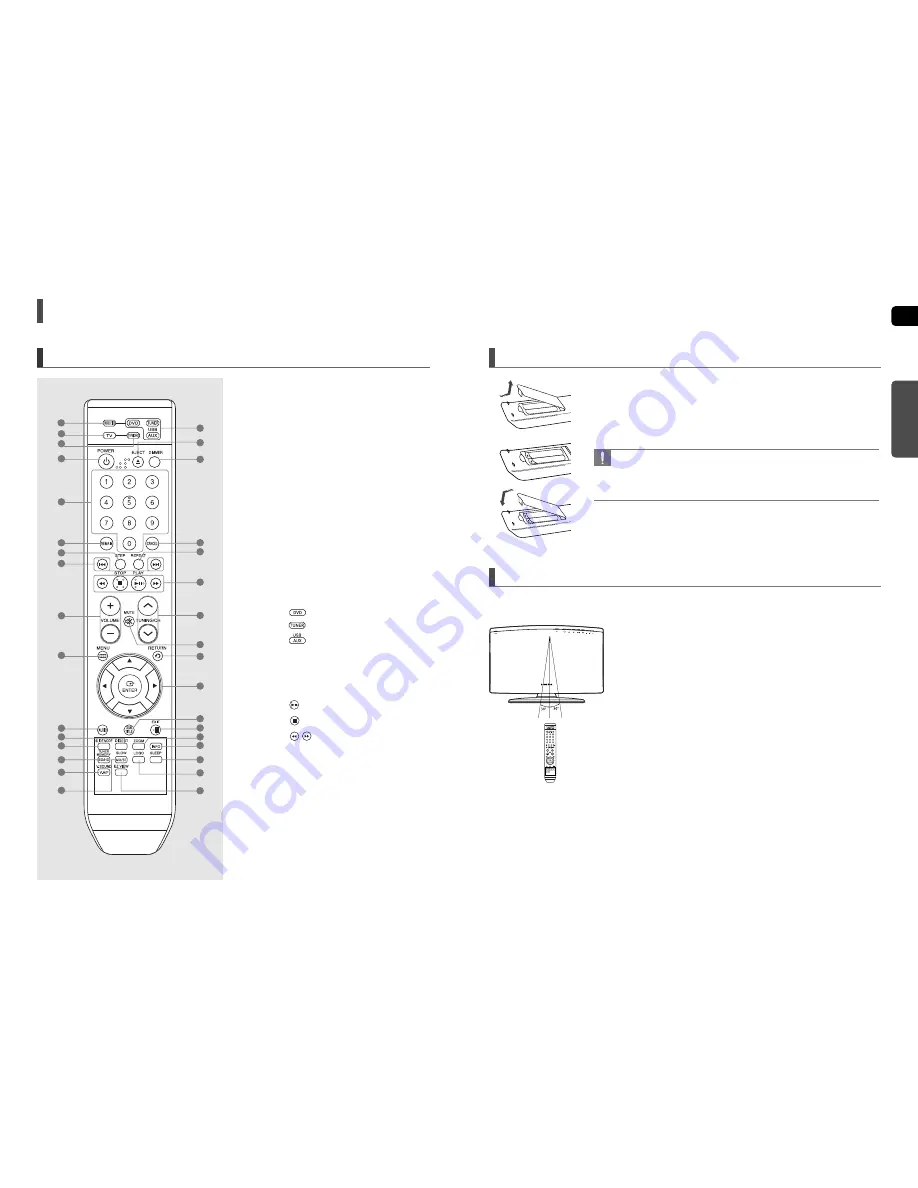
1. DVD RECEIVER button 

2. TV button 

3. TV/VIDEO button

4. POWER button

5. Number (0~9) buttons

6. REMAIN button

7. STEP button

8. Tuning Preset/CD Skip buttons

9. VOLUME button

10. MENU button

11. AUDIO button

12. DIGEST button

13. SLIDE MODE button

14. TUNER MEMORY, SD(Standard

Definition)/HD(High Definition) button

15.V-SOUND(Virtual Sound), 

V-H/P(Virtual Headphone) button

16. SLOW, MO/ST button

17.

DVD button 

TUNER button

USB, AUX button

18. EJECT button

19. DIMMER button

20. CANCEL button

21. REPEAT button

22.

PLAY/PAUSE button

STOP button 

SEARCH buttons

23. TUNING/CH button

24. MUTE button

25. RETURN button

26. Cursor/ENTER button 

27. SUBTITLE button

28. EXIT button

29. ZOOM button

30. INFO button

31. SLEEP button

32. LOGO button

33. EZ VIEW button

1

Remove the battery cover in the direction of the arrow.

2

Insert two 1.5V AAA batteries, paying attention to the correct polarities

(+ and –).

3

Replace the battery cover.

Follow these precautions to avoid leaking or cracking cells:

• Place batteries in the remote control so they match the polarity : (+) to (+) and (–) to (–).
• Use the correct type of batteries. Batteries that look similar may differ in voltage.
• Always replace both batteries at the same time.
• Do not expose the batteries to heat or a flame.

Insert Remote Batteries

PREP

ARA

TION

Operation Range of the Remote Control

The remote control can be used up to approximately 23 feet (7 meters) in a straight line. It can also be operated 
at a horizontal angle of up to 30° from the remote control sensor.

1

6

7

8

3

4

14

15

16

9

10

13

12

2

11

5

17

20
21

22

23

25

24

26

28
29
30

31

32

33

27

19

18

Summary of Contents for HT-X200

Page 1: ...CT DIGITAL AUDIO ENG Instruction Manual AH68 01963R REV 00 If you have any questions or comments relating to Samsung products please contact the SAMSUNG customer care center Samsung Electronics America Inc 1 800 SAMSUNG 7267864 www samsung com ...

Page 2: ...pparatus shall not be exposed to dripping or splashing and no objects filled with liquids such as vases shall be placed on the apparatus This reminder is provided to call the CATV system installer s attention to Section 820 40 of the NEC which provides guidelines for proper grounding and in particular specifies that the cable ground shall be connected to the grounding system of the building as clo...

Page 3: ...al 21 Before Using Your Home Theater 22 Disc Playback 23 MP3 WMA CD Playback 24 JPEG File Playback 25 DivX Playback 26 Using the Playback Function 28 Displaying Disc Information 28 Checking the Remaining Time 29 Fast Playback 29 Slow Playback 29 Skipping Scenes Songs 30 Repeat Playback 31 To Select a Repeat Playback Mode in the Disc Information Screen 31 A B Repeat Playback 32 Step Function 32 Ang...

Page 4: ...files in the picture folder can be played Picture discs other than Kodak Fuji Picture CDs may take longer to start playing or may not play at all CD R MP3 Discs Only CD R discs with MP3 files in ISO 9660 or Joliet format can be played MP3 file names should be 8 characters or less in length and contain no blank spaces or special characters Use discs recorded with a compression decompression data ra...

Page 5: ...hone Jack 2 AUX IN 1 Jack 3 USB Port 1 2 1 Channel Speaker Output Connector 2 Component Video Output Jacks Connect a TV with Component video inputs to these jacks 3 Video Output Jack Connect your TV s video input jacks VIDEO IN to the VIDEO OUT Jack on this unit 4 External Digital Optical Input Jack Use this to connect external equipment capable of digital output 5 HDMI OUT Jack 6 AUX IN 2 Jacks 7...

Page 6: ...OOM button 30 INFO button 31 SLEEP button 32 LOGO button 33 EZ VIEW button 1 Remove the battery cover in the direction of the arrow 2 Insert two 1 5V AAA batteries paying attention to the correct polarities and 3 Replace the battery cover Follow these precautions to avoid leaking or cracking cells Place batteries in the remote control so they match the polarity to and to Use the correct type of ba...

Page 7: ...t screen color may be distorted because of the magnetic field generated by the speaker If this occurs place the speaker away from your TV set 1 Press down the terminal tab on the back of the speaker 2 Insert the black wire into the black terminal and the red wire into the red terminal and then release the tab 3 Connect the connecting plugs to the back of the Home Theater Make sure the colors of th...

Page 8: ...before installation 1 Turn the stand counter clockwise and pull it apart The DVD Player and stand are separated 2 Hold the DVD Player and stand as shown by the figure and turn the right side of the stand upward so that it is slightly slanted 3 Insert the 2 stand anchors into the holes on the back of the DVD Player 4 Turn the right side of the stand clockwise to fix it to the back of the DVD Player...

Page 9: ...d you turn off the main unit your TV will also turn off Anynet HDMI CEC will only work while in the DVD mode In Stop mode press and hold the SD HD Standard Definition High Definition button on the remote control Resolutions available for the HDMI output are 480p 720p and 1080i SD Standard Definition resolution is 480p and HD High Definition resolution is 720p 1080i Resolution Selection If the TV d...

Page 10: ...on on the main unit The mode switches as follows DVD D IN AUX 1 AUX 2 USB FM Connecting Audio from External Components Audio Cable not supplied If the external analog component has only one Audio Out connect either left or right You can connect the Video Output jack of your VCR to the TV and connect the Audio Output jacks of the VCR to this product AUX1 Side Panel AUX2 Rear Panel Audio Cable not s...

Page 11: ... before reading the user manual Icon Term Definition DVD CD MP3 JPEG DivX CAUTION NOTE DVD CD MP3 JPEG DivX This involves a function available with DVD or DVD R DVD RW discs that have been recorded and finalized in Video Mode This involves a function available with a data CD CD R or CD RW This involves a function available with CD R RW discs This involves a function available with CD R RW discs Th...

Page 12: ...forward Playback starts automatically 2 To eject the disc press the EJECT button Depending on the content of the disc the initial screen may appear different Pirated discs will not run in this player because it violates the CSS Content Scrambling System a copy protection system recommendations To stop playback press the STOP button during playback If pressed once PRESS PLAY is displayed and the st...

Page 13: ...P3 WMA disc WMA DRM files cannot be played 2 In Stop mode use the Cursor button to select the album and then press the ENTER button Use the Cursor button to select the track 3 To change the album use the Cursor button to select another album in Stop mode and then press the ENTER button To select another album and track repeat Steps 2 and 3 above 4 Press the STOP button to stop playback To play a f...

Page 14: ...will be played normally If the Disc has more than One Subtitle File DivX is a video file format developed by Microsoft and is based on MPEG4 compression technology to provide audio and video data over the Internet in real time MPEG4 is used for video encoding and MP3 for audio encoding so that the users can watch a movie at near DVD quality video and audio DivX Digital internet video eXpress 1 Sup...

Page 15: ...a button that operation is not possible with the disc currently being played DVD AUDIO display DVD AUDIO Press the REMAIN button For checking the total and remaining time of a title or chapter being played Each time the Remain button is pressed Checking the Remaining Time Press the button Each time the button is pressed during playback the playback speed changes as follows Fast Playback 2X 4X 8X 3...

Page 16: ...back Repeat Playback Options Press the REPEAT button Each time the button is pressed during playback the repeat playback modechanges as follows 1 Press the INFO button twice 2 Press the Cursor button to move to REPEAT PLAYBACK display 3 Press the Cursor button to select the desired Repeat Playback mode To select another album and track repeat Steps 2 and 3 above 4 Press the ENTER button For DivX M...

Page 17: ...oves forward one frame each time the button is pressed during playback DVD Step Function 33 1 Press the INFO button 2 Press the Cursor button to move to ANGLE display 3 Press the Cursor or numeric buttons to select the desired angle Each time the button is pressed the angle changes as follows This function allows you to view the same scene in different angles Angle Function 2 3 3 3 1 3 The Angle f...

Page 18: ...oup that requires a 4 digit key number to access See the disc packaging for details and the key number Bonus Group During playback press the button on the remote control You can select the desired image from a DVD Audio disc containing still images With some discs you may not be able to select images Navigating Pages BONUS GROUP KEY NUMBER DVD AUDIO DVD AUDIO To operate this function you can also ...

Page 19: ...elected title or time 01 05 001 040 0 00 37 1 1 Using the Disc Menu Using the Title Menu The disc menu display may be different depending on the disc 1 In Stop mode press the MENU button 2 Press the Cursor button to move to the DISC MENU and then press the ENTER button When you select Disc Menu and it is not supported by the disc the This menu is not supported message appears on the screen 3 Press...

Page 20: ...isappears The USB MENU screen appears on the TV screen and the saved file is played 3 To stop playback press the STOP button Safe USB Removal To prevent damage to the memory stored in the USB device perform safe removal before disconnecting the USB cable 1 Press the STOP button twice in a row The display will show REMOVE USB 2 Remove the USB cable During playback press the button When there is mor...

Page 21: ...DVDs recorded in different screen sizes you should adjust the aspect ratio to fit your TV or monitor For a standard TV select either 4 3PS or 4 3LB option according to personal preference Select WIDE HDTV if you have a widescreen TV 1 In Stop mode press the MENU button 2 Press the Cursor button to move to Setup and then press the ENTER button 3 Press the Cursor button to move to TV DISPLAY and the...

Page 22: ...display and all settings will return to the default values Press the POWER button Using the RESET function will erase all stored settings Do not use this unless necessary If you have forgotten the rating level password do the following While watching a DVD or JPEG CD you can set the image you like as background wallpaper 1 During playback press the PLAY PAUSE button when an image you like appears ...

Page 23: ...s adjust the audio delay time to to match the video 1 In Stop mode press the MENU button 2 Press the Cursor button to move to Audio and then press the ENTER button 3 Press the Cursor button to move to AV SYNC and then press the ENTER button 4 Press the Cursor button to select the AV SYNC Delay Time and then press the ENTER button You can set the audio delay time between 0 ms and 300 ms Set it to t...

Page 24: ...peakers Settings Con t Listening to Radio 1 Press the TUNER button to select the FM band 2 Tune in to the desired station Automatic Tuning 1 When the button is pressed a preset broadcast station is selected Automatic Tuning 2 Press and hold the button to automatically search for active broadcasting stations Manual Tuning Briefly press the button to increase or decrease the frequency incrementally ...

Page 25: ...the time that the Home Theater will shut itself off Press the SLEEP button Each time the button is pressed the preset time changes as follows 10 20 30 60 90 120 150 OFF To confirm the sleep timer setting press the SLEEP button The remaining time before the Home Theater will shut itself off is displayed Pressing the button again changes the sleep time from what you have set earlier To cancel the sl...

Page 26: ...trol will work on a Samsung TV by default Convenient Functions Con t The 2 channel sounds can be listened with virtual effects for producing much more realistic sounds as in 5 1 channels Press the V SOUND button Each time the button is pressed the selection changes as follows V S1 V S2 OFF V SOUND Virtual Sound 1 Plug the headphones into the headphone jack You can purchase headphones from most Ele...

Page 27: ...03 03 03 06 07 08 09 54 66 67 73 74 18 03 15 17 18 48 54 59 62 69 90 15 17 18 40 48 54 62 72 63 66 80 91 15 18 59 40 06 66 67 17 48 56 60 61 75 18 59 67 76 77 78 92 93 94 03 19 40 00 15 16 17 40 43 46 47 48 49 59 60 98 19 61 65 03 40 60 61 15 18 19 15 57 64 57 58 50 51 52 53 55 03 40 01 18 18 40 48 54 59 60 62 61 95 96 06 18 03 15 18 25 18 40 19 57 63 71 18 59 60 69 15 17 18 40 48 54 60 64 18 40 0...

Page 28: ...button is pressed while listening to TV audio using the D IN AUX functions the DVD functions are turned on and this stops the TV audio While listening to TV audio through the main unit no sound is heard Symptom Check Remedy You can play 16 9 DVDs in 16 9 WIDE mode 4 3 LETTER BOX mode or 4 3 PAN SCAN mode but 4 3 DVDs can be seen in 4 3 ratio only Refer to the DVD disc jacket and then select the ap...

Page 29: ...ital Camera KD 310Z Konica Digital Camera Finecam SL300R Kyocera Digital Camera Finecam SL400R Kyocera Digital Camera Finecam S5R Kyocera Digital Camera Finecam Xt Kyocera Digital Camera Dimage Z1 Minolta Digital Camera Dimage Z1 Minolta Digital Camera Dimage X21 Minolta Digital Camera Coolpix4200 Nikon Digital Camera Coolpix4300 Nikon Digital Camera Coolpix 2200 Nikon Digital Camera Coolpix 3500 ...

Page 30: ...ded for in this statement noncommercial use of this product and shall not apply to the following including but not limited to dam age which occurs in shipment delivery and installation applications and uses for which this product was not intended altered product or serial numbers cosmetic damage or exterior finish accidents abuse neglect fire water lightning or other acts of nature use of products...

Page 31: ...Contact SAMSUNG WORLD WIDE If you have any questions or comments relating to Samsung products please contact the SAMSUNG customer care centre Region Country Customer Care Center Web Site ...

Reviews: