background image

8

8

Settings 

(Con’t)


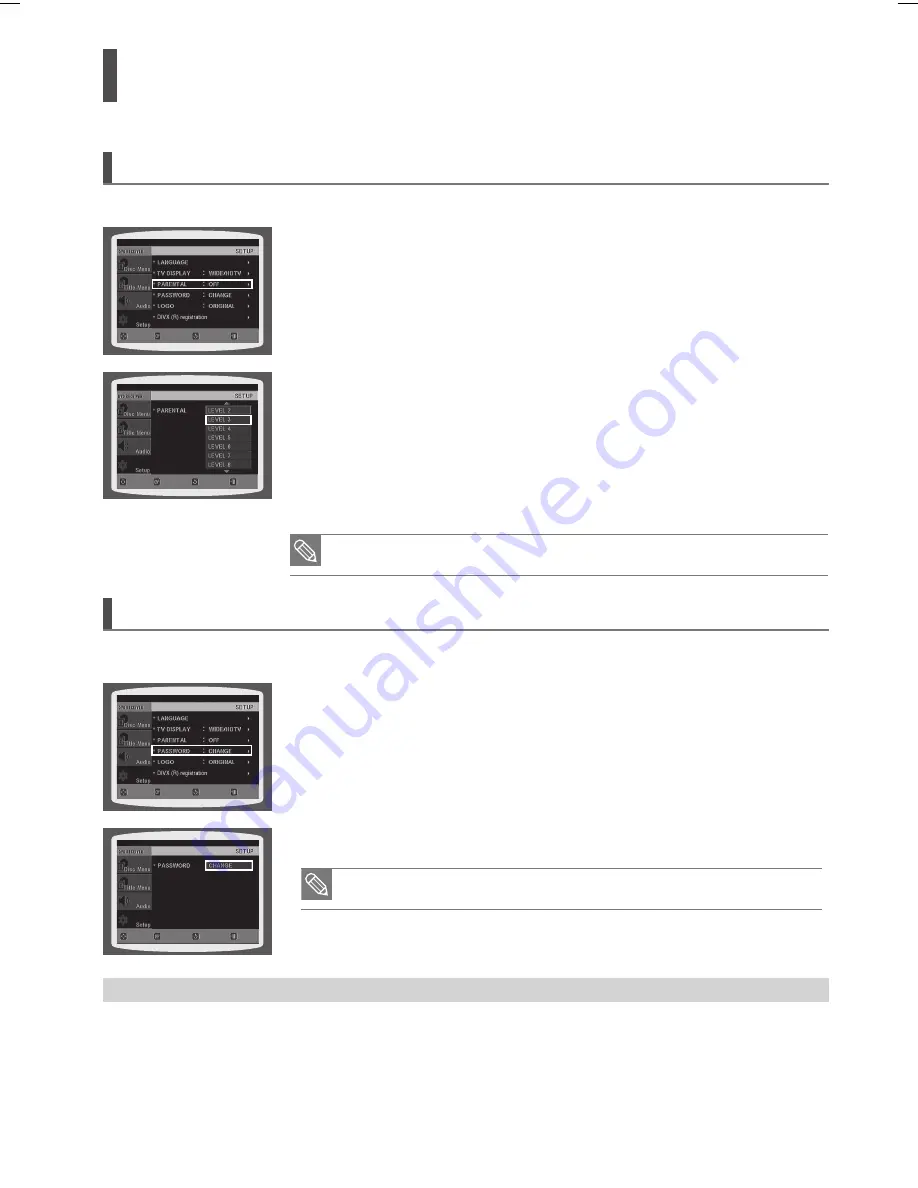
Setting Parental Controls (Rating Level) 

Use this to restrict playback of adult or violent DVDs you do not want children to view.


This function works only if a DVD disc contains the rating level information.

Setting the Password 

You can set the password for the Parental (rating level) setting.


If you have forgotten the rating level password, do the following

While the player is 

in no disc mode,

 hold the main unit's 

STOP (

@

)

 button for longer than 5 seconds. <INITIAL>  

appears on the display and all settings will return to the default values.

 Press the 

POWER

 button. 

Using the RESET function will erase all stored settings. Do not use this unless necessary.

1


In Stop mode, press button 

MENU

 button.


Press button Cursor 

%

 button to move to 

<Setup>

 and then press button  

ENTER

 button.


Press the Cursor 

%

 button to move to 

<PARENTAL>

 and then press the 

ENTER

 button.


Press the Cursor 

$

,

button to select the desired rating level and then press the 

ENTER

 button.

If you have selected Level 6, you cannot view DVDs with Level 7 or higher.
The higher the level, the closer the content is to violent or adult material.


Enter the password and then press the 

ENTER

 button.

The password is set to <7890> by default.

Once the setup is complete, you will be taken to the previous screen.

d

 Press the 

RETURN

 button to return to the previous level.

d

 Press the 

EXIT 

button to exit the setup screen.

`
`

`

`

MOVE

ENTER

EXIT

RETURN

MOVE

SELECT

EXIT

RETURN

1


In Stop mode, press the 

MENU

 button.


Press the Cursor 

%

 button to move to 

<Setup>

 and then press the 

ENTER

 button.


Press the Cursor 

%

 button to move to 

<PASSWORD>

 and then press the 

ENTER

 button.


 Press the 

ENTER

 button.


Enter the password and then press the 

ENTER

 button.

Enter the old password, a new password, and confirm new password.
The setting is complete. 


The password is set to <7890> by default.

`
`

MOVE

SELECT

EXIT

RETURN

MOVE

ENTER

EXIT

RETURN

HT-TKX500_CIS_ENG-0205.indd   48

2008-02-16   �� 1:35:02

Summary of Contents for HT-TKX500

Page 1: ...AH68 01660E REV 01 THIS APPLIANCE IS MANUFACTURED BY AH68 02013P REV 1 0 ...

Page 2: ...DIGITAL HOME CINEMA SYSTEM HT TKX500 ENG Instruction Manual COMPACT DIGITAL VIDEO COMPACT DIGITAL AUDIO COMPACT DIGITAL AUDIO ...

Page 3: ...g and no objects filled with liquids such as vases shall be placed on the apparatus The Mains plug is used as a disconnect device and shall stay readily operable at any time CLASS 1 LASER PRODUCT KLASSE 1 LASER PRODUKT LUOKAN 1 LASER LAITE KLASS 1 LASER APPARAT PRODUCTO LASER CLASE 1 TO REDUCE THE RISK OF ELECTRIC SHOCK DO NOT REMOVE REAR COVER NO USER SERVICEABLE PARTS INSIDE REFER SERVICING TO Q...

Page 4: ...g period of time DVD HOME CINEMA SYSTEM HT TX 00 DVD HOME CINEMA SYSTEM HT TX 00 During thunderstorms disconnect AC main plug from the wall outlet Voltage peaks due to lightning could damage the unit Do not expose the unit to direct sunlight or other heat sources This could lead to overheating and malfunction of the unit DVD HOME CINEMA SYSTEM HT TX 00 Phones Protect the player from moisture i e v...

Page 5: ...d TV Screen Saver Function If the main unit remains in stop mode for 3 minutes Samsung logo appears on TV screen The HT TKX500 automatically switches itself into the power saving mode after 20 minutes in the Screen Saver mode Power Saving Function The HT TKX500 automatically shuts itself off after 20 minutes in Stop mode HDMI HDMI transmits DVD video and audio signals simultaneously and provides a...

Page 6: ...a Files using the USB Host Feature 44 SETUP Settings 46 Setting the Language 46 Setting TV Screen type 47 Setting Parental Controls Rating Level 48 Setting the Password 48 Setting the Wallpaper 49 To Select One of the 3 Wallpaper Settings you ve made 49 DivX R registration 50 Setting the Speaker Mode 50 Setting the Delay Time 51 Setting the Test Tone 52 Setting the Audio 53 Setting the DRC Dynamic...

Page 7: ...io Video 12cm 74 min 8cm 20 min Do not use the following types of disc LD CD G CD I CD ROM and DVD ROM discs cannot be played on this player If such discs are played a WRONG DISC FORMAT message appears on the TV screen DVD discs purchased abroad may not play on this player If such discs are played a CAN T PLAY THIS DISC PLEASE CHECK REGION CODE message appears on the TV screen Copy Protection Many...

Page 8: ...h low bit rate and high bit rate e g 32Kbps 320Kbps the sound may skip during playback A maximum of 500 tracks can be played per CD A maximum of 300 folders can be played per CD CD R JPEG Discs Only files with the jpg extensions can be played If the disc is not closed it will take longer to start playing and not all of the recorded files may be played Only CD R discs with JPEG files in ISO 9660 or...

Page 9: ...Digital Optical Input Jack 1 Use this to connect external equipment capable of digital output 9 External Digital Optical Input Jack 2 Use this to connect external equipment capable of digital output 10 Stand Fix Hole 11 Cooling Fan 8 9 1 2 4 3 5 6 11 10 1 2 3 4 5 6 7 8 1 Power button Press and hold for more than 1 second 2 Function button 3 Tuning Down Skip button 4 Stop button 5 Play Pause button...

Page 10: ...SS 1 2 3 HDMI Cable Remote Control FM Antenna Video Cable User s Manual Core Toroidal Ferrite Core Stand basel System Cable Screw Large 3EA Screw Small 4EA Stand For more information about the speaker system refer to page 12 DVD KARAOKE DISC SONG LIST BOOK 4 WIRELESS MICROPHONE BATTERY 1 5VX 3EA WIRELESS MICROPHONE ANTENNA ...

Page 11: ...JECT button 19 SLEEP button 20 RDS Selection buttons 21 CANCEL button 22 REPEAT button 23 PLAY PAUSE button STOP button SEARCH buttons 24 TUNING CH button 25 MUTE button 26 RETURN button 27 Cursor Enter button 28 SEARCH SONG SUBTITLE button 29 EXIT button 30 DIMMER button BUZZER OFF button HOLD button LOGO button 31 INFO button 32 PL II EFFECT button 33 SOUND EDIT button 34 SLOW MO ST button 35 PL...

Page 12: ...ls Place batteries in the remote control so they match the polarity to and to Use the correct type of batteries Batteries that look similar may differ in voltage Always replace both batteries at the same time Do not expose the batteries to heat or a flame Operation Range of the Remote Control The remote control can be used up to approximately 7 meters 23 feet in a straight line It can also be oper...

Page 13: ...nd on the floor and tighten 2 Silver on the back of the stand 1 Speaker Packages Please confirm that all the following contents are included in the package Front speakers and rear speakers are packaged separately as shown in the diagram STAND STAND BASE SPEAKER 4EA STAND 4EA SCREW 16EA BLACK SCREW 16EA SILVER STAND BASE 4EA Center Speaker Subwoofer Speaker Speaker Cable 5EA Front Rear Speaker 1 2 ...

Page 14: ...ker on the stand Tighten 2 Silver screws on the back of the speaker This is the successfully assembled speaker 6 Make sure that the speaker is installed on a flat and stable area Otherwise it may be easily knocked over STAND SPEAKER 4 5 6 ...

Page 15: ...stand base Secure the main unit by aligning 2 protruding points on the back of the main unit with the fixing holes on the stand Tighten 3 screws in the middle of the stand Push the cable into the cable fixing hole in the stand 1 1 Installing the DVD player STAND BASE STAND STAND 1 2 3 4 ...

Page 16: ...d on the bottom of the stand and pass the cables through the holder Squeeze the cables into the groove on the holder of the round board Close the holder cover Open a Toroidal Ferrite Core by pulling it upward Wrap it around of the system connection cable so it will be next to the DVD Player Close it back by pressing it all the way down until you hear a clicking sound 6 8 5 6 7 8 Round Table Holder...

Page 17: ...It is best to install it at the same height as the front speakers You can also install it directly over or under the TV Selecting the Listening Position The listening position should be located about 2 5 to 3 times the distance of the TV s screen size away from the TV Example For 32 TVs 2 2 4m 6 8feet For 55 TVs 3 5 4m 11 13feet Rear Speakers hj Place these speakers behind your listening position ...

Page 18: ...ers They could get hurt if a speaker falls When connecting the speaker wires to the speakers make sure that the polarity is correct Keep the speaker out of reach of children so as to prevent children from inserting their hands or alien substances into the duct hole of the subwoofer speaker Do not hang the subwoofer on the wall through the duck hole If you place a speaker near your TV set screen co...

Page 19: ...ubwoofer Rear of Main unit Connecting the Speakers Con t subwoofer functions Power button External Audio Input Connector Crossover Controller Speaker Output Terminals 1 1 2 3 4 Subwoofer With the built in dedicated 165W amplifier the subwoofer generates rich bass sounds Crossover The Crossover sets the cutoff frequency for the subwoofer Set the Crossover control for the best bass response in your ...

Page 20: ...o not insert a card other than the TX card dedicated for the product The product might be damaged or the card may not be removed easily Do not insert the TX card upside down or in the reverse direction Insert the TX card when the DVD Player is turned off Inserting the card when it is turned on may cause a problem If the TX Card is inserted sound is not output from the Rear Speaker con nectors on t...

Page 21: ...eiving module setting is complete no audio signal is output from the Rear Speaker Output Connector on the back of the main unit The wireless receiving antenna is built into the wireless receiver module Keep the unit away from water and moisture For optimal listening performance make sure that the area around the wireless receiver module location is clear of any obstructions Sound will be heard fro...

Page 22: ...upplied video cable from the VIDEO OUT jack on the back of the main unit to the VIDEO IN jack on your TV This product operates in Interlace scan mode 576i for component output After making the video connection set the Video input source on your TV to match the corresponding Video output HDMI Component or Composite on your Home theater See your TV owner s manual for more information on how to selec...

Page 23: ...the Home Theater by using the TV remote control Available TV buttons and _ buttons button If you select the TV Set the Anynet HDMI CEC to On on your TV Receiver On You can listen to audio through the Home Theater Receiver Off You can listen to audio through the TV If you select the THEATER Select THEATER to connector and set the option of each items below View TV If Anynet HDMI CEC set to on and y...

Page 24: ... MP3 Player 1 Connect AUX IN 1 Audio on the Home Theater to the Audio Out of the external component MP3 player 2 Press the AUX button on the remote control to select AUX1 input You can also use the FUNCTION button on the main unit The mode switches as follows DVD D IN 1 D IN 2 AUX1 AUX2 USB FM AUX1 Side Panel Audio Cable not supplied ...

Page 25: ...nts such as a VCR 1 Connect AUX IN 2 Audio on the Home Theater to Audio Out on the external analog component Be sure to match connector colors 2 Press the AUX button on the remote control to select AUX2 input You can also use the FUNCTION button on the main unit The mode switches as follows DVD D IN 1 D IN 2 AUX1 AUX2 USB FM You can connect the Video Output jack on your VCR to the TV and connect t...

Page 26: ...gital Input OPTICAL 1 or 2 on the Home Theater to the Digital Output of the external digital component 2 Press the AUX button on the remote control to select D IN 1 D IN 2 You can also use the FUNCTION button on the main unit The mode switches as follows DVD D IN 1 D IN 2 AUX 1 AUX 2 USB FM OPTICAL Rear Panel Optical Cable not supplied ...

Page 27: ...ing Fan The cooling fan supplies cool air to the unit to prevent overheating Please observe the following cautions for your safety Make sure the unit is well ventilated If the unit has poor ventilation the temperature inside the unit may rise and may damage it Do not obstruct the cooling fan or ventilation holes If the cooling fan or ventilation holes are covered with a newspaper or cloth heat may...

Page 28: ... This involves a function available on CD R RW discs DivX DivX This involves a function available on MPEG4 discs DVD R RW CD R or CD RW Caution This involves a case where a function does not operate or settings may be cancelled Note This involves tips or instructions on the page that help each function operate In this manual the instructions marked with DVD DVD are applicable to DVD VIDEO and DVD ...

Page 29: ...ore plugging your system into a main socket you must checkthe voltage setting OPTIONAL If the voltage of the socket doesnot correspond to the setting on the rear of the unit you mayseriously damage your system 2 Press the TV button to set the remote to TV mode 3 Press the POWER button to turn on your Samsung TV with this remote 4 Press the TV VIDEO button to select VIDEO mode on your TV 5 Press th...

Page 30: ...playback press the PLAY PAUSE button during playback To resume playback press the PLAY PAUSE button again Depending on the content of the disc the initial screen may appear different Pirated discs will not run in this player because it violates the CSS Content Scrambling System a copy protection system recommendations 1 Load a disc vertically into the Disc Insert Hole Insert a disc so that the lab...

Page 31: ...The MP3 WMA menu screen will appear and playback will start The appearance of the menu depends on the MP3 WMA disc WMA DRM files cannot be played 2 In Stop mode use the Cursor _ button to select the album and then press the ENTER button Use to select the track 3 To change the album use the Cursor _ button to select another album in Stop mode and then press the ENTER button To select another album ...

Page 32: ...s Russian filenames are not supported In some cases depending on JPEG files record conditions those files may be displayed not the full screen size or low quality Load the JPEG disc Playback starts automatically Each image is displayed for 5 seconds and then the next image is displayed d Press the button to skip to the next slide Each time the button is pressed the slide moves backward or forward ...

Page 33: ...playback press the Cursor _ button Playback skips 5 minutes forward whenever you press the Cursor button Playback skips 5 minutes back whenever you press the Cursor _button Audio Display Press the AUDIO button If there are multiple audio tracks on a disc you can toggle between them Each time you press the button your selection will toggle between AUDIO 1 N 2 N and is displayed when there is one su...

Page 34: ...ound Format AVI WMV Supported Versions DivX3 11 DivX5 1 XviD V1 V2 V3 V7 Supported Video Formats Format MP3 WMA AC3 DTS Bit Rate 80 384kbps 56 128kbps 128 384kbps 1 5Mbps Sampling Frequency 44 1khz 44 1 48khz 44 1khz Supported Audio Formats DivX files including audio and video files created in the DTS format can only support up to 6Mbps Aspect Ratio Although default DivX resolution is 640x480 pixe...

Page 35: ... a button that operation is not possible with the disc currently being played Screen Display TITLE display ELAPSED TIME display STEREO L R display CHAPTER display REPEAT PLAYBACK display DOLBY DIGITAL display TRACK FILE display AUDIO LANGUAGE display ANGLE display SUBTITLE display DVD Display CD Display Press the INFO button Each time the button is pressed the display changes as follows The inform...

Page 36: ...32X PLAY During fast playback of a CD or MP3 CD sound is heard only at 2x speed and not at 4x 8x and 32x speeds Slow Playback DVD DivX DVD Press the SLOW button Each time the button is pressed during playback the playback speed changes as follows 1 2 1 4 1 8 1 2 1 4 1 8 PLAY DivX 1 2 1 4 1 8 PLAY No sound is heard during slow playback Reverse slow playback does not work with DivX ...

Page 37: ...nes Songs DVD MP3 Press the button Each time the button is pressed during playback the previous or next chapter track or directory file will be played You cannot skip chapters consecutively TITLE 01 05 CHAPTER 002 045 TITLE 01 05 CHAPTER 004 045 DVD MP3 ...

Page 38: ...APTER Repeatedly plays the selected chapter TITLE Repeatedly plays the selected title RANDOM Plays tracks in random order A track that has already been played may be played again TRACK Repeatedly plays the selected track DIR Repeatedly plays all tracks in the selected folder DISC Repeatedly plays the entire disc OFF Cancels Repeat Playback Repeat Playback DVD MP3 JPEG DivX CD Repeat playback allow...

Page 39: ...lay from the information display screen Point B cannot be set until 5 seconds of playback has elapsed from point A 1 Press the INFO button twice 2 Press the Cursor button to move to REPEAT PLAYBACK display 3 Press the Cursor button to select the desired Repeat Playback mode To select another album and track repeat Steps 2 and 3 above 4 Press the ENTER button DVD CD ...

Page 40: ... during playback No sound is heard during step motion playback 1 Press the INFO button twice 2 Press the Cursor button to move to REPEAT PLAYBACK display 3 Press the Cursor button to select A and then press ENTER button at the beginning of the desired segment When the ENTER button is pressed the selected position will be stored in memory 4 Press the ENTER button at the end of the desired segment T...

Page 41: ...d image 1 Press the INFO button 2 Press the Cursor button to move to ANGLE display 3 Press the Cursor button or numeric buttons to select the desired angle Each time the button is pressed the angle changes as follows ENTER SELECT SELECT ZOOM POSITION 1 Press the ZOOM button 2 Press the Cursor _ button to move to the area you want to enlarge 3 Press the ENTER button Each time the button is pressed ...

Page 42: ... a DVD disc a different audio language ENGLISH SPANISH FRENCH etc is selected each time the button is pressed SUBTITLE 01 03 KOREAN SUBTITLE 02 03 ENGLISH SUBTITLE 03 03 JAPANESE SUBTITLE OFF EN 1 3 OFF EN 1 3 EN 01 03 KO 01 03 OFF SP 02 03 FR 03 03 EN 1 3 EN 01 03 OFF SP 2 3 FR 3 3 OFF 03 1 Press the INFO button twice 2 Press the Cursor button to move to SUBTITLE display 3 Press the Cursor _butto...

Page 43: ...ctly to the desired title chapter or track Depending on the disc you may not be able to move to the selected title or time 42 1 Press the INFO button 2 Press the Cursor button or numeric buttons to select the desired title track and then press the ENTER button 3 Press the Cursor _ button to move to Chapter display 4 Press the Cursor button or numeric buttons to select the desired chapter and then ...

Page 44: ...tton The title menu appears d Press the EXIT button to exit the setup screen The Title menu display may be different depending on the disc ENG OPERATION ENTER MOVE EXIT 1 In Stop mode press the MENU button 2 Press the Cursor button to move to Disc Menu and then press the ENTER button When you select Disc Menu and it is not supported by the disc the This menu is not supported message appears on the...

Page 45: ...back press the STOP button d Safe USB Removal To prevent damage to the memory stored in the USB device perform safe removal before disconnecting the USB cable Press the STOP button twice in a row The display will show REMOVE USB Remove the USB cable To listen to your music files with 5 1 channel home theater sound you must set the Dolby Pro Logic II mode to Matrix See page 57 Skip Forward Back Fas...

Page 46: ... use a USB extension cable the USB device might not be recognized Supported Formats File name File extension Bit rate Version Pixel Sampling Frequency Still Picture JPG JPG JPEG 640X480 Music MP3 MP3 80 384kbps 44 1kHz WMA WMA 56 128kbps V8 44 1kHz Movie WMV WMV 4Mbps V1 V2 V3 V7 720X480 44 1KHz 48KHz DivX AVI ASF 4Mbps DivX3 11 DivX5 1 XviD 800X600 44 1KHz 48KHz CBI Control Bulk Interrupt is not ...

Page 47: ...ss the RETURN button to return to the previous level d Press the EXIT button to exit the setup screen MOVE ENTER EXIT RETURN MOVE ENTER EXIT RETURN MOVE ENTER EXIT RETURN MOVE SELECT EXIT RETURN OSD LANGUAGE Selecting the OSD Language AUDIO Selecting the Subtitle Language recorded on the disc SUBTITLE Selecting the Audio Language recorded on the disc DISC MENU Selecting the Disc Menu Language reco...

Page 48: ...6 9 picture in the letter box mode on a conventional TV Black bars will appear at the top and bottom of the screen WIDE HDTV Select this to view a 16 9 picture in the full screen mode on your widescreen TV You can enjoy the widescreen aspect If a DVD is in the 4 3 ratio you cannot view it in widescreen Since DVD discs are recorded in various image formats they will look different depending on the ...

Page 49: ...L and then press the ENTER button 4 Press the Cursor button to select the desired rating level and then press the ENTER button If you have selected Level 6 you cannot view DVDs with Level 7 or higher The higher the level the closer the content is to violent or adult material 5 Enter the password and then press the ENTER button The password is set to 7890 by default Once the setup is complete you w...

Page 50: ...de COPY LOGO DATA 1 In Stop mode press the MENU button 2 Press the Cursor button to move to Setup and then press the ENTER button 3 Press the Cursor button to move to LOGO and then press the ENTER button 4 Press the Cursor button to select the desired USER and then press the ENTER button This selects one of the 3 wallpaper screens 5 Press the EXIT button to exit the setup screen ORIGINAL Select th...

Page 51: ...to Audio and then press the ENTER button 3 In the SPEAKER SETUP press the ENTER button again 4 Press the Cursor _ button to move to the desired speaker and then press the ENTER button For C SL and SR each time the button is pressed the mode switches alternately as follows SMALL NONE For L and R the mode is set to SMALL SMALL Select this when using the speakers NONE Select this when no speakers are...

Page 52: ...ening position at different times depending on the placement of speakers you can adjust this difference by adding a delay effect to the sound of the Center and Surround Speakers Setting CENTER SPEAKER If the distance of Dc is equal to or longer than the distance of Df in the figure set the mode as 0ms Otherwise change the setting according to the table Distance between Df and Dc 0 00 m 0 34 m 0 68...

Page 53: ...io and then press the ENTER button 3 Press the Cursor button to move to TEST TONE and then press the ENTER button The test tone will be sent to L C R SR SL SW in order If the ENTER button is pressed again at this time the test tone will stop d Press the RETURN button to return to the previous level d Press the EXIT button to exit the setup screen MOVE ENTER EXIT RETURN STOP EXIT ...

Page 54: ...s the Cursor _ button to adjust the settings d Press the RETURN button to return to the previous level d Press the EXIT button to exit the setup screen Manually Adjusting the Speaker Volume and Balance with the SOUND EDIT Button Press the SOUND EDIT button and then press the Cursor _ button Adjusting Front Rear Speaker Balance You can select between 0 and 6 and OFF The volume decreases as you move...

Page 55: ...t is smaller d Press the RETURN button to return to the previous level d Press the EXIT button to exit the setup screen Setting the AV SYNC Video may look slower than the audio if it is connected to a digital TV If this occurs adjust the audio delay time to to match the video MOVE ENTER EXIT RETURN MOVE SELECT EXIT RETURN 1 In Stop mode press the MENU button 2 Press the Cursor button to move to Au...

Page 56: ... button ON Both video and audio signals are transmitted over the HDMI connection cable and audio is output through your TV speakers only OFF Video is transmitted over the HDMI connection cable only and audio is output through the home theater speakers only The default setting of this function is HDMI AUDIO OFF HDMI AUDIO is automatically down mixed to 2ch for TV speakers During DVD OK disc playbac...

Page 57: ...sic you can select POP JAZZ and ROCK STUDIO Provides a sense of presence as if in a studio CLUB Simulates the sound of a dance club with a throbbing bass beat HALL Provides a clear vocal as if listening in a concert hall MOVIE Provides the feeling of a movie theater CHURCH Gives the feel of being in a grand church PASS Select this for normal listening DSP EQ function is only available in STEREO mo...

Page 58: ...is sets the width of the center image The higher the setting the less sound comes from the center speaker 4 Press the PL II EFFECT button to select DIMENSION then press the Cursor _ button to select the desired setting You can select between 0 and 6 Incrementally adjusts the sound field DSP from the front or rear When playing a DVD disc encoded with two or more channels multi channel mode will be ...

Page 59: ...sn t work while HDMI mode and HDMI AUDIO ON If you use the wireless microphone under the TX card connected the rear speaker will not make sound A Karaoke CD supporting 5 1 channels in the market may not be played properly If you see MiC ON on the screen with noise when you turned off Wireless MiC change the channel If you see MiC ON on the screen with noise when you turned off Wireless MiC but fai...

Page 60: ...e life of microphone and main unit and may deteriorate the performance Make sure to turn off the power switch before inserting the batteries and check the polarity of battery when inserting the battery If you drop the battery in the water accidentally during use immediately turn off the power switch and contact the A S center RF noise may occur in the area near railroad power line and big motor wh...

Page 61: ... to be played first 1 Press the Numeric 0 9 buttons to select the song you want to reserve 2 Press the RESERVE button The next song is reserved d To Cancel the Reservation Enter the numeric of the song you have reserved Press the Cancel button RESERVE function will not operate if REPEAT function is set while DVD OK is played 1 2 1 In Stop mode press the Numeric 0 9 buttons to select the song you w...

Page 62: ...EAT button Each time the button is pressed the selection changes as follows RESERVE function will not operate if REPEAT function is set while DVD OK is played REPEAT OFF REPEAT TRACK REPEAT DISC REPEAT RANDOM 1 During the stop mode press the FAVORITE SONG button 2 Press _ button to select the location to save among FAVORITE1 2 3 3 Press the number 0 9 button to enter the song you want 4 Press the ...

Page 63: ...select the location to save among FAVORITE1 2 3 3 Press the CANCEL button 1 During the stop mode press the FAVORITE SONG button 2 Press _ button to select the location of song among FAVORITE 1 2 3 3 Press button to select the song you want 4 Press the ENTER button to play back selected song d To Exit FAVORITE SONG Screen Press STOP button or FAVORITE SONG button ...

Page 64: ...ect the language among RUSSIA ENGLISH UKLAINE At this time press _ button to move to the song list on the bottom 2 Press button to move to the detailed items and then press button to select the NAME or SINGER Press _ button if you want to move to the previous stage 3 Press button to move to alphabet and press button to select it Press _ button if you want to move to the previous stage 4 Press butt...

Page 65: ... 1 During the stop mode press the SEARCH SONG button and then press button to select the GENRE At this time press _ button to move to the song list on the bottom 2 Press button to move to the detailed items and then press button to select the genre you want You can select the genre among ROCK CHANSON FOLK BARD ROMANCES Press _ button if you want to move to the previous stage 3 Press button to move...

Page 66: ... to move to the previous stage 3 Press button to move to the song list on the bottom and then press button to select the song you want Press _ button if you want to move to the previous stage 4 Press the ENTER button to play back selected song d To Exit Search Song Screen Press STOP button or SEARCH SONG button During the playback press the KEY CONTROL buttons Each time button is pressed the key i...

Page 67: ...pressed the selection changes as follows ON OFF If you operate the Tempo function while a song with supporting chorus is played back the chorus will be released Chorus function may not work depending on information recorded in the disc During the playback press the MALE FEMALE button Each time the button is pressed this selection alternates between Male and Female Select Male when singing in male ...

Page 68: ...res displayed in the screen in advance 1 Load a DVD OK discs 2 Press MENU button 3 Press Cursor button to move to Average Score 4 Press ENTER button to select the desired item Each time the button is pressed the selection changes as follows LOW MIDDLE HIGH RANDOM OFF Setting the Shadow You can set the lyrics to be displayed in the black strips 1 Load a DVD OK discs 2 Press MENU button 3 Press Curs...

Page 69: ... the FM band 2 Select a broadcast station Automatic Tuning 1 Press the STOP button to select PRESET and then press the button to select the preset station Automatic Tuning 2 Press the STOP button to select MANUAL and then press the and hold button to automatically search the band Manual Tuning Press the STOP button to select MANUAL and then briefly press the button to tune in to a lower or higher ...

Page 70: ... the button to select preset number You can select between 1 and 15 presets 5 Press the TUNER MEMORY button again Press the TUNER MEMORY button before Number disappears from the display Number disappears from the display and the station is stored in memory 6 To preset another station repeat steps 2 to 5 d To tune in to a preset station press the button on the remote control to select a channel Thi...

Page 71: ...oadcast by a station if any and is composed of maximum 64 characters CT Clock Time Decodes the real time clock from the FM frequency Some stations may not transmit PTY RT or CT information therefore this may not be displayed in all cases TA Traffic Announcement When this symbol flashes it shows that the traffic announcement is in progress Press the RDS DISPLAY while listening to an FM station Each...

Page 72: ... Culture National or local culture includ ing the religious problem social science language theater etc SCIENCE Natural science and technology VARIED Others Speech amusing program quiz game interview comedy and satirical play etc POP M Pop music ROCK M Rock music M O R M Current contemporary music considered to be easy listening Display Program Type LIGHT M Light classical music Classical music an...

Page 73: ...y on the main unit so it won t interfere with your movie viewing Press the DIMMER button Each time the button is pressed the brightness of front display will be adjusted BUZZER HOLD Functions Each time you press and hold the DIMMER button for more than 2 seconds the following functions are selected in order BUZZER HOLD BUZZER Turns off the buzzer that rings each time you press any of the top butto...

Page 74: ... in the table enter one at a time to determine which code works Example For a Samsung TV While holding down the POWER button use the number buttons to enter 00 15 16 17 and 40 4 If the TV turns off the setting is complete You can use the TV POWER VOLUME CHANNEL and Numeric buttons 0 9 The remote control may not work on some brands of TVs Also some operations may not be possible depending on your b...

Page 75: ... CXC 03 62 Sanyo 19 61 65 20 Daewoo 02 03 04 15 16 17 18 19 20 21 22 23 24 63 Scott 03 40 60 61 25 26 27 28 29 30 32 34 35 36 48 59 90 64 Sears 15 18 19 21 Daytron 40 65 Sharp 15 57 64 22 Dynasty 03 66 Signature 2000 M Wards 57 58 23 Emerson 03 15 40 46 59 61 64 82 83 84 85 67 Sony 50 51 52 53 55 24 Fisher 19 65 68 Soundesign 03 40 25 Funai 03 69 Spectricon 01 26 Futuretech 03 70 SSS 18 27 General...

Page 76: ... motion playback Are the speakers connected properly Is the speaker setup correctly customized Is the disc severely damaged Sound can be heard only from a few speakers and not all six When listening to a CD or radio sound is output to the front speakers L R only Select PRO LOGIC II by pressing PL II Dolby Pro Logic II on the remote control to use all six speakers Make sure that the DVD disc is 5 1...

Page 77: ...n unit is not working Example The power goes out or strange noise is heard The DVD player is not working normally Turn off the power and hold the STOP button on the main unit for longer than 5 seconds Using the RESET function will erase all stored settings Do not use this unless necessary The password for rating level has been forgotten While No Disc message appears on the display of main unit hol...

Page 78: ...ol ventilated area Keep in a clean Protection jacket Store vertically Do not allow the discs to become contaminated with dirt Do not load cracked or scratched discs Handling and Storing Discs When you get fingerprints or dirt on the disc clean it with a mild detergent diluted in water and wipe with a soft cloth When cleaning wipe gently from the inside to the outside of the disc Condensation may f...

Page 79: ... Bengali Bangla 1245 Inupiak 1376 Dutch 1527 Tajik 1067 Tibetan 1248 Indonesian 1379 Norwegian 1528 Thai 1070 Breton 1253 Icelandic 1393 Occitan 1529 Tigrinya 1079 Catalan 1254 Italian 1403 Afan Oromo 1531 Turkmen 1093 Corsican 1257 Hebrew 1408 Oriya 1532 Tagalog 1097 Czech 1261 Japanese 1417 Punjabi 1534 Setswana 1103 Welsh 1269 Yiddish 1428 Polish 1535 Tonga 1105 Danish 1283 Javanese 1435 Pashto...

Page 80: ...o S40 Pentax Digital Camera Optio S50 Pentax Digital Camera Optio 33LF Pentax Digital Camera Optio MX Pentax Digital Camera Digimax 420 Samsung Digital Camera Digimax 400 Samsung Digital Camera Sora PDR T30 Toshiba Digital Camera Coolpix 5900 Nikon Digital Camera Coolpix S1 Nikon Digital Camera Coolpix 7600 Nikon Digital Camera DMC FX7 Panasonic Digital Camera Dimage Xt Minolta Digital Camera AZ 1...

Page 81: ...60dB Distortion 0 5 VIDEO OUTPUT Composite Video 1 0Vp p 75Ω load Component Video Y 1 0Vp p 75Ω load Pr 0 70Vp p 75Ω load Pb 0 70Vp p 75Ω load HDMI Impedance 85 115Ω AMPLIFIER Front speaker output 167W x 2 3Ω Center speaker output 167W 3Ω Rear speaker output 167W x 2 3Ω Subwoofer speaker output 165W 3Ω Frequency range 20Hz 20KHz S N Ratio 70dB Channel separation 60dB Input sensitivity AUX 500mV Ma...

Page 82: ...mensions W x H x D Front Rear 106 x 1310 x 85 mm Stand Base Ø340 270 x 496 x 410 mm Center 427 x 108 x 85 mm Weights Front Rear 5 1 kg 13 kg Center 1 6 kg WIRELESS MICROPHONE Power 3 AA Size 1 5V batteries DC 4 5V Weight 295g including battery Transmission Frequency 720 400MHz 722 900MHz Channels 7 channels Transmission Output 7mW Transmission Frequency Radio Wave Type F3E Antenna Impedance 50Ω Fr...

Page 83: ...amsung com ITALIA 800 SAMSUNG 726 7864 www samsung com LUXEMBURG 0035 0 2 261 03 710 www samsung com be NETHERLANDS 0900 SAMSUNG 726 7864 0 10 Min www samsung com nl NORWAY 815 56 480 www samsung com no POLAND 0 801 801 881 022 607 93 33 www samsung com pl PORTUGAL 80820 SAMSUNG 726 7864 www samsung com pt SLOVAKIA 0800 SAMSUNG 726 7864 www samsung com sk SPAIN 902 10 11 30 www samsung com SWEDEN ...

Page 84: ......

Reviews: