


70
GB
MISCELLANEOUS
71
Operating a TV with the Remote Control
(Con’t)
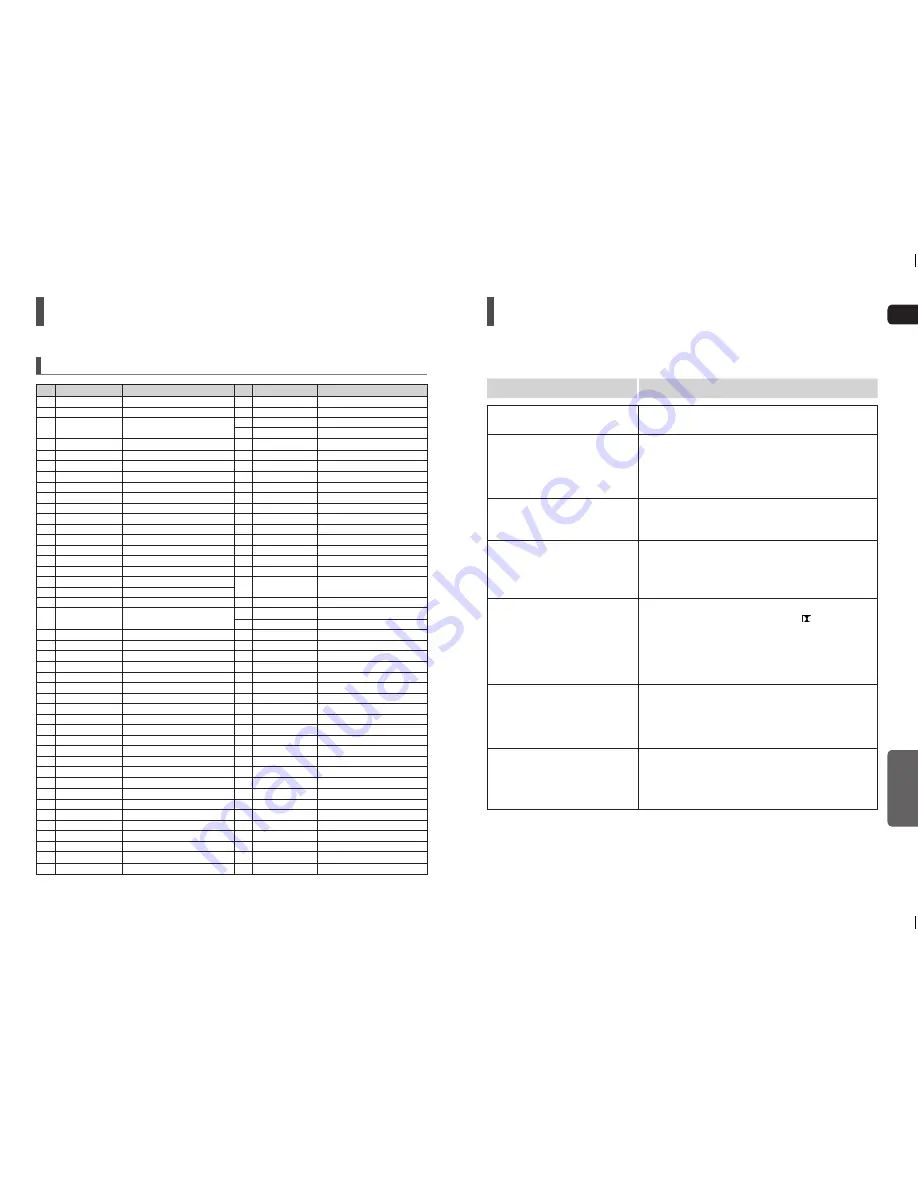
TV Brand Code List
No.
Brand
Code
No.
Brand
Code
1
Admiral (M.Wards)
56, 57, 58
44
MTC
18
2
A Mark
01, 15
45
NEC
18, 19, 20, 40, 59, 60
3
Anam
01, 02, 03, 04, 05, 06, 07, 08, 09, 10, 11,
13, 14
46
Nikei
03
47
Onking
03
4
AOC
01, 18, 40, 48
48
Onwa
03
5
Bell & Howell (M.Wards)
57, 58, 81
49
Panasonic
06, 07, 08, 09, 54, 66, 67, 73, 74
6
Brocsonic
59, 60
50
Penney
18
7
Candle
18
51
Philco
03, 15, 17, 18, 48, 54, 59, 62, 69, 90
8
Cetronic
03
52
Philips
15, 17, 18, 40, 48, 54, 62, 72
9
Citizen
03, 18, 25
53
Pioneer
63, 66, 80, 91
10
Cinema
97
54
Portland
15, 18, 59
11
Classic
03
55
Proton
40
12
Concerto
18
56
Quasar
06, 66, 67
13
Contec
46
57
Radio Shack
17, 48, 56, 60, 61, 75
14
Coronado
15
58
RCA/Proscan
18, 59, 67, 76, 77, 78, 92, 93, 94
15
Craig
03, 05, 61, 82, 83, 84
59
Realistic
03, 19
16
Croslex
62
60
Sampo
40
17
Crown
03
61
Samsung
00, 15, 16, 17, 40, 43, 46, 47, 48, 49, 59,
60, 98
18
Curtis Mates
59, 61, 63
19
CXC
03
62
Sanyo
19, 61, 65
20
Daewoo
02, 03, 04, 15, 16, 17, 18, 19, 20, 21, 22, 23, 24,
63
Scott
03, 40, 60, 61
25, 26, 27, 28, 29, 30, 32, 34, 35, 36, 48, 59, 90
64
Sears
15, 18, 19
21
Daytron
40
65
Sharp
15, 57, 64
22
Dynasty
03
66
Signature 2000 (M.Wards)
57, 58
23
Emerson
03, 15, 40, 46, 59, 61, 64, 82, 83, 84, 85
67
Sony
50, 51, 52, 53, 55
24
Fisher
19, 65
68
Soundesign
03, 40
25
Funai
03
69
Spectricon
01
26
Futuretech
03
70
SSS
18
27
General Electric (GE)
06, 40, 56, 59, 66, 67, 68
71
Sylvania
18, 40, 48, 54, 59, 60, 62
28
Hall Mark
40
72
Symphonic
61, 95, 96
29
Hitachi
15, 18, 50, 59, 69
73
Tatung
06
30
Inkel
45
74
Techwood
18
31
JC Penny
56, 59, 67, 86
75
Teknika
03, 15, 18, 25
32
JVC
70
76
TMK
18, 40
33
KTV
59, 61, 87, 88
77
Toshiba
19, 57, 63, 71
34
KEC
03, 15, 40
78
Vidtech
18
35
KMC
15
79
Videch
59, 60, 69
36
LG (Goldstar)
01, 15, 16, 17, 37, 38, 39, 40, 41, 42, 43, 44
80
Wards
15, 17, 18, 40, 48, 54, 60, 64
37
Luxman
18
81
Yamaha
18
38
LXI (Sears)
19, 54, 56, 59, 60, 62, 63, 65, 71
82
York
40
39
Magnavox
15, 17, 18, 48, 54, 59, 60, 62, 72, 89
83
Yupiteru
03
40
Marantz
40, 54
84
Zenith
58, 79
41
Matsui
54
85
Zonda
01
42
MGA
18, 40
86
Dongyang
03, 54
43
Mitsubishi/MGA
18, 40, 59, 60, 75
Troubleshooting
Refer to the chart below when this unit does not function properly. If the problem you are experiencing is not listed below or
if the instruction below does not help, turn off the unit, disconnect the power cord, and contact the nearest authorized dealer
or Samsung Electronics Service Center.
Symptom
Check/Remedy
Disc tray does not open.
Is the power cord plugged securely into the outlet?
Turn off the power and then turn it back on.
Playback does not start.
Check the region number of the DVD.
DVD discs purchased from abroad may not be playable.
CD-ROMs and DVD-ROMs cannot be played on this DVD
player.
Make sure that the rating level is correct.
Playback does not start
immediately when the
Play/Pause button is pressed.
Are you using a deformed disc or a disc with scratches on the
surface?
Wipe the disc clean.
Sound is not produced.
No sound is heard during fast playback, slow playback, and step
motion playback.
Are the speakers connected properly? Is the speaker setup correctly
customized?
Is the disc severely damaged?
Sound can be heard only from a few
speakers and not all six.
When listening to a CD or radio, sound is output to the front speakers
(L/R) only. Select <PRO LOGIC II> by pressing
PL II (Dolby Pro
Logic II) on the remote control to use all six speakers.
Make sure that the DVD disc is 5.1-CH compatible.
If you set C, SL, and SR to NONE in the speaker mode in the audio
setup of the setup screen, no sound is heard from the center speaker
and the front left and right speakers. Set C, SL, and SR to SMALL.
Dolby Digital 5.1 CH Surround Sound is
not produced.
Is there <Dolby Digital 5.1 CH> mark on the disc? Dolby Digital 5.1
CH Surround Sound is produced only if the disc is recorded with 5.1
channel sound.
Is the audio language correctly set to DOLBY DIGITAL 5.1-CH in the
information display?
The remote control does not work.
Is the remote control being operated within its operation range of
angle and distance?
Are the batteries exhausted?
Have you selected the mode(TV/DVD) functions of the remote control
(TV or DVD) correctly?


