background image

8

 - English


Connections

This section describes various methods of connecting the product to other external components. 
Before moving or installing the product, be sure to turn off the power and disconnect the power cord.

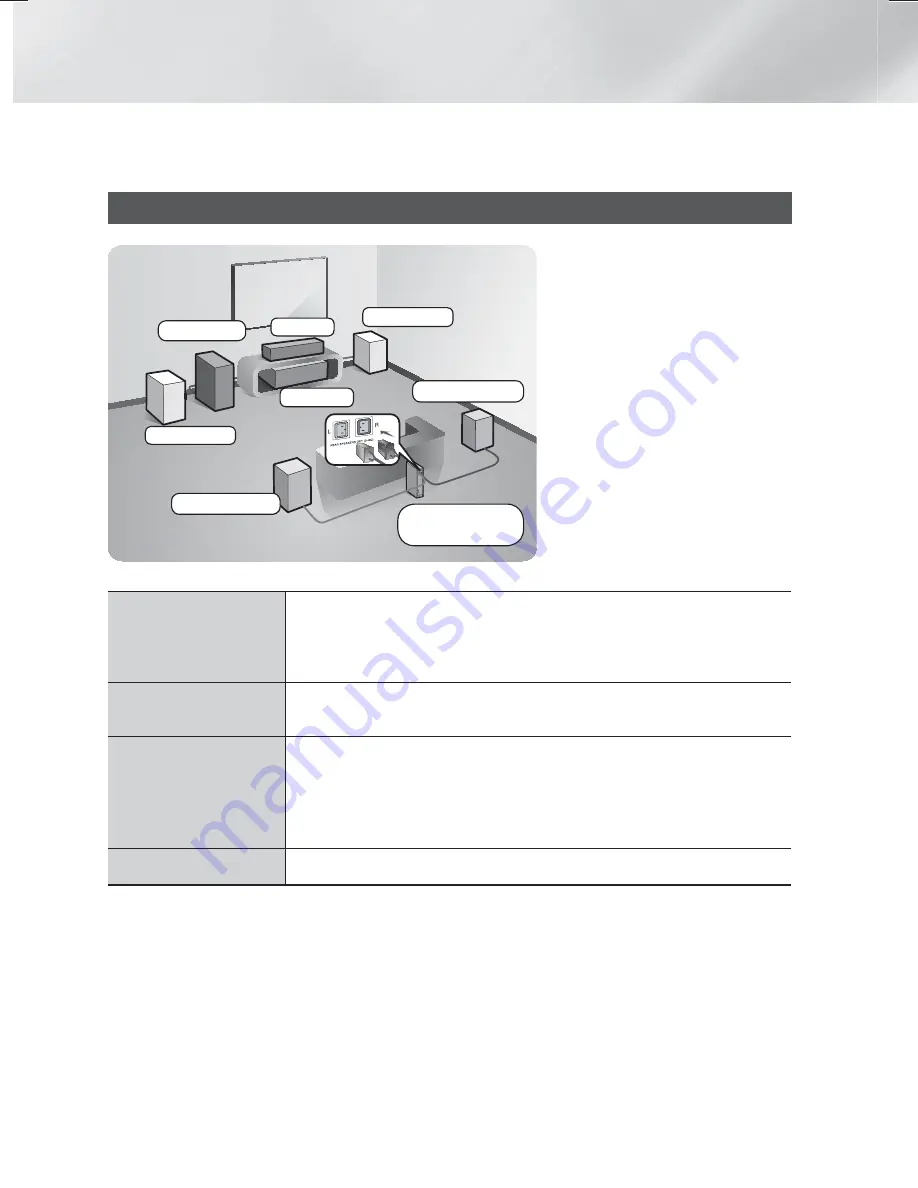
Connecting the Speakers

Surround (L)

Surround (R)

Product

Centre

Subwoofer

Wireless 

Receiver Module

Front (L)

Front (R)


Position of the product

Place it on a stand or cabinet shelf, or 
under the TV stand.

Selecting the Listening Position

The listening position should be located 
about 2.5 to 3 times the TV's screen 
size away from the TV. For example, if 
you have a 46 inch screen, locate the 
listening position 2.92 to 3.50 meters 
from the screen.

Front Speakers 

Place these speakers in front of your listening position, facing inwards (about 
45°) toward you. Place the front speakers so that their tweeters will be at the 
same height as your ear. Align the front face of the front speakers with the front 
face of the centre speaker or place them slightly in front of the centre speakers.

Centre Speaker

It is best to install the Centre Speaker at the same height as the front speakers. 
You can also install it directly over or under the TV.

Surround Speakers

Place these speakers to the side of your listening position. If there isn't enough 
room, place these speakers so they face each other. Position them about 60 to 
90cm above your ear, facing slightly downward.

*   Unlike the front and centre speakers, the surround speakers are used mainly

 for sound effects. Sound will not come from them all the time.

Subwoofer

The position of the subwoofer is not so critical. Place it anywhere you like.

*  

Surround speakers must be connected to the wireless receiver module.

*  

The appearance of your speakers may differ from the illustrations in this manual.

*  

Each speaker has a coloured label on its back or underside. Each cable has a single coloured band 
near its end. Match the band on each cable to the speaker label by colour, and then connect the 
cable to the speaker. See page 9 for exact instructions.

HT-H6550WM-XY-0519.indd   8

HT-H6550WM-XY-0519.indd   8

2014-05-19     4:21:20

2014-05-19     4:21:20

Summary of Contents for HT-H6550WM

Page 1: ... possibilities Thank you for purchasing this Samsung product To receive more complete service please register your product at www samsung com register 5 1CH Blu ray Home Entertainment System user manual HT H6550WM ...

Page 2: ...reate a danger of electric shock To avoid electric shock never touch the inside of this apparatus Only a qualified technician should open this apparatus Make sure to plug the power cord in until it is firmly seated When unplugging the power cord from a wall outlet always pull on the power cord s plug Never unplug by pulling on the power cord Do not touch the power cord with wet hands If this appar...

Page 3: ...UKT LUOKAN 1 LASER LAITE KLASS 1 LASER APPARAT PRODUCTO LÁSER CLASE 1 3D Precautions IMPORTANT HEALTH AND SAFETY INFORMATION FOR 3D PICTURES Read and understand the following safety information before using the 3D function Some viewers may experience discomfort while viewing 3D TV such as dizziness nausea and headaches If you experience any such symptom stop viewing 3D TV remove the 3D Active Glas...

Page 4: ...al Discs 26 Playing Multimedia Files 28 Controlling Video Playback 31 Controlling Music Playback 36 Using Bluetooth 39 Playing Photo Contents 40 Listening to the Radio 41 Using the Special Effects Remote Control Buttons NETWORK SERVICES 42 Logging In to Your Samsung Account 42 Adding a Credit Card 42 Before Using FILMS AND TV SHOWS or SAMSUNG APPS 43 Using FILMS AND TV SHOWS 44 Using SAMSUNG APPS ...

Page 5: ...f the coin button cell battery is swallowed it can cause severe internal burns in just 2 hours and can lead to death Keep new and used batteries away from children If the battery compartment does not close securely stop using the product and keep it away from children If you think batteries might have been swallowed or placed inside any part of the body seek immediate medical attention Speaker Com...

Page 6: ...ton To select the BD DVD mode exit the Internet or stop the content you are playing on the TV and then select the BD DVD mode To use the NFC function tag the compatible Bluetooth source device to the on the top of the product See page 38 Rear Panel HDMI OUT LAN POWER AUX IN FM ANT OPTICAL DIGITAL AUDIO IN L R HDMI IN SPEAKERS OUT CENTER SUBWOOFER FRONT L FRONT R IMPEDANCE 3 COOLING FAN FM ANTENNA ...

Page 7: ...enu or To display the number keypad may include function keys when applicable on the screen press and hold the button Press to stop the disc playing or to exist the menu Use to display the playback information when playing a Blu ray DVD disc or files Use to set a preset radio frequency Press to view the disc menu Set a Sleep time to shut off the product Press to open and close the disc tray Select...

Page 8: ...s with the front face of the centre speaker or place them slightly in front of the centre speakers Centre Speaker It is best to install the Centre Speaker at the same height as the front speakers You can also install it directly over or under the TV Surround Speakers Place these speakers to the side of your listening position If there isn t enough room place these speakers so they face each other ...

Page 9: ...e on the rear of the speaker using a screwdriver And then connect a speaker cable 6 This is the appearance after the speaker is installed Follow this steps to install other speaker Speaker Cable Connections 1 Match each speaker cable bundle to the correct speaker by matching the colour coded plug on each bundle to the coloured sticker on the bottom or back of each speaker 2 Connect the speaker wir...

Page 10: ... microwave oven wireless LAN Card Bluetooth device or any other device that uses the 2 4 5 8GHz frequencies near the product sound from the speakers may be disrupted because of interference The maximum transmission distance from the product to the wireless receiver module is about 10m but may vary depending on your operating environment If a steel concrete wall or metallic wall is between the prod...

Page 11: ...antenna is built into the wireless receiver module Keep it away from water and moisture For optimal listening performance make sure that the area around the wireless receiver module location is clear of any obstructions In 2 CH mode you will hear no sound from the wireless surround speakers Attaching the Toroidal Ferrite Core to the Power Cord of the Wireless Receiver Module SWA 6000 If you attach...

Page 12: ...olours on the input and output jacks Method 2 OPTICAL Connecting an External Digital Audio Component Use to connect the digital audio output of digital signal components such as Cable Boxes and Satellite Receivers Set Top Boxes to the home cinema Using a digital optical cable not supplied connect the Optical Digital Audio In jack on the product to the Digital Optical Out jack of the external digit...

Page 13: ... wired or wireless Wireless Network Broadband service Wireless IP sharer If your wireless IP router supports DHCP this product can use a DHCP or static IP address to connect to the wireless network Set your wireless IP router to Infrastructure mode Ad hoc mode is not supported The product supports only the following wireless security key protocols WEP OPEN SHARED WPA PSK TKIP AES WPA2 PSK TKIP AES...

Page 14: ...creen at a Glance PLAY DISC App 1 App 2 App 3 App 4 App 5 App 6 Screen Mirroring Function Settings FILMS AND TV SHOWS MULTIMEDIA SAMSUNG APPS No Disc 1 2 3 4 5 6 8 9 7 RECOMMENDED MY APPS 1 PLAY DISC Displays information about the disc currently in the disc tray Press OK to start playing the disc 2 FILMS AND TV SHOWS Download movies and TV Shows from the Internet Depending on your country this men...

Page 15: ...item or confirm a setting 4 e EXIT Button Press to exit the current menu Detailed Function Information Each Settings function menu item and individual option is explained in detail on screen To view an explanation use the buttons to select the function menu item or option The explanation will usually appear on the right of the screen A short description of each Settings function starts below Addit...

Page 16: ...ain the best possible surround sound Normal Mode Select if you have set up your speakers in the recommended speaker layout with the surround speakers next to or behind the listening positions Simple Mode Select if you have put your surround speakers in front of the listening position Downmixes the front sound to the surround sound speakers SFE Virtual 7 1 will not operate when the Simple Mode is o...

Page 17: ...ing Impaired a Custom Sound Profile especially composed of large sounds for those with hearing disorders If there are more than 3 Custom Sounds registered Family mode will be activated which is composed of the average value of all registered profiles Add Custom Sound Create and add a new Custom Sound Profile See the instructions above Edit Custom Sound Choose a Custom Sound Profile to modify it Fo...

Page 18: ...i Direct Lets you connect a Wi Fi Direct device to the product using a peer to peer network without the need for a wireless router Note that if the product is connected to a wireless network it may be disconnected when you use Wi Fi Direct See page 23 Text files such as files with a TXT or DOC extension will not display when you are using the Wi Fi Direct function Multimedia Device Settings Allow ...

Page 19: ...f it is supported on the disc Device Manager Lets you connect a wireless USB keyboard or mouse to the USB port on the front of the product Keyboard Settings Lets you configure a wireless USB keyboard connected to the product You can use the keyboard only when a QWERTY keyboard screen or window appears in the Web Browser Mouse Settings Lets you configure a wireless USB mouse connected to the produc...

Page 20: ...C compliant Samsung TV using HDMI Cable 2 Set the Anynet HDMI CEC feature to On in both the TV and the product 3 Search for and then select the product in the TV s Anynet HDMI CEC list For more exact instructions see the Anynet section of the TV s user s manual DivX Video On Demand View DivX VOD Registration Codes to purchase and play DivX VOD contents Support Remote Management When activated lets...

Page 21: ... the network 2 When it is done highlight OK and then press OK button Wired Manual If you have a static IP address or the automatic procedure does not work you ll need to set the Network Settings values manually After following Steps 1 to 3 above 1 In the Network Settings screen change Network type to Wired Then select Connect and press the OK button The product searches for a network and then disp...

Page 22: ...ork You should be able to find the security code or pass phrase on one of the set up screens you used to set up your router or modem Wireless Manual If you have a static IP address or the Automatic procedure does not work you ll need to set the Network Settings values manually After following Steps 1 to 3 in Configuring Your Network Connection on page 21 1 In the Network Settings screen change Net...

Page 23: ...eless router has a WPS PBC button follow these steps After following Steps 1 to 3 in Configuring Your Network Connection on page 21 1 In the Network Settings screen change Network type to Wireless The product searches for and then displays a list of the available networks 2 Scroll the list down select WPS PBC and then press the OK button 3 Press the WPS PBC button on your router within two minutes...

Page 24: ...e Wi Fi Direct device you want to connect 4 The Connecting pop up appears followed by the Connected pop up When it closes you should see the device listed on the Wi Fi Direct screen as connected The current wired or wireless network connection will be disconnected when you use the Wi Fi Direct function Text files such as files with a TXT or DOC extension will not display when you are using the Wi ...

Page 25: ...e power on If it downloads new upgrade software the product will ask you if you want to install it when you turn the product on To use the Auto update function your product must be connected to the Internet Update by USB 1 Visit www samsung com 2 Click SUPPORT on the top right of the page 3 Enter the product s model number into the search field As you enter the model number a drop down will displa...

Page 26: ... from the inside to the outside of the disc Disc Storage Do not keep in direct sunlight Keep in a cool ventilated area Keep in a clean protective jacket and store vertically Playing Multimedia Files 1 In the Home screen select MULTIMEDIA and then press the OK button The Recently Played screen appears 2 Select Storage Network Device or Storage Service at the bottom of the screen Storage Displays st...

Page 27: ...r device screen In the Filter drop down select Photos Videos or Music Even though the product will display folders that contain all content types it will only display files of the content type you selected For example if you selected Music you will only be able to see music files 3 If necessary use the buttons to select a folder and then press the OK button 4 Select a file to view or play and then...

Page 28: ...ideos and music files on a remote server accessible through the Internet When your home cinema is connected to the Internet you can view or play the media content saved in a cloud service through the home cinema To play the content in a cloud service you must log into your Samsung account and link the Samsung account to the cloud service account For the information about linking your Samsung accou...

Page 29: ...nt currently playing does not appear properly in 3D mode Use 3D menu for 3D content only If you apply the Side by Side or Top Bottom format to 2D content it will not be displayed properly Select Scene You can use the Select Scene function during playback to view or start a movie from the scene of your choice If the index information in the file is damaged or the file does not support indexing you ...

Page 30: ... User Lets you adjust the sharpness and noise reduction function respectively When you use the BD Wise function this menu will not appear Equaliser Mode Set Equalizer Mode on to use the equalizer Equaliser Settings Lets you set the equalizer Equaliser Settings only appears when Equaliser Mode is On Audio Select to set the desired audio language Audio Sync In some cases when the product is connecte...

Page 31: ...d files to on line sites Picasa Facebook etc or to devices To use Send with an on line site you need to establish an account with the on line site and then log in using the Log In function Send works essentially the same way for music photos and videos For general instructions see Using the Send Function on page 40 Depending on the disc or storage device the Options and Sort By menus may differ Al...

Page 32: ...e only when Equaliser Mode is on Play Selected Play Selected lets you select specific files to play It works essentially the same way for all media See Using Play Selected with Self Recorded Media CDs USB Devices etc on page 34 Ripping The Ripping function converts CD audio to the mp3 format and saves the converted files on a USB device or a mobile device connected to the product See Ripping on pa...

Page 33: ... In function Send works essentially the same way for music photos and videos For general instructions see Using the Send Function on page 40 Encoding Select to manage the text encoding options Rename Playlist Lets you modify the name of a playlist Delete Playlist Lets you delete a playlist Add to Playlist Lets you add additional files to a playlist Depending on the disc or storage device the Optio...

Page 34: ...ack List screen and the product will begin to play all tracks from Track 001 Use Clear All to deselect all selected tracks at once Then select individual tracks or use Select All to select all the tracks and then press the RETURN button on your remote or select Play and then press the OK button If you do not use Select All or select individual tracks the Play Selected list will not change Cancel c...

Page 35: ...If you selected New Playlist go to Step 8 8 On the on screen keyboard accept the default name for the new playlist or enter a new name When finished select Done press OK and then go to Step 9 9 Navigate to the screen that displays the music you want to put into the playlist 10 Use the buttons to select a track and then press the OK button A check appears in the check box on the left side of the tr...

Page 36: ...on and then select Yes Select No to continue ripping 11 When ripping is complete the Successfully ripped message appears Press the OK button The Track List screen reappears Using Bluetooth You can use a Bluetooth device to enjoy music with high quality stereo sound all without wires What is Bluetooth Bluetooth is a technology that enables Bluetooth compliant devices to interconnect with each other...

Page 37: ...r around the home cinema If several Bluetooth devices are simultaneously paired with product If the Bluetooth device is turned off not in place or malfunctions Note that such devices as microwave ovens wireless LAN adapters fluorescent lights and gas stoves use the same frequency range as the Bluetooth device and can cause electric interference For a more reliable connection to a Bluetooth device ...

Page 38: ...n lock function on the smart phone is off The smart phone s NFC function will not work if screen lock is on 2 Gently touch the NFC logo on the top of the Home Cinema with the NFC supported device If the Home Cinema is off it will turn on automatically 3 A pop up asking whether to proceed with the Bluetooth connection appears on the smart phone Select Yes When the connection is complete the connect...

Page 39: ...sites Picasa Facebook etc or devices To use Send with an on line site you need to establish an account with the on line site and then log in using the Log In function Send works essentially the same way for music photos and videos For general instructions see Using the Send Function on page 40 Information Displays the picture information Depending on the disc or storage device the Options menu may...

Page 40: ... is removed 5 When done press the button to select Send and then press the OK button The Send pop up appears listing the on line sites Picasa Facebook etc or devices that you can send the photos to 6 Select a destination and then press the OK button 7 If you are sending the photos to an on line site the site starts Log in and follow the directions on the screen To send photos to an on line site yo...

Page 41: ... 1 Creates a virtual 7 1 CH sound using the 5 1 CH speaker system Off Select for normal listening Virtual Surround You can set a two channel input source to produce sound in 5 1 channel surround mode SFE Mode Symphony Hall in Boston Hall 1 Provides a clear vocal as if listening in a concert hall Philharmonic Hall in Bratislava Hall 2 Also provides a clear vocal as if listening in a concert hall bu...

Page 42: ...in automatically the next time you log in the product will automatically enter your e mail and password All you need to do is select Sign In If you press the button after you have logged in the Sign In screen appears You can select Link Accounts Edit profile Remove Account and Sign out Adding a Credit Card To add a credit card to your account follow these steps 1 Select the in the upper right of t...

Page 43: ...ies TV Shows Trailers or Trending and then press the OK button On the page that appears use the buttons to select a show movie or trailer and then press the OK button On the Movies or TV Shows screen you can also select What s New or Genres to see more available shows or films On the Genres screen use the buttons to select a genres and then press the OK button To make a selection on a page display...

Page 44: ...pps The first time you open the SAMSUNG APPS screen the Home cinema automatically downloads a group of free apps Once these apps have been downloaded they appear on the SAMSUNG APPS screen To see additional apps select Most Popular What s New or Categories on the bottom of the screen and then press the OK button Most Popular displays the most popular apps What s New the newest Categories displays ...

Page 45: ...you will be asked if you want to change to Custom View If the current view is Custom View you will be asked if you want to change the view to Most Played Most Played sorts the apps by the number of times you ran each app Custom View lets you arrange the apps to your liking 3 Select OK and then press the OK button to change the view Lock Unlock Locking an app makes it more difficult to delete accid...

Page 46: ...wser application 1 Select SAMSUNG APPS on the Home screen and then press the OK button 2 On the SAMSUNG APPS screen select WebBrowser and then press the OK button When you run the Web Browser with the product connected by HDMI to a BD Wise compatible TV and BD Wise is on the browser is maximized to fill the screen and the TV s resolution is set to the optimal resolution automatically The Web Brows...

Page 47: ...ccess a data or text entry field and then press the OK button the keyboard pop up appears http www samsung com As you enter characters recommended text will be shown Caps 1 2 3 4 5 6 7 8 9 0 Clear q w e r t y u i o p 123 a s d f g h j k l Done z x c v b n m Cancel 100 ENG www com To use the keyboard pop up with your remote follow these steps 1 Use the buttons on your remote to move the highlight t...

Page 48: ...er function on and off When the Grabber function is on you can move a web page up and down without dragging the scroll bar The Grabber function is only available in Pointer Browsing Approved Sites Lets you restrict your children s access to inappropriate web pages by allowing access only to the web sites you have registered Every time you access this function the PIN screen appears Press and hold ...

Page 49: ...se steps 1 On the Home screen select the button in the upper right corner and then press the OK button to log in to your Samsung Account 2 After you have logged in select the button again and then press the OK button 3 Select Link Accounts in the My Account screen and then press the OK button 4 On the Link Accounts screen select the service you want to link to the product and then press the OK but...

Page 50: ...o select the correct Digital Output or you will hear no sound or just loud noise If the HDMI device AV receiver TV is not compatible with compressed formats Dolby Digital DTS the audio signal outputs as PCM Regular DVDs do not have BONUSVIEW audio and Navigation Sound Effects Some Blu ray Discs do not have BONUSVIEW audio and Navigation Sound Effects This Digital Output setup does not affect the a...

Page 51: ...ection of subtitles that are encoded on the disc and may not be available on all Blu ray Discs DVDs Information about the main feature BONUSVIEW mode will also appear if the Blu ray Disc has a BONUSVIEW section This function changes both the primary and secondary subtitles at the same time The total number of primary and secondary subtitles respectively is displayed Playing JPEG files You can t en...

Page 52: ...vide only certain features during playback Please note that this is not a defect in the product Samsung cannot guarantee that this product will play every disc bearing the Blu ray Disc DVD or CD logo because disc formats evolve and problems and errors may occur during the creation of Blu ray Disc DVD and CD software and or the manufacture of discs Please contact the SAMSUNG Customer Care Centre at...

Page 53: ...o resolution and frame rate Supported Formats Notes on the USB connection Your product supports USB storage media MP3 players digital cameras and USB card readers The product does not support folder or file names longer than 128 characters Some USB digital camera devices may not be compatible with the product Your product supports the FAT 16 FAT 32 and NTFS file systems Connect USB devices directl...

Page 54: ...tents with bitrate frame rates that are above standard The seek skip function is not available if the file s index table is damaged Depending on your network status play may become disrupted when playing contents from the network Some USB Digital camera devices may not be compatible with the product RMVB format is supported in China and Hong Kong only AVS codec is supported for contents for China ...

Page 55: ...WMA WMA Supports WMA 10 Pro Up to 5 1 Does not support WMA lossless audio Supports up to M2 profile wav wav wav mid midi midi midi type 0 and type 1 Seek not supported Supported on USB only ape ape ape NonSmart not supported aif aiff AIFF AIFF m4a ALAC ALAC Picture File Support File Extension Type Resolution Comments jpg jpeg JPEG 15360x8640 png PNG 4096x4096 bmp BMP 4096x4096 mpo MPO 15360x8640 ...

Page 56: ...y the main feature audio stream so that your AV receiver can decode the audio bitstream You will not hear BONUSVIEW audio or Navigation Sound Effects Decodes the main feature audio and BONUSVIEW audio stream together into PCM audio and adds Navigation Sound Effects then re encodes the PCM audio into DTS bitstream Decodes the main feature audio and BONUSVIEW audio stream together into PCM audio and...

Page 57: ...If you select Yes the TV s screen will go to blank for 15 seconds and then the resolution will revert to the previous resolution automatically If the screen stays blank after you have changed the resolution remove all discs and then press and hold the button on the top of the product for more than 5 seconds All settings are restored to the factory default Run the Initial Settings procedure again T...

Page 58: ...roperly Is the speaker setup correctly customized Is the disc severely damaged You can only hear sound from a few speakers but not all 6 On certain Blu ray DVD discs sound is output from the front speakers only Check if the speakers are connected properly Adjust the volume When playing audio from a CD the radio or a TV the unit outputs sound to the front speakers only Dolby Digital 5 1 CH Surround...

Page 59: ...the antenna connected properly If the antenna s input signal is weak install an external FM antenna in an area with good reception While listening to TV audio through the product there is no sound If you press the OPEN CLOSE button while listening to TV audio using the D IN or AUX functions the Blu ray DVD disc functions are turned on and the TV audio is muted Not Available appears on screen The f...

Page 60: ... a firewall enabled If so disable the firewall function BD LIVE The home cinema cannot connect to the BD LIVE server Test whether the network connection is active by using the Network Status function Check whether a USB memory device is connected to the product The memory device must have at least 1GB of free space to accommodate the BD LIVE service You can check the available size in BD Data Mana...

Page 61: ...itivity 12 dB Total harmonic distortion 0 5 HDMI Video 1080p 1080i 720p 576p 480p Audio PCM multichannel audio Bitstream audio PCM audio Amplifier Front speaker output 165W x 2 3 Centre speaker output 170W 3 Surround speaker output 165W x 2 3 Subwoofer speaker output 170W 3 Frequency response Analogue input 20Hz 20kHz 3dB Digital input 20Hz 40kHz 4dB S N Ratio 70dB Channel separation 60dB Input se...

Page 62: ...bwoofer 40Hz 160Hz 88dB W M 168 0 x 350 0 x 285 0 3 67 Network speeds equal to or below 10Mbps are not supported Samsung Electronics Co Ltd reserves the right to change the specifications without notice Weight and dimensions are approximate Design and specifications are subject to change without prior notice For the power supply and Power Consumption refer to the label attached to the product SWA ...

Page 63: ... trademarks or registered trademarks of HDMI Licencing LLC in the United States and other countries Oracle and Java are registered trademarks of Oracle and or its affiliates Other names may be trademarks of their respective owners This item incorporates copy protection technology that is protected by U S patents and other intellectual property rights of Rovi Corporation Reverse engineering and dis...

Page 64: ..._en support English INDIA 1800 3000 8282 Toll Free 1800 266 8282 Toll Free 30308282 Non Toll Free www samsung com in support INDONESIA 0800112888 021 56997777 www samsung com id support JAPAN 0120 327 527 www samsung com jp support MALAYSIA 1800 88 9999 www samsung com my support PHILIPPINES 1 800 10 7267864 PLDT 1 800 8 7267864 Globe landline and Mobile 02 4222111 Other landline www samsung com p...

Reviews: