background image

English  

23


|

05

Basic Functions

USB Function

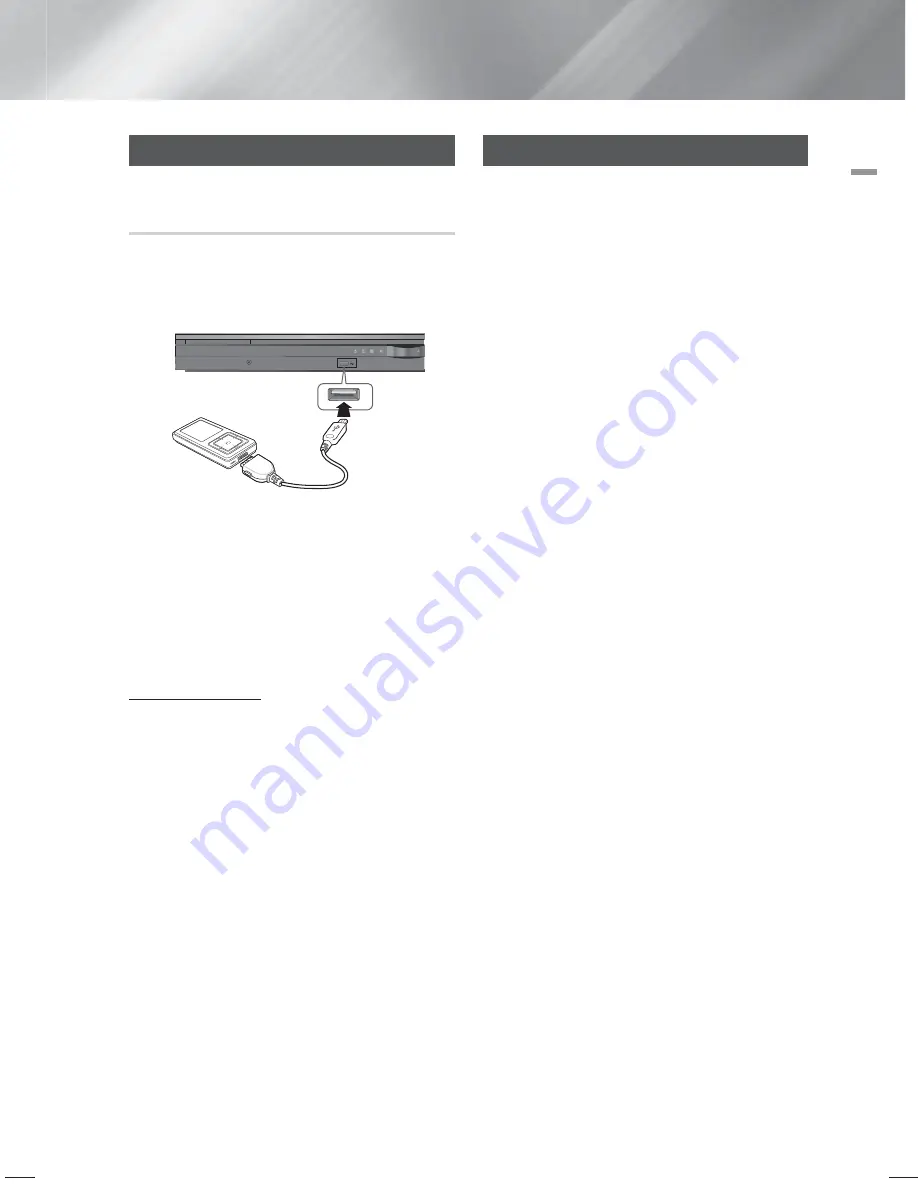
Playing Media Files using the USB Host 
Feature

You can enjoy media files such as pictures, movies and 
music saved on an MP3 player, USB memory stick or 
digital camera in high quality video with 5.1 channel 
sound by connecting the storage device to the USB port 
of the product.

AUX IN 1

5V 500mA

1 . 

Connect the USB device to the USB port on the 

front panel of the product.

2 . 

Press the 

FUNCTION

 button to select USB.

• 

USB

 appears on the display screen and then 

disappears.

3 . 

Press the 

◄►

 buttons to select 

Videos

Photos

 or 

Music

.

•  Select a file to play.

Safe USB Removal

To prevent damage to the memory stored in the USB 
device, perform safe removal before disconnecting the 
USB cable.

• Press the 

YELLOW(C)

 button.


-

REMOVE

 will appear on the display.

•  Remove the USB cable.

| NOTE |


Remove the USB cable from the USB port slowly. 
Otherwise, it may cause damage to the USB port.


The product will automatically turn off  from no USB 
and Stop mode for more than 25 minutes.

USB Recording

While playing CD-DA using the USB Recording function 
or listening to the FM radio or receiving audio source from 
an external device, you can record the audio source in 
the USB memory.

Ex) USB recording of CD-DA audio contents

1 . 

Connect the USB device to your product.

2 . 

Insert the CD-DA disc into the CD tray.

3 . 

Press the 

USB REC

 button on the remote control.

•  To start recording the current track, press the 

USB REC button on the remote control while the 
system is playing a track or stopped temporarily.

•  To record the entire CD, press and hold the USB 

REC button on the remote control.


- "FULL RECORDING" appears on the 

displayand recording starts.

4 . 

Press the 

5

 button to stop recording.

•  When USB recording of a CD is completed, you 

will find a new folder named “RECORDING” in the 
USB drive. The contents will be saved in the folder 
in the MP3 format.

•  When USB recording of FM radio or AUX source 

is completed, you will find a new folder named 
“TUNER RECORDING or AUX RECORDING” in 
the USB drive. The contents will be saved in the 
folder in the MP3 format.

| NOTE |


Do not disconnect the USB connection or the power cable 

during the USB Recording. Otherwise, it may cause damage to 
the data. 
To stop USB Recording, press the 

5

 button and disconnect 

the USB device after the system stops playing the CD 
completely.


If you disconnect the USB connection during the USB 

Recording, the system will turn off and you will not be able to 
delete the recorded file.


If you connect the USB device to the system while it is playing 

a CD, the system stops temporarily and will play again. 


If the recording duration is less than 5 seconds, a recording file 

may not be created.


USB Recording works only if the USB device is formatted in the 

FAT file system. (The NTFS file system is not supported.)


The audio signal will not be output during USB recording of the 

CD in no MIC connecting state.Otherwise,The audio signal will  
be output during USB recording of the CD in MIC connecting 
state.


When Speaker selection is set to TV Speaker, the USB 

Recording function is not supported.


Disconnect the microphone to the set during recording, 

recording will be stopped.


The set will be started X3 recording when the Microphone 

doesn't connect to the set.


Any button except Stop /Volume/Mute/ Mic Volume/Echo  

button doesn't work during USB recording.

HT-F450-ENG MIC-12-12.indd   23

HT-F450-ENG MIC-12-12.indd   23

2013-2-18   13:54:25

2013-2-18   13:54:25

Summary of Contents for HT-F445K

Page 1: ...Thank you for purchasing this Samsung product To receive more complete service please register your product at www samsung com register Digital Home Entertainment System user manual HT F450K HT F453K HT F453HK HT F445K HT F455K ...

Page 2: ... dripping or splashing and no objects filled with liquids such as vases shall be placed on the apparatus The Mains plug is used as a disconnect device and shall stay readily operable at any time This apparatus shall always be connected to an AC outlet with a protective grounding connection To disconnect the apparatus from the mains the plug must be pulled out from the mains socket therefore the ma...

Page 3: ...on in your device setup menu Go to vod divx com for more information on how to complete your registration DivX Certified to play DivX video including premium content DivX DivX Certified and associated logos are trademarks of Rovi Corporation or its subsidiaries and are used under license Covered by one or more of the following U S patents 7 295 673 7 460 668 7 515 710 7 519 274 Manufactured under ...

Page 4: ...ion 18 DivX R Deactivation 18 Language 18 Security 18 Parental Rating 18 Change Password 18 Support 18 Product Information BASIC FUNCTIONS 19 Disc Playback 19 Audio CD CD DA MP3 WMA Playback 19 JPEG File Playback 19 Using the Playback Function 21 Using the Special Remote Control Buttons 22 Listening to Radio 23 USB Function 23 USB Recording OTHER INFORMATION 24 Troubleshooting 25 Specifications 27...

Page 5: ... to rest of this user manual for additional information on playback restrictions Some commercial discs and DVD discs purchased outside your region may not play on this product This product does not support DTS sound Supported Formats Video File Support Format Supported Versions AVI DivX3 11 DivX6 8 WMV V1 V2 V3 V7 Music File Support Format Bit Rate Sampling Frequency MP3 80 320kbps 44 1khz WMA 56 ...

Page 6: ...erate properly PTP protocol for digital camera is not supported Do not disconnect USB device during a Reading process Bigger the image resolution the longer the delay to displaying DRM applied MP3 WMA or video files downloaded from a commercial site are not played back External HDD device is not supported The maximum current supported by the USB port for an external device is 500 mA at 5V DC Suppo...

Page 7: ...ICAL FM ANTENNA SPEAKER OUTPUT CONNECTORS COOLING FAN FA NET Only for Service VIDEO OUT FM ANT DIGITAL AUDIO IN OPTICAL SURROUND SUBWOOFER SURROUND SPEAKERS OUT HDMI OUT AUX IN 2 VIDEO OUT FA NET Only For Service Connecting the FM Antenna 1 Connect the FM antenna supplied to the FM ANTENNA Jack 2 Slowly move the antenna wire around until you find a location where reception is good then fasten it t...

Page 8: ...oduct s setup menu Return to the previous menu Press this to exit the menu Display current disc file status Allow access to common functions of the DVD Home Theater such as navigating the Photo List Use this to enter the Title menu Press Virtual Surround to select On Off Used to change the audio subtitle language angle etc Adjust the brightness of Display If you want to change to TV mode press the...

Page 9: ... 11 12 13 14 Nikei 03 AOC 01 18 40 48 Onking 03 Bell Howell M Wards 57 58 81 Onwa 03 Brocsonic 59 60 Panasonic 06 07 08 09 54 66 67 73 74 Candle 18 Penney 18 Cetronic 03 Philco 03 15 17 18 48 54 59 62 69 90 Citizen 03 18 25 Philips 15 17 18 40 48 54 62 72 Cinema 97 Pioneer 63 66 80 91 Classic 03 Portland 15 18 59 Concerto 18 Proton 40 Contec 46 Quasar 06 66 67 Coronado 15 Radio Shack 17 48 56 60 6...

Page 10: ...e mainly sound effects and sound will not come from them all the time Subwoofer The position of the subwoofer is not so critical Place it anywhere you like CAUTION Do not let children play with or near the speakers They could get hurt if the speaker falls When connecting the speaker wires to the speakers make sure that the polarity is correct Keep the subwoofer out of the reach of children so as t...

Page 11: ... R SURROUND STAND DRIVER STAND NUT CENTER SUBWOOFER SPEAKER CABLE FRONT L R STAND BASE SPEAKER CABLE SURROUND L R CENTER SUBWOOFER STAND SCREW 5 15 16EA Connecting The Speakers 1 Press down the terminal tab on the back of the speaker 2 Insert the black wire into the black terminal and the red wire into the red terminal and then release the tab 3 Connect the connecting plugs to the back of the prod...

Page 12: ...n and put in the hole on the center of Stand Base 4 Connect the upper Speaker to the assembled Stand 5 Insert a screw clockwise into the hole on the rear of the speaker using a screwdriver And then connect a speaker cable 6 This is the appearance after the speaker is installed Follow this steps to install other speaker 2 4 1 3 5 6 Stand Base Stand Speaker Stand In case of HT F450K FM ANT DIGITAL A...

Page 13: ...lf Tallboy Stand HT F453HK only Front Speakers 1 Stretch out the speaker cables as shown and arrange it through the hole of the stand base 2 When done use the stand driver to tighten the stand nut as shown 3 This is the appearance after the speaker is installed Follow these steps to install another speaker 4 If you want to adjust the height of the speaker loosen two screws on the rear of the speak...

Page 14: ...select the correct mode for an external device press the FUNCTION button Each time you press the button the mode changes in this order DVD CD D IN AUX 1 AUX 2 USB FM R Red W White Method 1 Method 2 External Devices Cable not supplied Cable not supplied FM ANT DIGITAL AUDIO IN OPTICAL HDMI OUT AUX IN 2 VIDEO OUT AUDIO OUT DIGITAL OUT Method 1 AUX 2 Connecting an External Analog Component Connect AU...

Page 15: ...n is pressed the selection is changed as follows Vocal Reduction Original vocals NOTE If you hear strange noises squealing or howling while using the Karaoke feature move the microphone away from the speakers Turning down the microphone s volume or the speaker volume is also effective The microphone does not operate in the AUX and TUNER mode When Speaker Selection is set to TV Speaker The Micropho...

Page 16: ... below Buttons on the Remote Control Used for the Settings Menu b 1 2 4 3 1 HOME Button Press to move to the Home screen 2 RETURN Button Return to the previous menu 3 E Enter DIRECTION Button Press to move the cursor or select an item Press the E button to activate the currently selected item or confirm a setting 4 EXIT Button Press to exit the current menu Display TV Aspect 4 3 Pan Scan Select wh...

Page 17: ...ell as Test Tone in this mode Sound Edit You can adjust the balance and level for each speaker Press the buttons to select and adjust the desired speaker Press the buttons to adjust the settings Delay Time If the speakers cannot be placed at equal distances from the listening position you can adjust the delay time of the audio signals from the Center and Surround speakers You can also set the Test...

Page 18: ...s not activated if you select OK To activate this option please activate the DivX R Deactivation Even after you reset the system the settings of DivX Registration will not be reset DivX R Deactivation Select this to get a new registration code Language You can select the language you prefer for on screen menu disc menu etc To select a language that does not appear in the menu select OTHERS in the ...

Page 19: ...he recording mode Table of contents of a MP3 CD varies depending on the MP3 WMA track format recorded on the disc WMA DRM files cannot be played The product will automatically turn off from no Disc and Stop mode for more than 25 minutes JPEG File Playback Insert a JPEG disc select Photo select the desired folder E select the desired photo E The selected file will play and slide show will start To ...

Page 20: ... DVD or CD 1 During the DVD disc or CD playback press the REPEAT button on the remote control 2 For DVD press the buttons to select A For CD press the REPEAT button repeatedly until appears 3 Press the E button at the point where you want repeat play to start A 4 Press the E button at the point where you want repeat play to stop B 5 To return to normal playback For DVD press the REPEAT button then...

Page 21: ...lable with 2 channel LPCM sources such as MP3 DivX CD and WMA GIGA GIGA The GIGA Sound Function amplifies bass and improves bass twice as much for you to appreciate powerful real sound Subwoofer only NOTE The GIGA Sound works when in 2 channel LPCM mode only GIGA doesn t work when connecting the microphone to the MIC jack S VOL smart volume S VOL This will regulate and stabilize the volume level a...

Page 22: ...O O OFF O O Anynet HDMI CEC supported TV No opeartion O O Make sure that D IN function is changed to TV CEC ON state otherwise ARC audio is not available Listening to Radio Using buttons on the Remote Control 1 Press the FUNCTION button to select FM 2 Tune in to the desired station Preset Tuning 1 You must first add a desired frequency as a preset Press the 5 button to select PRESET and then press...

Page 23: ...USB REC button on the remote control FULL RECORDING appears on the displayand recording starts 4 Press the 5 button to stop recording When USB recording of a CD is completed you will find a new folder named RECORDING in the USB drive The contents will be saved in the folder in the MP3 format When USB recording of FM radio or AUX source is completed you will find a new folder named TUNER RECORDING ...

Page 24: ...from a few speakers and not all 6 On certain DVD discs sound is output from the front speakers only Check if the speakers are connected properly Adjust the volume When listening to a CD radio or TV sound is output to the front speakers only Select V SURROUND Virtual Surround on the remote control to use all six speakers Dolby Digital 5 1 CH Surround Sound is not produced Is there Dolby Digital 5 1...

Page 25: ... than 5 seconds INIT appears on the display and all settings will return to the default values And then press the POWER button Using the RESET function will erase all stored settings Do not use this unless necessary Can t receive radio broadcast Is the antenna connected properly If the antenna s input signal is weak install an external FM antenna in an area with good reception Specifications Gener...

Page 26: ...x 74 220 x 380 x 363 HT F453K 94 8 x 1112 x 74 5 Stand base 276 x 189 95 x 116 x 74 HT F455K 94 8 x 1112 x 74 5 Stand base 276 x 189 94 8 x 1112 x 74 5 Stand base 276 x 189 HT F453HK 120 x 612 x 71 mm stand base 210 x 210 90 x 141 x 68 360 x 74 x 68 200 x 390 x 356 HT F445K 89 x 1053 x 71 mm stand base 229 x 229 89 x 1053 x 71 mm stand base 229 x 229 228 x 77 x 70 168 x 350 x 285 Weights Unit kg F...

Page 27: ...oung eay cryptsoft com All rights reserved This package is an SSL implementation written by Eric Young eay cryptsoft com The implementation was written so as to conform with Netscapes SSL This library is free for commercial and non commercial use as long as the following conditions are aheared to The following conditions apply to all code found in this distribution be it the RC4 RSA lhash DES etc ...

Page 28: ...ung com Rumania 1 08010 SAMSUNG 72678 doar din reţeaua Romtelecom tarif local 2 021 206 01 10 din orice reţea tarif normal www samsung com Area Contact Centre Web Site Serbia 0700 Samsung 0700 726 7864 www samsung com Slovakia 0800 SAMSUNG 726 7864 www samsung com Spain 902 1 SAMSUNG 902 172 678 www samsung com Sweden 0771 726 7864 SAMSUNG www samsung com Switzerland 0848 SAMSUNG 7267864 CHF 0 08 ...

Reviews: