background image

using the menu items

HANDLING MENUS AND QUICK MENUS

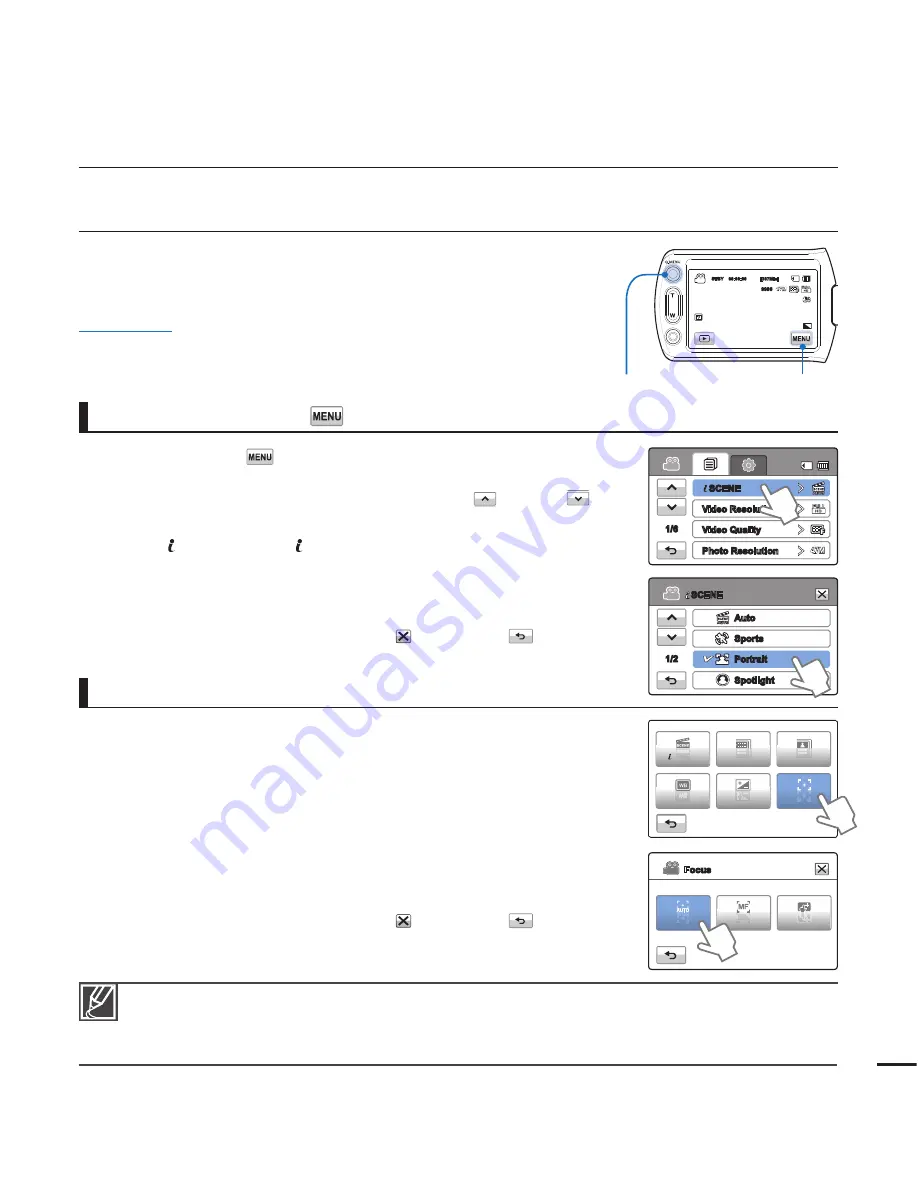
The instructions below are examples of how to access and use menu 

items using the Menu Tab and the 

Q.MENU

 Button. When you access 

and use other menu items, use these examples as guides.

PRECHECK!

Insert a memory card. 

page 28

Select the record mode by pressing the 

MODE

 button. 

page 24

1. 

Touch the Menu (

) tab on the touch panel.

The menu screen appears.

To change the current page, touch the up (

)/down (

tab. 

2. 

Touch “

SCENE.

” (The  SCENE function is used here as an 

example.)

3. 

Touch the desired option. 

Adjust the setting values accordingly.

To exit the menu, touch the Exit ( ) or Return (

) tab.

Using the Menu (

) tab

Quick menu enables you to access your favorite functions quickly. 

You can easily select the desired menu with one-touch. 

1. 

Press the 

Q.MENU

 button on your camcorder to see the 

available menu options.

The quick menu screen appears. 

2. 

Touch “

Focus.

” (The Focus function is used here as an example.)

3. 

Touch the desired option.

Adjust the setting values accordingly.

To exit the menu, touch the Exit ( ) or Return (

) tab.

Using the Q.MENU button

When using Menu or Quick menu items, some menu items can not be used at the same time, or may be 

grayed out. For more information, see Troubleshooting on page 112. 

For easy understanding, the menu setting procedures on this page are explained using the simplest 

methods. Menu setting methods can differ depending on the menu options you choose.

45

Touch Point

Manual

Auto

Focus

Photo 

Resolution

Video 

Resolution

SCENE

Focus

EV

WB

1/6

SCENE

Video Resolution

Video Quality

Photo Resolution

SCENE

Auto

Sports

Portrait

Spotlight

1/2

STBY    00:00:00           [307Min]

9999

OFF

OFF

SUPER

SUPER

Q.MENU button

Menu tab

Summary of Contents for HMX-T10BN

Page 1: ...nual HMX T10WN HMX T10BN HMX T10ON High Definition Digital Camcorder www samsung com register For video recording use a memory card that supports faster write speeds Memory Card A Class 6 SDHC card or...

Page 2: ...using a function These warning signs are here to prevent injury to you and others Please follow them explicitly After reading this section keep it in a safe place for future reference PRECAUTIONS Warn...

Page 3: ...t Stop button to start recording until you press again to pause the recording The terms photo and still image are used interchangeably and have the same meaning This camcorder records video in H 264 M...

Page 4: ...d trademarks of their respective holders Furthermore and are not mentioned in each case in this manual The SD logo is a trademark The SDHC logo is a trademark Microsoft Windows Windows Vista Windows 7...

Page 5: ...ent of the obsolete outlet 10 Protect the power cord from being walked on or pinched particularly at plugs convenience receptacles and the point where they exit from the apparatus 11 Only use attachme...

Page 6: ...items placed upon or against them paying particular attention to cords or plugs convenient receptacles and the point where they exit from the unit 20 OUTDOOR ANTENNA GROUNDING CAMCORDER be sure the an...

Page 7: ...or water d If the CAMCORDER does not operate normally by following the operating instructions adjust only those controls that are covered by the operating instructions Improper adjustment of other co...

Page 8: ...ference by one or more of the following measures Reorient or relocate the receiving antenna Increase the separation between the equipment and receiver Connect the equipment into an outlet on a circuit...

Page 9: ...L I O Do not disconnect the AC adaptor by pulling on its power cord as this could damage the power cord Do not allow water or metal and inflammable matter to enter the camcorder or AC power adaptor D...

Page 10: ...malfunction or electric shock W 4 4 W If the camcorder malfunctions immediately detach the AC adaptor or battery from the camcorder There is a risk of fire or injury W 4 4 W Keep the power cord unplug...

Page 11: ...before using insecticide E D I C I T C E S N I Do not use the camcorder near dense exhaust gas generated by gasoline or diesel engines or near a corrosive gas such as hydrogen sulphide Doing so may c...

Page 12: ...injuries caused by abnormal operation w T T w Place the camcorder on a stable surface that is well ventilated W 4 4 W Keep important data separately Samsung is not responsible for data loss Do not use...

Page 13: ...ejecting the battery 18 Charging the battery 19 Checking the battery state 22 Turning your camcorder on off 23 Switching to the power saving mode 24 Setting the operation modes 24 Using the Display b...

Page 14: ...items 48 Quick menu items 49 SCENE 50 Video Resolution 50 Video Quality 51 Photo Resolution 51 Photo Sharpness 52 White Balance 53 Aperture 54 Shutter 55 EV 55 Super C Nite 56 Back Light 57 Focus 58...

Page 15: ...fo 74 Format 75 File No 75 Time Zone 76 Date Time Set 76 Date Type 76 Time Type 77 Date Time Display 77 LCD Brightness 78 Auto LCD Off 79 Beep Sound 79 Shutter Sound 80 Auto Power Off 81 Quick On STBY...

Page 16: ...TV with HDMI 89 Connecting to a regular TV 90 Viewing on a TV screen 91 Dubbing to a VCR or DVD HDD recorder 92 Direct printing with a PictBridge printer 94 What you can do with a windows computer 95...

Page 17: ...camcorder page 17 Make sure that the SAMSUNG logo is facing up and the battery is placed as shown in the figure 2 Charge the battery fully page 18 The battery is fully charged when the CHG charging i...

Page 18: ...ct is in focus quick start guide Recording videos Recording photos The default video resolution setting is 1080 60i You can also record in SD standard definition video quality You can also take photos...

Page 19: ...Touch the thumbnail HD SD tab then touch the desired image Viewing on a high definition TV You can enjoy HD high definition videos on an HDTV page 87 Simple and fun Enjoy the various features of the i...

Page 20: ...d like to playback Sharing videos photos on YouTube Flickr FaceBook Share your contents with the world by uploading videos and photos directly to a web site with one click Click Share Upload tab on th...

Page 21: ...169A Hand strap AD63 04924A User manual CD AD46 00355A Quick start guide AD68 05486A The exact appearance of each item may vary by model The contents may vary depending on the sales region Parts and a...

Page 22: ...eful not to block the internal microphone and lens getting to know the camcorder TFT LCD screen Touch screen Q MENU button Zoom W T button Recording start stop button Power button Display button SMART...

Page 23: ...Video Photo Play mode Zoom W T lever PHOTO button Hand strap hook Jack cover USB HDMI AV USB HDMI AV Audio Video jack Jack cover DC IN Charging CHG indicator DC IN jack Tripod receptacle Battery Memo...

Page 24: ...9 This camcorder provides one record mode which combines the video and photo record modes You can easily record videos or photos in the same mode without having to change it Left of the LCD screen Ind...

Page 25: ...2 106 Top of the LCD screen Indicator Meaning Video play mode Operating status play pause 00 00 05 00 00 50 Playback time recorded time Storage media Memory card Battery info remaining charge level Pl...

Page 26: ...y mode X1 1 Slide show Playback zoom X1 1 X8 0 100_0001 File name file number 1 10 Photo image counter current image total number of recorded images Storage media memory card Battery info Erase protec...

Page 27: ...cover by sliding the OPEN CLOSE switch toward OPEN 2 Insert the battery into the battery slot until it locks Make sure that the SAMSUNG logo is facing up and the battery is placed as shown in the figu...

Page 28: ...attery into the camcorder page 17 To charge use the supplied AC power adaptor or the USB cable Charge the battery using the AC power adaptor or the USB cable The charging CHG indicator lights up and c...

Page 29: ...e will be forced to turn off after 3 seconds Low Battery CHECKING THE BATTERY STATE You can check the charging state and remaining battery capacity To check the charging state Battery level display Th...

Page 30: ...our times may differ depending on your usage and conditions The recording and playback times will be shorter when you use your camcorder in low temperatures Continuous Recording without zoom The conti...

Page 31: ...ry may be completely discharged if it has been installed and left in the camcorder for a long period of time If this occurs the battery may not fully operate even if you charge it If the battery is no...

Page 32: ...open basic operation of the camcorder TURNING YOUR CAMCORDER ON OFF 1 Open the LCD screen to turn on the camcorder Your camcorder turns on automatically when you open the LCD screen 2 To turn off the...

Page 33: ...in is set the camcorder turns off in 5 minutes If you open the LCD screen or connect a cable to the camcorder when the camcorder is in sleep mode the camcorder returns to the last active operation mod...

Page 34: ...es Warning indicators and messages may appear depending on the recording conditions The Display button does not work when the menu or quick menu screen is being displayed Press the Display button The...

Page 35: ...indicators that appear on the LCD screen depend on the current recording playback status of your camcorder The camcorder does not recognize touches if you touch more than two points on the screen at...

Page 36: ...ur camcorder includes a internal rechargeable battery that retains the date and time settings even after the power is turned off If the battery is depleted the current date time values are reset to th...

Page 37: ...setting The camcorder displays the menus and messages in the language you selected Language options may be changed without a prior notice The camcorder retains the language you select even when not co...

Page 38: ...itch toward OPEN 2 Gently push the memory card to eject it 3 Close the memory card cover by sliding the OPEN CLOSE switch toward CLOSE INSERTING EJECTING A MEMORY CARD NOT SUPPLIED To avoid data loss...

Page 39: ...ite protection switch Setting the switch prevents accidental erasure of files recorded on the card To enable writing move the switch up in the direction of the terminals To set write protection move t...

Page 40: ...emory card out of the reach of children who might swallow it The camcorder supports SD and SDHC memory cards giving you a wider choice of cards to choose from The data storage speed may differ dependi...

Page 41: ...olution the more memory is used Lower resolution and quality increases the recording time but the image quality may suffer The bit rate automatically adjusts to the recording image Accordingly the rec...

Page 42: ...offers high quality image viewing Excessive rotation may damage the connective hinge between the screen and the camcorder Clean fingerprints or dust on the screen with a soft cloth 1 Open the LCD scre...

Page 43: ...comfortable position with a clear view of your subjects while you record Make sure the camcorder lens is angled for proper shooting We recommend you keep the sun behind you while shooting Aim the camc...

Page 44: ...start stop button The recording indicator appears and recording starts 3 To stop recording press the Recording start stop button again 4 Touch the Quick View icon to view the most recently recorded v...

Page 45: ...d is recorded by the internal stereo microphone located on the front of the camcorder Make sure that the microphone is not blocked Before recording an important video make sure to test the recording f...

Page 46: ...o photograph and then press the PHOTO button When the indicator disappears the camcorder has recorded the photo image without a shutter sound Video keeps recording even while you take photos 3 To stop...

Page 47: ...urn to the standby mode touch the Return tab The recordable number of photos varies depending on the recording conditions and the photo resolution page 31 The camcorder does not record audio when you...

Page 48: ...ages 34 37 4 To cancel Smart Auto mode press the SMART AUTO button again Buttons unavailable during Smart Auto operation Menu tab Q MENU button etc Most settings are automatically adjusted in Smart Au...

Page 49: ...he zoom function consumes more power The camcorder can record the sound of the zoom mechanism ZOOMING This camcorder allows you to record using optical 10x power zoom and digital zoom by sliding the Z...

Page 50: ...that was last used However you can choose the video HD or SD or photo thumbnail view display options by touching the HD HD SD SD or photo tab on the LCD screen Understanding how to change the operatio...

Page 51: ...anywhere on the screen To stop playback and return to the thumbnails touch the Return tab It may take some time to start playback depending on the size and quality of the selected video The camcorder...

Page 52: ...y When you lift off your finger the camcorder plays the video you selected Slow playback When playback is paused touching the Reverse slow Forward slow tab reduces the playback speed Reverse forward p...

Page 53: ...r briefly They reappear when you touch anywhere on the screen 3 To return to the thumbnails touch the Return tab Loading time may vary depending on the size and quality of the photo you selected Your...

Page 54: ...from the center of the photo You can zoom in from x1 1 to x8 0 3 Touch the up down left right tab to view the area you want on the magnified photo 4 To cancel touch the Return tab Photos recorded on...

Page 55: ...he desired menu with one touch 1 Press the Q MENU button on your camcorder to see the available menu options The quick menu screen appears 2 Touch Focus The Focus function is used here as an example 3...

Page 56: ...o Resolution 1080 60i 50 Video Quality Fine 50 Photo Resolution 2880x1620 51 Photo Sharpness Normal 51 White Balance Auto 52 Aperture Auto 53 Shutter Auto 54 EV 0 55 Super C Nite Normal 55 Back Light...

Page 57: ...light X X 67 Delete 69 Protect Off Single 70 Edit Divide X X 71 Combine X X X 72 File Info 68 Slide Show Start X X 44 Slide Show Option X X 68 available X not available Playback menu items Menu option...

Page 58: ...eo Resolution 1080 60i 50 Photo Resolution 2880x1620 51 WB Auto 52 EV 0 55 Focus Auto 57 Operation mode Item Video Photo Page Thumbnail Single Thumbnail Single Highlight X X 67 Delete 69 Protect 70 Ed...

Page 59: ...oors with artificial light SCENE Using the iScene function you can select a setting that matches the scene you are shooting Sports Portrait etc Based on your selection the camcorder sets the appropria...

Page 60: ...uch the Exit or Return tab Submenu items Super Fine Records videos in super fine image quality Fine Records videos in fine image quality Normal Records videos in normal image quality 60i indicates the...

Page 61: ...to PRECHECK Select the record mode by pressing the MODE button page 24 1 Touch the Menu tab Photo Sharpness 2 Touch the desired submenu item 3 To exit the menu touch the Exit or Return tab Submenu ite...

Page 62: ...emoves unrealistic color casts so that white objects are rendered white in your image and all other colors look natural Proper white balance has to take into account the color temperature of a light s...

Page 63: ...Aperture Manual the SCENE mode is cancelled Super C Nite is set to Off and Shutter is set to Auto automatically If the aperture is set to manual the aperture value changes depending on the zoom level...

Page 64: ...harmed by too much light When you specify Shutter Manual the SCENE mode is cancelled Super C Nite is set to Off and Aperture is set to Auto automatically Even if the shutter speed is set to 1 10000 th...

Page 65: ...alue Super C Nite Use to get better images of slowly moving subjects or subjects in dark places When you turn the Super C Nite function on the camcorder adjusts the shutter speed so that the images ar...

Page 66: ...items Off Disables the function On Backlight compensation brightens the subject It typically occurs when The subject is in front of a window The person you want to record is wearing white or shiny clo...

Page 67: ...hes the end The camcorder applies the adjusted value right after you touch the or tab Focusing manually during recording Submenu items Auto In most situations it is better to use the automatic focus f...

Page 68: ...corder focus on a small section of the picture You get the camcorder to focus on a particular point by touching the desired point on the LCD screen To activate the touch point with a long touch You ca...

Page 69: ...t This mode helps adjust for facial imperfections Sepia This mode gives the image an old time reddish brown look When you turn on Smart Auto mode it automatically sets Anti shake OIS to On The Anti Sh...

Page 70: ...rns the Fader function off after it has been used once You must reset it each time you want to use it Fade in With Fader set to In press the Recording start stop button The recording starts with a dar...

Page 71: ...Return tab Submenu items Off Disables the function On You can focus on a small portion of a large object at a wide angle When recording in Tele Macro mode the focus speed may be lowered Use a tripod...

Page 72: ...PRECHECK Select the record mode by pressing the MODE button page 24 1 Touch the Menu tab Cont Shot 2 Touch the desired submenu item 3 To exit the menu touch the Exit or Return tab Wind Cut Using the...

Page 73: ...When you enable the self timer there is a time delay of 10 seconds before recording starts You can record videos or take photos of yourself PRECHECK Select the record mode by pressing the MODE button...

Page 74: ...finish the recording Touch the Quick View icon to view the most recent video or photo you have recorded After the Quick View is completed your camcorder switches back to the standby mode The Quick Vie...

Page 75: ...en 3 To exit the menu touch the Exit or Return tab Submenu items Off Disables the function Placing the subject at the center cross point puts the subject in the middle of the frame Positioning subject...

Page 76: ...turn tab Submenu items Play All Plays video clips in succession starting from a video you select and ending at the last video you recorded then returns to the thumbnail index view Play One Plays the s...

Page 77: ...et In the Highlight play mode you can adjust the volume by touching the screen You can also cancel the playback Submenu items Recent Plays a portion of all videos created within the last 24 hours All...

Page 78: ...d melodies stored in the boot up flash memory When music is On starting a slide show starts the play back of the 7 melodies in shuffle mode Effect Continuously plays back photos using the fade in out...

Page 79: ...selected All Files the camcorder deletes all the files in the storage media except for those that are protected If you selected Select Files the camcorder deletes the files you selected You can also o...

Page 80: ...iles you will see the message that corresponds to that option Go to Step 4 3 Touch the files you want to protect After you have selected all the files you want to protect touch the tab Go to Step 4 Se...

Page 81: ...ayed as the last thumbnail After the division you can partially delete an unnecessary section or combine it with other videos You can also operate this function in the full and single image display mo...

Page 82: ...camcorder combines the video files you selected in the order you designated and then stores the combined videos as a single video file You can not combine files that are protected Cancel the protect...

Page 83: ...t value Page Card Info 74 File No Series 75 Time Zone Home 75 Date Time Set JAN 01 2010 12 00 AM Summer Time Off 76 Date Type JAN 01 2010 76 Time Type 12 Hr 76 Date Time Display Off 77 LCD Brightness...

Page 84: ...camcorder You can not format a memory card with the protection tab set to lock page 29 If there is no storage media inserted you can not select the Format function and its name will be dimmed on the m...

Page 85: ...sited area 3 Touch the tab when the time zone setting is complete The camcorder does not apply the time zone you set if you finish the setting by touching the tab without touching the tab Submenu item...

Page 86: ...ype You can set the display format for the time 1 Touch the Menu Setting tab Time Type 2 Touch the desired display option 3 To exit the menu touch the Exit or Return tab Submenu items 12Hr Displays th...

Page 87: ...he date time will read JAN 01 2010 12 00 AM in the following case When the internal rechargeable battery is depleted This function depends on the Date Type and Time Type setting page 76 If the surroun...

Page 88: ...Y 00 02 00 307Min 9999 OFF OFF SUPER SUPER STBY 00 02 00 307Min STBY 00 02 00 307Min STBY 00 02 00 307Min STBY 00 02 00 307Min STBY 00 02 00 307Min STBY 00 02 00 307Min STBY 00 02 00 307Min STBY 00 02...

Page 89: ...e menu touch the Exit or Return tab Submenu items Off Disables the function On You will hear a beep when pressing buttons or tabs such as the Power button or Recording start stop button The Beep Sound...

Page 90: ...turn tab Submenu items Off Disables the function 5 Min The camcorder turns off if idle for 5 minutes without an operation Auto Power Off does not work in the following situations When the camcorder ha...

Page 91: ...ck On STBY mode is not available under the following conditions When the LCD screen is open When a video cable HDMI Audio Video cable or the USB cable is connected to the camcorder When you operate th...

Page 92: ...der the following conditions If USB Connect is set to PictBridge To enable the PC Software function set USB Connect to Mass Storage in the system setting menu option page 82 The PC Software is compati...

Page 93: ...ct Guide when you connect your camcorder to a TV 3 To exit the menu touch the Exit or Return tab To connect the Audio Video cable Submenu items Auto The video signals are output in the same format as...

Page 94: ...il display and Demo screens are shown on the TV even if you set TV Display to Off Default Set You can restore all menu settings to their factory default settings 1 Touch the Menu Setting tab Default S...

Page 95: ...ily 1 Touch the Menu Setting tab Demo 2 Touch the desired submenu item 3 To exit the menu touch the Exit or Return tab Submenu items Off Disable the Demo function On Enables the Demo function The Demo...

Page 96: ...s the function On The Anynet function is enabled When the camcorder is connected to an Anynet supported TV you can operate some functions of the camcorder using the TV s remote control When you turn o...

Page 97: ...ttach it to a TV Select HDMI TV Out page 83 Using a mini HDMI cable 1 Turn on the camcorder If you do not turn on the camcorder first the camcorder may fail to recognize the connected TV 2 Connect the...

Page 98: ...n the camcorder may turn the TV s power on an Anynet function If you don t want this to occur set Anynet HDMI CEC to Off page 86 Use only HDMI 1 3 cable when connecting to the HDMI jack of this camcor...

Page 99: ...the camcorder is connected incorrectly When connecting to a TV using the Audio Video cable match the color of the cables to the color of the corresponding jacks Video input may appear green depending...

Page 100: ...pearance on 4 3 TV Images recorded in a 16 9 ratio Video images Photo images Photo capture images Adjust the volume to a moderate level If the volume is too high the video may include noise If TV Disp...

Page 101: ...in this camcorder can be dubbed to a VCR or DVD HDD recorders PRECHECK Videos are dubbed to the other recording device via analog data transfer composite connection Use the supplied Audio Video cable...

Page 102: ...Touch the Menu Setting tab USB Connect PictBridge 2 Use a USB cable to connect your camcorder to the printer 3 Turn your printer on The photo thumbnails appear on the LCD screen 4 Touch the photos you...

Page 103: ...rning the camcorder off during printing might damage data on the storage media You can not print video images You can not print photos recorded on other devices Various printing options are available...

Page 104: ...ore 2 2 GHz or higher is recommended Notebook Intel Core2 Duo 2 2GHz or AMD Athlon X2 Dual Core 2 6GHz or higher is recommended RAM 1GB or higher is recommended Video Card NVIDIA GeForce 8500 or highe...

Page 105: ...Connecting the USB cable 1 Set USB Connect Mass Storage and PC Software On These are the default settings 2 Connect the camcorder to a PC with the USB cable A new file saving window appears along with...

Page 106: ...a PC via a USB HUB or simultaneously connect the camcorder along with other USB devices the camcorder may not work properly If this occurs remove all USB devices from the PC and then reconnect the ca...

Page 107: ...multiple videos and photos by various classifications Global Map Displays the locations where photos and videos were shot on a map 9 Selects the connected device 10 Shows Contents Manager and My Compu...

Page 108: ...ack inside the thumbnail frame allowing you to search for a desired scene with ease 4 After you select the video or photo you want double click to play back Playback starts and the controls appear Ste...

Page 109: ...assword to access Access to the web site contents can be limited depending on your web access environment Flickr is an image hosting website web services suite and online community platform In additio...

Page 110: ...The folders in the storage media appear Different file types are stored in different folders 6 Select the desired folder or files to copy then drag and drop them into the destination folder The folder...

Page 111: ...mcorder requires that files have their original folder and file names Video file H 264 HD quality videos have an HDV_ MP4 name format SD quality videos have a SDV_ MP4 name format The file number used...

Page 112: ...uthentic If not change to an authentic Samsung battery We recommend you use only genuine Samsung batteries in this camcorder Storage media Message Icon Informs that Action Insert card There is no memo...

Page 113: ...The memory card is not fast enough to record at this resolution Record video at a lower resolution and quality Replace memory card with a faster card Recording Message Icon Informs that Action Write...

Page 114: ...Reset Format the storage media File number is full Cannot record video Folder and file number have reached the maximum number and you can not record Set File No to Reset and format the storage media...

Page 115: ...eleting unnecessary files Select 2 files for combine Only two files can be combined Combine two files first and then combine the resulting file with an additional file Note that you can not combine fi...

Page 116: ...to Mass Storage Ink Error There is a problem with an ink cartridge Check the ink cartridge Put a new ink cartridge into the printer Paper Error There is a problem with the paper Check the paper in the...

Page 117: ...connect the power supply to the camcorder again before turning it on The battery discharges quickly The temperature is too low The battery is not fully charged Charge the battery again The battery has...

Page 118: ...black for an instant This is not a malfunction During recording the date time does not display Date Time Display is set to Off Set the Date Time Display to On page 77 You cannot record a photo image...

Page 119: ...if the directory structure complies with the international standard Adjusting the image during recording Symptom Explanation Solution Focus does not adjust automatically Set Focus to Auto page 57 The...

Page 120: ...per jack The image appears distorted on a TV This phenomenon is caused by connecting to a TV with 4 3 aspect ratio You cannot view the image on or hear the sound from a TV connected using the HDMI cab...

Page 121: ...n properly Exit the Intelli studio application and restart the Windows computer Intelli studio does not start Set PC Software to On in the Settings menu or install Intelli studio on the computer pages...

Page 122: ...above shows examples of unworkable combinations of functions and menu items Menu and quick menu cannot be used in Smart Auto mode The following functions cannot be used during video recording Video R...

Page 123: ...camcorder turn off the camcorder Remove the battery and AC power adaptor Remove the memory card Cleaning the camcorder Before cleaning turn off the camcorder and remove the battery and AC power adapt...

Page 124: ...d have the appropriate Audio Video jacks Otherwise you may need to use a separate video format transcoder For example an NTSC to PAL format converter NTSC compatible countries regions Bahamas Canada C...

Page 125: ...d C type connector 7 5 dBs 600 terminated mini USB B type USB2 0 High Speed General Power source Power source type Power consumption Recording Operating temperature Storage temperature Storage media E...

Page 126: ...be presented to the authorized service center EXCLUSIONS WHAT IS NOT COVERED This warranty does not cover damage due to accident fire flood and or other acts of God misuse incorrect line voltage impro...

Page 127: ...o not use the 6 hazardous materials Cadmium Cd Lead Pb Mercury Hg Hexavalent Chromium Cr 6 Poly Brominated Biphenyls PBBs Poly Brominated Diphenyl Ethers PBDEs in our products COUNTRY CALL OR VISIT US...

Reviews: