background image

42

Basic playback

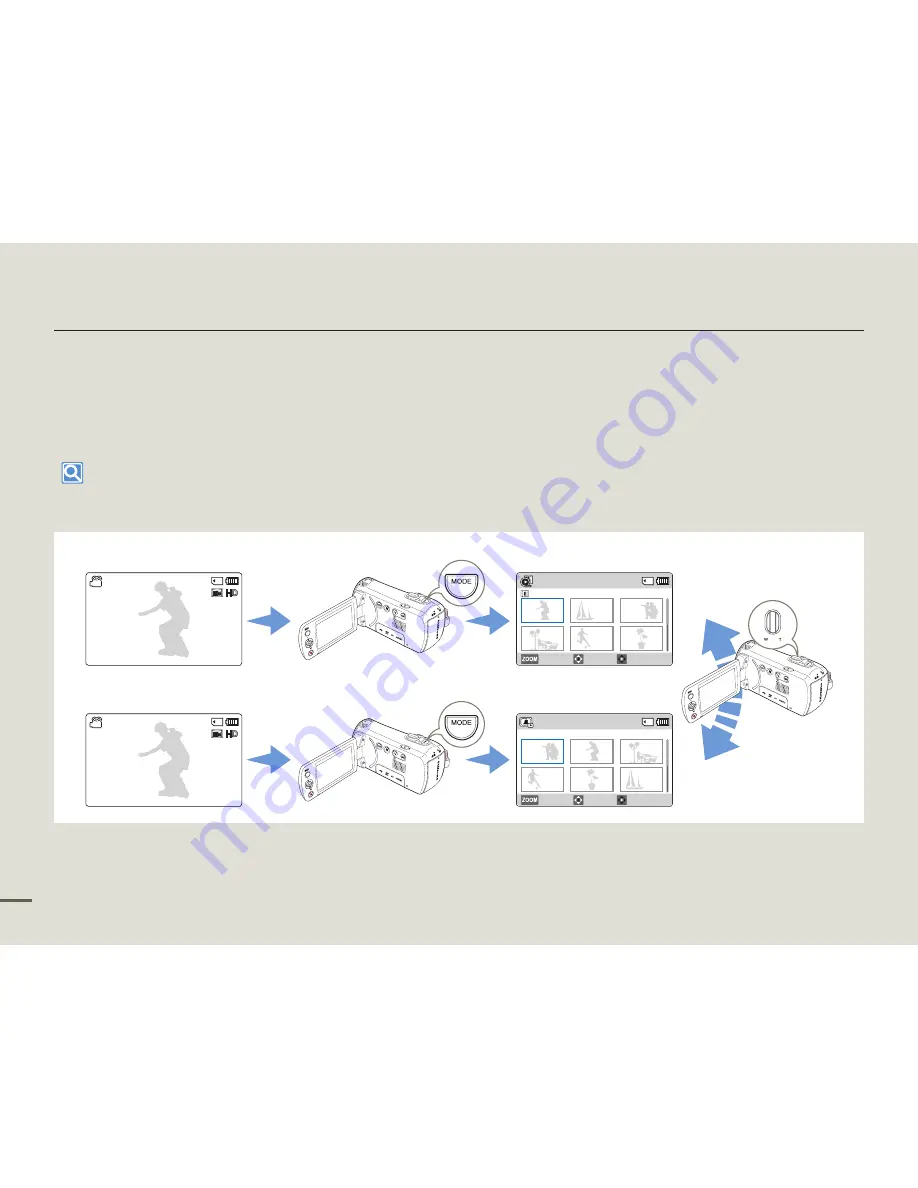
CHANGING THE PLAYBACK MODE

You can switch to the playback mode by pressing the [

MODE

] button.

The recorded videos or photos appears in thumbnail view and the most recently created file is highlighted in the thumbnail view.
The camcorder selects the thumbnail display options based on the standby mode you used the last time. However, you can choose the 
video or photo thumbnail view display options by using the [

Zoom

] lever.

Understanding how to change the operation modes

You can easily change the playback mode by using the buttons as shown in the following figures:


Normal

1/10

Move

Play

Movie

Normal

1/10

Photo

Move

Play

0:00:55

<Video playback mode>

<Photo playback mode>

<Going to the standby mode 

after recording a video>

<Going to the standby mode 

after taking a photo>

[220Min]

STBY

9999

[220Min]

STBY

9999

Summary of Contents for HMX-F80BP

Page 1: ... Camcorder www samsung com register For video recording use a memory card that supports faster write speeds Recommended Memory Card 6MB s Class 6 or above HMX F80BP HMX F80SP HMX F800BP HMX F800SP USER MANUAL ...

Page 2: ...ains socket therefore the mains plug shall be readily operable IMPORTANT INFORMATION ON USE Thank you for purchasing this Samsung Camcorder Please read this user manual carefully before you use the camcorder and keep it handy for future reference Should your camcorder fail to operate correctly refer to Troubleshooting pages 91 100 This User Manual covers models HMX F80 and HMX F800 Illustrations o...

Page 3: ...ct and cannot be used without permission of the owner of the copyright except for personal enjoyment Even if you record an event such as a show performance or exhibition for personal enjoyment we strongly recommend that you obtain permission beforehand For Open Source licences information refer to the Opensource F80 pdf in the provided CD ROM Notes regarding trademarks All the trade names and regi...

Page 4: ...ing the battery at a high temperature may cause an explosion Do not allow water or metal and inflammable matter to enter the camcorder or power adaptor Doing so may pose a fire hazard No sand or dust Fine sand or dust entering the camcorder or power adaptor could cause malfunctions or defects L I O No oil Oil entering the camcorder or power adaptor could cause electric shock malfunctions or defect...

Page 5: ... of children If the lithium battery or memory card is swallowed by a child consult physician immediately Do not plug or unplug the power adaptor with wet hands There is a risk of electric shock Keep the power adaptor unplugged when not in use or during lightning storms There is a risk of fire When cleaning the power adaptor unplug the power adaptor There is a risk of malfunction or electric shock ...

Page 6: ... or steam could damage the camcorder case or cause a malfunction Do not use the camcorder near dense exhaust gas generated by gasoline or diesel engines or corrosive gas such as hydrogen sulphide Doing so may corrode the external or internal terminals disabling normal operation Do not expose the camcorder to insecticide Insecticide entering the camcorder could cause the product to fail to operate ...

Page 7: ...osion electric shock or personal injuries caused by abnormal operation Place the camcorder on a stable surface that is well ventilated Keep important data separately Samsung is not responsible for data loss Only plug the power adaptor plug into a socket that is easily accessible If any problem occurs with the product you must pull the plug out of the socket to disconnect the power completely Turni...

Page 8: ...MENU OK GUIDE 27 SELECTING THE LANGUAGES 29 Getting ready to start recording 30 INSERTING AND EJECTING A MEMORY CARD NOT SUPPLIED 30 SELECTING A SUITABLE MEMORY CARD NOT SUPPLIED 31 RECORDABLE TIME AND CAPACITY 33 ATTACHING THE STRAP 34 ADJUSTING THE LCD SCREEN 34 Basic recording 35 RECORDING VIDEOS 35 RECORDING PAUSE RESUME 36 TAGGING AND CAPTURING GREAT MOMENTS WHILE RECORDING MY CLIP FUNCTION 3...

Page 9: ...Display 75 LCD Brightness 76 Auto LCD Off 76 Beep Sound 77 Shutter Sound 77 Auto Power Off 78 PC Software 78 Format 79 Default Set 79 Language 79 Connecting to a TV 80 CONNECTING TO A HIGH DEFINITION TV WITH HDMI 80 CONNECTING TO A REGULAR TV 81 VIEWING ON A TV SCREEN 82 Dubbing videos 83 DUBBING TO VCR OR DVD HDD RECORDERS 83 Using with a windows computer 84 WHAT YOU CAN DO WITH A WINDOWS COMPUTE...

Page 10: ...CD screen and press the Power button to turn on the camcorder Set the Lens cover open close switch to open page 15 2 To record videos press the Recording start stop button or to record photos press the PHOTO button pages 35 38 This quick start guide introduces the basic operation and features of your camcorder See the reference pages for more information Recording start stop button Recording start...

Page 11: ...ontrol Up Down Left Right button to select a desired video or photo and then press the Control OK button Normal 1 10 Photo Move Play 0 00 55 Viewing on a TV You can enjoy detailed brilliant quality videos on a connected TV pages 80 82 CARD STEP 4 Save recorded videos photos Using the Intelli studio programme built in to your camcorder you can import videos and photos into your computer and edit or...

Page 12: ...ers directory on your PC 3 Double click the file you would like to play back Sharing videos photos on Web sites Share your contents with the world by uploading photos and videos directly to a web site with a single click Click the Share p Upload tab on the browser page 88 Intelli studio runs automatically when you connect the camcorder to a Windows computer if you have set PC Software On page 78 S...

Page 13: ... User manual CD Quick start guide Micro HDMI cable Carrying case Memory card External battery charger Optional accessories The exact appearance of each item may vary by model The contents may vary depending on the sales region You can purchase parts and accessories after consulting with your local Samsung dealer SAMSUNG is not responsible for reduced battery life time or malfunctions caused by any...

Page 14: ...utton 4 Recording start stop button 5 LCD screen 6 Memory card Jack cover ⓐ USB jack ⓑ Memory card slot ⓒ AV jack ⓓ CHG charging indicator ⓔ HDMI jack 7 Internal speaker 8 Display button 9 Recording pause resume button 10 Back light button SMART BGM button 11 SMART AUTO button 12 Power button 2 3 4 5 6 8 9 10 11 12 1 7 ⓑ CA RD ⓓ ⓒ ⓐ ⓔ ...

Page 15: ...rap hook 6 Lens cover open close switch 7 Internal microphone 8 Battery release switch BATT 9 Tripod receptacle Rear 1 Mode indicator Recording mode Video Photo Playback mode 2 Recording start stop button 3 Battery slot Be careful not to cover the internal microphone and lens during recording 8 9 2 3 1 7 6 4 5 1 3 2 ...

Page 16: ...Operating status standby recording pause photo capturing 0 00 00 220Min Time counter video recording time remaining recordable time iSCENE Smart Auto Time Lapse REC My Clip 9999 Photo image counter total number of recordable photos White Balance Manual focus 1 50 C Nite 0 3 EV Exposure Value Zoom optical zoom intelli zoom digital zoom Digital Special Effect 01 JAN 2012 00 00 Date Time Display Righ...

Page 17: ...me recorded time Storage media memory card Battery info remaining battery level PlayOption Video Resolution Indicator Meaning My Clip Protect Shortcut menu Bottom of the LCD screen Indicator Meaning Button guide 100 0001 File name file number Normal 1 10 Photo Move Play 0 00 55 Top of the LCD screen Indicator Meaning Video playback mode Storage media memory card Battery info remaining battery leve...

Page 18: ...ber of recorded photos Storage media memory card Battery info remaining battery level Photo Resolution Indicator Meaning Protect Shortcut menu Bottom of the LCD screen Indicator Meaning Button guide 100 0001 File name file number Normal 1 10 Move Movie Play Top of the LCD screen Indicator Meaning Photo playback mode Storage media memory card Battery info remaining battery level Bottom of the LCD s...

Page 19: ... battery 2 Push down and then lift the battery out in the direction shown in the figure Battery release BATT switch Use only Samsung approved batteries Do not use batteries from other manufacturers Otherwise there is a danger of overheating fire or explosion Samsung is not responsible for the problems caused by unapproved batteries Remove the battery from the camcorder when the camcorder is not in...

Page 20: ...lose to the wall outlet If you experience a malfunction while using the camcorder separate the power adaptor immediately from the wall outlet Do not use the power adaptor in a tight space such as between furnishings Make sure to turn off the camcorder before disconnecting the power adaptor Otherwise you can damage the storage media or data When recording indoors with a wall outlet available it is ...

Page 21: ...nk Battery level display The battery level display shows the amount of battery power remaining in the battery Battery Level Indicator State Message Fully charged 75 50 50 25 25 5 less than 5 Exhausted flickers The device will soon turn off Change the battery as soon as possible The device will be forced to turn off after 3 seconds Low battery The figures above are based on a fully charged battery ...

Page 22: ...ing and playback times will be shorter when you use your camcorder in low temperatures We recommend using the power adaptor when using the Time Lapse REC function Continuous Recording without zoom The continuous recording time shows the available recording time when you record without using any other function after recording starts The battery may discharge 1 5 times faster than this reference if ...

Page 23: ...ttery before using the camcorder outdoors in cold temperatures The cold temperature may shorten the length of time you can use the battery before needing to recharge it Carry the supplied USB cable and power adaptor to charge the battery while travelling Check whether the battery terminal is damaged if the battery falls or is dropped If you install a battery with the damaged terminal into the camc...

Page 24: ...rder for the extended time the following functions enable you to prevent unnecessary energy consumption Sleep mode The camcorder switches to the sleep mode when the LCD screen is closed and then if idle for more than 20 minutes the camcorder turns off However if Auto Power Off 5 Min is set the camcorder turns off in 5 minutes If you open the LCD screen during sleep mode the sleep mode ends and the...

Page 25: ...orage media Internal rechargeable battery Your camcorder includes a internal rechargeable battery that retains the date and time settings even after the power is turned off Once this battery is depleted the current date time values are all reset to defaults and you need to recharge the internal rechargeable battery The date time must be set again Charging the internal rechargeable battery The inte...

Page 26: ...ay back videos or photos This camcorder provides one recording mode for both video and photo recordings You can easily record videos or photos in the same mode without having to switch modes SWITCHING THE INFORMATION DISPLAY MODE You can switch the on screen information display mode Press the Display button The full and minimum display modes will alternate Warning indicators and messages may appea...

Page 27: ... select EV function Press the Control Left Right button to adjust the exposure while viewing the image on the LCD screen 3 Press the Control OK button to confirm your selection Press the Control OK button to exit the shortcut menu The exposure value setting is applied and the indicator and setting value appear The shortcut menu OK guide cannot be used in the SMART AUTO mode The example above shows...

Page 28: ...layback Pause Access the shortcut menu Playback zoom Confirms selection UP iSCENE Zoom tele Increases the volume Moves the cursor up DOWN Focus Zoom wide Decreases the volume Moves the cursor down LEFT EV Search playback RPS Reverse Playback Search rate x2 x4 x8 x16 Previous skip playback Previous image Moves to the previous menu RIGHT Face Detection Search playback FPS Forward Playback Search rat...

Page 29: ... to exit the menu The OSD language appears in the selected language Language options may be changed without prior notice The selected language remains even without the battery The date and time format may change depending on the language you selected Submenu items English ǎᨕ Français Deutsch Italiano Español Português Nederlands Svenska Suomi Norsk Dansk Polski Čeština Slovensky Magyar Română Бълг...

Page 30: ...DHC and SDXC cards Compatibility with this camcorder may vary depending on the card manufacturer and type To insert a memory card 1 Turn the camcorder off 2 Open the memory card cover as shown in the figure 3 Insert the memory card into the card slot until it softly clicks Make sure that the camcorder is placed as shown above and the terminal portion of the card is facing up 4 Close the cover To e...

Page 31: ... correctly and your recordings may be lost The memory cards released after this camcorder may not be compatible with the camcorder When the camcorder operates with 6MB s Class 6 or above memory cards it can be stable SD SDHC SDXC memory cards have a mechanical write protection switch Setting the switch prevents accidental erasure of files recorded on the card To enable writing move the switch up i...

Page 32: ...se a soft dry cloth to clean the terminals if required Do not paste anything other than the label provided with the card on the label pasting area of the card Do not use a damaged memory card Be careful to keep the memory card out of the reach of children who might swallow it Samsung is not responsible for data loss due to misuse including loss caused by any PC virus We recommend using a memory ca...

Page 33: ...he figures in the table may differ depending on the actual recording conditions and subject The higher the resolution the more memory is used Lower resolution increases the recording time but the image quality may suffer The bit rate automatically adjusts to the recording image Accordingly the recording time may vary Memory cards bigger than 64GB may not operate normally The recording length of a ...

Page 34: ...e LCD screen with your finger The screen opens up to 90 2 Rotate the LCD screen towards the lens You can rotate it up to 180 towards the lens and up to 90 backwards To view recordings more conveniently rotate the screen by 180 towards the lens and then fold it back to the body Excessive rotation may damage the connective hinge between the screen and the camcorder When the LCD screen is rotated by ...

Page 35: ...een to the best angle for recording Use the Zoom lever or Zoom button to adjust the size of the subject page 40 2 Press the Recording start stop button The recording z indicator appears and recording starts 3 To stop recording press the Recording start stop button again If power is interrupted or an error occurs during recording the video may not be recorded Samsung is not responsible for any dama...

Page 36: ...ing the sound of the zoom mechanism etc When you record indoors or in the dark places ISO sensitivity is automatically adjusted It can make interference effects on images and you cannot view the images recorded in the dark places correctly We recommend you to use professional camcorders like a infrared camcorder when recording at night An image can be shaken when the Anti Shake HDIS function is en...

Page 37: ...ing start stop button again Understanding My Clip function During a video recording Captured photos are saved on the photo thumbnail view You can extract and play back the scenes tagged as My Clip from a video page 45 The camcorder can tag up to 5 as My Clip and capture up to 5 photos while recording a video The camcorder tags the scene recorded between before 3 seconds and after 5 seconds when pr...

Page 38: ...mpletely saved on the storage media Do not turn off the camcorder or remove the memory card when taking photos as it may damage the storage media or data This camcorder provides one combined video and photo recording mode You can easily record videos or photos in the same mode without having to change it The recordable number of photos varies depending on the photo resolution page 33 Audio is not ...

Page 39: ...a portrait outdoors at night 3 Press the Recording start stop button or PHOTO button pages 35 38 4 To cancel the SMART AUTO mode press the SMART AUTO button again The SMART AUTO and Anti Shake HDIS icons disappear from the screen When there is no detected scene the icon appears The camcorder may not detect the Portrait mode when recording a face depending on the position of the face or brightness ...

Page 40: ... the minimum possible distance between the camcorder and subject is about 1cm about 0 39 inch for wide angle and 1m about 39 4 inches for telephoto Optical zoom preserves image quality but the image quality may suffer when you use digital zoom Fast zooming or zooming in a subject that is a good distance away may cause the camcorder to focus slowly If this occurs use Focus Manual page 58 We recomme...

Page 41: ...ck lighting influences recording when the subject is darker than the background The subject is in front of a window The subject is against a snowy background The subject is outdoors and the background is overcast The light sources are too bright The person to be recorded is wearing white or shiny clothes and is placed against a bright background The person s face is too dark to distinguish his her...

Page 42: ...ndby mode you used the last time However you can choose the video or photo thumbnail view display options by using the Zoom lever Understanding how to change the operation modes You can easily change the playback mode by using the buttons as shown in the following figures Normal 1 10 Move Play Movie Normal 1 10 Photo Move Play 0 00 55 Video playback mode Photo playback mode Going to the standby mo...

Page 43: ... back a video tagged as My Clip the My Clip icon on the LCD screen appears The colour of the My Clip icon is changed to yellow at the scenes tagged as My Clip for 8 seconds 3 To stop playback and return to the thumbnail view use the Zoom lever Do not power off the camcorder or eject the memory card during video playback Doing so may damage the recorded data The loading time of a video may vary dep...

Page 44: ...uring playback you may not hear the sound from the speaker You can hear the recorded sound only when the playback is at normal speed When playing back the My Clip tags the search playback function does not operate Various playback operations Playback Pause Stop 1 Playback and pause alternate when you press the Control OK button during playback 2 Use the Zoom lever to stop playback and return to th...

Page 45: ...HE SMART BGM FUNCTION You can enjoy music during video playback If the original sound in the video is big the background music will be decreased naturally On the other hand if the original sound in the video is small the background music will be increased naturally This function works only in the video playback mode page 26 Select the desired video to play back and then press the SMART BGM button ...

Page 46: ... a short time 3 Aim the camcorder at the scene you want and then press the PHOTO button The camcorder tags the scenes as My Clip and captures photos at the same time 4 To stop playback and return to the thumbnail view use the Zoom lever During a video playback the camcorder can tag up to 20 as My Clip from a video and capture photos until the available remaining capacity of the storage media Photo...

Page 47: ...ays the photo you selected in full screen view and the shortcut menu for playback appears for a short time To view the previous next photo press the Control Left Right button 3 To return to the thumbnail view use the Zoom lever Do not power off the camcorder or eject the memory card during photo playback Doing so may damage the recorded data Loading time may vary depending on the size and quality ...

Page 48: ...amed and the image is magnified starting from the centre of the image You can zoom in from x1 3 to x2 0 3 Press the Control Up Down Left Right button to view the area you want on the magnified photo 4 To cancel use the Zoom lever Photos recorded on other devices or those edited on a PC cannot be magnified While you are using the playback zoom you cannot select other images 1 10 100 0001 Thumbnail V...

Page 49: ...t the desired submenu item and then press the Control OK button 4 When you finish making settings press the MENU button to exit While you are using certain menu items some other menu items cannot be used at the same time or may be greyed out For more information see Troubleshooting on page 100 For easy understanding the menu setting procedures in the example above are explained using the simplest ...

Page 50: ...Detection Off 56 EV 57 C Nite 58 Focus Auto 58 Anti Shake HDIS Off 60 Digital Special Effect Off 61 Zoom Type Optical Zoom 62 Cont Shot Off 63 Time Lapse REC Off 64 Guideline Off 66 Settings 74 Playback menu items M Accessible Not accessible Items Video playback mode Photo playback mode Default value Page Thumbnail View Option Thumbnail view only M M Normal 67 PlayOption M Play All 68 Smart BGM Op...

Page 51: ...n 77 Auto Power Off M M M M M 5 Min 78 PC Software M M M M M On 78 Format M M M M M 79 Default Set M M M 79 Language M M M M M English 79 Menu options and default values may be changed without prior notice There are some functions you cannot activate simultaneously in the menu These items are greyed out You cannot select the grey menu items In general functions in both the thumbnail display and fu...

Page 52: ...ems Items Use On screen display Auto Use this setting for regular recording conditions The camcorder automatically adjusts the aperture value and shutter speed for optimum recording Sports For recording rapidly moving subjects Example When recording sports Portrait For recording a portrait image Use this setting to capture natural skin tones Spotlight For recording subjects under strong light For ...

Page 53: ... frames per second Recorded files are encoded using Variable Bit Rate VBR VBR is an encoding system that automatically adjusts the bit rate according to the image being recorded High resolution images occupy more memory space than low resolution images If you select the higher resolution there is less space to record videos in the memory The recording times depend on the resolution of a video to b...

Page 54: ...ace to store photos in the memory Resolutions marked with are the resolutions of photos to be recorded when you set video resolution to 720X576 50p 4 3 White Balance Using the White Balance function you can select a setting that matches the light illuminating the subject you are shooting Daylight Fluorescent etc or let the camcorder make all adjustments automatically Based on your selection the ca...

Page 55: ...white balance and provide a more natural result When you set white balance manually the object you frame must be white Otherwise your camcorder may not detect an appropriate setting value The adjusted setting remains until you set the white balance again During normal outdoor recording setting to Auto may provide better results Cancel the digital zoom function for clear and precise setting Reset t...

Page 56: ... faces as shown in the figure below The camcorder can detect up to three faces 220Min STBY 9999 The Face Detection indicator and Face Detection frame are not recorded Face Detection may not operate depending on the recording conditions For example the Face Detection frame may appear on a face like shape even when the subject is not a person s face If this occurs turn off the Face Detection functio...

Page 57: ... 0 3 0 0 3 0 6 1 0 1 3 1 6 2 0 4 Confirm your selection by pressing the Control OK button The camcorder will apply the exposure value setting and the indicator and setting value appear To cancel the adjusted exposure value manually select 0 in Step 3 Understanding EV Exposure Value Exposure value is the total amount of light allowed to fall on the photographic media Image sensor during the process...

Page 58: ...the camcorder on focus is always set to automatic You can also set the focus manually Select the recording mode by pressing the MODE button page 26 1 Press the MENU button p Control Left Right button p Focus 2 Select the desired submenu item with the Control Up Down button and then press the Control OK button 3 Press the MENU button to exit the menu Submenu Items Items Use On screen display Auto I...

Page 59: ...the Control Left Right button to adjust the focus Further subject Nearer subject Examples of the Manual focus mode When the subject is dark When the background is too bright When you view the subject through a window that is stained or wet When the subject has dense horizontal or sloping stripes When the subject is distant and behind a nearby wire fence Walls atmosphere and other low contrast subj...

Page 60: ...l object When recording while walking or in a moving car The camcorder automatically activates the Anti Shake HDIS function in the Smart Auto mode Gross camcorder shake may not be entirely corrected even if Anti Shake HDIS is On Firmly hold the camcorder with both hands When this function is On the actual movement of the subject and the movement displayed on the screen may be slightly different Wh...

Page 61: ...utton 3 Press the MENU button to exit the menu Examples of 7 digital effect options Off Disables the function Blk Wht This mode changes the image into black and white Sepia This mode gives images a reddish brown pigment Negative This mode reverses the colours and the brightness and creates a negative look Dazzle This mode creates a brighter image by increasing colour saturation Noir This mode crea...

Page 62: ...s digitally processed more than the intelli or optical zoom modes As a result the image resolution may deteriorate The image quality may deteriorate depending on how much you zoom in on the subject The zoom range will change depending on the aspect ratio of the video Submenu Items Items Use Optical Zoom To use optical zoom up to 52X Intelli Zoom The camcorder zooms the full width of the image sens...

Page 63: ...esired submenu item with the Control Up Down button and then press the Control OK button 3 Press the MENU button to exit the menu The number of recordable photos depends on the photo s resolution and the memory space If an error occurs Card full etc during continuous shot the recording stops and an error message appears Submenu Items Items Use On screen display Off To record only one photo image O...

Page 64: ...recording interval Sec with Control Up Down button 4 Move to the next setting Hr by pressing the Control Left Right button and then set the desired total recording time in the same way 5 Press the Control OK button to finish the setting and then press the MENU button to exit the menu 6 After setting the Time Lapse REC mode press the Recording start stop button The Time Lapse REC starts Depending o...

Page 65: ...30 Sec you need to set the recording time for the Time Lapse Recording to at least 25 or 13 minutes to record a minimum video length of 1 second 50 or 25 images Press the Recording start stop button if you want to stop the Time Lapse Recording Audio is not recorded during time lapse recording The maximum continuous recording time is under 20 minutes The maximum video file size is 1 8GB When a vide...

Page 66: ...ontrol OK button 3 Press the MENU button to exit the menu Positioning a subject at the cross point of a guideline provides a balanced composition Guidelines are not recorded Submenu Items Items Use On screen display Off To cancel the guideline function Cross Use when focusing a subject in the centre Grid Use when recording a subject in a horizontal or vertical composition or shooting with the tele...

Page 67: ...tion 2 Select the desired submenu item with the Control Up Down button and then press the Control OK button Date Normal Normal 1 10 Photo Move Play 0 00 55 Date 1 10 Photo Date Play 01 JAN 2012 0 10 31 This function is available in the thumbnail view only Submenu Items Items Use Normal To display the thumbnails of files in the order in which the files were recorded Date To sort the thumbnails of r...

Page 68: ... menu To play back the selected background music with a video press the SMART BGM button when the video plays back To stop the background music press the SMART BGM button again When you change a background music by pressing the MENU button while the video is playing back the video will be paused Press the Control OK button to play back the paused video again with the changed background music Subme...

Page 69: ...songs from Manage BGM in the Smart BGM screen or from the BGM folder in the memory card In the case of the camcorder sold in Europe you should save external songs as follows 1 Follows steps 1 3 as the figure on the left 2 Change the external song s name select a location to save it click Convert Yes The BGM folder is automatically created in the selected location and then the external song is conv...

Page 70: ...corresponding to the selected option will appear Use the Control Left Right button to select Yes and then press the Control OK button Deleted images cannot be recovered Do not remove the power adaptor or memory card while deleting files otherwise the storage media may be damaged You can also delete your recordings in the single view To protect important images from accidental deletion activate imag...

Page 71: ... ⓐ and ⓑ for each video tagged as My Clip ⓓ Press the MENU button to delete all tags from the videos you selected ⓔ The message corresponding to the selected option appears Use the Control Left Right button to select Yes and then press the Control OK button 4 If you selected All Files the message corresponding to the selected option will appear Use the Control Left Right button to select Yes and t...

Page 72: ...ress the MENU button to protect the photos and videos you selected ⓔ The message corresponding to the selected option appears Use the Control Left Right button to select Yes and then press the Control OK button 4 If you selected All On the message corresponding to the selected option will appear Use the Control Left Right button to select Yes and then press the Control OK button 5 If you selected ...

Page 73: ...press the Control OK button The following information for the selected file appears Date Duration Video only Size Resolution 3 Press the MENU button to exit the menu Submenu Items Items Use Start To start a slide show from the current image The indicator appears To stop the slide show press the Control OK button again To return to the thumbnail view move the Zoom lever Interval Continuously plays ...

Page 74: ...orded files in the order they were recorded 1 Press the MENU button p Control Left Right button p Settings p Control Up Down button p File No p Control OK button 2 Select the desired submenu item with the Control Up Down button and then press the Control OK button 3 To exit the menu press the MENU button When you set File No to Series each file is assigned a different number to avoid duplicating f...

Page 75: ...ntrol OK button 2 Select the desired submenu and menu item with the Control Up Down button and then press Control OK button 3 Press the MENU button to exit the menu The date time appears on the LCD screen according to the selected option When the internal battery is depleted the date time will read 01 JAN 2012 00 00 Submenu Items Items Use On screen display Off Not to display the current date time...

Page 76: ...Off p Control OK button 2 Select the desired submenu item with the Control Up Down button and then press the Control OK button 3 Press the MENU button to exit the menu When the Auto LCD Off function is enabled you can press any button on the camcorder to return LCD brightness to normal Auto LCD Off will be disabled in the following case If the power cable Power adaptor USB cable is connected Subme...

Page 77: ...ss the PHOTO button on or off 1 Press the MENU button p Control Left Right button p Settings p Control Up Down button p Shutter Sound p Control OK button 2 Select the desired submenu item with the Control Up Down button and then press the Control OK button 3 Press the MENU button to exit the menu Submenu Items Items Use Off Disables the function On To have the camcorder beep every time you press a...

Page 78: ... cable between the camcorder and your PC Using the software you can download stored video and photo images on the camcorder to your PC s hard disk You can also edit video and photo files using the PC software 1 Press the MENU button p Control Left Right button p Settings p Control Up Down button p PC Software p Control OK button 2 Select the desired submenu item with the Control Up Down button and...

Page 79: ... card was formatted on other devices If the memory card was used to record on other devices If the camcorder cannot read the memory card A memory card with the protection tab set to lock will not be formatted If there is no storage media inserted it cannot be selected and will be dimmed in the menu You cannot format when the battery power is insufficient We recommend you use the power adaptor to av...

Page 80: ... or source selector to the HDMI input you ve attached the camcorder to Refer to the TV s instruction manual to see how to select the TV s input or source 4 Start to play back images page 42 Understanding the HDMI HDMI High Definition Multimedia Interface is a compact audio video interface for transmitting uncompressed digital data You can use only a D to A type micro HDMI cable with this camcorder...

Page 81: ... camcorder to the correct input jacks The TV screen may not display the right image information if connected incorrectly Do not use excessive force when connecting the cables We recommend you use the power adaptor as the power source When connecting to a TV using the Audio Video cable match the colour of the cables to the colour of the corresponding jacks Video input may appear green depending on ...

Page 82: ...ding on LCD and TV screen ratio Recording ratio Appearance on Wide Screen 16 9 TV Appearance on 4 3 TV Images recorded in a 16 9 ratio Images recorded in a 4 3 ratio Adjust the volume to a moderate level If the volume is too high the video may include the noise CARD ...

Page 83: ...rders with the supplied Audio Video cable 3 Start the playback on your camcorder and record it on the recording device Refer to the instruction manuals supplied with your recording device for details 4 When dubbing finishes stop the recording device and then your camcorder Videos recorded on this camcorder can only be dubbed using the Audio Video cable in SD standard definition image quality regard...

Page 84: ...e2 Duo 2 2GHz or AMD Athlon X2 Dual Core 2 6GHz or higher is recommended RAM 1GB or higher is recommended Video Card NVIDIA GeForce 8500 or higher ATI Radeon HD 2600 series or higher Display 1024 x 768 16 bit colour or higher 1280 x 1024 32 bit colour recommended USB USB 2 0 Direct X DirectX 9 0c or higher Recommended Memory Card 6MB s Class 6 or above System requirements mentioned above are recom...

Page 85: ...ollow these steps 1 Click the Safely Remove Hardware icon on the taskbar 2 Select USB Mass Storage Device and then click Stop 3 If the Stop a Hardware device window appears click OK 4 Disconnect the USB cable from the camcorder and PC Use the provided USB cable Supplied by Samsung Make sure you insert the USB plug into the USB jack with the plug facing in the correct direction When the USB cable i...

Page 86: ...ntended for home use It is not for precision or industrial productions For these applications we recommend an editing software designed for professional use For details select Help Help on the Intelli studio screen No Description 1 Menu items 2 Display files in the selected folder 3 Switch to Photo edit mode 4 Switch to Video edit mode 5 Switch to Share mode 6 Enlarge or reduce the thumbnails in t...

Page 87: ...r photo you want double click to play back Playback starts and the controls appear Intelli studio supports the following file formats Video formats MP4 Video H 264 Audio AAC WMV WMV 7 8 9 Photo formats JPG GIF BMP PNG TIFF Step 4 Editing videos or photos You can edit the videos or photos in various ways with various functions Change Size Fine Tuning Image Effect Insert Frame etc Before editing a v...

Page 88: ...s to You can choose YouTube twitter Flickr Facebook Picasa Email or another web site you want to use for your site management 4 Click Upload to start uploading A pop up window appears to open the web browser of the selected site or a pop up window appears asking for your ID and password 5 Enter your ID and the password to access Access to the web site contents can be limited depending on your web ...

Page 89: ...lick OK 4 The folders in the storage media appear Different file types are stored in different folders 5 Copy and paste or drag and drop the files from the storage media to your PC If the Removable Disk window does not appear confirm the connection page 85 or repeat steps 1 through 3 again When the removable disk does not appear automatically open the removable disk folder of My Computer If the con...

Page 90: ...00VIDEO 101VIDEO etc The maximum number of folders is 999 The camcorder can create a maximum of 9 999 files in a storage media Photos z As with video clip files the file number automatically increases when a new image file is created Photo files have a SAM_ JPG format A new folder stores files starting with SAM_0001 JPG Folder names increase in this order 100PHOTOp101PHOTO etc File format Video files Vi...

Page 91: ...is is not a rated adaptor Use only the rated adaptor that we provided The power adaptor failed to authenticate Check the power adaptor s authenticity We recommend you use only genuine Samsung power adaptors in this camcorder Storage media Message Icon Informs that Action Insert Card There is no memory card inserted in the memory card slot Insert a memory card Card Full There is not enough space to...

Page 92: ...backing up important files to your PC or another storage media Release the Smart Auto You cannot operate some functions manually when SMART AUTO is activated Release the SMART AUTO function The number of video files is full Cannot record video The number of video files that can be stored is 9 999 Delete unnecessary files from the storage media Back up files to your PC or another storage media and del...

Page 93: ...ed the maximum number and you cannot record Set File No to Reset and format the storage media Remember to back up important files before formatting Check the lens cover Lens cover is closed Open the lens cover Playback Message Icon Informs that Action Read Error Some problems occurred when reading data from storage media Format the storage media using the menu after backing up important files to PC ...

Page 94: ...no button is pressed for about 5 minutes the camcorder is automatically turned off Auto Power Off To disable this option change the setting of Auto Power Off to Off Use the power adaptor Power cannot be turned off Remove the battery or unplug the power adaptor and then reconnect the power supply to the camcorder before turning it on The battery is quickly discharged The temperature is too low The ...

Page 95: ...se the lock on the write protect tab of the memory card SDHC memory card etc if any page 31 You cannot format the memory card Release the lock on the write protect tab of the memory card SDHC memory card etc if any page 31 The memory card is not supported on your camcorder or the card has some problems The data file name is not indicated correctly The file may be corrupted The file format is not sup...

Page 96: ...s and the features you used Recording a fast moving subject increases the bit rate and consequently the amount of storage space required for the recording which can lead to a shorter available recording time The recording stops automatically There is no more free space for recording on the storage media Back up important files to your PC and then format the storage media or delete the unnecessary fi...

Page 97: ...nected to the camcorder the beep sound will automatically turn off There is a time difference between the point where you press the Recording start stop button and the point where the recorded video starts stops On your camcorder there may be a slight time delay between the point where you press Recording start stop button and the actual point where the recorded video starts stops This is not an e...

Page 98: ...f the temperature inside the camcorder is too high it cannot function properly Turn the camcorder off wait for a few moments and then turn it on again Playback is interrupted unexpectedly Check if the power adaptor or battery is properly connected and stable You cannot hear sound when playing back a Time Lapse recording The Time Lapse REC function does not record sound Photos stored on a storage m...

Page 99: ...ecifications Intelli studio does not function properly Exit the Intelli studio application and restart the Windows computer Intelli studio is not Mac OS compliant Set PC Software to On in the Settings menu The image or sound of the video file recorded by your camcorder does not play back correctly on your PC The image or sound of the video file may stop playing back temporarily depending on the data...

Page 100: ...charged page 25 Pressing a button will not turn on or operate the computer Remove the battery or unplug the power adaptor and then reconnect the power supply to the camcorder before turning it on Menu items that cannot be used at the same time Symptom Explanation Solution Menu items are greyed out You cannot select greyed items if items in the menu displays grey If you have not inserted a memory c...

Page 101: ...or tissue Mould may form if the lens is left dirty If the lens looks dim turn off the camcorder and leave it off for about 1 hour LCD screen To prolong its service life do not rub the LCD screen with a coarse cloth Be aware of the following LCD screen phenomena They are not malfunctions When you use the camcorder the surface around the LCD screen may heat up If you leave the power on for a long ti...

Page 102: ...authorised service centre USING YOUR CAMCORDER ABROAD Each country or region has its own electric and colour systems Before using your camcorder abroad check the following items Power sources The power adaptor provided lets you power recharge and use your camcorder in any country region that has the power in the 100 V to 240 V 50 60 Hz range You may need a commercially available AC plug adaptor de...

Page 103: ... of the lens to its focal point in millimeters Longer focal lengths result in narrower angles of view and the subject is magnified Shorter focal lengths result in wider angles of view F No F Number The F number defines the brightness of lens Smaller number lens has generally brighter image The F number is directly proportional to the focal length and inversely proportional to the lens diameter F N...

Page 104: ... 0V p_p 75Ω analogue Audio output 7 5dBm 47KΩ analogue stereo HDMI output D type connector Micro HDMI USB output mini USB B type USB2 0 High Speed General Power source 5 0V Using the power adaptor 3 7V Using Lithium Ion battery Power source type Power supply 100V 240V 50 60Hz Lithium Ion battery Power consumption 2 4W LCD on Operating temperature 0 C 40 C 32 F 104 F Operating humidity 10 80 Storag...

Page 105: ...msung com Europe ALBANIA 42 27 5755 www samsung com AUSTRIA 0810 SAMSUNG 7267864 0 07 min www samsung com BELGIUM 02 201 24 18 www samsung com be Dutch www samsung com be_fr French Region Country Contact Centre Web Site Europe BOSNIA 05 133 1999 www samsung com BULGARIA 07001 33 11 www samsung com CROATIA 062 SAMSUNG 062 726 7864 www samsung com CZECH 800 SAMSUNG 800 726786 www samsung com DENMARK...

Page 106: ...G KONG 852 3698 4698 www samsung com hk www samsung com hk_en INDIA 1800 1100 11 3030 8282 1800 3000 8282 1800 266 8282 www samsung com INDONESIA 0800 112 8888 021 5699 7777 www samsung com Region Country Contact Centre Web Site Asia Pacific JAPAN 0120 327 527 www samsung com MALAYSIA 1800 88 9999 www samsung com PHILIPPINES 1 800 10 SAMSUNG 726 7864 for PLDT 1 800 3 SAMSUNG 726 7864 for Digitel 1...

Page 107: ...nvironmentally safe recycling Business users should contact their supplier and check the terms and conditions of the purchase contract This product and its electronic accessories should not be mixed with other commercial wastes for disposal Correct disposal of batteries in this product Applicable in the European Union and other European countries with separate battery return systems This marking o...

Page 108: ...the use of certain Hazardous Substances in electrical and electronic equipment and we do not use the 6 hazardous materials Cadmium Cd Lead Pb Mercury Hg Hexavalent Chromium Cr 6 Poly Brominated Biphenyls PBBs Poly Brominated Diphenyl Ethers PBDEs in our products ...

Reviews: