background image

Rear Panel Jacks

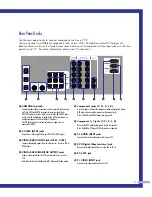
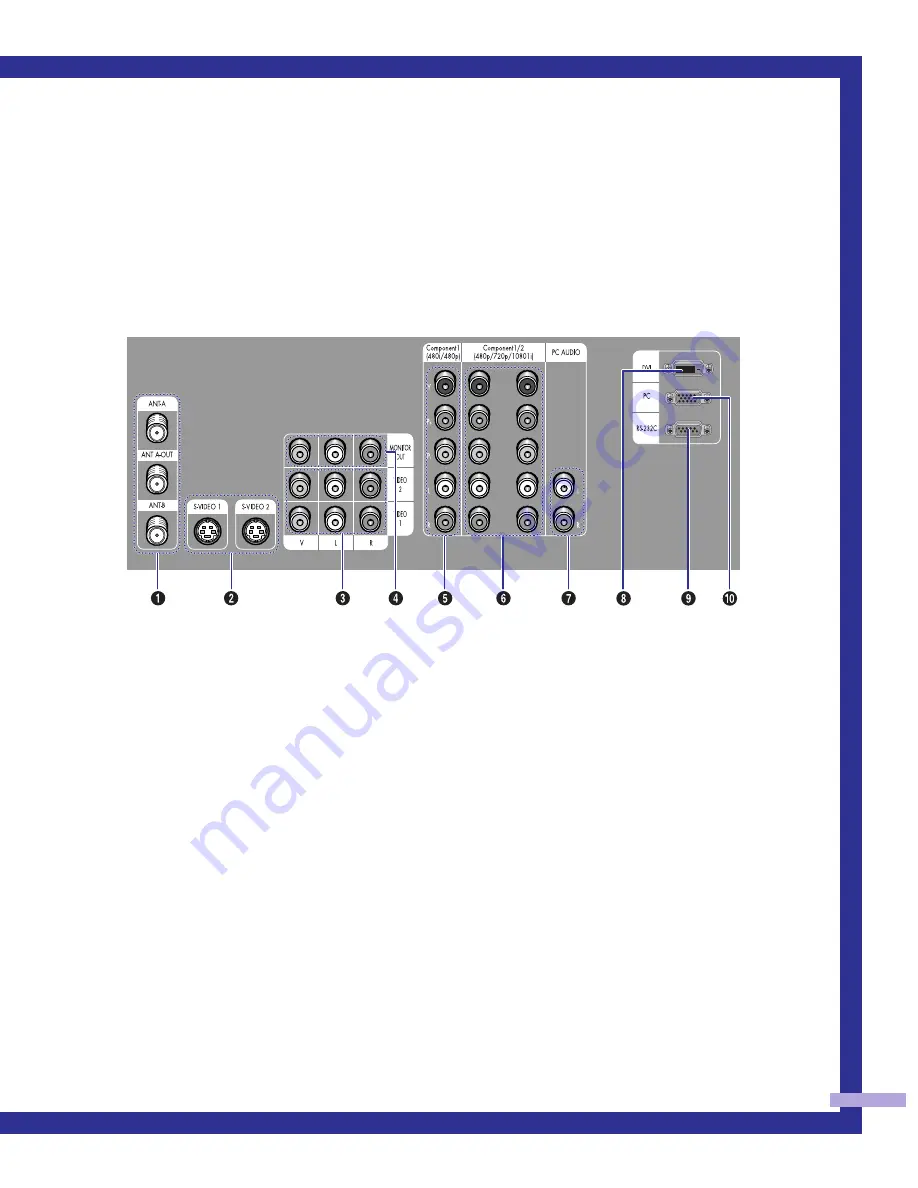
Use the rear panel jacks to connect components such as a VCR.  
You can connect two different components such as two VCRs, Set-Top Box and a DVD player etc., 
because there are two sets of video input jacks and one set of component video input jacks on the rear
panel of your TV.  For more information, please see “Connections”.  

15

Œ

ANTENNA terminals

Two independent cables or antennas can be connected to these termi-
nals. Use ANT-A and ANT-B terminals to receive a signal from
VHF/UHF antennas or your cable system. Use the ANT A-OUT termi-
nal to send the signal being received by the ANT-A terminal out to
another component (such as a Cable Set Top Box). 
The PIP channel can be received only when a signal source is 
connected to ANT-A.

´

S-VIDEO INPUT jacks

Connects an S-Video signal from an S-VHS VCR or DVD player. 

ˇ

VIDEO/AUDIO INPUT jacks(VCR1, VCR2)  

Connect video/audio signals from external sources, such as a VCR or
DVD players.

¨ 

VIDEO/AUDIO MONITOR OUTPUT jacks  

Sends a video signal from the TV to an external source, such as a
VCR.
Note: Monitor Out is available only in RF, Video and S-Video modes.  

ˆ

Component1 jacks (Y, P

b

, P

r, 

L, R) 

Use these jacks to connect the component video/audio signals from a
DVD player when using the component video input jacks.
Note: Only 480i and 408p formats are supported. 

Ø

Component 2, 3 jacks (Y, P

b

, P

r, 

L, R) 

Receives the DTV video/audio signals from a set top box.
Note: Only 480p, 720p and 1080i formats are supported.

PC AUDIO INPUT jacks 

Connect these to the audio-output jacks on your PC.

DVI (Digital Video Interface) jack 

Receives the digital signals from a set top box or PC etc.

RS-232C jack

˝

PC VIDEO INPUT jack 

Connect to the video output port on your PC.

BP68-00030A-1  4/15/05  8:26 PM  Page 15

Summary of Contents for HLM5065W

Page 1: ...I N S T R U C T I O N M A N U A L HLM4365W HLM5065W HLM437W HLM507W HLM617W DLPTV ...

Page 2: ... chocs electriques introduire la lame le plus large de la fiche dans la borne correspondante de la prise et pousser jusqu au fond Note to CATV system installer This reminder is provided to call CATV system installer s attention to Article 820 40 of the National Electrical Code Section 54 of Canadian Electrical Code Part I that provides guidelines for proper grounding and in particular specifies th...

Page 3: ...here it can fall A falling TV can cause serious injury to a child or adult and serious damage to the appliance Use only with a cart stand tripod bracket or table recommended by the manufacturer or sold with the TV Follow the manufacturer s instructions when mounting the unit and use a mounting accessory recommended by the manufacturer Move the TV and cart with care Quick stops excessive force and ...

Page 4: ...grounding electrode Do not attempt to service the TV yourself Refer all servicing to qualified service personnel Unplug the unit from the wall outlet and refer servicing to qualified service personnel when The power supply cord or plug is damaged Liquid has been spilled on the unit or if objects have fallen into the unit The TV has been exposed to rain or water The TV does not operate normally by ...

Page 5: ...ul This booklet was prepared by the Federal Communications Commission It is available from the U S Government Printing Office Washington DC 20402 Stock Number 004 000 00345 4 Warning User must use shielded signal interface cables to maintain FCC compliance for the product Declaration of conformity for products marked with FCC Logo This device complies with Part 15 of the FCC Rules Operation is sub...

Page 6: ...d Leads 20 Separate VHF and UHF Antennas 21 Connecting Cable TV and VCR 22 Cable without a Cable Box 22 Cable with a Cable Box that Descrambles All Channels 22 Connecting a Cable Converter Box 23 Connecting a Cable Converter Box and a VCR 23 Connecting a Camcorder 24 Connecting a DVD Player 25 Connecting a DTV Set Top Box 26 Operation 30 Turning the TV On and Off 30 Viewing the Menus and Displays ...

Page 7: ...ble for PIP 64 Swapping the Contents of the PIP and Main image 65 Changing the Size of the PIP image 66 Changing the Picture in Picture Channel 67 Selecting the Sound Source 68 Changing the Location of the PIP image 68 Using the V Chip 69 PC Display 76 Using Your TV as a Computer PC Display 76 How to connect Your PC to the TV 76 How to Set up Your PC Software Windows only 77 Display Modes 78 How t...

Page 8: ...SAMSUNG ...

Page 9: ...Your New Wide TV ...

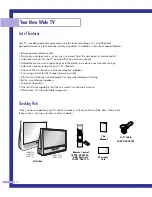
Page 10: ...for up to 181 channels A special filter to reduce or eliminate reception problems Fine tuning control for the sharpest picture possible A built in multi channel sound decoder for stereo and bilingual listening Built in dual channel speakers A special sleep timer Picture in Picture capability that lets you watch two channels at once Widescreen TV with adjustable image size Checking Parts Once you h...

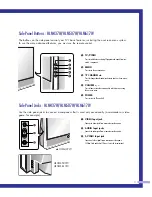
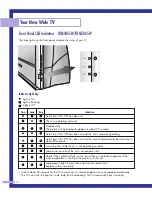
Page 11: ...V programs and signals from con nected components MENU Press to see the on screen menu ˇ CHANNEL Press to change channels and move between items on the on screen menu VOLUME Press to lower or raise the volume and to select items when using the on screen menu ˆ POWER Press to turn the TV on and off Œ VIDEO Input jack Connect the video signal from a camcorder or video game AUDIO Input jacks Connect ...

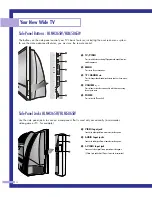
Page 12: ... between viewing TV programs and signals from con nected components MENU Press to see the on screen menu ˇ CHANNEL Press to change channels and move between items on the on screen menu VOLUME Press to lower or raise the volume and to select items when using the on screen menu ˆ POWER Press to turn the TV on and off Œ VIDEO Input jack Connect the video signal from a camcorder or video game AUDIO In...

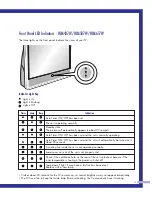
Page 13: ...Timer ON OFF has been set The set is operating normally Standby state The picture will automatically appear in about 25 seconds Auto Timer ON OFF has been set and the set is normally operating Auto Timer ON OFF has been set and the set will automatically be turned on in about 25 seconds A cooling fan inside the set is not operating normally Lamp cover on rear of the set is not properly shut Check ...

Page 14: ... Auto Timer ON OFF has been set The set is operating normally Standby state The picture will automatically appear in about 25 seconds Auto Timer ON OFF has been set and the set is normally operating Auto Timer ON OFF has been set and the set will automatically be turned on in about 25 seconds A cooling fan inside the set is not operating normally Lamp cover on rear of the set is not properly shut ...

Page 15: ... VIDEO INPUT jacks Connects an S Video signal from an S VHS VCR or DVD player ˇ VIDEO AUDIO INPUT jacks VCR1 VCR2 Connect video audio signals from external sources such as a VCR or DVD players VIDEO AUDIO MONITOR OUTPUT jacks Sends a video signal from the TV to an external source such as a VCR Note Monitor Out is available only in RF Video and S Video modes ˆ Component1 jacks Y Pb Pr L R Use these...

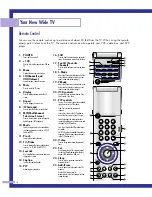
Page 16: ...r scene Press again to resume normal video 17 Fav CH Favorite Channel Press to switch between your favorite chan nels 18 S Mode Adjust the TV sound by selecting one of the preset factory settings or select your per sonal customized sound settings 19 P Mode Adjust the TV picture by selecting one of the preset factory settings or select your per sonal customized picture settings 20 VCR controls Cont...

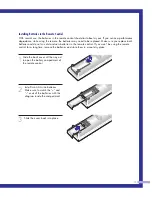
Page 17: ...ce both batteries and do not mix old and new batteries in the remote control If you won t be using the remote control for a long time remove the batteries and store them in a cool dry place 1 Slide the back cover all the way out to open the battery compartment of the remote control 2 Install two AAA size batteries Make sure to match the and ends of the batteries with the diagram inside the compart...

Page 18: ...SAMSUNG ...

Page 19: ...Connections ...

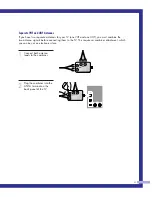
Page 20: ... has 300 ohm flat twin leads 1 Place the wires from the twin leads under the screws on the 300 75 ohm adapter Use a screwdriver to tighten the screws 2 Plug the adapter into the ANT A terminal on the back panel of the TV Antennas with 75 ohm Round Leads If your antenna looks like this it is an antenna with 75 ohm round leads 1 Plug the antenna lead into the ANT A terminal on the back panel of the ...

Page 21: ...VHF and one UHF you must combine the two antenna signals before connecting them to the TV This requires a combiner attachment which you can buy at an electronics store 1 Connect both antenna leads to the combiner 2 Plug the combiner into the ANT A terminal on the back panel of the TV ...

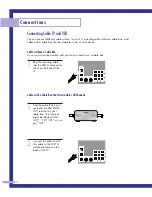
Page 22: ... want to connect cable and you do not need to use a cable box 1 Plug the incoming cable into the ANT A antenna ter minal on the back of the TV Cable with a Cable Box that Descrambles All Channels 1 Find the cable that is con nected to the ANTENNA OUT terminal on your cable box This terminal might be labeled ANT OUT VHF OUT or sim ply OUT 2 Connect the other end of this cable to the ANT A antenna t...

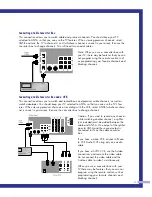
Page 23: ...pes You should keep your TV selected to ANT A so that you can use the TV s fea tures When viewing premium channels or recording with the VCR select ANT B whichever chan nel is vacant in your area then use the converter box to change channels Caution If you want to record one channel while watching another channel a splitter not included must be added between the cable and ANT A One output of the s...

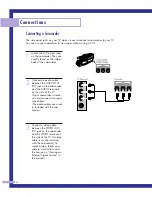
Page 24: ...AUDIO OUT PUT jack on the camcorder and the AUDIO terminals on the side of the TV If your camcorder is stereo you must connect two sepa rate cables The audio cables are usual ly included with the cam corder 3 Connect a video cable between the VIDEO OUT PUT jack on the camcorder and the VIDEO terminal on the side of the TV A video cable is usually included with the camcorder To watch a tape follow ...

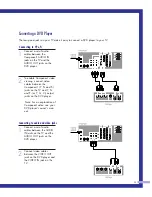
Page 25: ...deo viewing connect video cables between the Component1 Y Pb and Pr jacks on the TV and Y Pb and Pr or Y Cb Cr output jacks on the DVD player Note For an explanation of Component video see your DVD player s owner s man ual Connecting to audio and video jacks 1 Connect a set of audio cables between the AUDIO IN jacks on the TV and the AUDIO OUT jacks on the DVD player 2 Connect video cables between...

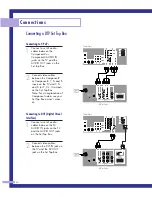
Page 26: ...isual Interface 1 Connect a set of audio cables between the PC AUDIO IN jacks on the TV and the AUDIO OUT jacks on the Set Top Box 2 Connect video cables between the DVI IN jack on the TV and the DVI OUT jack on the Set Top Box Connections 26 Component1 480i 480p Component1 2 480p 720p 10801i Y Pb Pr L R L R PC AUDIO DTV Set Top Box ANT A ANT A OUT ANT B S VIDEO 1 S VIDEO 2 V L R MONITOR OUT VIDEO...

Page 27: ...s on the Set Top Box 2 Connect video cables between the PC IN jack on the TV and the R G B OUT jack on the Set Top Box Component1 480i 480p Component1 2 480p 720p 10801i Y Pb Pr L R L R PC AUDIO DTV Set Top Box ANT A ANT A OUT ANT B S VIDEO 1 S VIDEO 2 V L R MONITOR OUT VIDEO 2 VIDEO 1 DVI PC RS 232C TV Rear Panel DVI ...

Page 28: ...SAMSUNG ...

Page 29: ...Operation ...

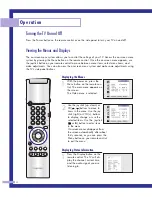
Page 30: ...djustments using the TV s side panel buttons Displaying the Menus 1 With the power on press the Menu button on the remote con trol The main menu appears on the screen The Video menu is selected 2 Use the joystick up down or CH buttons to move to items in the menu Use the joy stick right or VOL buttons to display change or use the selected items Use the joystick or button to enter items in the menu...

Page 31: ...he Menu button on the remote control to exit the menu Selecting the Antenna Input You can connect to two different signal sources by choosing the antenna input ANT A or ANT B 1 Press the Menu button Move the joystick down to select SETUP then press the joystick to enter 2 Press the joystick to enter The chan nel setup menu will appear The first line of the menu is selected 3 Move the joystick righ...

Page 32: ...o either an antenna or a cable system 1 Press the Menu button Move the joystick down to select SETUP then press the joystick to enter 2 Press the joystick to enter The channel setup menu will appear Move the joystick down to select Air or CATV 3 If you are connected to an antenna leave AIR dis played If you connected cable press the joystick to the right to display the type of cable system STD HRC...

Page 33: ...s on the main screen Adding and Erasing Channels 1 Use the number buttons to select the channel you want to add or erase 2 To add a channel select it and press the Add Erase button on the remote control The channel will be added to the TV s memory and the word Channel added will appear in the corner of the screen 3 To erase a channel select it and then press the Add Erase button on the remote cont...

Page 34: ...sed Using the Number Buttons To change to single digit channels 0 9 faster press 0 before the single digit Example For channel 4 press 0 then 4 To select a channel over 100 press the 100 button first Example For channel 122 press 100 then 2 then 2 Using the Previous Channel Press the Pre ch button on the remote control The TV changes to the last channel you were watching Scanning channels You can ...

Page 35: ... menu will appear Move the joystick down to select Air or CATV then move the joystick to the right to display the type of cable system or Air 3 Move the joystick down to select Favorite Channel then press the joystick to enter 4 Move the joystick to the left or right to select channel Note Only memorized chan nels can be set as Favorite channels To View Your Favorite Channels Press the Fav CH butt...

Page 36: ...to select SETUP then press the joystick to enter 3 Press the joystick to enter Move the joystick down to select Labeling 4 Move the joystick to the right to begin labeling Each label has four fields See top para graph Move the joystick up or down to select a letter a number or a blank Pressing the CH but ton results in this sequence A B Z blank 0 1 9 5 Move the joystick to the right to switch to t...

Page 37: ...when the TV is powered On or Off 1 Press the Menu button Move the joystick down to select SETUP then press the joystick to enter 2 Move the joystick down to select Melody 3 Move the joystick to the right or left to select On 4 Press the Menu button to exit 37 ...

Page 38: ...o enter You will see the items Contrast Brightness Sharpness Color and Tint 3 Move the joystick up or down to select the item you want to change 4 Move the joystick right or left to raise or lower the value of the item using the on screen gauge as your guide When you are finished adjusting an item wait a moment The level indicator will disappear and the Video menu will return You can continue to m...

Page 39: ...mic Standard Movie or Custom picture setting Guide to Automatic Picture Settings Choose Standard to set the TV to operate at top performance according to your TV s specifications Choose Dynamic for viewing the TV during the day or when there is bright light in the room Choose Movie when viewing the movie Choose Custom if you want to adjust the settings yourself 39 ...

Page 40: ...ess the Mute button on the remote control to silence the volume The word Mute will appear in the lower left cor ner of the screen To turn mute off press the Mute button again or raise or lower the volume with the VOL and VOL buttons Customizing the Sound 1 Press the Menu button Move the joystick down to select SOUND then press the joystick to enter 2 Move the joystick down to select Adjust then pr...

Page 41: ...e S Mode button on the remote control to change the automatic sound setting 2 Press the S Mode button again to select the Standard Music Movie Speech or Custom sound setting Guide to Automatic Sound Settings Choose Standard for the factory settings the best choice for most people Choose Music when watching music videos or concerts Choose Movie when watching a movie Choose Speech when watching a sh...

Page 42: ...ck down to select SETUP then press the joystick to enter 2 Move the joystick down to select Time then press the joystick to enter 3 Move the joystick right to select the hour Move the joy stick up or down to select the correct hour 4 Move the joystick right to select the minute Move the joystick up or down to select the correct minute When selecting the hours be sure to select the proper time of d...

Page 43: ... SETUP then press the joystick to enter 2 Move the joystick down to select Time then press the joystick to enter 3 Move the joystick down to select the On Time Move the joystick right to select the hour then Move the joystick up or down to adjust the hour for the TV to turn on When selecting the hours be sure to select the proper time of day am or pm 4 Move the joystick right to select the minute ...

Page 44: ...volume level or channel when the TV turns on move the joystick down to select On Timer Vol or On Timer CH Move the joystick right to set the volume level or to select the channel you want when the TV turns on Press the Menu button to return to normal viewing Setting the Sleep Timer You can set your TV to automatically turn off after a preset interval 1 Press the Sleep button on the remote con trol...

Page 45: ...ect a particular signal source and then press the joystick to activate it When you connect equipment to the TV you can choose between the following sets of jacks Video 1 Video 2 S video 1 S video 2 Component 1 Component 2 Component 3 DVI or PC on the TV s rear panel and Video 3 or S Video 3 on the TV s side panel Remote Control VCR DVD Buttons Flip the cover of the remote control up to access butt...

Page 46: ...SAMSUNG ...

Page 47: ...Special Features ...

Page 48: ...that the VCR LED is illuminated 3 Press the Set button on your TV s remote control 4 Using the number buttons on your remote control enter three digits of the VCR code listed on page 47 of this manual for your brand of VCR Make sure you enter three digits of the code even if the first digit is a 0 If more than one code is listed try the first one 5 Press the Power button on the remote control Your...

Page 49: ... enter three digits of the code even if the first digit is a 0 If there is more than one code listed try the first one 5 Press the Power button on the remote control Your cable box should turn on if your remote is set up correctly If your cable box does not turn on after set up repeat steps 2 3 and 4 but try one of the other codes listed for your brand of cable box If no other codes are listed try...

Page 50: ...e sure you enter three digits of the code even if the first digit is a 0 If there is more than one code listed try the first one 5 Press the Power button on the remote control Your DVD should turn on if your remote is set up correctly If your DVD does not turn on after set up repeat steps 2 3 and 4 but try one of the other codes listed for your brand of DVD If no other codes are list ed try each c...

Page 51: ...51 Remote Control Codes VCR Codes Cable Box Codes DVD Codes ...

Page 52: ...e the joy stick down to select SETUP then press the joystick to enter 3 Press the joystick to enter in the Channel setup menu 4 Move the joystick down to select the Fine tune then move the joystick right or left to adjust the fine tuning To store the fine tuning setting in the TV s memory move the joystick up A heart icon will appear To reset the fine tuning to 0 move the joystick down 5 Press the...

Page 53: ...Menu button to exit Setting the Film Mode On Automatically senses and processes film signals from all sources and adjusts the picture for optimum quality Off Switches off the Film mode 1 Press the Menu button Press the joystick to enter 2 Move the joystick down to select Film Mode then move the joystick to the right or left to select On or Off 3 Press the Menu button to exit Note Film mode is supp...

Page 54: ...wish to continue viewing the poor picture you must set the Blue screen mode to Off 1 Press the Menu button on the remote control Move the joy stick down to select SETUP then press the joystick to enter 2 Move the joystick down to select Blue Screen 3 Move the joystick to the right or left to select On or Off 4 Press the Menu button to exit Special Features 54 ...

Page 55: ...amic picture Zoom1 Magnifies the size of the picture on screen You can also move the picture on screen using the Scroll function Press the CH buttons to scroll the picture Zoom2 Magnifies the size of the picture more than Zoom1 You can also move the picture on screen using the Scroll function Press the CH buttons to scroll the picture Normal Sets the picture to 4 3 normal mode This is a standard T...

Page 56: ...he DVI and PC 1080i mode You can select Wide TV Wide PC screen size in the DVI and PC 720p Mode You can select Wide TV Wide PC Normal 4 3 screen size in the DVI and PC 480p Mode If you set PIP ON in any mode Normal Panorama Zoom1 Zoom2 except Wide the mode will automatically change to Wide Special Features 56 ...

Page 57: ...ove the joystick down to select SOUND then press the joystick to enter 2 Move the joystick down to select MTS 3 Move the joystick to the right repeatedly to select Mono SAP or Stereo 4 Press the Menu button to exit Guide to MTS Settings Choose Stereo for channels that are broadcasting in stereo Choose Mono for channels that are broadcasting in mono or if you are having difficulty receiv ing a ster...

Page 58: ...d sounds are mixed into the L R speakers 1 Press the Menu button Move the joystick down to select SOUND then press the joystick to enter 2 Move the joystick down to select Dolby Virtual 3 Move the joystick to the right or left to select Virtual or Off 4 Press the Menu button to exit NOTE Dolby Virtual and BBE can t be set ON at the same time ...

Page 59: ...Press the Menu button Move the joystick down to select SOUND then press the joystick to enter 2 Move the joystick down to select BBE 3 Move the joystick to the right or left to select On or Off 4 Press the Menu button to exit NOTE Dolby Virtual and BBE can t be set ON at the same time ...

Page 60: ...s the volume of the desired channel by lowering the sound output when the modulation signal is high or by raising the sound output when the modulation signal is low 1 Press the Menu button Move the joystick down to select SOUND then press the joystick to enter 2 Move the joystick down to select Auto Volume 3 Move the joystick to the right or left to select On or Off 4 Press the Menu button to exit...

Page 61: ...r left to turn closed captioning on off Misspelling and unusu al characters sometimes occur in closed caption transmis sions especially those of live events There may be a small delay before captions appear when you change channels These do not indicate the TV is malfunctioning Move the joystick down to select the Mode Move the joystick right or left to choose Caption or Text ln caption mode cap t...

Page 62: ...ss the Menu button Move the joystick down to select PIP then press the joystick to enter Quick way to access PIP Just press PIP on the remote control 2 Move the joystick right to select PIP On The PIP image will appear in the corner of the screen 3 Press Menu to exit NOTES Picture in Picture doesn t function when the V chip is active If you turn the TV off while watching and turn it on again then ...

Page 63: ...lect Source 3 Move the joystick right or left to select an external signal You can choose between TV Video 1 3 or S Video 1 3 The signal from these inputs will not appear if you have not connected any equipment to the TV s input jacks For more information about external signals see Viewing an External Signal Source See page 41 If you select TV the PIP image is the same as the main image 4 Press Me...

Page 64: ... broadcasting sources are differ ent making adjustments is necessary 1 Press the Menu button Move the joystick down to select PIP then press the joystick to enter 2 Move the joystick down to select Air or CATV 3 If an antenna is connected the setting is AIR If a Cable TV system is providing the sig nal move the joystick to the left or right until the appropri ate type of cable system is displayed ...

Page 65: ...o enter Quick way to access PIP Swap Just press Swap on the remote control 2 Move the joystick down to select Swap 3 Move the joystick to the right or left The channel in the PIP image will appear in the main image and vice versa 4 Press Menu to exit NOTE When ANT B Component mode PC or DVI is selected the PIP Swap function doesn t work ...

Page 66: ...he joystick to enter Quick way to access PIP Size Just press Size on the remote control 2 Move the joystick down to select Size 3 Move the joystick to the right or left to select Large Double1 Double2 or Small Note Double function doesn t operate In the Component PC DVI mode 4 Press Menu to exit Special Features ...

Page 67: ...ick down to select PIP then press the joystick to enter Quick way to access PIP channel Just press PIP CH on the remote control 2 Move the joystick down to select Channel 3 Move the joystick to the right or left to change the channel of the PIP image 4 Press Menu to exit NOTE The PIP channels are not available when RF is set to ANT B The PIP channels link to ANT A ...

Page 68: ...ck to enter 2 Move the joystick down to select Sound Select 3 Move the joystick to the right or left to switch Main or Sub audio source Main is for the main TV picture audio and Sub is for the PIP picture audio 4 Press Menu to exit Changing the Location of the PIP image Press the Locate button repeatedly to move the PIP image from corner to corner on the screen Special Features ...

Page 69: ...V chip on the remote control 2 Move the joystick down to select V chip then press the joystick to enter The Enter PIN screen will appear Enter your 4 digit PIN number Note The default PIN number for a new TV set is 0 0 0 0 3 After entering a valid PIN number the V chip screen will appear Move the joystick down to select Change PIN then press the joystick to enter The Change pin screen will appear ...

Page 70: ... or left will alternate between On and Off How to Set up Restrictions Using the TV guidelines First set up a personal identification number PIN and enable the V Chip See previous section Parental restrictions can be set up using either of two methods The TV guidelines or the MPAA rat ing 1 Press the Menu button Move the joy stick down to select SETUP then press the joystick to enter Move the joyst...

Page 71: ...he joystick right Depending on your existing setup a letter U or B will be select ed U Unblocked B Blocked Move the joystick down or up to block or unblock the category Move the joystick to the right To select a different TV Rating move the joystick down or up and then repeat the process Note 1 TV Y7 TV PG TV 14 and TV MA have additional options See the next step to change any of the following sub...

Page 72: ...screens Or proceed to the next section and set up additional restrictions based on the MPAA codes How to Set up Restrictions Using the MPAA Ratings G PG PG 13 R NC 17 X The MPAA rating system uses the Motion Picture Association of America MPAA system and its main application is for movies Eventually movie videocassettes will be encoded with MPAA rat ings When the V Chip lock is on the TV will auto...

Page 73: ... category that is more restrictive For example if you block the PG 13 category then R NC 17 and X will automati cally be blocked also How to Reset the TV after the V Chip Blocks a Channel Emergency Escape If the TV is tuned to a restricted channel the V Chip will block it The screen will go blank and the following message will appear Excessive rating To resume normal viewing tune to a different ch...

Page 74: ...SAMSUNG ...

Page 75: ...PC Display ...

Page 76: ...r TV as a Computer PC Display How to connect Your PC to the TV Note This figure shows the Standard Connector jack panel The actual configuration on your TV may be different depending on the model 15Pin D Sub Cable Audio Cable ...

Page 77: ...e Settings is highlighted move the cursor so that control panel is highlight ed When the control panel screen appears click on Display and a display dialog box will appear Navigate to the Settings tab on the dis play dialog box The two key variables that apply to the TV PC interface are resolution and col ors The correct settings for these two vari ables are Screen area sometimes called resolu tio...

Page 78: ...4x768 1024x768 1920x1080i 1280x720p 720x483p Total 800x449 900x449 936x446 800x525 864x525 832x520 840x500 832x509 1024x625 1056x628 1040x666 1056x625 1048x6321 1152x667 1344x806 1328x806 1312x800 2200x1125 1650x750 858x525 Hor Freq 31 47 kHz 31 47 kHz 37 93 kHz 31 47 kHz 35 00 kHz 37 86 kHz 37 50 kHz 43 27 kHz 35 16 kHz 37 88 kHz 48 08 kHz 46 87 kHz 53 67 kHz 49 73 kHz 48 36 kHz 56 40 kHz 60 02 k...

Page 79: ...coarse and position are adjusted automatically 1 Press TV VIDEO on the remote con trol Move the joystick up or down to select PC then press the joystick to enter 2 Press the Menu button Move the joystick down to select PC then press the joystick to enter 2 Move the joystick down to select Auto Adjust 3 Press the joystick to enter ...

Page 80: ...ck up or down to select PC then press the joystick to enter 2 Press the Menu button Move the joystick down to select PC then press the joystick to enter 3 Move the joystick down to select Coarse Remove picture noise vertical stripes on the screen by mov ing the joystick right or left If frequency is not set proper ly then vertical stripes will appear on the screen Fine tuning 4 Move the joystick d...

Page 81: ...own to select Position then press the joystick to enter Adjust the position of screen by using the joystick button Press the Menu to exit NOTE If a PC signal is input to DVI you can t adjust the quality and position of picture To Initialize the Screen Position and Picture Quality Adjustment After steps 1 2 above are completed move the joystick down to select Recall Press the joystick to initialize...

Page 82: ...f the screen mode will be displayed at the bottom of the TV screen Wide TV Scales the picture to the size of the TV screen regardless of the aspect ratio of the input source Wide PC Scales the picture to 92 of the screen regardless of the aspect ratio of the input source Expand Scales the picture to the aspect ratio of the input source Normal Displays the picture as it is without chang ing the asp...

Page 83: ...and and Normal screen modes are available In XGA 1024x768 mode the Wide TV Wide PC and Expand screen modes are available Aspect Wide TV Wide TV Wide PC Wide TV Wide PC Expand Wide TV Wide PC Normal Wide TV Wide PC Expand Normal Source PC DVI 1920 x 1080i 1280 x 720 1024 x 768 720 x 483 480p Others ...

Page 84: ...SAMSUNG ...

Page 85: ...Appendix ...

Page 86: ... Make sure the Mute button is off No picture or sound Try another channel Press the TV Video button Make sure the TV is plugged in Check the antenna connections No color or wrong colors Make sure the program is broadcasted in color Adjust the picture settings Picture rolls vertically Adjust the antenna Check all wire connections If you are using a VCR check the tracking Erratic operation or Unplug...

Page 87: ...taminant may become attached to the inside of the TV set Temperature If your TV is suddenly moved from a cold to a warm place unplug the power cord for at least two hours so that moisture that may have formed inside the unit can dry completely Using the TV in Another Country If you plan to take your TV to a foreign country please be aware of the different television systems that are in use around ...

Page 88: ...Samsung Electronics of America Inc Service Division 400 Valley Road Suite 201 Mt Arlington N J 07660 TEL 1 800 SAMSUNG 1 800 726 7864 www samsungusa com BP68 00030A 00 ENG DLPTV ...

Reviews: