background image

ENG-32

ENG-33

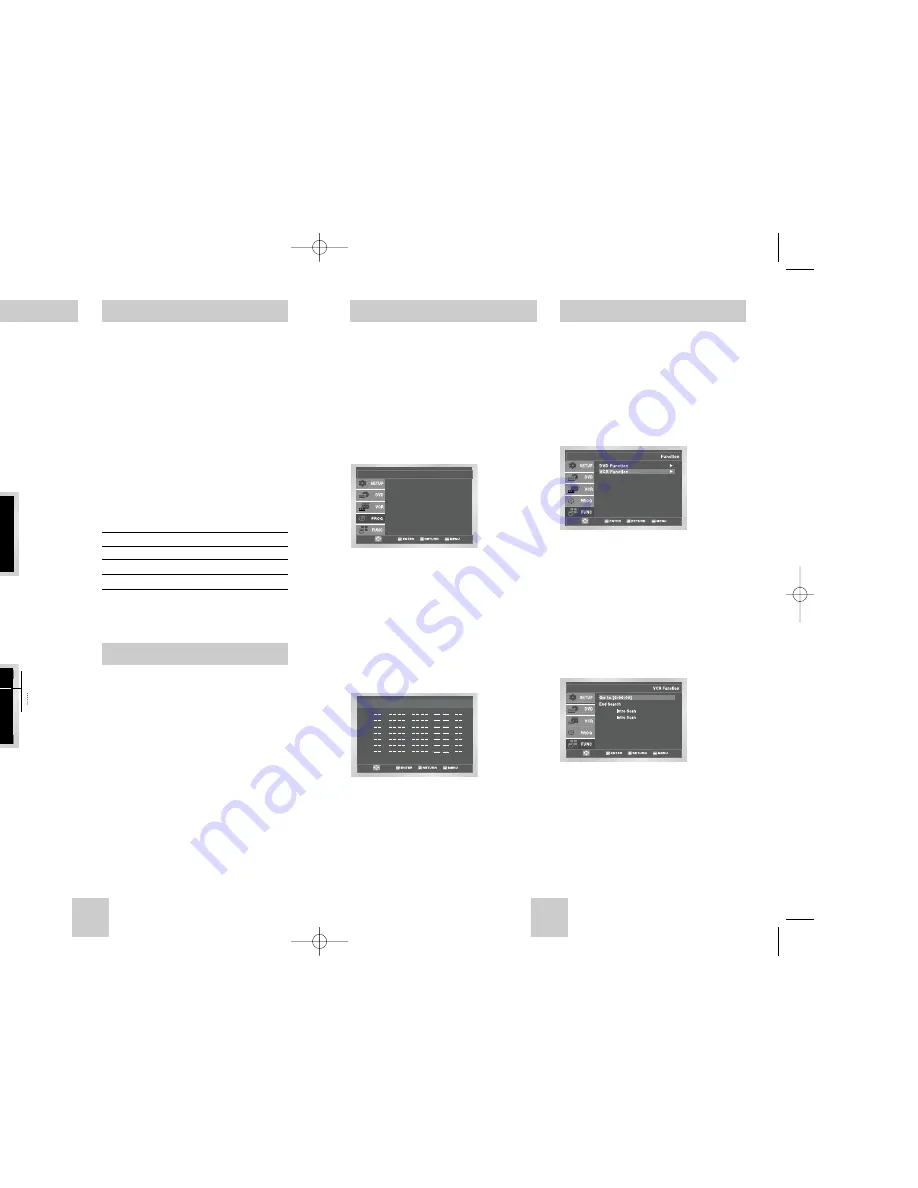
Function (VCR)

1

Open “MENU”
In the DVD in Stop or Play mode, press the MENU 
button.

2

Select “FUNCTION”
Use the UP/DOWN buttons to highlight 
“FUNCTION” then press the ENTER button.

3

Select “VCR Function”
Using the UP/DOWN buttons to highlight “VCR 
Function”  then press ENTER to select. 

4

Select “Go to ( 0: 00: 00)”
Highlight “Go to ( 0: 00: 00 )”, then press the 
ENTER button.

End Search

Highlight “End Search”, then press the ENTER 
button.

Forward Intro Scan

Highlight “Forward Intro Scan”, then press the 
ENTER button.

Reverse Intro Scan

Highlight “Reverse Intro Scan”, then press the 
ENTER button.

Forward

Reverse 

4

Set “Time/Date/Speed”
Repeat Step 3 above to set start time, end time, 
date and record speed. Date can be set for one 
time, daily or weekly recording. See below.

5

Daily/Weekly Date Programming
Press the RETURN button to finish setting the timer
recording. Stop the VCR or turn the power off. 
Then the VCR will automatically turn on and begin 
recording at the time you set. To stop the timer 
recording, press the POWER button or press the 
STOP button twice. 

6

Auto Speed Select 
If the length of the videotape is not long enough for 
a timer recording in the SP mode, set the recording 
tape speed to “AUTO”. Recording will start in the 
SP mode. If the length is not long enough, the tape 
speed will automatically change from SP mode to 
SLP mode.

7

Save “Timer Recording” 
Weekly [Sun’s~Sat’s]: Use this to record TV 
programs on the same channel at the same time 
every week. Daily [MO - FR] : Use this to record TV
programs on the same channel at the same time 
every day Monday through Friday. 

If you want to set

the timer program,

press the ENTER key

Timer Program

No        Ch           Start             End           Date      Speed

:

:

:

:

:

:

:

:

:

:

:

:

:

:

/

/
/
/
/
/

/

1

2

3

4

5

6

7

How to Set a Timer Recording

Forward

Reverse 

Forward

Reverse 

One-Touch Recording (OTR) allows you to add

recording time in 30-minute increments up to 4 hours

at the touch of a button.

1

Start Recording
Follow the instructions on page 30 to begin 
recording.

2

Activate OTR
While in Record mode, press the  (REC) button 
again to activate One-Touch Recording (OTR).
• Record length 0:30 appears on the On-Screen 

Display and the DVD-VCR will record for exactly 
30 minutes.

3

Add Recording Time
Continue pressing  (REC) to add recording time in
30 minute increments up to 4 hours.
• The DVD-VCR stops recording automatically 

when the time has elapsed.  And  DVD-VCR will 
be Automatically turned off when  the OTR 
finished. 

One-Touch Recording (OTR)

SP

0:30
1:00
1:30

4:30

Record       length       0:30        07

Record                                     07

SP

Record Speed

How to Set a Timer Recording

You can slow down the recording speed from SP to SLP

in order to fit six hours of programming on a T-120

tape.

1

Start Recording
Follow the Basic Recording instructions on page 28.

2

Set Record Speed
Press the SPEED button on the remote control to 
set the Record Speed to one of the following 
options:

• SP – Standard Play, for best quality.
• SLP – Super Long Play, for maximum recording 

time (3 times SP).

NOTE: The selected Record Speed will appear on the 

front panel display and on-screen display.

Maximum Recording Time - SP vs. SLP

Tape Length      SP (Standard Play)      SLP (Super Long Play)

T-120

2 hrs

6 hrs

T-160

2hrs 40 mins

8 hrs

T-180

3 hrs

9 hrs 

Insert a blank videotape into the VCR deck. Be sure to

leave the Record Safety Tab intact.
With the Timer Recording function, you can program

up to 7 events at a time to record up to a month in

advance. 
To Begin Setting the Timer Recording,

•  Turn on your DVD-VCR, and

•  Turn on your TV.

1

Open “MENU”
Press the MENU button or the TIMER button while 
the VCR is in Stop or Play mode.

2

Select “Program”
Use the UP/DOWN buttons to highlight 
“PROGRAM” then press the ENTER button.

3

Select Channel Number 
Use the Right and UP/DOWN buttons to set the 
channel. Press the RIGHT button to move to the 
next setting. 

CD-R JPEG Discs

Only files with the ".jp
played.

• 

If the disc is not closed
and not all of the reco

•  Only CD-R discs with

format can be played

•  The name of the JPE

characters and should
special characters (. /

•  Only a consecutively 

played. If there is a b
disc, the disc can be 
segment.

•  A maximum of 500 im

CD.

•  Only Kodak Picture C

When playing a Koda
in the pictures folder c

•  Picture discs other tha

longer to start playing

• 

If a number of files in 
file can be played.

•  If a number of folders

files in 300 folders ca

00368A DVD-V4600/XAC-ENG  12/5/03 10:24 AM  Page 32

Summary of Contents for DVD-V4600

Page 1: ......

Page 2: ......

Page 3: ...eo Out 20 Parental 21 8 DVD Operations Special Playback Features 22 Disc Menu Navigation 22 EZ View 23 Title Chapter Time Selection 24 Angle View 25 Subtitle 25 A to B Repeat 26 Repeat Chapter Title 26 Audio 27 Bookmarks 27 Function DVD 28 9 VCR Playback Special VCR Playback Features 28 Tracking 29 Auto Play 29 S VHS Playback 30 Variable Search System 30 10 VCR Recording Basic Recording 31 Special...
Page 4: ...e type of disc or condition of the recording Disc Types Logos Recording Types Disc Size Max Playing Time Characteristics 12 Cm 8 Cm Single sided 240 min Double sided 480 min Single sided 80 min Double sided 160 min Audio Video VIDEO CD AUDIO CD DVD DVD contains excellent sound and video due to Dolby Digital and MPEG 2 system Various screen and audio functions can be easily selected through the on ...

Page 5: ...Line Connection method 3 Plug In Your DVD VCR s power should be plugged into a standard 120V 60Hz wall outlet Avoid pressing any buttons on the remote control or on the unit during an Auto Setup While your DVD VCR is running an Auto Setup AUTO will blink When Auto Setup is complete the current time will be displayed on the front panel displayed In case Auto Clock set fails to locate a channel to s...

Page 6: ...e Refer to your monitor television owner s manual for the correct setting 3 Connection is Complete To Monitor TV Audio Video Inputs S Video Component Video Connections for DVD Use the S Video or Component Video connection method only for the DVD player The tuner and VCR can still be viewed through the RF or line inputs To activate your alternative S Video or Component video selection follow the Al...

Page 7: ...s this button to display the current channel This also works in DVD and VCR mode Language English Front Display Auto Auto Power Off Off Basic DVD Operation Deck Control Buttons Follow the instructions below to playback a DVD 1 Open the Disc Tray Press the OPEN CLOSE button on your remote control or on the front panel of the unit to turn on the power and open the disc tray 2 Insert a Disc Put a dis...

Page 8: ...arrow to Ant Cable then press right to select from the following options Antenna Indicates that the DVD VCR is connected to an indoor or outdoor VHF UHF antenna Cable TV Indicates that the DVD VCR is connected to Cable TV Language English Front Display Auto Auto Power Off Off Ant Cable Cable TV Auto Channel Memory Channel Add Delete Cable TV Antenna Manual Clock Set language to English steps e the...

Page 9: ...1 hour after the last button is pressed 2Hr DVD VCR will auto shut off 2 hours after the last button is pressed Front Display Auto Auto Power Off Off Language English Language English Front Display Auto Auto Power Off Off Off 1Hr 2Hr e Search missed a dd delete a channel y mode press the ns move the selection NTER to select s move the selection ENTER to select e hannel Add Delete ete to tune in th...

Page 10: ...U button while the DVD is in Stop mode 2 Select DVD Use the UP DOWN buttons to highlight DVD then press the ENTER button 3 Select Audio Highlight Audio then press the ENTER button 4 Set Digital Output Highlight Digital Output then press the RIGHT button to select one of the following options PCM To use your DVD TV with an A V receiver without a Dolby Digital decoder Bitstream To use your DVD TV wi...

Page 11: ...ght TV Aspect then press the RIGHT button to select one of the following options Widescreen This method allows you to view the full 16 9 picture on a widescreen television Letterbox This method displays the full width of the widescreen movie on a standard 4 3 television As a result black bars will appear at the top and bottom of the screen Pan Scan The familiar way of watching DVD and VHS movies t...

Page 12: ...t password Write your password down and keep it in a safe place in case you need to change your settings later 6 Select Rating Level Move the selection bar to Rating Level then press ENTER to select 7 Change Rating Level Use the UP DOWN buttons to select one of the following ratings Level 8 Adult Level 4 Level 7 Level 3 Level 6 Level 2 Level 5 Level 1 Kids Safe All ratings above the level you sele...

Page 13: ... from looking horizontally stretched For 4 3 aspect ratio discs Normal Screen Displays the content of the DVD title in 4 3 aspect ratio Screen Fit The top and bottom of the screen are cut off and the full screen appears The picture would look vertically stretched Zoom Fit The top bottom left and right of the screen are cut off and the central portion of the screen is enlarged This function may beh...

Page 14: ...in ENG On ENG Off Selection er Track and counter during DVD playback be used to quickly playing time ess the INFO button T RIGHT buttons to umeric buttons or nge among all T RIGHT buttons to n press the ENTER available select the counter he numeric buttons unter position in the M Minutes S on to enter the desired To make the screen disappear press the INFO button again To access the desired title ...

Page 15: ... may not work 4 Play Bookmark During playback press the MARK button on the remote control Use the LEFT RIGHT buttons to move to a previously set bookmark Press the ll PLAY PAUSE button to play the bookmark Press the CLEAR button to cancel the Bookmark Press the MARK button again to exit the Bookmark menu Stereo ENG DOLBY DIGITAL 5 1CH DVD CD CLEAR ou to repeat the CD To activate mark end B of the ...

Page 16: ...ard at 5 times normal speed Jet Search Press and hold to advance the tape forward or backward at 7 times normal speed 4 Skip In Play mode press F ADV SKIP to cue ahead exactly 30 seconds Press F ADV SKIP repeatedly up to 4 times to cue ahead 2 minutes 5 Repeat In Play mode press Repeat to review the last 5 seconds of tape SP mode In Play mode press Repeat to review the last 15 seconds of tape SLP ...

Page 17: ...ack high quality e VCR deck the remote control to S tape Variable Search System Press the SEARCH button to display the search screen in the stop mode When a program is recorded the starting point is given an Index mark for easy location However the VHS Index Search System VISS cannot recognize index marks made by old VCRs If the VCR has trouble finding a mark it is probably because the cassette wa...

Page 18: ...utton Recording OTR s on the On Screen will record for exactly o add recording time in 4 hours ding automatically And DVD VCR will when the OTR ng OTR 0 30 1 00 1 30 4 30 7 07 Record Speed How to Set a Timer Recording You can slow down the recording speed from SP to SLP in order to fit six hours of programming on a T 120 tape 1 Start Recording Follow the Basic Recording instructions on page 28 2 S...

Page 19: ...rther warrants that if this product fails to operate properly within the specified warranty period and the failure is due to improper workmanship or defective material SECA will repair or replace the product at its option All warranty repairs must be performed by a SECA authorized service cen tre The name and address of the location nearest you can be obtained by calling toll free 1 800 268 1620 o...

Page 20: ......

Page 21: ......

Page 22: ......

Page 23: ...ipule que toute modification de cet appareil risque d annuler le droit de l utilisateur de l utiliser k match wide blade of plug to wide slot fully insert cs électriques introduire la lame la plus large de la fiche dans la borne correspondante de la statué que l enregistrement non autorisé de programmes de télévision avec droits d auteur con droits d auteur américaines Il existe aussi des émission...

Page 24: ...pparaîtra Les codes régionaux pour ce lecteur figurent sur la face arrière du lecteur Il se peut que le CD R CD RW et DVD R ne soient pas lus dans tous les cas en raison du type du disque ou des conditions de l enregistrement Type de disque Type Taille des Durée maximale Caratéristiques d enregistrement disques de lecture 12 Cm 8 Cm Face unique 240 min Double face 480 min Face unique 80 min Double...

Page 25: ...connexion Ligne si votre téléviseur est équipé des prises RCA 3 Prêt à brancher Plug Play Branchez la prise du cordon d alimentation du DVD VCR à une prise murale 120V 60Hz standard Branchez le DVD VCR sur la prise c a N appuyez pas sur les touches du DVD VCR ou de la télécommande pendant le réglage automatique Pendant que I indicateur AUTO clignote le DVD VCR effectue la programmation automatique...

Page 26: ...ion est terminée Vers les entrées audio vidéo de l écran du télévise Connexions Composants Vidéo S vidéo DVD Les DVD peuvent être visualisés UNIQUEMENT à travers une connexion S Vidéo ou connexion composants Le syntoniseur et le magnétoscope sont lus à partir des entrées de ligne ou FR Pour activer la sélection vidéo secondaire vous devez suivre les instructions sortie vidéo alt figurant page 20 V...

Page 27: ...ge Chaînes Réglage Initial Affi du Panneau Auto Coupure Auto Non Mode Lecture de Base du DVD Touches de Commande du Boîtier Pour lire un DVD procédez comme suit 1 Ouverture du lecteur de disque Appuyez sur la touche OPEN CLOSE de la télécommande ou du panneau frontal pour mettre le DVD magnétoscope sous tension et ouvrir le lecteur 2 Insertion du disque Placez un disque dans le lecteur étiquette o...

Page 28: ...te pour choisir l une des options suivantes Antenne Spécifie que le DVD magnétoscope est connecté à une antenne VHF UHF interne ou externe Câble TV Spécifie que le DVD magnétoscope est connecté à un réseau câble ou TV sans boîtier de raccordement Langue Français L horloge Chaînes Affi du Panneau Auto Coupure Auto Non Réglage Initial Ant Câble Câble TV Prog Auto des Chaînes Ajouter Enlever Chaînes ...

Page 29: ...st désactivée 1Hr Le magnétoscope DVD se mettra hors tension une heure après l activation de la dernière touche 2Hr Le magnétoscope DVD se mettra hors tension deux heures après l activation de la dernière touche Langue Français L horloge Chaînes Affi du Panneau Auto Coupure Auto Non Réglage Initial Langue Français L horloge Chaînes Affi du Panneau Auto Coupure Auto Non Réglage Initial Non 1Hr 2Hr ...

Page 30: ...sez les touches HAUT BAS pour mettre DVD en surbrillance et appuyez sur la touche ENTER 3 Sélectionner Audio Mettez Audio en surbrillance et appuyez sur la touche ENTER 4 Sélection du Sortie Numérique Sélectionnez Sortie Numérique puis appuyez sur Droite pour choisir l une des options suivantes PCM Pour utiliser voter DVD TV avec un récepteur A V qui n est pas muni d un décodeur Dolby Digital Bits...

Page 31: ...oir l image complète en 16 9 sur un téléviseur à grand écran Letterbox Boîte aux lettres Cette méthode affiche en totalité la largeur d une image grand écran sur un téléviseur 4 3 standard De ce fait des bandes noires apparaîtront dans le haut et le bas de l écran Pan Scan Panoramique La manière courante de regarder des films en DVD et VHS cette méthode coupe de manière sélective par des mouvement...

Page 32: ...er le contrôle du contenu puis appuyez sur ENTER pour valider 7 Modifier le niveau de contrôle du contenu Utilisez les touches Haut Bas pour sélectionner l un des niveaux suivants Niveau 8 Adulte Niveau 4 Niveau 7 Niveau 3 Niveau 6 Niveau 2 Niveau 5 Niveau 1 Tout Public Tous les niveaux supérieurs au niveau sélectionné seront également bloqués Par exemple si vous bloquez le niveau 6 les niveaux 7 ...

Page 33: ...et inférieure de l écran L image remplit l espace entre les deux bandes et a l apparence étirée à la verticale Elargissement Les extrémités et les parties supérieure et inférieure de l écran sont amputées alors que la partie centrale de l écran s agrandit Dans le cas de certains disques le comportement du rapport hauteur largeur de l écran pourrait différer de celui décrit ci dessus Les disques au...

Page 34: ...teur sur le disque magnétoscope sur la touche INFO de s touches HAUT BAS ppuyez sur les touches e sélection parmi les ur le disque une piste une piste à l aide des CHE DROITE puis ectuer une sélection s Pistes disponibles sur ENG ENG Pour fermer l écran appuyez à nouveau sur la touche INFO Permet de sélectionner le titre souhaité parmi plusieurs titres sur le disque Par exemple si un DVD contient ...

Page 35: ... 4 Lecture d une scène favorite signet Pendant la lecture appuyez sur la touche MARK de la télécommande Appuyez sur les touches DROITE GAUCHE pour sélectionner l un des trois signets existants Appuyez sur la touche LECTURE PAUSE pour lire la séquence correspondant au signet sélectionné Appuyer sur CLEAR pour annuler le signet Appuyer à nouveau sur MARK pour quitter le menu Signet Stereo ENG DOLBY ...

Page 36: ...En mode Lecture appuyez sur Saut pour avancer la bande d une minute Appuyez sur Saut plusieurs fois maximum de 4 fois pour avancer la bande de 2 minutes 5 Répétition A partir du mode Play appuyez sur Repeat afin de revenir sur les 5 dernières secondes d une cassette mode SP A partir du mode Play appuyez sur Repeat afin de revenir sur les 15 dernières secondes d une cassette mode SLP 6 Shuttle En m...

Page 37: ...puyez sur la touche SEARCH pour afficher ou supprimer le menu de recherche Lorsqu une émission est enregistrée une marque d index est donnée au début pour faciliter le repérage Cependant le système de recherche d index VHS ne peut pas reconnaître des marques d index produites par des magnétoscopes anciens Si votre magnétoscope n est pas capable de repérer les marques d index il se peut que la cass...

Page 38: ...ienne hebdomadaire Hebdomadaire DIM SAM Vous pouvez enregistrer des émissions sur la même chaîne à la même heure toutes les semaines Quotidienne LUN VEN Vous pouvez enregistrer des émissions sur la même chaîne à la même heure tous les jours du lundi au vendredi Si vous souhaitez régler le programme minuterie appuyez sur la touche ENTER Enregistrement par Minuteris No Ca Debut Fin Date Vit 1 2 3 4 ...

Page 39: ...enablement durant la période de garantie SECA se réservera le droit de réparer ou de remplacer l appareil défectueux Toutes les réparations sous garantie doivent être effectuées par un Centre de service autorisé SECA Le nom et l adresse du Centre de service le plus près de chez vous peut être obtenu en composant sans frais le 1 800 268 1620 ou en visitant notre site web au www samsung ca Main d oe...

Page 40: ......

Reviews: