background image

English


_91

  EDITING

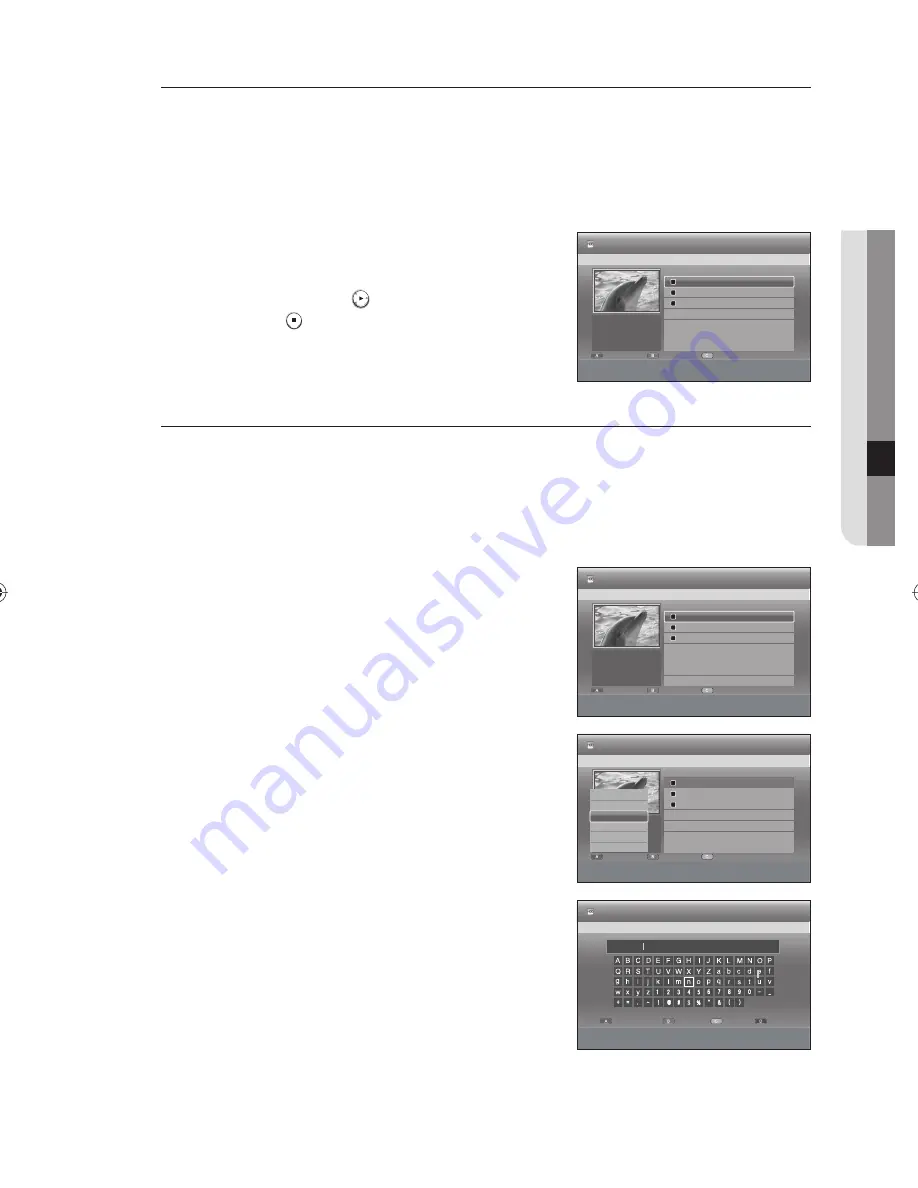
Playing Entries in the Playlist 

SXC


(VR mode)

Follow these instructions to play the playlist entries.

Using the PLAY LIST button

With the unit in Stop mode/Playback mode, press the 

PLAY 

LIST

 button.

Press the 

▲▼

 buttons to select the playlist you want to play, 

then press the 

OK

 or 

PLAY

 (

) button.

Press the 

STOP

 (

) button to stop playing.

The screen returns to the Playlist screen.

Renaming a Playlist Entry

SXC


(VR mode)

Follow these instructions to rename a playlist entry, i.e. to edit the title of a playlist entry.

Using the PLAY LIST button

With the unit in Stop mode/Playback mode, press the 

PLAY LIST


button.

Press the 

▲▼

 buttons to select the title you want to Rename 

from the Playlist, then press the 

RED(A)

 button.

The Edit menu is displayed.

Press the 

▲▼

 buttons to select 

Rename

, then press the 

OK

 or 

 button.

The Rename screen is displayed.

Select the desired characters using the 

▲▼◄ ►

 buttons, then 

press the 

OK

 button.

Back Space (RED(A) button)

 : Deletes and moves the cursor 

backwards by one position.

Space (GREEN(B) button)

 : Enters a blank and moves the 

cursor one forward (to the right).

Clear (YELLOW(C) button)

 : Deletes all the character inputs.

Save (BLUE(D) button)

 : Registers the character inputs.

Press the 

BLUE(D)

 button to select 

Save

.

The changed title is displayed in the title fi eld of the selected 
playlist entry.

N

1.

2.

3.

N

1.

2.

3.

4.


5.

No. Title 

Length


a

 CHECK


e

EXIT

 HDD 

Playlist

001  JAN/02/2008 13:47 

00:06:09

002  JAN/02/2008 13:51 

00:03:33

003  JAN/02/2008 14:08 

00:01:54


Edit


Sort


Title List

JAN/02/2008 13:47 

1/3

i
4
7

PLAYLIST
JAN/02/2008 13:47
6 Scenes

No. Title 

Length


a

 CHECK


e

EXIT

 HDD 

Playlist

001  JAN/02/2008 13:47 

00:06:09

002  JAN/02/2008 13:51 

00:03:33

003  JAN/02/2008 14:08 

00:01:54


Edit


Sort


Title List

JAN/02/2008 13:47 

1/3

i
4
7

PLAYLIST
JAN/02/2008 13:47
6 Scenes

No. Title 

Length


a

 CHECK


e

EXIT

 HDD 

Playlist

001  JAN/02/2008 13:47 

00:06:09

002  JAN/02/2008 13:51 

00:03:33

003  JAN/02/2008 14:08 

00:01:54


Edit


Sort


Title List

JAN/02/2008 13:47 

1/3

i
4
7

PLAYLIST
JAN/02/2008 13:47
6 Scenes

Delete
Copy
Rename
Edit Playlist
New Playlist
Select All

Dolphin

 m 

MOVE 

s

SELECT 

r

RETURN 

e

EXIT


Back Space


Space


Clear


Save

 HDD 

Rename

01582A-01-SH873,875,876M-XEU-ENG91   91

01582A-01-SH873,875,876M-XEU-ENG91   91

2008-04-18   오후 4:16:41

2008-04-18   오후 4:16:41

Summary of Contents for DVD-SH873M

Page 1: ...he possibilities Thanks you for purchasing this Samsung product To receive a more complete service please register your product at www samsung com global register DVD user manual DVD SH873M DVD SH875M DVD SH876M ...

Page 2: ...lug incorporating a fuse The value of the fuse is indicated on the pin face of the plug If it requires replacing a fuse approved to BS1362 of the same rating must be used Never use the plug with the fuse cover omitted if the cover is detachable If a replacement fuse cover is required it must be of the same colour as the pin face of the plug Replacement covers are available from your dealer If the ...

Page 3: ... unused for long periods of time Refer all servicing to qualified service personnel Servicing is required when the apparatus has been damaged in any way such as power supply cord or plug is damaged liquid has been spilled or objects have fallen into the apparatus the apparatus has been exposed to rain or moisture does not operate normally or has been dropped Handling Cautions Before connecting oth...

Page 4: ...ecover lost data The hard disk is only a temporary storage space Disc Handling Use discs with regular shapes If an irregular disc a disc with a special shape is used this HDD DVD Recorder may be damaged Holding discs Avoid touching the surface of a disc where recording is performed DVD RAM DVD RW and DVD R Clean with an optional DVD RAM PD disc cleaner LF K200DCA1 where available Do not use cleane...

Page 5: ...lay Some CD R RW discs may not be playable with this unit depending on the device which was used to burn them For contents recorded on CD R RW media from CDs for your personal use playability may vary depending on contents and discs DVD R Disc Playback and Recording Once a DVD R recorded in Video Mode is finalised it becomes DVD Video You can record onto the available space on the disc and perform...

Page 6: ...discs refer to the user s manual for the player For cartridge type DVD RAM discs remove the cartridge and use the disc only Disc Copy Title Copy Specifications Contents HDD DVD DVD HDD Recorded Video Title Supported Supported Copy Protected Title Not supported Not supported Copy Once Title Move Deletes the Title in the HDD after copying Not supported Once Copy Once programme has been recorded on t...

Page 7: ...itation recording failure loss of recorded or edited materials or damage to the HDD DVD Recorder Disc Format Using MP3 disc CD R RW DVD RAM RW R HDD USB with MP3 files recorded with UDF ISO9660 or JOLIET format can be playbacked Only MP3 files with the mp3 or MP3 extension can be played For MP3 files recorded with a VBR Variable Bit Rates from 32 Kbps to 320 Kbps the sound may cut in out Playable ...

Page 8: ... storage devices and PTP devices such as digital still cameras The USB host port provides USB2 0 connectivity and also backward compatibility with USB1 1 USB1 0 devices Supported devices at host port Mass Storage Devices Digital Still Camera MP3 Player Memory stick Card Reader One or Multi slot Card Reader External Hard disk drive Only supports FAT32 formatted HDD Others removable storage devices ...

Page 9: ...ital Still Camera Vendor Brand Samsung VP MS11 S800 Pro815 V20 V10 D60 UCA5 Sony DSC W50 DSC R1 DSC P150 DSC P200 Canon IXUS 60 IXUS 600 PowerShot A700 IXUS 700 A620 S80 Panasonic DMC FX01 DMC LX1S DMC FZ5 Nikon Coolpix 7900 Coolpix p3 Coolpix S2 Olympus C 70 zoom SP 700 FE5500 C 470Z Fuji Finepix F700 MP3 Player Vendor Brand Samsung YP T8 YP U2 YP T9 YP P2 i river H10 N11 T30 Mplayer Others Produ...

Page 10: ...e Video Output Cable 26 Other Types of connections with the Audio Output Cable 29 Connecting HDMI DVI to a TV 31 Connecting to AV 3 IN DV input jack 32 Connecting to USB Devices SYSTEM SETUP 33 33 On Screen Menu Navigation 33 Plug Play Setup 35 Clock Set 36 Channel Set 39 Setting up the System Options 41 Setting up the Language Options 41 Setting up the Audio Options 43 Setting up the Video Option...

Page 11: ... DivX RECORDING 69 69 Recordable Discs 70 Recording Formats 71 Recording Mode 72 Unrecordable pictures 73 Recording immediately 74 Copying from a Camcorder 75 Making a One Touch Recording OTR 75 Simultaneous Recording and Playback 76 Time Shift function as a live signal 78 Making a Timer Recording 81 Using the Video Plus Feature 82 Video Plus Extended 82 Go To Recorded List EDITING 84 84 Basic Edi...

Page 12: ...ustment for Timer Recording If FR mode is selected the video quality is adjusted automatically so that all video for the scheduled time can be recorded onto the free disc space See pages 78 79 Copying data from a digital camcorder using a DV input jack Record DV Device video onto HDD and DVD RAM RW R discs using the DV input jack IEEE 1394 4pin 4pin See page 74 High quality progressive scan Progre...

Page 13: ...V R This involves a function available on DVD R K RW This involves a function available on DVD RW L R This involves a function available on DVD R CD DA This involves a function available on a data CD CD R or CD RW G JPEG This involves a function available on CD R RW DVD R RW RAM discs or HDD A MP3 This involves a function available on CD R RW DVD R RW RAM discs or HDD D DivX This involves a functi...

Page 14: ...c can be formatted in either DVD Video format V mode or DVD Video Recording format VR mode For an unused disc a message that asks whether to initialise a disc or not If you select DVD VR or DVD V initialising will be started You can play a Video mode disc on various DVD components A VR mode disc allows more varied editing Using a DVD R Formatting disc is unnecessary and only V Mode Recording is su...

Page 15: ...e existing recording Step 6 Finalising Playing on other DVD components To play your DVD on other DVD components finalising may be necessary First finish all editing and recording operations then finalise the disc When using a DVD RW disc in VR Mode DVD discs recorded in VR mode can only be played back in DVD recorders not players When using a DVD RW disc in Video Mode The disc should be finalised ...

Page 16: ...over If the remote does not operate properly Check the polarity of the batteries Dry Cell Check if the batteries are drained Check if remote sensor is blocked by obstacles Check if there is any fluorescent lighting nearby Dispose of batteries according to local environmental regulations Do not put them in the household trash To determine whether your television is compatible follow the instruction...

Page 17: ...rily work on all televisions If you encounter problems operate the television directly M M BRAND BUTTON SAMSUNG 01 02 03 04 05 06 07 08 09 AIWA 82 ANAM 10 11 12 13 14 15 16 17 18 BANG OLUFSEN 57 BLAUPUNKT 71 BRANDT 73 BRIONVEGA 57 CGE 52 CONTINENTAL EDISON 75 DAEWOO 19 20 23 24 25 26 27 28 29 30 31 32 33 34 EMERSON 64 FERGUSON 73 FINLUX 06 49 57 FORMENTI 57 FUJITSU 84 GRADIENTE 70 GRUNDIG 49 52 71...

Page 18: ...TV preset channels Stop mode PLAY PAUSE button Plays a disc or pauses playback STOP button Stops disc playback REC button Starts recording HDD DVD button Selects HDD DVD mode DISC TRAY Opens to accept a disc USB HOST Connects to digital still camera MP3 player memory stick Card reader externl HDD or other removable storage devices 10 DV INPUT Connects to external digital equipment with a DV jack s...

Page 19: ...plifier having a digital optical audio input jack DIGITAL AUDIO OUT COAXIAL Connects to an amplifier having a digital coaxial audio input jack VIDEO OUT Connects the input of external equipment using a Video cable AUDIO OUT Connects to the audio input of external equipment using audio cables AV1 TV OUTPUT SCART Connector Connects to equipment having SCART input jack Out to TV connector Connects RF...

Page 20: ...r Lights when DVD mode is selected HDD VIEW Indicator Lights when HDD mode is selected USB VIEW Indicator Lights when USB mode is selected Disc Media Indicator Lights when a DVD RW R disc is loaded TIMER Indicator Lights to indicate the timer record mode HDMI Indicator Lights to indicate when HDMI is connected REC Indicator Lights in the record mode STATUS Indicator Playing time clock current stat...

Page 21: ...utton Use this to set the desired recording time and picture quality XP SP LP EP SELECT TV USB DVD HDD OPEN CLOSE button To open and close the disc tray TV STANDBY ON button Press to turn the TV On Off COPY button Used to copy contents or title TV MUTE button In TV mode this operates as sound mute PROG button Use this to select a TV programme RETURN button Press to return to the previous menu OK D...

Page 22: ...as shown Connect one end of the SCART cable to the AV1 socket on the rear of the HDD DVD Recorder Plug the other end into the appropriate connector on the television Plug in the HDD DVD Recorder and TV Turn on the HDD DVD Recorder and TV Press the INPUT SEL button on your TV remote control until the Video signal from the HDD DVD Recorder appears on the TV screen The RF cable connection of this pro...

Page 23: ...Connect the AV1 connector to the SCART AV connector on the TV Turn on the HDD DVD Recorder External device VCR Satellite receiver and TV Set Input mode on AV2 TV mode Press the TV DVD button on remote control then TV appear on Front display or turn off HDD DVD Recorder You can watch programmes from a satellite or digital tuner connected to this HDD DVD Recorder even when the HDD DVD Recorder is tu...

Page 24: ... This is only available with TVs that support progressive scan Progressive Scan Output 576P Consumers should note that not all high definition television sets are fully compatible with this product and may cause artifacts to be displayed in the picture in case of 576 progressive scan picture problems It is recommended that the user switch the connection to the standard definition output If there a...

Page 25: ...V Connect audio cables white and red between the AUDIO OUT jacks on the HDD DVD Recorder and AUDIO IN jacks on TV or AV amplifier See pages 26 28 After connecting refer to the page 44 Make sure that the colour coded connections match The Y PB PR component output jacks of your HDD DVD Recorder must be connected to the exact corresponding component input jacks on your TV Progressive setting is only ...

Page 26: ...e 3 Connecting to an AV amplifier with a digital output jack Manufactured under license under U S Patent 5 451 942 other U S and worldwide patents issued pending DTS and DTS Digital Out are registered trademarks and the DTS logos and Symbol are trademarks of DTS Inc 1996 2007 DTS Inc All Rights Reserved Manufactured under licence from Dolby Laboratories Dolby and the double D symbol are trademarks...

Page 27: ...27 CONNECTING SETTING UP Case 2 Connecting to a stereo amplifier with AV output jacks If your stereo amplifier only has AUDIO INPUT jacks L and R use the AUDIO OUT jacks White Red Front L speaker Front R speaker ...

Page 28: ...V amplifier has a Dolby Digital MPEG2 or DTS decoder and a digital input jack use this connection To enjoy Dolby Digital MPEG2 or DTS sound you will need to set up the audio settings According to your amplifier connect to an optical cable or a coaxial cable See pages 41 42 or Rear L Rear R Front L Front R Subwoofer Centre ...

Page 29: ...a TV with DVI Jack Case 1 Connecting to a TV with HDMI Jack Using the HDMI cable not supplied connect the HDMI OUT jack on the rear of the HDD DVD Recorder to the HDMI IN jack of your TV Press the input selector on your TV remote control until the HDMI signal from the HDD DVD Recorder appears on your TV screen If the HDD DVD Recorder is connected to your TV in HDMI 1080p output mode you must use H...

Page 30: ...ically activates when HDMI is connected If TV HDMI Receiver does not support DTS Audio output is not available when you play a disc in DTS format You can switch from the HDMI output to other output only in stop mode If you use an HDMI cable to connect a Samsung TV to the HDD DVD Recorder you can operate the recorder using the TV remote control This is only available with SAMSUNG TVs that support A...

Page 31: ...corder to your TV What is the HDCP HDCP High bandwidth Digital Content Protection is a system for protecting DVD content outputted via HDMI from being copied It provides a secure digital link between a video source PC DVD etc and a display device TV projector etc Content is encrypted at the source device to prevent unauthorised copies from being made CONNECTING TO AV 3 IN DV INPUT JACK This allows...

Page 32: ...ut CONNECTING TO USB DEVICES This allows you to connect your HDD DVD RECORDER to USB devices Connecting a USB memory MP3 player Digital Camera to the USB HOST Disconnecting the USB cable during the data transfer will stop the communication and may damage data stored in the memory When data communication is disrupted due to static electricity magnetic field or other reason restart the programme or ...

Page 33: ...use HDMI cable not supplied make the Audio Video connection before plugging in the power cord or after finishing the Plug Play Setup Do not connect the HDMI cable while the Plug Play Setup is progressing Plug the HDD DVD Recorder into the mains AUTO in the front panel display flickers Press the OK or button then Country option display Press the buttons to select the desired country option then pre...

Page 34: ...rmed by pressing STOP on the unit continuously for 5 seconds or more during power off with no disc inserted Check the date and time If it is Correct press OK button then the date and time will be saved If you don t press the OK button the date and time will be saved automatically after 5 seconds If it is Incorrect input correct Month Day Year Hour or Minute using buttons or number buttons Press OK...

Page 35: ...mber buttons to input clock data directly Press the OK button then the date and time will be saved If you don t press the OK button it will not be saved You must have the RF cable connected to set the Auto Clock See page 22 The DVD Recorder automatically sets the clock according to the time signal broadcast between the channels PR1 to PR5 If there is no clock in the analogue broadcast the clock wi...

Page 36: ...igital Analogue or All If you select Analogue you can not select the Scan Mode Start frequency and End frequency Scan Mode Only Free Receives signals except for the scrambled signal All Receives signals including the scrambled signal Start frequency End frequency It is changed automatically when the country is selected Press the button to select Start then press OK button Auto Scan will be started...

Page 37: ... CH Name MFT select Save then press the OK button CH Tune the channel using buttons Name Display station name automatically detected in broadcasting signal If not detected you can edit name by using buttons MFT Manual Frequency Tunning You can tune the channel frequency manually using buttons Delete GREEN B button The selected programme will be removed Swap YELLOW C button You can swap the channel...

Page 38: ...ite Channel This function is possible in DVB T mode only You can immediately register the present channel to the Digital Favorite Channel list To setup follow steps 1 2 on page 36 Press the buttons to select Digital Favorite Channel then press OK or button To add the current channel the Digital Favorite channels press the YELLOW C button To delete a favorite channel from the Digital Favorite chann...

Page 39: ...r recording the device will operate until the playback or recording is finished If you off and on the HDD DVD Recorder the option will be returned to default Anynet HDMI CEC Anynet is a function that can be used to operate the recorder using a Samsung TV remote control by connecting the HDD DVD Recorder to a SAMSUNG TV using an HDMI Cable See pages 29 30 This is only available with SAMSUNG TVs tha...

Page 40: ...automatically When the HDD DVD Recorder is recording it can t be powered off If you change the HDMI to other sources Composite Component RF etc in TV while playing the DVD disc the HDD DVD Recorder will stop playing But the HDD DVD Recorder may keep the DVD disc Recording DVB T Auto Subtitle On The subtitle is shown automatically when watching the DVB T Off The function is cancelled It is availabl...

Page 41: ... supported on the disc and DVB T During the playback press the SUBTITLE button to select DVD subtitle Because the default of DVD subtitle is off press the button to select the desired subtitle SETTING UP THE AUDIO OPTIONS You can connect the HDD DVD Recorder to an external amp or Home theatre Audio options allow you to setup the Audio device and sound status depending on the audio system in use Yo...

Page 42: ...n to make low level content more intelligible and prevent dramatic passages from getting too loud Off You can enjoy the movie with the standard Dynamic Range NICAM NICAM programmes are divided into 3 types NICAM Stereo NICAM Mono and Bilingual transmission in another language NICAM programmes are always accompanied by a standard mono sound broadcast and you can select the desired sound by setting ...

Page 43: ...e reduction Off Normal On Provides a clear picture through noise reduction for recording Video Output You can enjoy high quality image through RGB or Component video connections RGB video output is available connecting scart jack AV1 and component video output is available connecting component Y PB PR jack Only one of these signals can be selected at one time Component RGB 1 2 3 4 5 SYSTEM SETUP S...

Page 44: ...nnect the HDD DVD Recorder to your TV via HDMI Set your TV s input to HDMI Progressive scan automatically activates when HDMI is connected Consult your TV User s Manual to find out if your TV supports Progressive Scan If Progressive Scan is supported follow the TV User s Manual regarding Progressive Scan settings in the TV s menu system If Video Output is set incorrectly the screen may be blocked ...

Page 45: ...t time the Create the Password message will be displayed Enter the 4 digit password using the number buttons on the remote control The Confirm the password message will be displayed Enter your password again If you forgot your password Switch the DVD mode and remove the disc Press and hold the PLAY PAUSE button on the front panel for 10 seconds or more Setting the Programme Grade Press the buttons...

Page 46: ...pter Creator then press the OK or button Press the buttons to select Off or On then press the OK or button Off Select if you do not want to use Automatic Chapter Creator On Select this option to use the Automatic Chapter Creator feature Press the EXIT button to exit the menu Press the REC button to start recording See page 71 about how to set recording speed The message Do you want to create the c...

Page 47: ...ew It is initialised to V mode automatically DVD RW only Press the REC button EZ Record function will automatically Finalise the disc under the following conditions When you press the OPEN CLOSE button on your HDD DVD Recorder after recording on at least 70 of the disc The tray will open after the disc has been finalised The above feature is available only when a DVD RW V DVD R or DVD R disc is in...

Page 48: ...the multi audio broadcasting is recorded on HDD Titles recorded on HDD under such setup status can be copied to DVD RW R or DVD RW V mode Dual L and Dual R options can be selected from Audio Selection Recording HDD DVD RECORDER HDD Chapter Creator On EP Mode Time 6 Hours EZ Record Off V Mode Compatibility Off m MOVE sSELECT rRETURN eEXIT Library Guide Channel Timer Record Disc Manager Setup Off On...

Page 49: ...ress the buttons to select desired Audio track then press the OK button Setting the Favourtie Channel You can immediately register the present channel to the Digital Favorite Channel List Press the FAV LIST button while you are viewing a programme To add the current channel to the Digital Favorite channels press the YELLOW C button To delete a favorite channel from the Digital Favorite channel lis...

Page 50: ... the GUIDE button while you are viewing a programme DTV RED A button Timer Record Setting the Timer Record button Go to next day button Go to previous day It displays programme from now to 7 days after button select the programme and station INFO button Information View the detail information The contents of cell could be displayed slowly according to the broadcasting If Daylight Saving Time and G...

Page 51: ...12 recordings are possible including guide recording and general recording 1 2 M DTV FUNCTIONS 12 00 TUE 1 JAN 2008 PREVIOUS NEXT PAGE INFORMATION INFO DTV Guide 12 00 12 25 Blue Peter Timer Rec A TUE 1 JAN 12 30 13 00 13 30 001 BBC ONE Blue Peter Neighbours BBC News Look North 002 BBC TWO The Weakest Link Beg Borrow or Steal Strictly Come Dancing It T 007 BBC THREE 030 CBBC Channel Basli Brush Tr...

Page 52: ...m in U K France Germany etc DivX MP3 DISC TYPES THAT CAN BE PLAYED Disc Types Disc Logo content Recorded content Disc Shape Max Playing Time DVD VIDEO AUDIO VIDEO Single sided 12cm 240 min Double sided 12cm 480 min Single sided 8cm 80 min Double sided 8cm 160 min AUDIO CD AUDIO Single sided 12cm 74 min Single sided 8cm 20 min JPEG JPEG Image Single sided 12cm Single sided 8cm MP3 MP3 Audio Single ...

Page 53: ...DivX Discs that cannot be played DVD Video with a region number other than 2 or ALL 3 9 GB DVD R Disc for Authoring DVD RAM RW VR mode not recorded following the Video Recording Standard A DVD R DVD RW V disc which has been recorded and not finalised in a different manufacturer s recorder DVD ROM PD MV Disc etc VCD SVCD CVD CD ROM CDV CD G CD I BD HD DVD This HDD DVD Recorder can only operate with...

Page 54: ...e Be especially careful that children s fingers are not caught between the disc tray and the tray chassis when it closes You must only insert one DVD disc at a time Inserting two or more discs will not allow playback and may cause damage to the HDD DVD Recorder USING THE DISC MENU TITLE MENU Some type of discs contain a dedicated menu system that allows you to select special functions for title ch...

Page 55: ...peed Skipping Chapters Titles or Markers SXCV KL During play press the SKIP buttons on the remote control If you press the SKIP button it moves to the beginning of the chapter or Title or marker Pressing the button once again within 3 seconds returns to the beginning of the previous chapter or Title or marker If you press the SKIP button it moves to the next chapter or track or marker Slow Motion ...

Page 56: ...t Title Chapter or Time Press the buttons or number buttons to select the desired scene then press the OK button In case of searching a time enter the time in the sequence of hours minutes and seconds using the number buttons Then press the OK button This may not work for some discs When an audio CD CD DA or an MP3 JPEG disc is inserted depending on the disc type the information display may not ap...

Page 57: ...gle function Press the INFO button during playback Press the buttons to select Angle Press the buttons to select the desired angle This function is disc dependent and may not work on all DVDs This function does not work when a DVD has not been recorded with a multi camera angle system Displays the current angle total angle number REPEAT PLAY Playing Repeatedly Repeat Playback SZXCVKLD You can also...

Page 58: ...Playback by pressing the EXIT button Audio CDs CD DA MP3 discs and DivX discs do not support the Repeat A B function ZOOMING IN SZXCVKL Press the INFO button during playback Press the buttons to select Zoom then press the OK or button will be displayed Press buttons to move to the area you want to enlarge Press the OK button The screen will be enlarged to twice the normal size The screen size will...

Page 59: ...ng the button once again within 3 seconds returns to the beginning of the previous marker If you press the SKIP button it moves to the next marker Clearing a marker Press the MARKER button during playback Press the buttons to select a marked scene Press the RED A button to delete the selected mark When a marker is cleared while HDD DVD RAM RW VR mode is playing marker numbers will change For examp...

Page 60: ... page Press the SEARCH buttons Fast Play X 2 X 4 X 8 Audio CD only STOP button Stops a track song PAUSE button Pauses playback PLAY button OK button Plays the selected track song Selects a track song RED A button Creates a playlist or go to playlist Select All MP3 CD DA Copy MP3 CD Import Audio CD GREEN B button Selects the sort order MP3 disc only YELLOW C button Selects the play mode REPEAT BLUE...

Page 61: ...he REPEAT button on the remote control During playback press the REPEAT button repeatedly to select the repeat mode you want Press the YELLOW C button during the Music List playback Press the buttons to select desired play mode then press the OK or button Normal CD CD DA MP3 Tracks on a disc are played in the order in which they were recorded on the disc Repeat Track CD CD DA MP3 Repeat Folder MP3...

Page 62: ...e order in which you want them to play then press the OK button If you playlisted a wrong track press the buttons to select the wrong track then press the OK button To store the Playlist press the RED A button A new Playlist will be created 1 2 3 4 5 6 M 1 2 3 4 U 00 00 00 No Title Length mMOVE sSELECT a CHECK eEXIT CD Playlist Y PLAYLIST q Y PLAYLIST E PLAYLIST01 Save Music List No Title CD Make ...

Page 63: ...ss the buttons to select Go To Playlist then press the OK or button Press the buttons to select the Playlist you want to edit Press the GREEN B button in playlist mode Press the buttons to select tracks in the order in which you want them to play then press the OK button If you playlisted a wrong track press the buttons to select the wrong track then press the OK button To store the Playlist press...

Page 64: ...unction is possible only when the disc contains the selected contents Audio CD CD DA is not available 1 1 2 M 1 2 M SONG 10 mp3 1 10 9 SONG 10 mp3 E ROOT 00 02 22 No Title Size PREVIOUS NEXT PAGE a CHECK eEXIT Edit Sort Play Mode Contents CD Music List Y ROOT Q SONG 1 MP3 3 8 MB 002 SONG 2 MP3 3 8 MB 003 SONG 3 MP3 5 1 MB 004 SONG 4 MP3 9 2 MB 005 SONG 5 MP3 5 2 MB 006 SONG 6 MP3 10 3 MB Name Size...

Page 65: ...rate Slide Show in by pressing the YELLOW C button Press the RED A button to select Speed Press the buttons to select the Slide Show speed then press the OK or button The Slide Show starts and plays at the selected speed You can go to Photo List by pressing YELLOW C button To stop the Slide Show Press the GREEN B STOP or RETURN button 1 2 M 1 2 3 4 5 6 7 PLAYBACK Image 1 jpg 1 17 Rotate Zoom PHOTO...

Page 66: ...o To Photo List To setup follow steps 1 to 4 on page 65 5 1 Press the RETURN button to go to Photo List Using the Sort When you need to change the Sort order of Photo List you can sort by Name and Size To setup follow steps 1 to 4 on page 65 While the list menu is displayed press the GREEN B button to select Sort Press the buttons to select the desired item then press the OK or button Name In alph...

Page 67: ...nction Description Skip Scene During play press the SKIP buttons it moves forward or backward 5 minutes Search Scene During play press the SEARCH buttons and press again to search at a faster speed X 2 X 4 X 8 Slow Motion In pause mode press the SEARCH button on the remote control 1 2 1 4 1 8 Reverse Slow Motion Play is not available Step Motion In pause mode press the SKIP buttons on the remote c...

Page 68: ...e GREEN B button to select Sort Press the buttons to select the desired item then press the OK or button Name In alphabetical order Size In order of DivX file size You can sort by Name Size Sorted list will be resorted in copied order upon reentering DivX List Select Contents Press the BLUE D button to select Contents Press the buttons to select the contents you want to move then press the OK or b...

Page 69: ...ecorder DVD RAM VR Mode Samsung X Recordable Other Company X Recordable DVD RW VR Mode Samsung finalised Not recordable not finalised Recordable Other Company finalised Not recordable not finalised Recordable V Mode Samsung finalised Not recordable not finalised Recordable Other Company finalised Not recordable not finalised Not recordable DVD R V Mode Samsung finalised Not recordable not finalise...

Page 70: ... DVD RAM R Formatting will be started automatically DVD RW Use after formatting the disc DVD RW Use after initialising the disc If you want to change the VR or V mode refer to Formatting a Disc on pages 101 102 DVD R Formatting disc is unnecessary and only V Mode Recording is supported DVD RAM RW VR mode This mode allows multiple editing functions such as deletion of the whole title partial deleti...

Page 71: ... Approx 1 hour about 8 5 Mbps SP standard quality mode Approx 67 hours Approx 2 hours about 4 5 Mbps LP long recording mode Approx 133 hours Approx 4 hours about 2 Mbps EP extended mode Approx 199 hours Approx 264 hours Approx 6 hours about 1 6 Mbps Approx 8 hours about 1 2 Mbps FR Flexible Recording Approx 33 hours 264 hours Approx 1 8 hours DVD SH875M 876M Recording Mode Recording Times HDD 250G...

Page 72: ...y Once and Copy Never If you want to record a copy once type programme use DVD RW with CPRM in VR Mode DVD RAM and HDD Signal type Media Copy Free Copy Once Copy Never DVD RW Ver 1 1 O DVD RW Ver 1 1 with CPRM VR mode V mode O O O DVD R O DVD RAM Ver 2 0 O O DVD RW O DVD R O HDD O O Once Copy Once has been recorded recording cannot be done anymore Content Protection for Recordable Media CPRM CPRM ...

Page 73: ...V2 AV3 DV If you connect a digital camcorder press the INPUT SEL button to select DV See page 74 Press the REC MODE button repeatedly or press the REC MODE button then press the buttons to select the recording speed quality Press the REC button Information concerning the external input mode is displayed on the screen then recording begins Icon REC is displayed on the front panel To pause recording...

Page 74: ...ront of your HDD DVD Recorder using a DV cable Press the HDD or DVD button If you select DVD press the OPEN CLOSE button and place a recordable disc on the disc tray Press the OPEN CLOSE button to close the disc tray Wait until LOAD disappears from the front panel display Press the REC MODE button repeatedly to select the recording speed quality Press the INPUT SEL button to select DV If the input...

Page 75: ...inute from 8 00 to 0 00 then the HDD DVD Recorder stops recording To stop recording Press the STOP button The message Do you want to stop recording is displayed Press the buttons to select Yes then press the OK button Or press the STOP button again SIMULTANEOUS RECORDING AND PLAYBACK S You can play back from the beginning of the programme you are currently recording You can watching the previous t...

Page 76: ...topping Playback Recording Press the STOP button once playback screen disappears and the Title List screen appears Pressing the MENU button again the recording in progress screen appears Pressing the STOP button once more will stop the recording No sound is heard during search mode DVD disc or HDD playback is available during HDD recording However JPEG MP3 and DivX files in the disc cannot be play...

Page 77: ...rent status Watching Point Current play time Live Point Live Time Time Shift Time Bar Buttons on the Remote Control used for Time Shift function PLAY button Playback PAUSE button Pause live TV SEARCH buttons Fast play X 2 X 4 X 8 X 16 X 32 X 128 SKIP button STOP button Switches to live TV SKIP button Returns to the point where Time Shift begins The Time Shift is available only when HDD mode is sel...

Page 78: ...MON SAT JAN 01 Every Day Start End Time Start and end time of the timer recording Mode Recording Mode FR Flexible Recording Select when you want to set video quality automatically In FR mode the most suitable record mode is adjusted automatically according to the remaining time on the disc and length of the timer recording This function is selected only one mode in XP SP LP and EP modes XP high qu...

Page 79: ...s Follow steps 4 and 5 of Renaming Labeling a Title on pages 84 85 After selecting the set up value for each mode press the OK button to select Save will appear on the front panel It means that a timer recording is registered If the timer settings overlap The programmes are recorded in order of priority After recording of the first programme is complete the second programme starts being recorded T...

Page 80: ...t items See pages 78 79 Press the OK button to confirm the added setting Press the EXIT button after finishing the operation The Scheduled List screen will disappear N 1 2 3 4 5 N 1 2 3 4 5 80_ recording recording Current Time 10 54 No To Source Date Start End Mode PDC HDD Scheduled List MOVE sSELECT rRETURN eEXIT 01 HDD PR 01 JAN 01 17 30 18 30 SP On 02 HDD PR 01 JAN 01 21 00 22 00 SP On 03 HDD P...

Page 81: ...the code of the programme that you want to record in your television magazine If you want to correct the Video Plus code that you are entering Press the button until the digit to be corrected is cleared Enter the correct digit Press the OK button The information concerning the programme is displayed When using the Video Plus function for the first time with stored stations the programme number fla...

Page 82: ...t Video Plus Extended then press the OK or button Press the buttons to select the Video Plus Extended time then the press OK or button Press the EXIT button to exit the menu GO TO RECORDED LIST SXCVKL You can confirm the performance results of title lists that have passed the reserved recording time Using the TIMER button With the unit in Stop mode press the TIMER button Press the button to select...

Page 83: ...ess the YELLOW C button English _83 No To Source Date Start End Mode PDC Status HDD Recorded List sSELECT rRETURN eEXIT Delete Delete All Scheduled List 01 HDD PR 01 JAN 01 17 30 18 30 SP On OK 02 HDD PR 01 JAN 01 21 00 22 00 SP On OK 03 HDD PR 01 JAN 01 23 15 23 45 SP On OK Timer rec was finished successfully OK No To Source Date Start End Mode PDC Status HDD Recorded List m MOVE sSELECT rRETURN ...

Page 84: ...le List then press the RED A button Press the buttons to select Rename then press the OK or button The Rename screen is displayed Select the desired characters using the buttons press the OK button Back Space RED A button Deletes and moves the cursor backwards by one position Space GREEN B button Enters a blank and moves the cursor one forward to the right Clear YELLOW C button Deletes all the cha...

Page 85: ...On then press the OK button The key icon on the information window for the selected entry changes to the locked status 1 0 If you want to cancel the Protection select Off in step 5 and press the OK button The key icon changes to the unlocked status 0 1 If you select Select All in the Edit menu all titles will be checked 5 N 1 2 3 4 5 6 M Sports A1 m MOVE sSELECT rRETURN eEXIT Back Space Space Clea...

Page 86: ...t cannot be deleted With DVD R titles are only deleted from the menu however the Title remains physically on the disc If you select Select All in the Edit menu all titles will be checked Splitting a Section of a Title Split SK Follow these instructions to split a section of a Title List entry into two titles Using the TITLE LIST button With the unit in Stop mode Playback mode press the TITLE LIST ...

Page 87: ...t the start and end points of the section you want to delete using the playback related buttons Playback related buttons PLAY PAUSE SEARCH Press the OK button at the end point The image and end point time is displayed in the Section deletion ending point window 3 4 5 6 N 1 2 3 4 5 Select Split Return Title List No 001 00 00 00 00 00 00 Split 1 Split 2 MOVE sSELECT rRETURN eEXIT HDD Split JAN 01 20...

Page 88: ...pied order upon reentering the Title List NAVIGATION MENU Time Navigation SXC VR mode Using this function you can search scene minute by minute from the recorded title list Using the TITLE LIST button With the unit in Stop mode Playback mode press the TITLE LIST button Press the buttons to select an entry you want to play from Title List then press the YELLOW C button Press the buttons to select T...

Page 89: ...perate if a selected title does not have Markers SELECT CONTENTS SXCVKL Press the BLUE D button to select Contents Press the buttons to select the contents you want to move then press the OK or button This function is possible only when the disc contains the selected contents 4 M N 1 2 3 4 M 1 2 M No Title Length a CHECK eEXIT HDD Title List 001 JAN 01 2008 17 30 PR 01 00 00 002 JAN 02 2008 21 00 ...

Page 90: ... Repeat steps 4 6 to make a new scene for the playlist A new scene will be added to the current playlist You can check and see all the scenes on the Edit playlist screen See pages 91 94 To make a new playlist Repeat steps 1 6 if you want to make a new playlist Press the button to select Return then press the OK button to finish the operation You can create up to 99 playlist entries Depending on th...

Page 91: ... cursor backwards by one position Space GREEN B button Enters a blank and moves the cursor one forward to the right Clear YELLOW C button Deletes all the character inputs Save BLUE D button Registers the character inputs Press the BLUE D button to select Save The changed title is displayed in the title field of the selected playlist entry N 1 2 3 N 1 2 3 4 5 No Title Length a CHECK eEXIT HDD Playl...

Page 92: ...ndow Select the starting or ending point of the section you want to modify using the playback related buttons PLAY PAUSE SEARCH SKIP 6 Press the OK button at the end point of the scene The image and ending point time is displayed in the End window 7 Press the buttons to select Change then press the OK button The scene you want to modify is changed with the selected section N 1 2 3 4 No Title Lengt...

Page 93: ...age and end point time are displayed in the End window To cancel press the buttons to select Return then press the OK button 7 Press the buttons to select Add then press OK button The section you want to add is inserted prior to the scene selected in step 4 1 of Adding a Scene Deleting a Scene To setup follow steps 1 to 3 on page 92 4 1 Press the buttons to select the scene you want to delete then...

Page 94: ...he GREEN B button to Press the buttons to select the desired item then press the OK or button Date In order of when the playlists were created Name In alphabetical order You can sort by Date Name Sorted list will be resorted in copied order upon reentering the Playlist N 1 2 3 4 5 M 1 2 M No Title Length a CHECK eEXIT HDD Playlist Edit Sort Title List JAN 02 2008 13 47 1 3 i 4 7 PLAYLIST JAN 02 20...

Page 95: ... been recorded on the HDD this title can be copied to DVD RW VR mode or DVD RAM Using the TITLE LIST button Press the OPEN CLOSE button and place a recordable disc on the disc tray Press the OPEN CLOSE button to close the disc tray Wait until LOAD disappears from the front panel display Check that the disc has enough available space for the recording Select a desired mode by pressing the HDD or DV...

Page 96: ... on the disc tray Press the OPEN CLOSE button to close the disc tray During the playback press the COPY button Copying will be started The Copy function will be disabled in the if you try to copy any of the following A section of the menu A NTSC disc or copy protected disc Titles that are different in the broadcasting system The audio title that is copied to the HDD will be recorded in the 2ch AC3...

Page 97: ...py Insert a Disc JPEG MP3 or DivX into the tray Press the buttons to select Library then press the OK or button Press the buttons to select Music Photo or DivX then press the OK or button MP3 JPEG or DivX folder is displayed 1 2 3 4 5 6 7 8 9 1 2 3 9 MP3 8 5 85MB PREVIOUS NEXT PAGE a CHECK eEXIT Start Copy Sort Selection All Unselect All CD Copy Selected Items 5 85MB 1 Available Source DVD To Y RO...

Page 98: ... one folder MP3 JPEG DivX If you want to file copy you should create a new folder before starting a copy You cannot copy to top level ROOT folder directly without creating a new folder If the top level ROOT folder has had already 500 folders you should delete one or more items before you can create a new folder File size on a disc and the copied file in the HDD may be slightly different due to the...

Page 99: ...s the BLUE D button to select Save A disc name is given to the disc You may need to clear Disc Protection before editing Depending on the kind of disc the displayed screen may be different If you have recorded a DVB T radio channel program the time information displayed for each of free and used space may be incorrect 1 2 3 4 1 2 3 4 5 M MOVE sSELECT rRETURN eEXIT DVD RAM VR Disc Manager Rename Pr...

Page 100: ... cannot be deleted from that disc If you select Yes you will be prompted with the confirmation message All playlists will also be deleted Do you want to continue Press the buttons to select Yes then press the OK button All title lists are deleted 1 2 3 4 1 2 3 4 MOVE sSELECT rRETURN eEXIT DVD RAM VR Disc Manager Rename Protection Delete All Format Disc Name Used Space Available Space Disc Protecti...

Page 101: ...prompted with the confirmation message Current media Do you want to format If you select Yes you will be prompted with the confirmation message All data will be deleted Do you want to continue 1 2 3 4 5 1 2 3 MOVE sSELECT rRETURN eEXIT HDD Disc Manager Delete Format Used Space Available Space 000 39 1 68 GB 065 19 XP 231 01 GB MOVE sSELECT rRETURN eEXIT HDD Disc Manager Delete Format Used Space Av...

Page 102: ...he record list After being finalised the DVD R RW video mode operates in the same manner as a DVD Video Depending on the disc type the displayed screen may be different Finalising time may be different depending on the amount of data recorded on the disc Data on the disc will be damaged if the recorder is powered off during finalisation process You can finalise the disc automatically using EZ Reco...

Page 103: ...nalise Unfinalise Mark DVD Video RW DVD RW V Operation Same as DVD Video Additional recording protection and deletion are possible A DVD RW can be finalised or unfinalised in VR mode Finalise Unfinalise Mark DVD RW VR F DVD RW VR Operation Additional recording deletion editing and protection are impossible Additional recording deletion editing and protection are possible 1 2 3 4 5 M MOVE sSELECT r...

Page 104: ...the moment 4 You ve requested a title chapter or scan time that is out of range Play mode settings are different from the settings configured in the Settings menu The disc does not support all selected functions In this case some settings configured in the settings menu may not work properly Cannot change the aspect ratio The aspect ratio is fixed for DVD discs See page 43 The angle operation does...

Page 105: ...onnection between the TV and the HDMI jack of the HDD DVD Recorder See if your TV supports HDMI Abnormal HDMI output screen If snow noise appears on the screen it means that TV does not support HDCP Highbandwidth Digital Content Protection HDMI output Jitter Check your TV system setup correctly Please refer to the user s manual of your TV The remote control doesn t work Point the remote control at...

Page 106: ...Coaxial digital audio output Video Composite Video Video output jack x 1 Component output x 1 Y 1 0Vp p PB 0 70Vp p PR 0 70Vp p at 75Ω load HDMI DVI 576p 720p 1080i 1080p Scart Jack AV1 Scart TV Video Composite RGB Audio analogue Recording Picture Compression format MPEG II Audio Compression format Dolby Digital 2ch 256Kbps MPEG II Recording Quality XP about 8 5 Mbps SP about 4 5 Mbps LP about 2 5...

Page 107: ...roducts caused by such repair work will not be covered by this warranty 4 This product is not considered to be defective in materials nor workmanship by reason that it requires adaptation in order to conform to nation al or local technical or safety standards in force in any Country other than the one for which the product was originally designed and manu factured This warranty will not cover and ...

Page 108: ...amsung com ITALIA 800 SAMSUNG 726 7864 www samsung com LUXEMBURG 0035 0 2 261 03 710 www samsung com be NETHERLANDS 0900 SAMSUNG 726 7864 0 10 Min www samsung com nl NORWAY 815 56 480 www samsung com no POLAND 0 801 801 881 022 607 93 33 www samsung com pl PORTUGAL 80820 SAMSUNG 726 7864 www samsung com pt SLOVAKIA 0800 SAMSUNG 726 7864 www samsung com sk SPAIN 902 10 11 30 www samsung com SWEDEN ...

Page 109: ...nvironment or human health from uncontrolled waste disposal please separate this from other types of wastes and recycle it responsibly to promote the sustainable reuse of material resources Household users should contact either the retailer where they purchased this product or their local government office for details of where and how they can take this item for environmentally safe recycling Busi...

Reviews: