background image

ENG-7

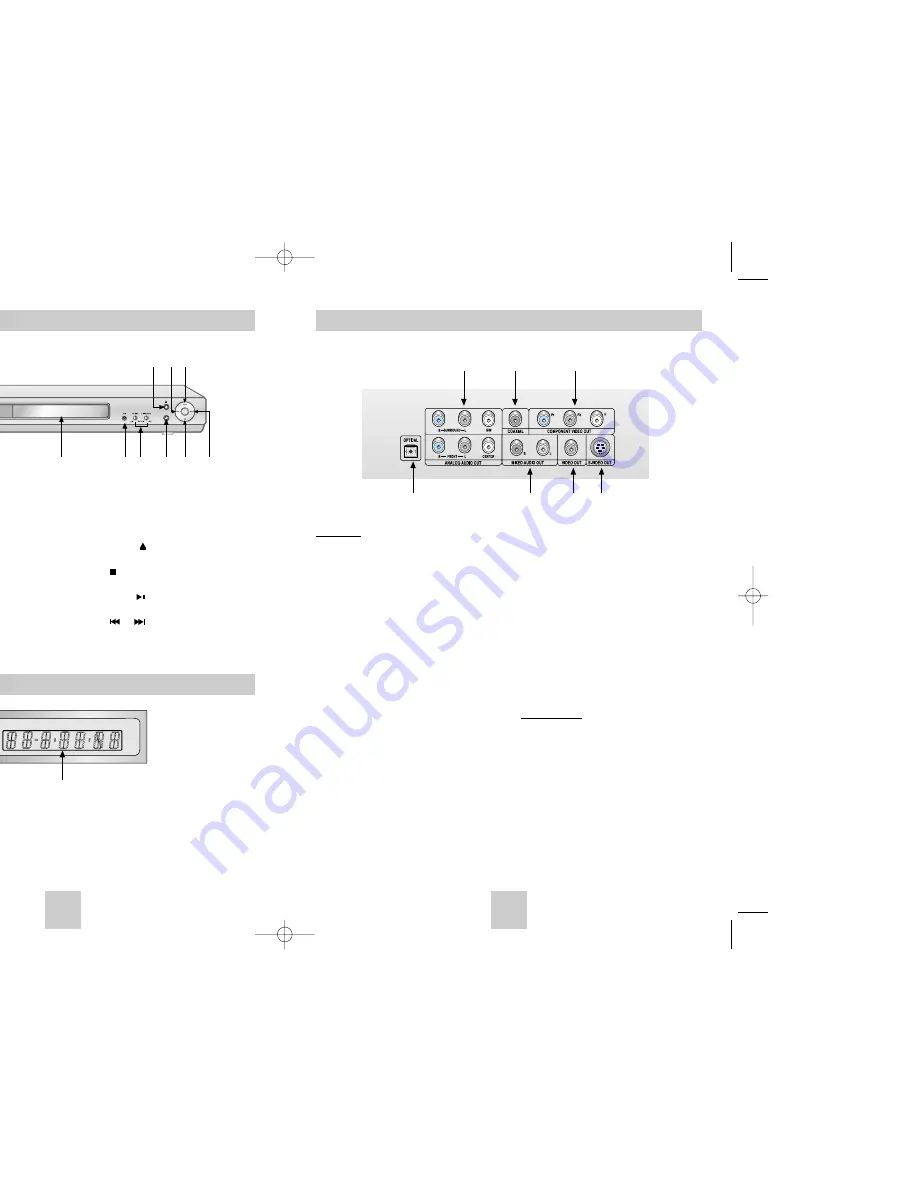
Description-Rear Panel

Rear Panel

1. DIGITAL AUDIO OUT JACKS

• Use either a optical or coaxial digital cable to

connect to a compatible Dolby Digital receiver. 
Use to connect to an A/V Amplifier that contains
a Dolby Digital or DTS decoder.

2. 5.1CH ANALOG AUDIO OUT JACKS

• Connect to an amplifier with 5.1ch analog input

jacks.

3. MIXED AUDIO OUT JACKS

• Connect to the Audio input jacks of your 

television, audio/video receiver.

4. VIDEO OUT JACK

• Use a video cable to connect to the Video input

jack on your television.

• The Video Output in Setup Menu must be set to

Component(I-SCAN) or S-Video.

5. S-VIDEO OUT JACK

• Use the S-Video cable to connect this jack to

the S-Video jack on your television for a higher 
picture quality. 

• The Video Output in Setup Menu must be set to

S-Video.

6. COMPONENT VIDEO OUT JACKS

• Use these jacks if you have a TV with

Component Video in jacks. These jacks provide
Pr, Pb and Y video. Along with S-Video,
Component Video provides the best picture
quality.  

• If Component(P-SCAN) Video Output is select-

ed in Setup Menu, progressive scan mode will
work.

• If Component(I-SCAN) Video Output is selected

in Setup Menu, interlaced scan mode will work.

Important Note

• Consult your TV User’s Manual to find out if your

TV supports Progressive Scan. 
If Progressive Scan is supported, follow the TV
User’s Manual’s instructions regarding Progressive
Scan settings in the TV’s menu system.

• If Component (P-SCAN) Video Output is selected

in Setup Menu, Video and S-Video will not work.

• See page 32 to get more information on how to

use the setup menu.

1

1

2

3

4

5

6

ENG-6

Description-Front Panel

STANDBY/ON

EZ VIEW

1

2

3

4

5

6

8

7

9

10

10

Front Panel Controls

1. STANDBY/ON (       )

• When the unit is first plugged in, the indicator

lights. When STANDBY/ON is pressed on again,
the light goes out and the player is turned on.

2. DISC TRAY

• Place the disc here.

3. DISPLAY

• Operation indicators are displayed here

.

4. MIC

• Connect Microphone for karaoke functions.

5. MICROPHONE VOLUME / DIGITAL ECHO

• Use to adjust microphone volume level and 

echo delay.

6. EZ VIEW

• Easy View can convert Letter Box images to full

screen viewing on your conventional TV.

7. OPEN/CLOSE (      )

• Press to open and close the disc tray.

8. STOP (       )

• Stops disc play.

9. PLAY/PAUSE (       )

• Begin or pause disc play.

10. SKIP (         /        ) SEARCH

• Allow you to search forward/backward through

a disc. Use to skip the title, chapter or track.

Front Panel Display

1. Disc type indicators
2. Play / Pause / Forward play
3. Displays various messages concerning operations such as PLAY, STOP, LOAD ...

no DISC

: No disc loaded.

OPEN

: The disc tray is open.

LOAD

: Player is loading disc information.

1

2

3

Display Indicators 

DVD-P548K-BPT(00439A)gb  6/18/04 7:10 PM  Page 6

Summary of Contents for DVD-P548K

Page 1: ...DVD Player DVD P548K AK68 00439A 18 04 7 11 PM Page 2 ...

Page 2: ...ge 17 Changing the Camera Angle 18 Using the Instant Replay Skip Function 18 Using the Bookmark Function 19 Using the Zoom Function 20 Clips Menu for MP3 WMA JPEG MPEG4 20 Folder Selection 21 MP3 WMA Playback 21 MPEG4 Playback 22 Picture CD Playback 24 Karaoke Functions Beginning Karaoke Functions 25 Reserving a Song 25 Vocal Function 26 Changing Setup menu Using the Setup Menu 27 Setting Up the L...

Page 3: ...torted picture from copy protected DVD discs This product incorporates copyright protection technology that is protected by methods claims of certain U S patents and other intellectual property rights owned by Macrovision Corporation and other rights owners Use of this copyright protection technology must be authorized by Macrovision Corporation and is intended for home and other limited viewing u...

Page 4: ... Video provides the best picture quality If Component P SCAN Video Output is select ed in Setup Menu progressive scan mode will work If Component I SCAN Video Output is selected in Setup Menu interlaced scan mode will work Important Note Consult your TV User s Manual to find out if your TV supports Progressive Scan If Progressive Scan is supported follow the TV User s Manual s instructions regardi...

Page 5: ...se to begin Karaoke functions 10 SUBTITLE Button 11 OPEN CLOSE Button To open and close the disc tray 12 CLEAR Button Use to remove menus or status displays from the screen 13 INSTANT REPLAY Button This function is used to replay the previous 10 seconds of a movie from the current position 14 INSTANT SKIP Button This function skips playback ahead 10 seconds 15 PLAY PAUSE Button Begin Pause disc pl...

Page 6: ... STEP mode No sound is heard during slow mode Press PLAY PAUSE button to resume normal play Reverse slow motion play will not work RESUME function When you stop disc play the player remembers where you stopped so when you press PLAY PAUSE button again it will pick up where you left off unless the disc is removed or the player is unplugged or if you press the STOP button twice Note If the player is...

Page 7: ...Refers to the language of the film soundtrack In the example the soundtrack is played in English 5 1CH A DVD disc can have up to eight different soundtracks Refers to the subtitle languages available in the disc You will be able to choose the subtitle languages or if you prefer turn them off from the screen A DVD disc can have up to 32 different subtitles Note When in VCD 2 0 mode Menu On mode thi...

Page 8: ... repeatedly at the speed you chose To return to normal play press the CLEAR button and then press the PLAY PAUSE button A B REPEAT does not allow you to set point B until at least 5 seconds has elapsed after point A has been set When in VCD 2 0 mode Menu On mode this function does not work See page 12 PROGRAM RANDOM PROGRAM RANDOM PROGRAM 01 Track 05 06 07 08 09 10 11 12 13 14 15 16 Program Order ...

Page 9: ...ct a desired audio quickly and easily with the AUDIO button Using the AUDIO button 1 Press the AUDIO button 2 The Audio changes when the button is pressed repeatedly The audio languages are represented by abbreviations In case of a VCD or CD you can select among Stereo Right or Left Use the LEFT RIGHT buttons to select the desired Audio on a MPEG4 then press the ENTER 3 To remove the AUDIO icon pr...

Page 10: ...play press the MENU button on the remote and select the Bookmark 2 Use the LEFT RIGHT buttons to select the bookmark number you want to delete 3 Press the CLEAR button to delete a bookmark number Note Up to three scenes may be marked at a time When in VCD 2 0 mode Menu On mode this function does not work See page 12 Depending on a disc the Bookmark function may not work Using the Instant Replay Sk...

Page 11: ...NTER To select the Sub Folder Use the LEFT RIGHT buttons to highlight right window Use the UP DOWN buttons to select the desired folder then press ENTER Root WMA JPEG MP3 SONG FILE 3 MPEG4 FILES MUSIC SONG FILE 1 SONG FILE 2 1st 2nd Parent Folder Current Folder Sub Folders Peer Folders tion VCD he MENU ight Function utton buttons then T buttons to ant to zoom in m in m in 2X Normal Clips Menu for ...

Page 12: ... the audio and video data Only AVI format files with the avi extensions can be played 1 Select the desired folder See page 21 to select the folder 2 Use the UP DOWN or LEFT RIGHT buttons to select an avi file DivX XviD and then press the ENTER button Repeat Playback Press the REPEAT button to change playback mode There are 4 modes such as Off Folder Title and A B a distance between two points appo...

Page 13: ...G files in 300 folders can be played Operation Sequence 1 Connect the Mixed Audio Out terminals with the TV or AMP 2 Connect Mic into Mic jack When the MIC should be connected karaoke function can operate Key Control 1 Press the KARAOKE button 2 Select the Keycon using the LEFT RIGHT buttons 3 By use of the LEFT RIGHT buttons change to the desired tone To let 7 scales down by half scale Original s...

Page 14: ... to watch and several display options Parental Setup Setup of the Parental Level Allows users to set the level necessary to prevent children from viewing unsuitable movies such as those with violence adult subject matter etc DivX R Registration Please use the Registration code to register this player with the DivX R Video on Demand service This will allow you to rent and purchase videos using the ...

Page 15: ... the RIGHT or ENTER button 5 Use the UP DOWN buttons to select the desired language Select Automatic if you want the subtitle language to be the same as the language selected as the audio preference Select Others if the language you want is not listed Some discs may not contain the language you select as your initial language in that case the disc will use its original language setting 6 Press the...
Page 16: ...ound effects are difficult to hear select either of these according to the rear speaker s position This activates the Dolby Digital bass redirection circuitry and outputs the bass frequencies of the rear speaker from other speakers Setting up TEST The test output signals come clockwise starting from the Front Speaker L Adjust Channel Balance to match to the volume of test signals memorized in the ...

Page 17: ...0 9 Video Output Select Video Output 1 S Video Select when you want to use Video and S Video Out 2 Component I SCAN Select when you want to use Component Interlace 625i 525i Out 3 Component P SCAN Select when you want to use Component Progressive 625p 525p Out If the Yes No selection in the Display Setup sub Menu is not made within 10 seconds the screen returns to the previous menu Important Note ...

Page 18: ...disc using the following settings 1 You have to download a new file through Download Center of Samsung Internet Site www samsung com 2 Write the file to Disc using CD RW of your computer Note File System CD ROM ISO Level Character set ISO 9660 Finalized single session Write speed low Upgrade procedure 1 Press OPEN CLOSE to open the disc tray 2 Insert the upgrade CD R disc label facing up 3 Press O...

Page 19: ...the label side facing up he region number of the DVD nnel sound is reproduced only when the following condi e met DVD player is connected with the proper amplifier disc is recorded with 5 1 channel sound whether the disc being played has the Dolby 5 1 ch mark outside your audio system is connected and working properly TUP Menu is the Audio Output set to Bitstream tures or action cannot be complete...

Reviews: