background image

ENG-11

Playing a Disc

Before Play

• Turn on your TV and press the TV/VIDEO button

to select the video mode.

• Turn on your Audio System and select AUX, CD or

DVD.

After plugging in the player, the first time you press
the DVD POWER button, this screen comes up :
If you want to select the language, press a 
NUMBER button. (This screen will only appear
when you plug in the player for the first time.)

Play

1. Press the OPEN/CLOSE button. 

The STANDBY indicator light goes out and the tray
opens.

2. Place a disc gently into the tray with the disc’s

label facing up.

3. Press the PLAY/PAUSE (       ) button or

OPEN/CLOSE button to close the disc tray.

4. Stopping Play

Press the STOP (      ) button during play.

5. Removing Disc

Press the OPEN/CLOSE button.

6. Pausing Play

Press the PLAY/PAUSE (       ) or STEP button on the
remote during play.
- Screen stops, no sound.
- To resume, press the PLAY/PAUSE (       ) button once

again.  

7. Step Motion Play (Except CD)

Press the STEP button on the remote during play.  
- Each time the button is pressed, a new frame will

appear.

- No sound is heard during STEP mode.
- Press PLAY/PAUSE (      ) to resume normal play.

(You can only perform step motion play in the forward

direction.)

8. Slow Motion Play (Except CD)

Press and hold the        button on the remote during
PAUSE or STEP mode. Press again and you can select
slow motion play for 1/8, 1/4 and 1/2 of normal speed.

- No sound is heard during slow mode.
- Press PLAY/PAUSE (      ) to resume normal play.
- Reverse slow motion play will not work.

RESUME function

When you stop disc play, the player remembers
where you stopped, so when you press the 
PLAY (      ) again, it will pick up where you left off.
(unless the disc is removed or the player is
unplugged, or if you press the STOP (      ) button
twice.)

Note

Note

• If the player is left for 5 minutes in pause mode, it

will stop.

• If the player is left in the stop mode for more than

30 minutes, the power will automatically shut off.
(Automatic Power-Off Function)

• If the player is left in the stop mode for more than

one minute without any user interaction, a screen
saver will be activated. Press the PLAY (      ) 
button to resume normal play.

• This       icon indicates an invalid button press.

ENG-10

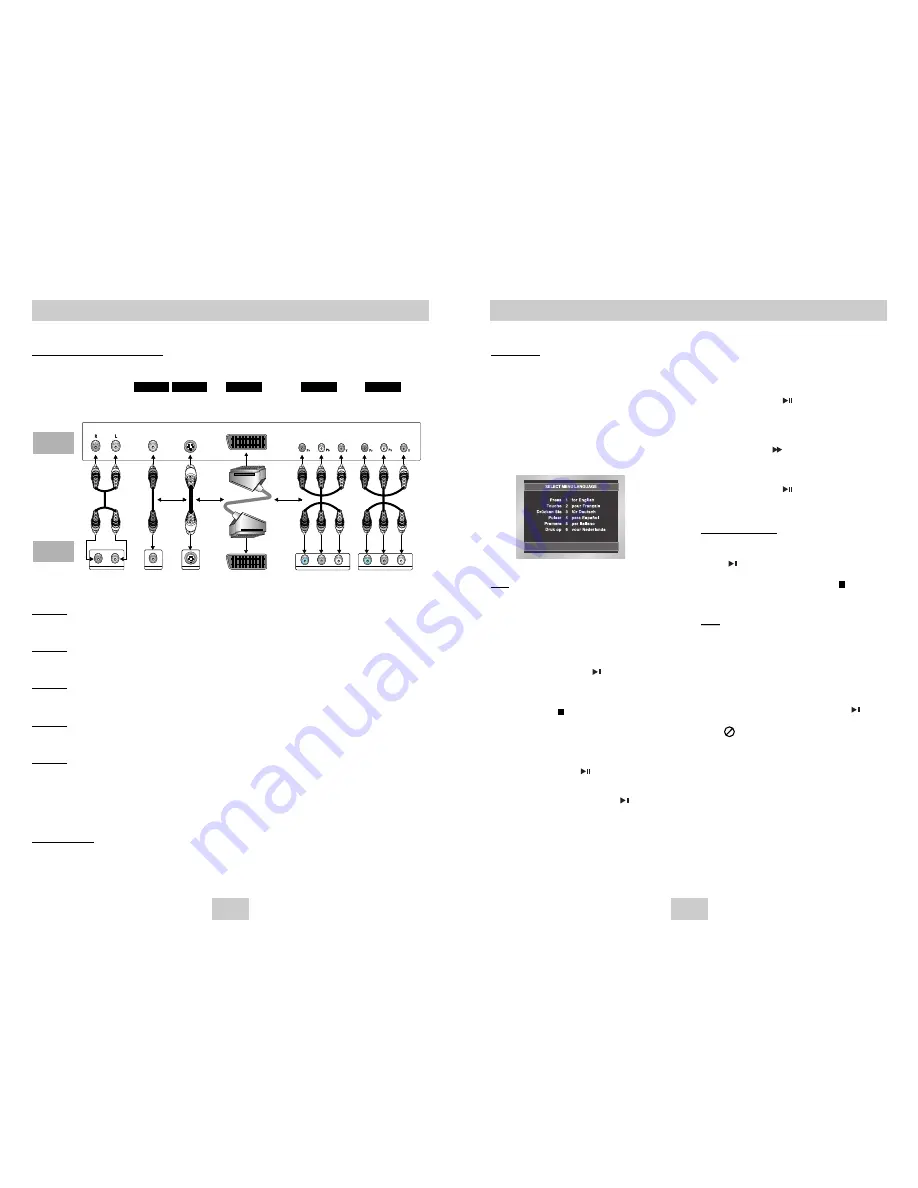
Choosing a Connection

Connection to a TV (For Video)

TV (Normal, Widescreen, Projection, etc..)

Method 1

DVD  TV with Video Input Jack
(The Video Output in Setup Menu must be set to the S-Video or SCART Output.)

Method 2

DVD  TV with S-Video Input Jack 
(The Video Output in Setup Menu must be set to the S-Video.)

Method 3

DVD  TV with Scart Input Jacks (Audio & Video)
(The Video Output in Setup Menu must be set to SCART Output.)

Method 4

DVD  TV with interlace Scan Component Video Jacks 
(The Video Output in Setup Menu must be set to the Component (I-SCAN).)

Method 5

DVD  TV with Progressive Scan Component Video Jacks. 
(The Video Output in Setup Menu must be set to the Component (P-SCAN).)
• If you want to convert Video Output to the Progressive Scan, you have to first connect Video or S-Video on

your TV. Then select Component (P-SCAN) out of Video Output in Setup Menu. Within 10 seconds, change the
TV’s external input to 625p/525p(576p/480p or Component) and select “Yes” (See Page 29).

• If Component(P-SCAN) Video Output is selected in Setup Menu, Video and S-Video will not work.

Important Note

Important Note

• Consult your TV User’s Manual to find out if your TV supports Progressive Scan. 

If Progressive Scan is supported, follow the TV User’s Manual’s instructions regarding Progressive Scan set-
tings in the TV’s menu system.

• Depending on your TV, the Method of connection may differ from the illustration above.

R

L

ANALOG AUDIO OUT

Pr

Pb

Y

S-VIDEO OUT

VIDEO OUT

COMPONENT VIDEO OUT

Pr

Pb

Y

COMPONENT VIDEO OUT

Good 

picture

Better 

picture

Best 

picture

Best 

picture

Optimum  

picture

Basic Audio

AV 

Cable

S-Video

Cable

Scart

Cables

(not 

supplied)

OR

OR

OR

Video

Cables

Audio Output 

Jacks

Video Output

Jack

S-Video 

Jack

SCART Jack

Component Video

Jacks

(Interlace)

Component Video

Jacks

(Progressive)

TV

DVD 

Player

Method 1

Method 2

Method 3

Method 4

Method 5

Summary of Contents for DVD-P345

Page 1: ...DVD Player Lecteur DVD DVD Speler DVD P345 AK68 00420G ...

Page 2: ...on of air Do not push the disc tray by the hand Do not stack components Be sure to turn all components off before moving the player Before connecting other components to this player be sure to turn them off Be sure to remove the disc and turn off the player after use especially if you don t use it for a long time 2 For your safety This product utilizes a laser Use of controls or adjustments or per...

Page 3: ...cs which cannot be played with this player DVD ROM DVD RAM CD ROM CDV CDI HD layer of super Audio CD CDGs play audio only not graphics Ability to play back may depend on recording conditions DVD R R CD RW DVD RW RW The unit may not play certain CD R CD RW and DVD R due to the disc type or recording conditions COPY PROTECTION Many DVD discs are encoded with copy protection Because of this you shoul...

Page 4: ...tant Note Consult your TV User s Manual to find out if your TV supports Progressive Scan If Progressive Scan is supported follow the TV User s Manual s instructions regarding Progressive Scan settings in the TV s menu system If Component P SCAN Video Output is selected in Setup Menu Video and S Video will not work See page 29 to get more information on how to use the setup menu 1 2 3 4 5 6 ENG 6 D...

Page 5: ...INSTANT REPLAY Button This function is used to replay the previous 10 seconds of the movie from the current position 14 INSTANT SKIP Button This function skips playback ahead 10 seconds 15 PLAY PAUSE Button Begin Pause disc play 16 INFO Button Displays the current disc mode 17 DISC MENU Button Brings up the Disc menu 18 ENTER DIRECTION Button UP DOWN or LEFT RIGHT Buttons This button functions as ...

Page 6: ...n If the player is left in the stop mode for more than one minute without any user interaction a screen saver will be activated Press the PLAY button to resume normal play This icon indicates an invalid button press ENG 10 Choosing a Connection Connection to a TV For Video TV Normal Widescreen Projection etc Method 1 DVD Player TV with Video Input Jack The Video Output in Setup Menu must be set to...

Page 7: ...page 12 Title Chapter Time Audio Subtitle ENG 12 Using the Display Function When Playing a DVD VCD CD 1 During play press the INFO button on the remote 2 Use the UP DOWN buttons to select the desired item 3 Use the LEFT RIGHT buttons to make the desired setup and then press ENTER You may use the number buttons of the remote control to directly access a title chapter or to start the playback from t...

Page 8: ...erminate the function press the CLEAR button When in VCD 2 0 mode MENU ON mode this function does not work See page 12 PROGRAM RANDOM PROGRAM RANDOM PROGRAM 01 Track 05 06 07 08 09 10 11 12 13 14 15 16 Program Order 01 02 03 04 ENTER RETURN CLEAR Slow Repeat Play ENG 14 Repeat Play Repeat the current track chapter title a chosen section A B or all of the disc When playing a DVD VCD CD 1 Press the ...

Page 9: ...scs Wide Screen Displays the content of the DVD title in 16 9 aspect ratio Screen Fit The top and bottom of the screen are cut off When playing a 2 35 1 aspect ratio disc the black bars at the top and bottom of the screen will disappear The picture will look vertically stretched Depending on the type of disc the black bars may not disappear completely Zoom Fit The top bottom left and right of the ...

Page 10: ... VCD 2 0 mode MENU ON mode this function does not work See page 12 Depending on the disc the Bookmark function may not work ENG 18 Using the Instant Replay Skip Function Changing the Camera Angle When a DVD contains multiple angles of a particular scene you can select the Angle function Using the ANGLE button Press the ANGLE button to see if an ANGLE mark is present at the upper left hand corner o...

Page 11: ... S a d D a y Parent Folder Current Folder and Peer Folders Folders and Files in Current Folder ENG 20 How to insert a Memory Card This unit accepts 7 different types of Memory Cards Insert the Memory Card correctly with the label facing up otherwise it may not work This device supports 7 types of memory cards Memory Stick SD Card MMC and Smart Media Card through the upper slot and Compact Flash Mi...

Page 12: ...sion transfer rate of at least 64Kbps when recording WMA files Sound quality with WMA files basically depends on the rate of compression decompression you choose Getting CD audio sound requires an analog digital sampling rate that is conversion to WMA format of at least 64Kbps and up to 192Kbps Conversely files with decompression rates below 64Kbps or over 192Kbps will not be played properly Do no...

Page 13: ...the disc is not closed it will take longer to start playing and not all of the recorded files may be played Only CD R discs with JPEG files in ISO 9660 or Joliet format can be played Memory Cards over 2GB use FAT32 which may be not compatible with this unit The name of the JPEG file may not be longer than 8 characters and should contain no blank spaces or special characters Only a consecutively wr...

Page 14: ...ton Manufactured under license from Dolby Laboratories Dolby and the double D symbol are trademarks of Dolby Laboratories DTS and DTS Digital Out are trademarks of Digital Theater Systems Inc ENG 26 Setting Up the Language Features Using the Audio Language 1 With the unit in Stop mode press the MENU button 2 Select Setup using UP DOWN buttons then RIGHT or ENTER button 3 Select Language Setup usin...

Page 15: ...reen shakes in the Auto mode 3 Frame Select this feature when you want to see small letters more clearly in the Auto mode Screen Messages Use to turn on screen messages On or Off Black Level Adjusts the brightness of the screen On Off TV System 1 NTSC Disc In case of using NTSC disc If your TV system only has PAL Video input you must choose PAL When you choose PAL Interlace output format is PAL 60...

Page 16: ... on the front panel for 1 second The SELECT MENU LANGUAGE display will appear Select the number button of the desired language Press power on from a cold start with no disc in the unit Press the SEARCH SKIP button on the front panel for 1 second The SELECT MENU LANGUAGE display will appear Select the number button of the desired language Press the MENU button and then press DOWN button to select t...

Page 17: ...Play Time 74 min Reading Speed 4 8 5 6 m sec Maximum Play Time 20 min Reading Speed 4 8 5 6 m sec Maximum Play Time 74 min Video Audio 1 channel 1 0 Vp p 75 Ω load R Red 0 7 Vp p 75 Ω load G Green 0 7 Vp p 75 Ω load B Blue 0 7 Vp p 75 Ω load Composite Video 1 0 Vp p 75 Ω load Luminance Signal 1 0 Vp p 75 Ω load Color Signal 0 3 Vp p 75 Ω load Y 1 0 Vp p 75 Ω load Pr 0 70 Vp p 75 Ω load Pb 0 70 Vp ...

Reviews: