ENG-7
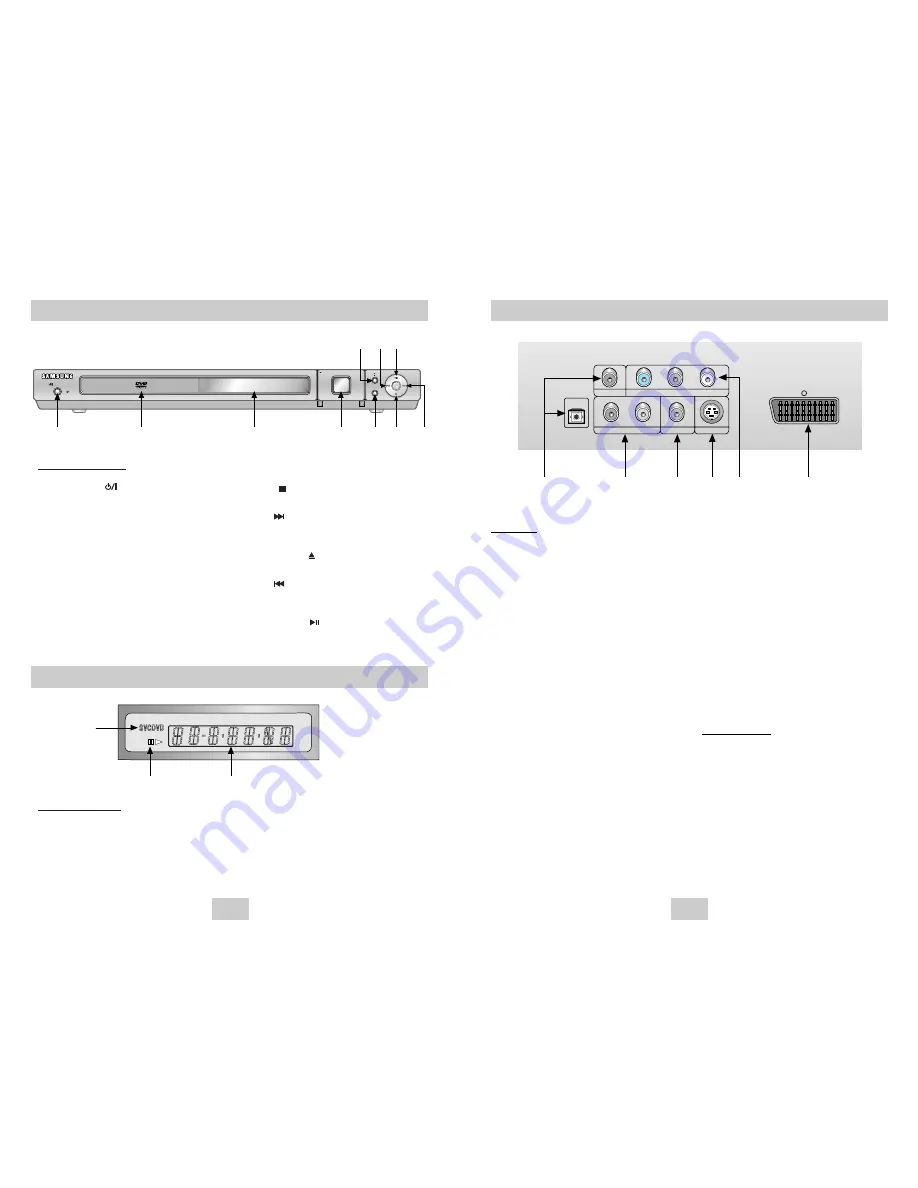
Description-Rear Panel
COAXIAL
R
Pr
Pb
Y
L
S-VIDEO OUT
VIDEO OUT
ANALOG AUDIO OUT
COMPONENT VIDEO OUT
OPTICAL
Rear Panel
1. DIGITAL AUDIO OUT JACKS
• Use either an optical or coaxial digital cable to
connect to a compatible Dolby Digital receiver.
Use to connect to an A/V Amplifier that contains
a Dolby Digital, MPEG-2 or DTS decoder.
2. ANALOG AUDIO OUT JACKS
• Connect to the Audio input jacks of your
television, audio/video receiver.
3. VIDEO OUT JACK
• Use a video cable to connect to the Video input
jack on your television.
• The Video Output in Setup Menu must be set to
the Component (I-SCAN) or S-Video.
4. S-VIDEO OUT JACK
• Use the S-Video cable to connect this jack to
the S-Video jack on your television for a higher
picture quality.
• The Video Output in Setup Menu must be set to
the S-Video.
5. COMPONENT VIDEO OUT JACKS
• Use these jacks if you have a TV with
Component Video in jacks. These jacks provide
Pr, Pb and Y video. Along with S-Video,
Component Video provides the best picture
quality.
• If Component (P-SCAN) Video Output is
selected in Setup Menu, progressive scan mode
will work.
• If Component (I-SCAN) Video Output is selected
in Setup Menu, interlaced scan mode will work.
6. SCART JACK
• Connect to a TV scart input jack.
Important Note
Important Note
• Consult your TV User’s Manual to find out if your
TV supports Progressive Scan.
If Progressive Scan is supported, follow the TV
User’s Manual’s instructions regarding Progressive
Scan settings in the TV’s menu system.
• If Component (P-SCAN) Video Output is selected
in Setup Menu, Video and S-Video will not work.
• See page 29 to get more information on how to
use the setup menu.
1
2
3
4
5
6
ENG-6
Description-Front Panel
STANDBY/ON
EZ VIEW
MULTI-CARD INPUT
PULL OPEN
1
2
3
4
5
6
7
8
9 10
Front Panel Controls
1. STANDBY/ON ( )
• When the unit is first plugged in, the indicator
lights. When STANDBY/ON is pressed on again,
the light goes out and the player is turned on.
2. DISC TRAY
• Place the disc here.
3. DISPLAY
• Operation indicators are displayed here.
4. MULTI-CARD INPUT
(See page 20)
5. EZ VIEW
• Easy View can convert Letter Box images to full
screen viewing on your conventional TV.
6. STOP ( )
• Stops disc play.
7. SKIP ( ) / SEARCH
• Allows you to search forward through a disc.
Use to skip the title, chapter or track.
8. OPEN/CLOSE ( )
• Press to open and close the disc tray.
9. SKIP ( ) / SEARCH
• Allows you to search backward through a disc.
Use to skip the title, chapter or track.
10. PLAY/PAUSE ( )
• Begin or pause disc play.
Front Panel Display
1. Disc type indicators
2. Play / Pause / Forward play
3. Displays various messages concerning operations such as PLAY, STOP, LOAD ...
no DISC
: No disc loaded.
OPEN
: The disc tray is open.
LOAD
: Player is loading disc information.
1
2
3
Display Indicators


