background image

25

English

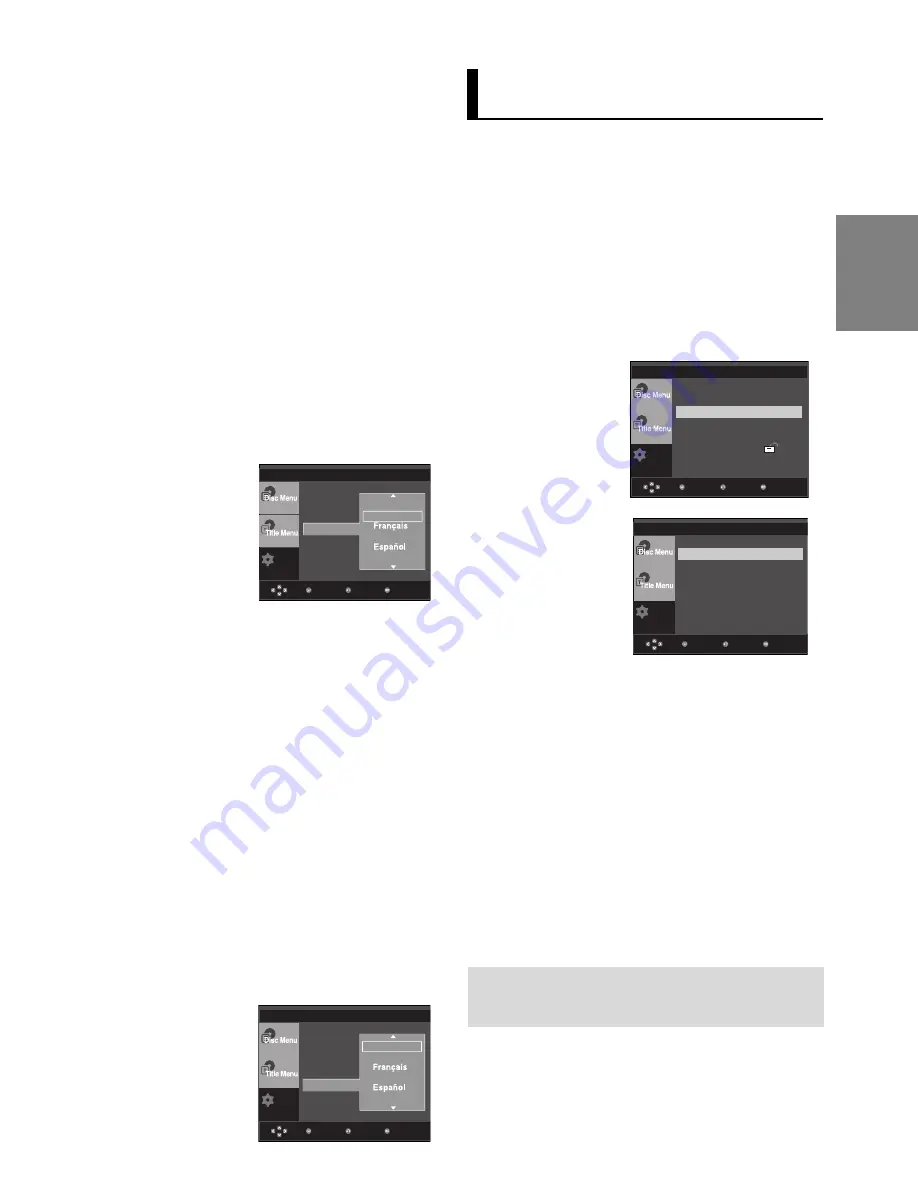
Setting Up the Audio
Options

Audio Options allows you to setup the audio device
and sound status settings depending on the audio
system in use.

1. With the unit in Stop mode, press the 

MENU

button.

2. Press the 

›

›

/

‚

‚

buttons to select 

Setup

, then press the 

Š

or 

ENTER

button.

3. Press the 

›

›

/

‚

‚

buttons to select 

Audio Setup

, then press

the 

Š

or 

ENTER

button.

4. Press the 

›

›

/

‚

‚

buttons to select the desired item, then

press the 

Š

or 

ENTER

button.

Dolby Digital Out

- PCM : Converts to PCM(2CH) audio.
- Bitstream : Outputs Dolby Digital via the digital output.

Select Bitstream when connecting to a Dolby Digital 
Decoder.

MPEG-2 Digital Out

- PCM : Converts to PCM(2CH) audio. 
- Bitstream : Converts to MPEG-2 Digital Bitstream  

(5.1CH or 8CH). Select Bitstream when using the
Digital Audio Output.

DTS

Select On when connecting to a DTS Decoder.

- Off : Doesn’t output digital signal.
- On : Outputs DTS Bitstream via digital output. 

Note

• There is no analog audio output when you play

a DTS sound disc.

Setup

Menu

Return

Enter

Dolby Digital Out

:PCM

MPEG-2 Digital Out

:PCM

DTS

:Off

Dynamic Compression :On

PCM Down Sampling 

:On

Setup

Menu

Return

Enter

Language Setup

Š

Audio Setup

Š

Display Setup

Š

Parental Setup :  

Š

Using the Subtitle Language

1. With the unit in Stop mode, press the 

MENU

button.

2. Press the 

›

›

/

‚

‚

buttons to select 

Setup

, then press the 

Š

or 

ENTER

button.

3. Press the 

›

›

/

‚

‚

buttons to select 

Language Setup

, then

press the 

Š

or 

ENTER

button.

4. Press the 

›

›

/

‚

‚

buttons to select 

Subtitle

, then press the 

Š

or 

ENTER

button.

5. Press the 

›

›

/

‚

‚

buttons to select the desired  language,

then press the 

Š

or 

ENTER

button.

- Select “Automatic” if you want the subtitle  language to

be the same as the language selected as the audio
language.

-  Some discs may not contain the language you  select

as your initial language; in that case the disc will use its
original language setting.

- The language is selected and the screen returns to

setup menu.

- To make the setup menu disappear, press the MENU

button.

Using the Audio Language

1. With the unit in Stop mode, press the 

MENU

button.

2. Press the 

›

›

/

‚

‚

buttons to select 

Setup

, then press the 

Š

or 

ENTER

button.

3. Press the 

›

›

/

‚

‚

buttons to select 

Language Setup

, then

press the 

Š

or 

ENTER

button.

4. Press the 

›

›

/

‚

‚

buttons to select 

Audio

, then press the 

Š

or 

ENTER

button.

5. Press the 

›

›

/

‚

‚

buttons to select the desired language, then

press the 

Š

or 

ENTER

button.

- Select “Original” if you want the default soundtrack

language to be the original language the disc is
recorded in.

- If the selected language is not recorded on the disc, the

original pre-recorded language is selected.

- The language is selected and the screen returns to

Language Setup menu.

- To make the setup menu disappear, press the MENU

button.

Setup

Player Menu

    : English

Disc Menu

    : English

Audio

    : English

Subtitle     

    : English

Subtitle

English

Deutsch

Italiano

Automatic

Menu

Return

Enter

Setup

Menu

Return

Enter

Player Menu

    : English

Disc Menu

    : English

Audio

    : English

Subtitle     

    : English


Audio

English

Original

Deutsch

Italiano

LANGUAGE SETUP

AUDIO SETUP

LANGUAGE SETUP

Summary of Contents for DVD-P270K

Page 1: ...de DVD DVD P270K Para prevenir cualquier mal funcionamiento y evitar da os lea detalladamente este manual de instrucciones antes de conectar y operar el aparato Conserve el manual para futuras referen...

Page 2: ...amente para uso personal Copiar Discos o descargar m sica para su venta posterior u otras actividades comerciales constituye o puede constituir una violaci n contra las leyes de derechos de reproducci...

Page 3: ...s Elecci n de una conexi n 9 Funciones B sicas Reproducci n de un disco 15 Funciones de b squeda y salto de cap tulo o pista 16 Funci n de pantalla 16 Uso del men del disco y de t tulos 17 Repetici n...

Page 4: ...este reproductor DVD ROM DVD RAM CD ROM CDV CDI CVD Super Audio CD excepto capa CD Discos CDG de audio solamente no gr ficos La capacidad de reproducci n puede depen der de las condiciones de la graba...

Page 5: ...aras de 160 min Audio Video El DVD contiene excelente sonido y v deo gracias al sistema Dolby Digital y MPEG 2 En el men en pantalla pueden selec cionarse f cilmente varias funciones de pantalla y aud...

Page 6: ...DISCO Aqu se introduce el disco 6 Bot n OPEN CLOSE Se pulsa para abrir y cerrar la bandeja del disco 7 PANTALLA Aqu aparecen los indicadores del funcionamiento 8 Bot n SALTAR BUSCAR Le permite buscar...

Page 7: ...ales de entrada de audio del televi sor o del receptor de audio v deo 4 TERMINAL DE SALIDA DE V DEO Use un cable de video para conectar al terminal de entrada de video del televisor La salida de v deo...

Page 8: ...4 Bot n ZOOM Ampl a la imagen del DVD 15 Bot n OPEN CLOSE Se pulsa para abrir y cerrar la bandeja del disco 16 Bot n STEP Avanza la reproducci n por fotogramas 17 Bot n INSTANT SKIP Salto instant neo...

Page 9: ...del reproductor de DVD a los terminales VIDEO amarillo AUDIO rojo y blanco IN del TV 2 Encienda el reproductor de DVD y el TV 3 Pulse el selector de entrada del mando a distancia del TV hasta que la...

Page 10: ...los terminales AUDIO rojo y blanco IN del TV Encienda el reproductor de DVD y el TV 3 Pulse el selector de entrada del mando a distancia del TV hasta que la se al de S Video del reproductor de DVD apa...

Page 11: ...rn on the DVD player and TV 3 Pulse el selector de entrada del mando a distancia del TV hasta que la se al de Component del reproductor de DVD aparezca en la pantalla del TV 4 Defina la salida de vide...

Page 12: ...ntalla Consulte las p ginas 26 y 27 Para ver la salida de v deo progresiva You need a TV set supporting the progressive scan input function And you have to set up the TV Consulte el Manual del usuario...

Page 13: ...de DVD el TV y el amplificador 4 Pulse el bot n de selecci n de entrada del amplificador para seleccionar la entrada externa para o r sonido en el reproductor de DVD Consulte el manual del usuario del...

Page 14: ...ot n de selecci n de entrada del amplificador para seleccionar la entrada externa para o r sonido en el reproductor de DVD Nota Cuando conecte el reproductor de DVD al amplificador DTS y reproduzca un...

Page 15: ...n Pulse el bot n PARAR durante la reproducci n 6 Interrupci n de la reproducci n Pulse el bot n REPRODUCIR PAUSA o STEP del mando a distancia durante la reproducci n La pantalla se detiene y no hay s...

Page 16: ...en el men de funciones pulsan do el bot n MENU 2 Pulse los botones para seleccionar el elemento deseado Cuando VCD 2 0 se encuentre solo en la modalidad Menu Off Men desactivado esta funci n est oper...

Page 17: ...repetici n 2 Pulse los botones para seleccionar Capitulo Titule o A B y pulse el bot n ENTER El DVD repite la reproducci n por cap tulo o t tulo el CD y el VCD repiten por disco o pista Capitulo repit...

Page 18: ...de ancho normal Presenta el contenido del DVD en el formato 16 9 relaci n de altura anchura La pel cula se ver alargada horizontalmente Screen Fit Ajuste Pantalla Los extremos superior e inferior de l...

Page 19: ...icono de AUDIO pulse el bot n CANCEL o RETURN ENG DOLBYDIGITAL 5 1CH AUDIO DVD Al reproducir un VCD o CD puede seleccionar entre Stereo Est reo Right Derecha o Left Izquierda AUDIO VCD Nota Esta func...

Page 20: ...u Off Men desactivado esta funci n est operativa Seleccione Menu Off Men desactivado pulsando el bot n DISC MENU Dependiendo del disco puede que la funci n Bookmark Marcador no est disponible 5 Pulse...

Page 21: ...la carpeta actual Random Aleatorio Los archivos del disco se Icono de archivo MP3 Icono de archivo WMA Icono de archivo JPEG CD Audio file icon Icono de carpeta Icono de carpeta actual Reproducci n d...

Page 22: ...des de muestreo por debajo de 128 Kbps no se podr n reproducir bien Reproducci n de CD de im genes 1 Seleccione la carpeta deseada 2 Pulse los botones para seleccionar un archivo de im genes en el men...

Page 23: ...rchivos graba dos S lo podr n reproducirse discos CD R con archivos JPEG en formato ISO 9660 o Joliet El nombre del archivo JPEG no deber contener m s de 8 caracteres y no deber incluir espacios en bl...

Page 24: ...1 Con la unidad en modo de parada pulse el bot n MENU 2 Pulse los botones hasta seleccionar Setup y pulse el bot n o ENTER 3 Pulse los botones hasta seleccionar Configuraci n Idioma y pulse el bot n o...

Page 25: ...Setup y pulse el bot n o ENTER 3 Pulse los botones hasta seleccionar Configuraci n Idioma y pulse el bot n o ENTER 4 Pulse los botones hasta seleccionar Subtitulos y pulse el bot n o ENTER 5 Pulse los...

Page 26: ...la pantalla On Act u Off Des No funciona en modo Progressive Progresivo Sistema de TV Cuando el sistema de TV seleccionado en el Reproductor de DVD no coincide con el sistema de TV del TV es posible q...

Page 27: ...rmato TV Modo Pausa Auto Mensajes Pantalla On Nivel Negro Off Sistema de TV NTSC Salida de Video S Video Setup P SCAN I SCAN S Video Salida de Video Salida de V deo Seleccione Salida de v deo S Video...

Page 28: ...e los botones hasta seleccionar Setup y pulse el bot n o ENTER Menu Return Enter Setup Nota Si ha olvidado la contrase a consulte la secci n Olvido de contrase a en la gu a de resoluci n de problemas...

Page 29: ...uciendo tiene la marca 5 1 ch en el exterior Compruebe y aseg rese de que su sistema de audio est adecuadamente conectado y funcione correctamente En un men Setup Configuraci n est configurada la sali...

Page 30: ...da de v deo Salida de audio 110V 240V 50 60 Hz 9 W 1 7 Kg 430mm An X 207mm Pr X 37 mm Al 5 C to 35 C 10 to 75 Velocidad de lectura 3 49 4 06 m seg Tiempo aprox reprod una cara una capa 135 min Velocid...

Page 31: ...31...

Page 32: ...e la Plz De Deportes Tel 502 385 3760 2da Calle casa 1201 Tegucigalpa Tel 506 257 5051 fax 221 9850 ITSA Tel 504 230 7485 fax 230 6001 Lim n 4ta Ave 12 38 Zona 9 Guatemala FRIOPARTES S A ELECTROFIL W...

Page 33: ...telecom com co TELEVISONIC Avenida San Martin No 9 178 Tels 075 6652782 6645350 Fax 6655812 E mail televisonic epm net co TECNOLOGIA ELEC COLOMBIANA Carrera 4 No 6 38 Tel 072 2128132 Fax 2128132 E mai...

Page 34: ...HERLANDS 0900 20 200 88 0 10 Min www samsung com nl NORWAY 231 627 22 www samsung com no POLAND 0 801 801 881 www samsung com pl PORTUGAL 80 8 200 128 www samsung com pt SLOVAKIA 0800 SAMSUNG 726786 w...

Page 35: ...Memo Memo...

Page 36: ......

Page 37: ...ayer will operate normally When condensation forms inside the player due to sharp changes in temperature the player may not operate correctly If this occurs leave the player at room tempera ture until...

Page 38: ...ntrol 8 Connections Choosing a Connection 9 Basic Functions Playing a Disc 15 Using the Search and Skip Functions 16 Using the Display Function 16 Using the Disc Menu and Title Menu 17 Repeat Play 17...

Page 39: ...M CDV CDI CVD CDGs play audio only not graphics Ability to play back may depend on recording conditions DVD R R CD RW DVD RW RW V mode The unit may not play certain CD R CD RW and DVD R due to the dis...

Page 40: ...min Single sided 80 min Double sided 160 min Audio Video DVD contains excellent sound and video due to Dolby Digital and MPEG 2 system Various screen and audio functions can be easily selected throug...

Page 41: ...to the left or right to control the vol ume 5 DISC TRAY Place the disc here 6 OPEN CLOSE Press to open and close the disc tray 7 DISPLAY Operation indicators are displayed here 8 SKIP SEARCH Allow you...

Page 42: ...Audio input jacks of your television or audio video receiver 4 VIDEO OUT JACK Use a video cable to connect to the Video input jack on your television The Video Output in Setup Menu must be set to Comp...

Page 43: ...ss various audio functions on a disc 14 ZOOM Button Enlarge DVD Picture 15 OPEN CLOSE Button To open and close the disc tray 16 STEP Button Advances play one frame at a time 17 INSTANT SKIP Button Thi...

Page 44: ...white OUT terminals on the rear of the DVD player to the VIDEO yellow AUDIO red and white IN terminals of TV 2 Turn on the DVD player and TV 3 Press the TV VIDEO button on the TV s remote control to s...

Page 45: ...UT terminals on the rear of the DVD player to the AUDIO red and white IN terminals of TV Turn on the DVD player and TV 3 Press the TV VIDEO button on the TV s remote control to select S Video 4 Set th...

Page 46: ...he rear of the DVD player to the AUDIO red and white IN terminals of TV Turn on the DVD player and TV 3 Press the TV VIDEO button on the TV s remote control to select Component or DVD 4 Set the Video...

Page 47: ...ages 26 to 27 To see the progressive video output You need a TV set supporting the progressive scan input function And you have to set up the TV Consult your TV User s Manual to find out if your TV su...

Page 48: ...VIDEO or COMPONENT IN terminal of your TV 3 Turn on the DVD player TV and Amplifier 4 Press the input select button of the Amplifier to select exter nal input in order to hear sound from the DVD playe...

Page 49: ...Amplifier 4 Press the input select button of the Amplifier to select external input in order to hear sound from the DVD player Note When you connect the DVD player to DTS Amplifier and play a DTS dis...

Page 50: ...e disc tray When you stop disc play the player remembers where you stopped so when you press PLAY PAUSE button again it will pick up where you left off 4 Stopping Play Press the STOP button during pla...

Page 51: ...te control You can select Info in the function menu by pressing the MENU button 2 Press the buttons to select the desired item Only Menu Off is available for VCD2 0 Each press of the DISC MENU button...

Page 52: ...screen appears 2 Press the buttons to select Chapter Title or A B then press the ENTER button DVD repeats play by chapter or title VCD repeat play by disc or track Chapter repeats the chapter that is...

Page 53: ...Normal Wide Displays the content of the DVD title in 16 9 aspect ratio The picture will look horizontally stretched SCREEN FIT The top and bottom portions of the screen are cut off and the full screen...

Page 54: ...press the CANCEL or RETURN button ENG DOLBYDIGITAL 5 1CH AUDIO DVD When playing a VCD you can select among Stereo Left or Right Stereo AUDIO VCD Note This function depends on audio languages are enco...

Page 55: ...mark press the ENTER button Up to three scenes may be marked at a time 1 Bookmark Enter Shortcut Note Only Menu Off is available for VCD2 0 Each press of the DISC MENU button toggles between Menu On...

Page 56: ...Repeats the current folder Random Files in the disc will be played in random order MP3 file icon Folder icon WMA file icon Current Folder icon JPEG file icon CD Audio file icon MP3 WMA CD Audio Playb...

Page 57: ...with decompression rates below 128 Kbps will not be played properly Picture CD Playback 1 Select the desired folder 2 Press the buttons to select a Picture file in the clips menu and then press the EN...

Page 58: ...h JPEG files in ISO 9660 or Joliet format can be played The name of the JPEG file may not be longer than 8 characters and should contain no blank spaces or special characters Only a consecutively writ...

Page 59: ...to select Setup then press the or ENTER button 3 Press the buttons to select Language Setup then press the or ENTER button 4 Press the buttons to select Disc Menu then press the or ENTER button 5 Pres...

Page 60: ...ENTER button 4 Press the buttons to select Subtitle then press the or ENTER button 5 Press the buttons to select the desired language then press the or ENTER button Select Automatic if you want the s...

Page 61: ...screen Extreme left and right side of movie picture will be cut off 16 9 Wide You can view the full 16 9 picture on your wide screen TV Setup Menu Return Enter Language Setup Audio Setup Display Setu...

Page 62: ...rn Enter Wide TV Aspect Still Mode Auto Screen Messages On Black Level On TV System PAL Video Output COMPOSIT SVID P SCAN I SCAN S Video Video Output Video Output Select Video Output S Video Select wh...

Page 63: ...2 Press the buttons to select Setup then press the or ENTER button Setup Menu Return Enter Note If you have forgotten your password see Forgot Password in the Troubleshooting Guide Enter Password Ente...

Page 64: ...c being played has the 5 1 ch mark on the outside Check if your audio system is connected and working properly In SETUP Menu is the Audio Output set to Bitstream The features or action cannot be compl...

Page 65: ...isc 135 min Reading Speed 4 8 5 6 m sec Maximum Play Time 74 min Reading Speed 4 8 5 6 m sec Maximum Play Time 20 min Reading Speed 4 8 5 6 m sec Maximum Play Time 74 min Video Audio 1 channel 1 0 Vp...

Page 66: ...14 Min www samsung de HUNGARY 06 80 SAMSUNG 7267864 www samsung com hu ITALIA 800 SAMSUNG 7267864 www samsung com it LUXEMBURG 0032 0 2 201 24 18 www samsung lu NETHERLANDS 0900 20 200 88 0 10 Min www...

Page 67: ...32 Memo Memo...

Page 68: ...AK68 01291L 01 ELECTRONICS...

Reviews: