background image

Downloaded from www.vandenborre.be

16_


aan de slag

aan de slag

UITPAKKEN

Accessoires

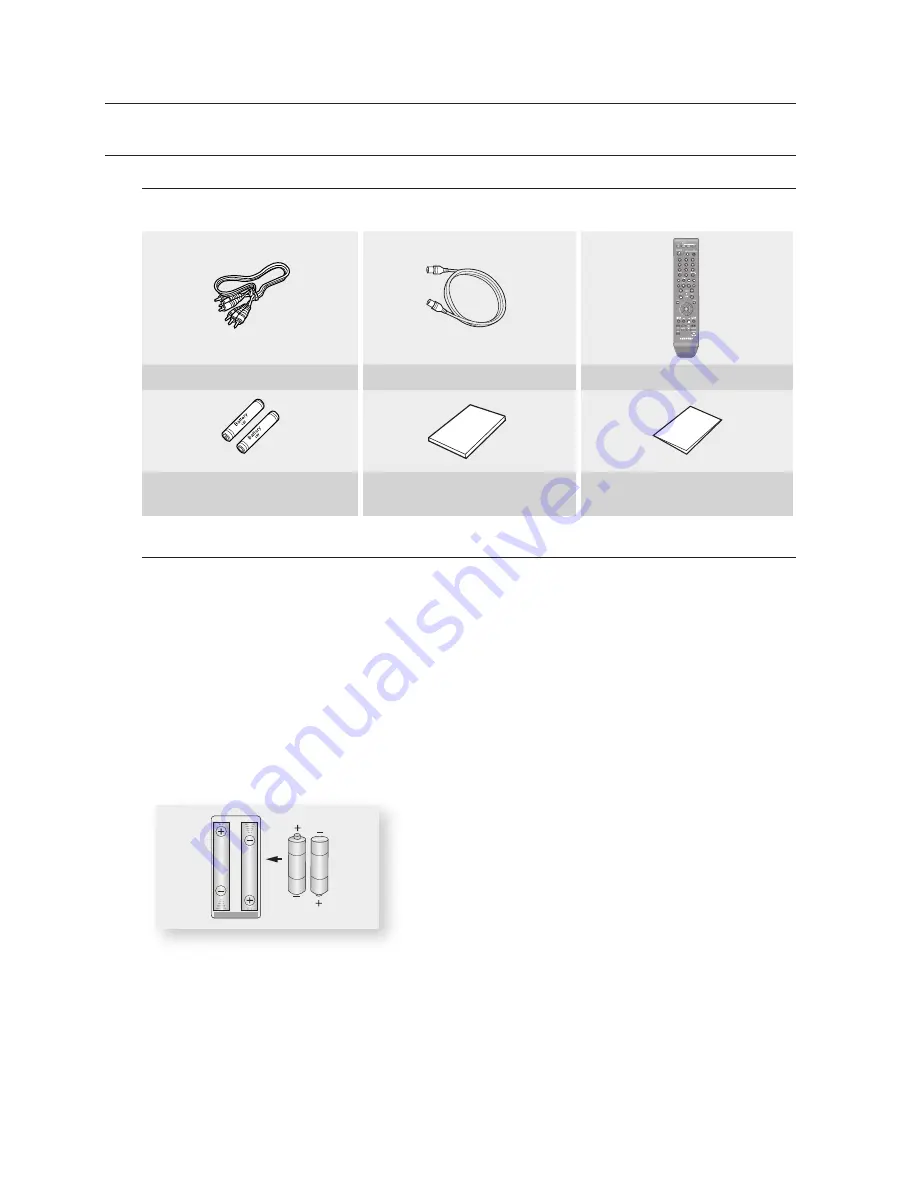
Controleer of de onderstaande accessoires zijn meegeleverd.

PAUSE

REPEAT

USB

Audio- en videokabel

RF-kabel voor TV

Afstandsbediening

Batterijen voor de afstandsbediening 

(AAA-formaat)

Gebruiksaanwijzing

Snelstartgids

De afstandsbediening voorbereiden

Batterijen plaatsen in de afstandsbediening

Open het batterijklepje aan de achterkant van de afstandsbediening.
Plaats twee AAA-batterijen. Let bij het plaatsen op de correcte polariteit (+ en -).
Schuif het batterijklepje weer op de afstandsbediening.

Als de afstandsbediening niet correct werkt:

Controleer de polariteit (+ / –) van de batterijen (Dry-Cell)
Controleer of de batterijen leeg zijn. 
Controleer of de sensor van de afstandsbediening niet door voorwerpen wordt geblokkeerd.
Controleer of er tl-verlichting in de directe omgeving is.

Gooi de batterijen weg volgens de milieuwetten in uw land. Gooi ze niet bij het huishoudelijk afval.

U bepaalt of uw televisie geschikt is, door de onderstaande instructies te volgen.

Zet de televisie aan.

Richt de afstandsbediening op de televisie.

Houd de toets 

TV STANDBY/ON

 ingedrukt en voer met de cijfertoetsen de tweecijferige code in voor het merk 

van de televisie.


1.

2.

3.

Summary of Contents for DVD-HR773

Page 1: ... v a n d e n b o r r e b e imagine the possibilities Thanks you for purchasing this Samsung product To receive more complete service please register your product at www samsung com register DVD user manual DVD HR773 DVD HR775 DVD HR777 ...

Page 2: ...t is supplied with a moulded plug incorporating a fuse The value of the fuse is indicated on the pin face of the plug If it requires replacing a fuse approved to BS1362 of the same rating must be used Never use the plug with the fuse cover omitted if the cover is detachable If a replacement fuse cover is required it must be of the same colour as the pin face of the plug Replacement covers are avai...

Page 3: ...uring lightning storms or when unused for long periods of time Refer all servicing to qualified service personnel Servicing is required when the apparatus has been damaged in any way such as power supply cord or plug is damaged liquid has been spilled or objects have fallen into the apparatus the apparatus has been exposed to rain or moisture does not operate normally or has been dropped Handling C...

Page 4: ...d disk be damaged you cannot recover lost data The hard disk is only a temporary storage space Disc Handling Use discs with regular shapes If an irregular disc a disc with a special shape is used this HDD DVD RECORDER may be damaged Holding discs Avoid touching the surface of a disc where recording is performed DVD RAM DVD RW and DVD R Clean with an optional DVD RAM PD disc cleaner LF K200DCA1 whe...

Page 5: ...ecorded as a closed session you may experience a delay in the early playback time all recorded files may not play Some CD R RW discs may not be playable with this unit depending on the device which was used to burn them For contents recorded on CD R RW media from CDs for your personal use playability may vary depending on contents and discs DVD R Disc Playback and Recording Once a DVD R recorded in...

Page 6: ... RAM recorded on this unit may not work with other DVD components To determine compatibility with these DVD RAM discs refer to the user s manual for the player For cartridge type DVD RAM discs remove the cartridge and use the disc only Disc Copy Contents Copy Specifications Contents HDD DVD DVD HDD Recorded Video Title Supported Supported Copy Protected Title Not supported Not supported Copy Once T...

Page 7: ... RW R manufacturer Use of poor quality DVD RAM RW R discs may cause following unexpected problems including without limitation recording failure loss of recorded or edited materials or damage to the HDD DVD RECORDER Disc Format Using MP3 disc CD R RW DVD RAM RW R HDD USB with MP3 files recorded with UDF ISO9660 or JOLIET format can be playbacked Only MP3 files with the mp3 or MP3 extension can be pl...

Page 8: ... such as digital still cameras The USB host port provides USB2 0 connectivity and also backward compatibility with USB1 1 USB1 0 devices Supported devices at host port Mass Storage Devices Digital Still Camera MP3 Player Memory stick Card Reader One or Multi slot Card Reader External Hard disk drive Only supports FAT32 formatted HDD Others removable storage devices PTP Picture Transfer Protocol de...

Page 9: ...rk well with this product DSC Digital Still Camera Vendor Brand Samsung VP MS11 S800 Pro815 V20 V10 D60 UCA5 Sony DSC W50 DSC R1 DSC P200 DSC P150 Olympus C 70 zoom SP 700 FE5500 C 470Z Nikon Coolpix 7900 Coolpix p3 Coolpix S2 Panasonic DMC FX01 DMC LX1S DMC FZ5 Canon IXUS 60 IXUS 600 PowerShot A700 IXUS 700 A620 S80 Fuji Finepix F700 MP3 Vendor Brand i river N11 T30 T10 Mplayer Samsung YP T8 YP U...

Page 10: ...ecting to USB Devices SYSTEM SETUP 34 34 On Screen Menu Navigation 34 Plug Play Setup 36 Setting the Clock 36 Channel Set 38 Setting up the Language Options 38 Setting up the System Options 41 Setting up the Audio Options 42 Setting up the Video Options 46 Setting up the Parental Lock 47 Setting up the Recording Options PLAYBACK 49 49 Region code DVD Video only 49 Logos of Discs that can be played...

Page 11: ...75 Simultaneous Recording and Playback 76 Time Shift function as a live signal 77 Making a Timer Recording 79 Go To Recorded List EDITING 81 81 Basic Editing Title List 85 Using the Sort function Title List 86 Navigation Menu 87 Select Contents 87 Advanced Editing Playlist 92 Copying from HDD to DVD or VICE VERSA 93 Copying MP3 JPEG or DivX 95 Changing the name of Music Photo DivX file 96 Disc Mana...

Page 12: ... Timer Recording If FR mode is selected the video quality is adjusted automatically so that all video for the scheduled time can be recorded onto the free disc space See page 77 Copying data from a digital camcorder using a DV input jack Record DV Device video onto HDD and DVD RAM RW R discs using the DV input jack IEEE 1394 4pin 4pin See page 73 High quality progressive scan Progressive scanning ...

Page 13: ...G This involves a function available on CD R RW DVD R RW RAM discs or HDD A MP3 This involves a function available on CD R RW DVD R RW RAM discs or HDD D DivX This involves a function available on CD R RW DVD R RW RAM discs or HDD J Caution This involves a case where a function does not operate or settings may be cancelled M NOTE This involves tips or instructions on the page that help each functi...

Page 14: ...ecessary Using a DVD RAM This type of disc can be formatted in DVD Video Recording format VR mode You can edit recorded images and create a playlist in a specific sequence according to your requirements Using a DVD RW This type of disc can be formatted in either DVD Video format V mode or DVD Video Recording format VR mode For an unused disc a message that asks whether to initialize a disc or not I...

Page 15: ...rate various edit functions such as delete copy rename lock etc on a recorded title Creating a playlist DVD RAM RW in VR mode HDD With this HDD DVD RECORDER you can create a new playlist on a disc and edit it without the original pre existing recording Step 6 Finalising Playing on other DVD components To play your DVD on other DVD components finalising may be necessary First finish all editing and r...

Page 16: ... aligned correctly Replace the battery cover If the remote does not operate properly Check the polarity of the batteries Dry Cell Check if the batteries are drained Check if remote sensor is blocked by obstacles Check if there is any fluorescent lighting nearby Dispose of batteries according to local environmental regulations Do not put them in the household trash To determine whether your televisi...

Page 17: ...listed above does not necessarily work on all televisions If you encounter problems operate the television directly M M BRAND BUTTON SAMSUNG 01 02 03 04 05 06 07 08 09 AIWA 82 ANAM 10 11 12 13 14 15 16 17 18 BANG OLUFSEN 57 BLAUPUNKT 71 BRANDT 73 BRIONVEGA 57 CGE 52 CONTINENTAL EDISON 75 DAEWOO 19 20 23 24 25 26 27 28 29 30 31 32 33 34 EMERSON 64 FERGUSON 73 FINLUX 06 49 57 FORMENTI 57 FUJITSU 84 ...

Page 18: ...ious title chapter track Playback mode Select TV preset Channels Stop mode STOP button Stops disc playback REC button Starts recording HDD DVD button Selects HDD DVD mode DISC TRAY Opens to accept a disc USB HOST Connects to digital still camera MP3 player memory stick Card reader external HDD or other removable storage devices 10 DV INPUT Connects to external digital equipment with a DV jack such...

Page 19: ...xial audio input jack 5 HDMI OUT Connects to equipment having HDMI input 6 DIGITAL AUDIO OUT OPTICAL Connects to an amplifier having a digital optical audio input jack 7 AV1 TV OUTPUT SCART connector Connects to equipment having SCART input jack 8 AUDIO OUT Connects to the audio input of external equipment using audio cables 9 COMPONENT VIDEO OUT Connects to equipment having Component video input 1...

Page 20: ... status icon DVD VIEW Indicator Lights when DVD mode is selected HDD VIEW Indicator Lights when HDD mode is selected USB VIEW Indicator Lights when USB mode is selected Disc Media Indicator Lights when a DVD RW R disc is loaded TIMER Indicator Lights to indicate the timer record mode HDMI Indicator Lights to indicate when HDMI is connected REC Indicator Lights in the record mode 10 STATUS Indicato...

Page 21: ...d to select or move up down left right when setting the menu function EXIT button Press to exit the setup screen PLAY LIST TITLE MENU button Use this to return to the Title menu or to view the recorded files list REC MODE button Use this to set the desired Recording time and picture quality XP SP LP EP REC PAUSE TIME SHIFT button Use this to pause during recording In HDD mode use this to operate Ti...

Page 22: ...levision Plug in the HDD DVD RECORDER and TV Turn on the HDD DVD RECORDER and TV Press the INPUT SEL button on your TV remote control until the Video signal from the HDD DVD RECORDER appears on the TV screen The RF cable connection of this product sends only signals of TV You must connect SCART cable or Audio Video cables to watch a DVD from your HDD DVD RECORDER TV mode Press the TV DVD button on...

Page 23: ...AV1 connector to the SCART AV connector on TV Turn on the HDD DVD RECORDER VCR Satellite receiver or digital tuner and TV Set Input mode on AV2 TV mode Press the TV DVD button on the remote control then TV will appear on Front display or turn off HDD DVD RECORDER You can watch programmes from a satellite or digital tuner connected to this HDD DVD RECORDER even when the HDD DVD RECORDER is turned o...

Page 24: ...NAL or Premiere broadcasts received through the built in TV tuner in HDD DVD RECORDER Connect RF antenna cables as shown Connect the AV1 connector on this recorder to the SCART AV connector on TV using a SCART cable Connect the AV2 connector to a SCART AV connector on decoder box To watch or record PAY TV Canal Plus programmes set your HDD DVD RECORDER to receive the channels using the on screen d...

Page 25: ...ge than interlaced video This is only available with TVs that support progressive scan Progressive Scan Output 576P Consumers should note that not all high definition television sets are fully compatible with this product and may cause artifacts to be displayed in the picture in case of 576 progressive scan picture problems It is recommended that the user switch the connection to the standard defini...

Page 26: ...and accurate colour reproduction images Connect audio cables white and red between the AUDIO OUT jacks on the HDD DVD RECORDER and AUDIO IN jacks on TV or AV amplifier See pages 27 29 After connecting refer to the page 44 Make sure that the colour coded connections match The Y PB PR component output jacks of your HDD DVD RECORDER must be connected to the exact corresponding component input jacks on...

Page 27: ...AV output jacks Case 3 Connecting to an AV amplifier with a digital output jack Manufactured under license under U S Patent 5 451 942 other U S and worldwide patents issued pending DTS and DTS Digital Out are registered trademarks and the DTS logos and Symbol are trademarks of DTS Inc 1996 2009 DTS Inc All Rights Reserved Manufactured under licence from Dolby Laboratories Dolby and the double D sym...

Page 28: ... b o r r e b e 28_ connecting setting up connecting setting up Case 2 Connecting to a stereo amplifier with AV output jacks If your stereo amplifier only has AUDIO INPUT jacks L and R use the AUDIO OUT jacks White Red Front L speaker Front R speaker ...

Page 29: ... Case 3 Connecting to an AV amplifier with a digital output jack If your AV amplifier has a Dolby Digital MPEG2 or DTS decoder and a digital input jack use this connection To enjoy Dolby Digital MPEG2 or DTS sound you will need to set up the audio settings According to your amplifier connect to an optical cable or a coaxial cable See pages 41 42 ...

Page 30: ...e input selector on your TV remote control until the HDMI signal from the HDD DVD RECORDER appears on your TV screen If the HDD DVD RECORDER is connected to your TV in HDMI 1080p output mode you must use High speed category2 HDMI cable M Case 2 Connecting to a TV with DVI Jack Using a DVI Adapter cable not supplied connect the HDMI OUT jack on the rear of the HDD DVD RECORDER to the DVI IN jack of...

Page 31: ...l audio Using HDMI the HDD DVD RECORDER transmits a digital video and audio signal and displays a vivid picture on a TV having an HDMI input jack HDMI connection description HDMI connector Both uncompressed video data and digital audio data LPCM or Bit Stream data Though the HDD DVD RECORDER uses a HDMI cable not supplied the HDD DVD RECORDER outputs only a pure digital signal to the TV If TV does...

Page 32: ...to the AV 3 IN jacks Case 2 Connecting a DV Device to the DV IN jack Case 1 Connecting a VCR Set Top Box STB DVD player or Cam corder to the AV 3 IN jacks Connecting a VCR or external device to AV 3 IN jacks of the HDD DVD RECORDER You can record from connected equipment VCR STB DVD player or Camcorder AV 3 in selection will be automatically done If the input is not selected automatically use INPU...

Page 33: ...ton to select proper input CONNECTING TO USB DEVICES This allows you to connect your HDD DVD RECORDER to USB devices Connecting a USB memory MP3 player Digital Camera to the USB HOST Disconnecting the USB cable during the data transfer will stop the communication and may damage data stored in the memory When data communication is disrupted due to static electricity magnetic field or other reason re...

Page 34: ...and scart cable To use an HDMI cable not supplied make the Audio Video connection before plugging in the power cord or after finishing the Plug Play Setup Do not connect the HDMI cable while the Plug Play Setup is progressing Plug the HDD DVD RECORDER into the mains AUTO in the front panel display flickers Press a number button to select the language Press the OK button to start the auto setup Selec...

Page 35: ...e Stations manually Channel Set Manual Setup menu See page 37 Auto setup function can be performed by pressing STOP on the unit continuously for 10 seconds or more during power off with no disc inserted Check the date and time If it is Correct press OK button then the date and time will be saved If you don t press the OK button the date and time will be saved automatically after 5 seconds If it is...

Page 36: ...e channels PR1 to PR5 If you do not need the Auto Clock Set function select Off 1 2 3 4 5 M CHANNEL SET Auto Scanning This feature allows you to manually set the HDD DVD RECORDER tuner band to Antenna or Cable whichever you connected to the Antenna In jack during initial setup With the unit in Stop mode press the MENU button Press the buttons to select Setup then press the OK or button Press the b...

Page 37: ...then press the OK or button Press the buttons to select a PR programme you wish to edit delete or swap then press the COLOUR button Select Edit Delete or Swap In case of Edit RED A button You can add or edit PR programme information After change PR informations CH Name Decoder MFT System select Save then press the OK button CH Tune the channel using buttons Name Display station name automatically ...

Page 38: ... Press the buttons to select the desired system option then press the OK or button Press the buttons to select the desired item then press the OK or button Auto Power Off Setting This feature automatically turns off your HDD DVD RECORDER if you do not press any button for the selected time Press the buttons to select Auto Power Off then press the OK or button Press the buttons to select the desire...

Page 39: ...by using TV remote control TV buttons that can be used to control the HDD DVD RECORDER and buttons button When you press Anynet button on the TV remote control the OSD to the left will appear Select Device Use this option to select device Record Use this option to start recording or stop recording Menu on Device Same as MENU button on the HDD DVD RECORDER remote control Device Operation Same as IN...

Page 40: ...is HDD DVD RECORDER with the DivX R Video On Demand format For more information visit www divx com vod HDD DVD RECORDER System HDD Library Timer Record Disc Manager Setup Clock Set Auto Power Off Off Anynet HDMI CEC On DivX R Registration sSELECT rRETURN eEXIT OK Your registration code is XXXXXXXX To learn more visit www divx com vod DivX R Video On Demand ...

Page 41: ...MPEG 2 Decoder Digital output setting is equally applied to both Dolby Digital and MPEG 2 audio LPCM sound track is always outputted as PCM It has no relation with Digital Output setting Be sure to select the correct Digital Output or you will hear no sound or a loud noise DTS Off Doesn t output DTS signal Select this when your AV receiver or AV amplifier does not have a DTS decoder On Outputs DTS ...

Page 42: ...pes NICAM Stereo NICAM Mono and Bilingual transmission in another language NICAM programmes are always accompanied by a standard mono sound broadcast and you can select the desired sound by setting NICAM on or off On NICAM mode Off Only set at this position to record the standard mono sound during a NICAM broadcast if the stereo sound is distorted due to inferior reception conditions HDD DVD RECOR...

Page 43: ...ear at the top and bottom of the screen 4 3 Pan Scan Select this for conventional size TV when you want to see the central portion of the 16 9 screen Extreme left and right side of movie picture will be cut off 16 9 Wide You can view the full 16 9 picture on your wide screen TV 3D Noise Reduction motion adaptive noise reduction Off Normal On Provides a clear picture through noise reduction for rec...

Page 44: ...ble when video output is component This setting enables you to select progressive mode To view Progressive scan mode first connect the component cable See page 26 Be sure the Component cables are connected properly Progressive The message Do you want to maintain progressive mode Reverting in 10 seconds will be displayed Select Yes to revert progressive mode Interlace The message Do you want to main...

Page 45: ...920 x 1080 Output selection Connect the HDD DVD RECORDER to your TV via HDMI Set your TV s input to HDMI The BD Wise menu item appears only if BD Wise is set to On BD wise function is enabled only if BD Wise compliant Samsung Products are connected with each other using the HDMI cable Progressive scan automatically activates when HDMI is connected Please make sure HDMI is indicated on the front pa...

Page 46: ...evel then press the OK or button Press the buttons to select the rating level you want then press the OK or button For example if you select up to Level 6 discs that contain Level 7 8 will not play A larger number indicates that the programme is intended for adult use only Changing the Password Press the buttons to select Change Password then press the OK or button Enter the 4 digit password using...

Page 47: ...ted recording mode A chapter will be about 5 minutes long in XP and SP and about 15 minutes long in LP and EP mode Press the STOP button to stop recording To display the created titles finalise the disc See page 98 and then press the TITLE MENU button The title menu will be displayed Finalising is generally unnecessary when using a DVD RW disc To display the created chapters select the desired Titl...

Page 48: ...ording is different according to recording mode See pages 49 50 V Mode Compatibility This feature is about the setup for selecting audios when recording the NICAM STEREO Multi audio broadcasting on HDD It does not directly affect DVD recording of a programme Off Both Dual L and Dual R of the multi audio broadcasting are recorded on HDD Titles recorded on HDD under such setup status cannot be copie...

Page 49: ...VD RECORDER is described on the rear panel of the HDD DVD RECORDER LOGOS OF DISCS THAT CAN BE PLAYED STEREO CREATOR Dolby Digital DTS Digital Audio Stereo PAL broadcast system in U K France Germany etc DivX MP3 DISC TYPES THAT CAN BE PLAYED Disc Types Disc Logo content Recorded content Disc Shape Max Playing Time DVD VIDEO VIDEO AUDIO Single sided 12cm 240 min Double sided 12cm 480 min Single side...

Page 50: ...ded DVD R AUDIO VIDEO Single Layer 12cm 4 7GB 1 hr XP Excellent Quality 2 hrs SP Standard Quality 4 hrs LP Long Playback 6 or 8 hrs EP Extended Dual Layer 12cm 8 5GB 1 hr 50 min XP Excellent Quality 3 hrs 40 min SP Standard Quality 7 hrs 20 min LP Long Playback 11 or 14 hrs 40 min EP Extended DVD RW AUDIO VIDEO 12cm 4 7GB 1 hr XP Excellent Quality 2 hrs SP Standard Quality 4 hrs LP Long Playback 6...

Page 51: ...EN CLOSE button to close the disc tray Your HDD DVD RECORDER closes the disc tray and plays the disc automatically The HDD DVD RECORDER does not play discs automatically after being powered on initially When the HDD DVD RECORDER is powered on and a disc is in the tray the unit will be activated and wait in stop status Press the PLAY button to start playback If you want the unit to play automatical...

Page 52: ...ay List HDD DVD RAM RW VR Press the PLAY LIST button This refers to a list of user selected titles When one playlist is played only the scene selected by the user will play and then stop Since only the information necessary for playing a desired scene is included in a playlist even if that playlist is deleted the original recording will not be deleted only VR mode USING THE PLAYBACK RELATED BUTTON...

Page 53: ...ress the SEARCH button 1 2 1 4 1 8 If you press the SEARCH button 1 2 1 4 1 8 To return to normal speed playback press the PLAY button Press and hold the SEARCH buttons during pause the disc will play slowly at 1 4 speed If the button is released the pause operation will resume The speed marked in this function may be different from the actual playback speed Slow motion operates only in the forwar...

Page 54: ...ds using the number buttons Then press the OK button This may not work for some discs When an audio CD CD DA or an MP3 JPEG disc is inserted depending on the disc type the information display may not appear The Time Search function does not operate on some discs To make the screen disappear press the RETURN button SELECTING THE SUBTITLE LANGUAGE ZD Selects one of the subtitle languages recorded on...

Page 55: ...rticular scene you can select the Angle function Press the INFO button during playback Press the buttons to select Angle Press the buttons to select the desired angle This function is disc dependent and may not work on all DVDs This function does not work when a DVD has not been recorded with a multi camera angle system Displays the current angle and the total angle number REPEAT PLAY Playing Repe...

Page 56: ...ou can also activate Normal Playback by pressing the EXIT button Audio CDs CD DA MP3 discs and DivX discs do not support the Repeat A B function ZOOMING IN SZXCVKL Press the INFO button during playback Press the buttons to select Zoom then press the OK or button will be displayed Press buttons to move to the area you want to enlarge Press the OK button The screen will be enlarged to twice the norm...

Page 57: ...on Markers cannot be set or deleted only playback is available Playing back a marker Press the MARKER button during playback Press the buttons to select a marked scene Press the OK or PLAY button to start playing from the selected scene If you press the SKIP button it moves to the beginning of the marker Pressing the button once again within 3 seconds returns to the beginning of the previous marke...

Page 58: ...r 2 is displayed and the scene is memorized Repeat above to bookmark other positions You can bookmark up to 10 scenes When the disc tray is opened and then closed bookmarks will disappear Playing back a bookmark Press the MARKER button during playback Press the buttons to select a bookmarked scene Press the OK or PLAY button to start playing from the selected scene Clearing a bookmark Press the MA...

Page 59: ...ents MP3 disc only Playing an Audio CD CD DA Insert an audio CD CD DA into the disc tray The audio CD menu appears and the tracks songs are played automatically Press the buttons to select the track song you want to hear and then press the OK button Audio CD CD DA Screen Elements Current track song Displays the number of the track currently being played Displays available buttons and a playback ti...

Page 60: ...control During playback press the REPEAT button repeatedly to select the repeat mode you want Press the YELLOW C button during the Music List playback Press the buttons to select desired play mode then press the OK or button Normal CD CD DA MP3 Tracks on a disc are played in the order in which they were recorded on the disc Repeat Track CD CD DA MP3 Repeat Folder MP3 Repeat All CD CD DA MP3 Random...

Page 61: ...he buttons to select tracks in the order in which you want them to play then press the OK button If you playlisted a wrong track press the buttons to select the wrong track then press the OK button To store the Playlist press the RED A button A new Playlist will be created 1 2 3 4 5 6 M 1 2 3 4 CD Make Playlist mMOVE sADD rRETURN eEXIT No Title 001 TRACK01 002 TRACK02 003 TRACK03 004 TRACK04 005 T...

Page 62: ...utton during the Music List playback Press the buttons to select Go To Playlist then press the OK or button Press the buttons to select the Playlist you want to edit Press the GREEN B button in playlist mode Press the buttons to select tracks in the order in which you want them to play then press the OK button If you playlisted a wrong track press the buttons to select the wrong track then press t...

Page 63: ...the OK or button The photo List will be displayed See page 64 To operate this function you have to select the disc containing both music files and photo file 1 1 2 M 1 2 M 1 2 M CD Playlist Q TRACK04 U 1 4 eEXIT No Title Length Y PLAYLIST01 R TRACK04 4 03 002 TRACK02 3 57 003 TRACK06 5 08 004 TRACK01 4 19 Edit Playlist New Playlist Music List I TRACK04 k PLAYLIST01 00 02 22 CD Music List Q Song 10 m...

Page 64: ...ected speed You can go to Photo List by pressing YELLOW C button To stop the Slide Show Press the GREEN B STOP or RETURN button Rotate To setup follow steps 1 and 4 above 5 1 Press the GREEN B button to select Rotate Press the buttons to select the rotate angle then press the OK or button Once you select a rotate angle you can change it by pressing the RED A button You can go to Photo List by pres...

Page 65: ... the desired item then press the OK or button Name In alphabetical order Size In order of photo file size You can sort by Name and Size Sorted list will be resorted in copied order upon re entering Photo List Select Contents To setup follow steps 1 to 3 in page 64 Press the BLUE D button to select Contents Press the buttons to select the contents you want to move then Press the OK or button This fu...

Page 66: ...t a faster speed X 2 X 4 X 8 Slow Motion Play In pause mode press the SEARCH button on the remote control 1 2 1 4 1 8 Reverse Slow Motion Play is not available Step Motion Play In pause mode press the SKIP button on the remote control in the still mode Reverse Step Motion Play is not available Some DivX files created on a personal computer may not be play back That is why Codec Type Version and Hig...

Page 67: ... it simply While the list menu is displayed press the GREEN B button to select Sort Press the buttons to select the desired item then press the OK or button Name In alphabetical order Size In order of DivX file size You can sort by Name Size Sorted list will be resorted in copied order upon reentering DivX List Select Contents Press the BLUE D button to select Contents Press the buttons to select t...

Page 68: ... Finalising Additional Recording in Samsung Recorder DVD RAM VR Mode Samsung X Recordable Other Company X Recordable DVD RW VR Mode Samsung finalised Not recordable not finalised Recordable Other Company finalised Not recordable not finalised Recordable V Mode Samsung finalised Not recordable not finalised Recordable Other Company finalised Not recordable not finalised Not recordable DVD R V Mode Samsung ...

Page 69: ...ts your preferences DVD RAM R Formatting will be started automatically DVD RW Use after formatting the disc DVD RW Use after initializing the disc If you want to change the VR or V mode refer to Formatting a Disc on page 98 DVD R Formatting disc is unnecessary and only V Mode Recording is supported DVD RAM RW VR mode This mode allows multiple editing functions such as deletion of the whole title p...

Page 70: ...RAM RW R XP high quality mode Approx 33 hours Approx 1 hour about 8 5 Mbps SP standard quality mode Approx 67 hours Approx 2 hours about 4 5 Mbps LP long recording mode Approx 133 hours Approx 4 hours about 2 Mbps EP extended mode Approx 199 hours Approx 264 hours Approx 6 hours about 1 6 Mbps Approx 8 hours about 1 2 Mbps FR Flexible Recording Approx 33 hours 264 hours Approx 1 8 hours DVD HR775 ...

Page 71: ...stops and the following message appears on the screen Concerning Copy Control Signals TV broadcasts that contain copy control signals may have one of the following three signal types Copy Free Copy Once and Copy Never If you want to record a copy once type programme use DVD RW with CPRM in VR Mode DVD RAM HDD Signal type Media Copy Free Copy Once Copy Never DVD RW Ver 1 1 O DVD RW Ver 1 1 with CPR...

Page 72: ...to select the recording speed quality SP LP EP XP Press the REC button Information concerning the channel is displayed on the screen then recording begins Icon REC is displayed on the front panel Recording from external equipment you are watching Press the INPUT SEL button to select the input source according to the connection you made The front panel display changes in the following sequence PR N...

Page 73: ... Recording will stop automatically if a copy protected image is selected DVD RAM RW discs must be formatted before starting to record Most new discs are sold unformatted Do not use DVD R authoring discs with this unit COPYING FROM A CAMCORDER SXCVKL You may control the Camcorder using the IEEE1394 DV interface Connect the DV output jack of your camcorder to the DV input jack on the front of your H...

Page 74: ...or DVD button If you select DVD press the OPEN CLOSE button and place a recordable disc on the disc tray Press the OPEN CLOSE button to close the disc tray Wait until LOAD disappears from the front panel display Press the PROG or number buttons to select the programme to record Press the REC button to start recording Press the REC button repeatedly to adjust the desired recording time 0 30 1 00 8 ...

Page 75: ...t Press the OK or PLAY button It plays back the title that you are currently recording from the beginning Using the MENU button With the unit in recording mode press the MENU button Press the buttons to select Title then press the OK button Title List screen is displayed Press the SKIP buttons to select the recording title list then press the OK or button It plays back the title that you are curre...

Page 76: ...e timeshift is currently working Displays the current status Watching Point Current play time 5 Live Point 6 Live Time 7 Time Shift Time Bar Buttons on the Remote Control used for Time Shift function PLAY button Playback PAUSE button Pause live TV SEARCH buttons Fast play X 2 X 4 X 8 X 16 X 32 X 128 SKIP button STOP button Moves to Live point STOP button If you press this button in the Live point ...

Page 77: ...selected only one mode in XP SP LP and EP modes XP high quality Select when video quality is important SP standard quality Select to record in standard quality LP low quality Select when a long recording time is required EP extended Select when a longer recording time is required VPS PDC VPS Video Programme System or PDC Programme Delivery Control function If you set this function on you can contr...

Page 78: ...imer Recording using VPS PDC the fan can still operate and make a noise when the power is off Editing the Scheduled List Follow these directions to edit the Scheduled List To setup follow steps 1 to 2 in Making a Timer Recording on page 77 Press the buttons to select the number of the Scheduled List you want to edit then press the OK button Edit the items you want to modify See the Making a Timer ...

Page 79: ...ther the selected Recorded List performed a Timer Recording successfully 3 1 Press the buttons to select the number of the Recorded List then press the OK button Delete Recorded List Deletes a Recorded List individually 3 1 Press the buttons to select the number of the Recorded List you want to delete and then press the RED A button Press the buttons to select Yes then press the OK button 3 4 5 N ...

Page 80: ...heduled List 3 1 Press the YELLOW C button 4 HDD Scheduled List Current Time 10 54 MOVE sSELECT rRETURN eEXIT Recorded List No To Source Date Start End Mode VPS PDC Recordable Time HDD 105 44 SP Add a list HDD Recorded List mMOVE sSELECT rRETURN eEXIT Delete Delete All Scheduled List No To Source Date Start End Mode V P Status 01 HDD PR 01 JAN 01 17 30 18 30 SP On OK 02 HDD PR 01 JAN 01 21 00 22 0...

Page 81: ...entry you want to rename from the Title List then press the RED A button Press the buttons to select Rename then press the OK or button The Rename screen is displayed Select the desired characters using the buttons press the OK button Back Space RED A button Deletes and moves the cursor backwards by one position Space GREEN B button Enters a blank and moves the cursor one forward to the right Clea...

Page 82: ...n Press the buttons to select On then press the OK button The key icon on the information window for the selected entry changes to the locked status 1 0 If you want to cancel the Protection select Off in step 5 and press the OK button The key icon changes to the unlocked status 0 1 If you select Select All in the Edit menu all title will be checked 5 N 1 2 3 4 5 6 M HDD Title List JAN 02 2009 21 0...

Page 83: ...want to delete is displayed Press the buttons to select Yes then press the OK button You cannot delete a protected entry If you want to delete a protected entry select Off in the Title Protection menu See page 82 When the Disc Protection has been set to Protected you cannot delete titles See page 96 Once an entry is deleted from the Title List it cannot be recovered Once DVD RW R is finalised it ca...

Page 84: ... select an entry you want to edit from the Title List then press the RED A button The Edit menu is displayed Press the buttons to select Partial Delete then press the OK or button N 1 2 3 4 5 6 N 1 2 3 HDD Split JAN 01 2009 17 30 PR1 MOVE sSELECT rRETURN eEXIT Title List No 001 Play Pause SCAN Split 1 Split 2 00 00 00 00 00 20 00 00 20 Split Select Return HDD Split JAN 01 2009 17 30 PR1 MOVE sSELE...

Page 85: ...G THE SORT FUNCTION TITLE LIST SXCVKL When you need to change the Sort order of Title List While the list menu is displayed press the GREEN B button to select Sort Press the buttons to select the desired item then press the OK or button Date In order of when the titles were recorded Name In alphabetical order Length In order of recorded title length Channel Info In order of Channel information You...

Page 86: ...nit in Stop mode Playback mode press the TITLE LIST button Press the buttons to select an entry you want to play from Title List then press the YELLOW C button Press the buttons to select Scene Navigation then press the OK or button Press the buttons to select desired scene then press the OK or PLAY button Scene Navigation will not operate if a selected title does not have Markers N 1 2 3 4 M N 1 ...

Page 87: ...w Make scene screen is displayed Repeat steps 4 6 to make a new scene for the playlist A new scene will be added to the current playlist You can check and see all the scenes on the Edit playlist screen See page 89 To make a new playlist Repeat steps 1 6 if you want to make a new playlist Press the buttons to select Return then press the OK button to finish the operation You can create up to 99 play...

Page 88: ... A button Deletes and moves the cursor backwards by one position Space GREEN B button Enters a blank and moves the cursor one forward to the right Clear YELLOW C button Deletes all the character inputs Save BLUE D button Registers the character inputs Press the BLUE D button to select Save The changed title is displayed in the title field of the selected playlist entry N 1 2 3 N 1 2 3 4 5 HDD Playl...

Page 89: ...d on the Start window Select the starting or ending point of the section you want to modify using the playback related buttons PLAY SEARCH SKIP Press the OK button at the end point of the scene The image and ending point time is displayed in the End window Press the buttons to select Change then press the OK button The scene you want to modify is changed with the selected section N 1 2 3 4 5 6 7 H...

Page 90: ...SEARCH SKIP Press the OK button at the end point of the scene The image and end point time are displayed in the End window To cancel press the buttons to select Return then press the OK button Press the buttons to select Add then press the OK button The section you want to add is inserted prior to the scene selected in step 4 1 of Adding a Scene Deleting a Scene To setup follow steps 1 to 3 on pag...

Page 91: ...s displayed press the GREEN B button to select Sort Press the buttons to select the desired item then press the OK or button Date In order of when the playlists were created Name In alphabetical order You can sort by Date Name Sorted list will be resorted in copied order upon reentering Playlist N 1 2 3 4 5 M 1 2 M HDD Playlist JAN 02 2009 13 47 1 3 a CHECK eEXIT No Title Length 001 JAN 02 2009 13...

Page 92: ...y Check that the disc has enough available space for the recording Select a desired mode by pressing the HDD or DVD button on the remote control You can also select a desired mode by pressing the HDD DVD button on the front panel With the unit in Stop mode Playback mode press the TITLE LIST button Press the COPY button Copy screen is displayed During Playback you can also copy the title by pressin...

Page 93: ...COPYING MP3 JPEG OR DIVX Contents Copy Specifications Contents HDD DVD or USB DVD HDD or USB USB HDD or DVD MP3 Supported Supported Supported JPEG photo Supported Supported Supported DivX Supported Supported Supported CD DA Not supported Supported Not supported Disc CD R CD DA CD RW DVD RAM DVD R Finalise DVD RW DVD RW Finalise HDD or USB HDD DVD R DVD RW V or USB USB HDD or DVD R DVD RW V PTP USB ...

Page 94: ...lder by pressing the GREEN B button Press the RED A button to select Start Copy The message Number of file x is displayed Press the buttons to select Start then press the OK button Folder copy begins Subfolders and files in the selected folder are copied To cancel the copying in progress press the EXIT button 6 7 8 9 1 2 3 4 5 6 7 8 CD Copy Selected Items 9 68MB 2 Available 236724MB eEXIT Start Copy...

Page 95: ...acters using the buttons then press the OK button Back Space RED A button Deletes and moves the cursor backwards by one position Space GREEN B button Enters a blank and moves the cursor one forward to the right Clear YELLOW C button Deletes all the character inputs Save BLUE D button Registers the character inputs Press the BLUE D button to select Save The changed file name is displayed on the sele...

Page 96: ...ode press the MENU button Press the buttons to select Disc Manager then press the OK or button Press the buttons to select Protection then press the OK button Press the buttons to select On then press the OK button 1 2 3 4 5 M 1 2 3 4 DVD RAM VR Disc Manager MOVE sSELECT rRETURN eEXIT Disc Name DVD VR Used Space 00 17 0 52 GB Available Space 01 54 SP 3 85 GB Disc Protection Info Not Protected Curr...

Page 97: ... List function will not operate If there is a title containing a still picture however that function will not operate If you want to delete a protected entry disable Protect for it on the Lock item Press the buttons to select the Title DivX Music or Photo then press the OK button Press the buttons to select Yes then press the OK button All title lists DivX lists music lists or photo lists are dele...

Page 98: ...VR DVD V DISC DVD RAM RW DVD RW DVD R With DVD RW discs there is no difference between DVD Video format Video mode and DVD Video Recording format VR mode Finalising a Disc CVL After you record titles onto a DVD RW R disc with your HDD DVD RECORDER it needs to be finalised before it can be played back on external devices With the unit in Stop mode press the MENU button Press the buttons to select Di...

Page 99: ...the buttons to select Unfinalise then press the OK button You will be prompted with the message Do you want to unfinalise disc Press the buttons to select Yes then press the OK button You will be prompted again with the message Disc will be unfinalised Do you want to continue Press the buttons to select Yes then press the OK button The disc is unfinalised A DVD RW can be finalised or unfinalised in Vide...

Page 100: ...gs menu The disc does not support all selected functions In this case some settings configured in the settings menu may not work properly Cannot change the aspect ratio The aspect ratio is fixed for DVD discs See page 43 The angle operation does not work while playing a DVD disc The angle operation is available only when the disc contains images captured from different angles The selected audio and ...

Page 101: ...e screen it means that TV does not support HDCP High bandwidth Digital Content Protection HDMI output Jitter Check your TV system setup correctly Please refer to the user s manual of your TV The remote control doesn t work Point the remote control at the remote control sensor on your HDD DVD RECORDER Allow for proper distance Remove obstacles between your HDD DVD RECORDER and the remote control Ch...

Page 102: ...jacks x 1 Optical Coaxial digital audio output Video Composite Video Video output jack x 1 Component output x 1 Y 1 0Vp p Pb 0 70Vp p Pr 0 70Vp p at 75Ω load HDMI DVI 576p 720p 1080i 1080p Scart Jack AV1 Scart TV Video Composite RGB Audio analogue Recording Picture Compression format MPEG II Audio Compression format Dolby Digital 2ch 256Kbps MPEG II Recording Quality XP about 8 5 Mbps SP about 4 5...

Page 103: ...r work which contains a notice placed by the copyright holder saying it may be distributed under the terms of this General Public License The Program below refers to any such program or work and a work based on the Program means either the Program or any derivative work under copyright law that is to say a work containing the Program or a portion of it either verbatim or with modifications and or ...

Page 104: ...e not required to accept this License since you have not signed it However nothing else grants you permission to modify or distribute the Program or its derivative works These actions are prohibited by law if you do not accept this License Therefore by modifying or distributing the Program or any work based on the Program you indicate your acceptance of this License to do so and all its terms and ...

Page 105: ... the start of each source file to most effectively convey the exclusion of warranty and each file should have at least the copyright line and a pointer to where the full notice is found One line to give the program s name and a brief idea of what it does Copyright C year name of author This program is free software you can redistribute it and or modify it under the terms of the GNU General Public ...

Page 106: ...a company cannot effectively restrict the users of a free program by obtaining a restrictive license from a patent holder Therefore we insist that any patent license obtained for a version of the library must be consistent with the full freedom of use specified in this license Most GNU software including some libraries is covered by the ordinary GNU General Public License This license the GNU Less...

Page 107: ...n supplied function or table used by this function must be optional if the application does not supply it the square root function must still compute square roots These requirements apply to the modified work as a whole If identifiable sections of that work are not derived from the Library and can be reasonably considered independent and separate works in themselves then this License and its terms...

Page 108: ...have already sent this user a copy For an executable the required form of the work that uses the Library must include any data and utility programs needed for reproducing the executable from it However as a special exception the materials to be distributed need not include anything that is normally distributed in either source or binary form with the major components compiler kernel and so on of t...

Page 109: ...LIBRARY TO THE EXTENT PERMITTED BY APPLICABLE LAW EXCEPT WHEN OTHERWISE STATED IN WRITING THE COPYRIGHT HOLDERS AND OR OTHER PARTIES PROVIDE THE LIBRARY AS IS WITHOUT WARRANTY OF ANY KIND EITHER EXPRESSED OR IMPLIED INCLUDING BUT NOT LIMITED TO THE IMPLIED WARRANTIES OF MERCHANTABILITY AND FITNESS FOR A PARTICULAR PURPOSE THE ENTIRE RISK AS TO THE QUALITY AND PERFORMANCE OF THE LIBRARY IS WITH YOU...

Page 110: ...air work and damage to the products caused by such repair work will not be covered by this warranty 4 This product is not considered to be defective in materials nor workmanship by reason that it requires adaptation in order to conform to national or local technical or safety standards in force in any Country other than the one for which the product was originally designed and manufactured This wa...

Page 111: ...0 www samsung com lu NETHERLANDS 0900 SAMSUNG 0900 7267864 0 10 Min www samsung com nl NORWAY 3 SAMSUNG 7267864 www samsung com no POLAND 0 801 1SAMSUNG 172678 022 607 93 33 www samsung com pl PORTUGAL 80820 SAMSUNG 726 7864 www samsung com pt SLOVAKIA 0800 SAMSUNG 726 7864 www samsung com sk SPAIN 902 1 SAMSUNG 902 172 678 www samsung com es SWEDEN 075 SAMSUNG 726 78 64 www samsung com se U K 084...

Page 112: ...an take these items for environmentally safe recycling Business users should contact their supplier and check the terms and conditions of the purchase contract This product and its electronic accessories should not be mixed with other commercial wastes for disposal AK68 01787C Correct disposal of batteries in this product Applicable in the European Union and other European countries with separate ...

Page 113: ...n b o r r e b e imaginez les possibilités Merci d avoir choisi cet appareil Samsung Pour recevoir une assistance plus complète veuillez enregistrer votre produit sur www samsung com register DVD Manuel d utilisation DVD HR773 DVD HR775 DVD HR777 ...

Page 114: ...urs pour les branchements REMARQUE IMPORTANTE Le câble relié au secteur de cet appareil est fourni avec une prise surmoulée incorporant un fusible La valeur du fusible est indiquée sur la face de la fiche présentant les broches S il doit être remplacé il convient d utiliser un fusible de la même valeur nominale et conforme à BS1362 N utilisez jamais la fiche sans le couvercle du fusible si ce couver...

Page 115: ...appareil En cas d utilisation d un chariot déplacez l ensemble chariot appareil avec précaution afin d éviter toute blessure due à un basculement de cet ensemble Débranchez cet appareil en cas d orage ou de non utilisation prolongée Confiez l ensemble des réparations au personnel qualifié Une réparation est nécessaire en cas de dommage subi par l appareil quel qu il soit cordon d alimentation ou fiche...

Page 116: ...de stockage temporaire Manipulation des disques Utilisez des disques présentant des formes régulières Si vous utilisez un disque aux formes irrégulières un disque avec une forme spéciale vous risquez d endommager le GRAVEUR DE DVD AVEC DISQUE DUR Tenue des disques Evitez de toucher la surface du disque sur laquelle vous allez effectuer un enregistrement DVD RAM DVD RW et DVD R Procédez au nettoyag...

Page 117: ... une session fermée vous risquez d avoir un retard en début de lecture de ne pas pouvoir lire tous les fichiers enregistrés Certains disques CD R RW ne peuvent pas être lus par cet appareil en fonction du dispositif utilisé pour le gravage Concernant les contenus enregistrés sur support CD R RW à partir de CD pour votre usage personnel la lisibilité peut varier en fonction du contenu et des disques...

Page 118: ...s composants DVD Pour déterminer la compatibilité avec ces disques DVD RAM reportez vous au manuel d utilisation du lecteur Pour les disques DVD RAM à cartouche retirez la cartouche et utilisez seulement le disque Copie de disque Spécifications de copie du contenu Contenu HDD DVD DVD HDD Titre vidéo enregistré Pris en charge Pris en charge Titre protégé contre la copie Arrêt pris en charge Arrêt pr...

Page 119: ...lisation de DVD RAM RW R de mauvaise qualité est susceptible de provoquer entre autres les problèmes inattendus suivants échec de l enregistrement perte de données enregistrées ou modifiées dommages à l enregistreur de DVD avec DISQUE DUR Format du disque Utilisation de disque MP3 Les CD R RW DVD RAM RW R et disques durs USB contenant des fichiers MP3 enregistrés au format UDF ISO9660 ou JOLIET peuv...

Page 120: ...qu une rétrocompatibilité avec les périphériques USB1 1 USB1 0 Périphériques pris en charge sur le port hôte Périphériques de stockage de masse Appareil photo numérique Lecteur MP3 Carte mémoire Memory Stick Lecteur de carte lecteur de carte à une ou plusieurs fentes Lecteur de disque dur externe prend uniquement en charge les disques durs formatés FAT32 Autres supports de stockage amovibles Appar...

Page 121: ...ompatible avec ce produit Appareil photo numérique Distributeur Marque Samsung VP MS11 S800 Pro815 V20 V10 D60 UCA5 Sony DSC W50 DSC R1 DSC P200 DSC P150 Olympus C 70 zoom SP 700 FE5500 C 470Z Nikon Coolpix 7900 Coolpix p3 Coolpix S2 Panasonic DMC FX01 DMC LX1S DMC FZ5 Canon IXUS 60 IXUS 600 PowerShot A700 IXUS 700 A620 S80 Fuji Finepix F700 MP3 Distributeur Marque i river N11 T30 T10 Mplayer Sams...

Page 122: ...NFIGURATION DU SYSTÈME 34 34 Navigation dans les menus à l écran 34 Configuration PLUG PLAY 36 Réglage de l horloge 36 Paramétrer un canal 38 Configuration des options de langue 38 Configuration des options du Système 41 Configuration des options audio 43 Configuration des options vidéo 46 Configuration du verrouillage parental 47 Configuration des options d enregistrement LECTURE 49 49 Code régional DVD...

Page 123: ...on de programmation en tant que signal direct 77 Réalisation d un enregistrement programmé 79 Accès à la liste d enregistrements programmés MODIFICATION 81 81 Modification de base Liste de titres 85 Utilisation de la fonction Trier Liste de titres 86 Menu Navigation 87 Sélection du Contenu 87 Modification avancée Liste de lecture 92 Effectuer des copies du disque dur vers un DVD et inversement 93 Co...

Page 124: ...a qualité vidéo est réglée automatiquement de sorte que toutes les vidéos programmées puissent être enregistrées sur l espace disque restant Reportez vous à la page 77 Copie des données à partir d un caméscope numérique à l aide d une prise d entrée DV Enregistrez les données vidéo d un périphérique DV sur des DVD RAM RW R ou sur le disque dur à l aide d une prise d entrée DV IEEE 1394 4 broches 4...

Page 125: ...DVD R RW RAM ou sur le disque dur A MP3 Indique une fonction disponible sur les CD R RW les DVD R RW RAM ou sur le disque dur D DivX Indique une fonction disponible sur les CD R RW les DVD R RW RAM ou sur le disque dur J Attention Désigne une situation dans laquelle un dysfonctionnement est survenu ou des paramètres ont été annulés M REMARQUE Conseils ou consignes permettant à chaque option de fon...

Page 126: ... ne nécessite aucun formatage Utilisation d un DVD RAM Ce type de disque peut être formaté au format Enregistrement DVD Video mode VR Vous pouvez selon vos besoins modifier une image enregistrée créer une liste de lecture et modifier des images selon une séquence spécifique Utilisation d un DVD RW Ce type de disque peut être formaté au format DVD Vidéo mode V ou au format Enregistrement DVDVideo mode...

Page 127: ...iste de lecture DVD RAM RW en mode VR disque dur Ce graveur vous permet de créer une nouvelle liste de lecture sur un même disque et de la modifier sans toucher à l enregistrement original Etape 6 Finalisation et lecture sur d autres composants DVD Afin de pouvoir lire votre DVD sur d autres composants DVD une opération de finalisation peut s avérer nécessaire Terminez d abord toutes les procédures d...

Page 128: ...vercle du compartiment réservé aux piles Si la télécommande ne fonctionne pas correctement Vérifiez la polarité des piles pile sèche Vérifiez que les piles ne sont pas déchargées Vérifiez que des obstacles n entravent pas la course du faisceau provenant du capteur de la télécommande Vérifiez qu aucun éclairage fluorescent ne se trouve à proximité Débarrassez vous des piles conformément à la réglementat...

Page 129: ... le numéro Il est possible que les fonctions mentionnées ci dessus ne puissent pas être activées sur tous les téléviseurs Si vous rencontrez des problèmes faites fonctionner le téléviseur directement M M MARQUE BOUTON SAMSUNG 01 02 03 04 05 06 07 08 09 AIWA 82 ANAM 10 11 12 13 14 15 16 17 18 BANG OLUFSEN 57 BLAUPUNKT 71 BRANDT 73 BRIONVEGA 57 CGE 52 CONTINENTAL EDISON 75 DAEWOO 19 20 23 24 25 26 2...

Page 130: ...haînes préréglées de votre téléviseur Mode Stop Arrêt BOUTON STOP Permet d arrêter la lecture du disque BOUTON REC Pour démarrer l enregistrement BOUTON HDD DVD Sélectionnez le mode HDD DVD TIROIR DISQUE S ouvre pour insérer le disque USB HOST Permet de brancher un appareil photo numérique un lecteur MP3 une carte mémoire Memory Stick un lecteur de carte un disque dur externe ou d autres supports ...

Page 131: ... Permet de connecter un appareil muni d une entrée HDMI 6 DIGITAL AUDIO OUT OPTICAL Pour raccorder un amplificateur muni d une prise d entrée audio numérique optique 7 Connecteur SORTIE PERITEL AV1 TV Permet de connecter un appareil muni d une entrée Péritel 8 SORTIE AUDIO Pour raccorder l entrée audio de l appareil externe à l aide de câbles audio 9 COMPONENT VIDEO OUT Permet de connecter un appar...

Page 132: ...n AFFICHAGE DVD S allume lorsque le mode DVD est sélectionné Témoin AFFICHAGE DISQUE DUR S allume lorsque le mode HDD DISQUE DUR est sélectionné Témoin AFFICHAGE USB S allume lorsque le mode USB USB est sélectionné Témoin du type de disque S allume lorsqu un DVD RW R est chargé Témoin TIMER MINUTERIE S allume pour indiquer le mode enregistrement programmé Témoin HDMI s allume lorsqu un câble HDMI ...

Page 133: ...ite pour le réglage de la fonction de menu Bouton EXIT Permet de quitter l écran de configuration Bouton PLAY LIST TITLE MENU Permet de revenir au menu Titres ou de visualiser la liste des fichiers enregistrés Bouton REC MODE Permet de régler la durée d enregistrement et la qualité de l image souhaitées XP SP LP EP Bouton REC PAUSE TIME SHIFT Permet d interrompre momentanément l enregistrement En mo...

Page 134: ...t le téléviseur Allumez le GRAVEUR DE DVD AVEC DISQUE DUR et le téléviseur Appuyez sur le bouton INPUT SEL de votre télécommande jusqu à ce que le signal vidéo du GRAVEUR DE DVD AVEC DISQUE DUR s affiche à l écran Le câble RF de cet appareil ne transmet que des signaux TV Vous devez connecter le câble Péritel ou les câbles audio vidéo pour visionner un DVD à partir de votre GRAVEUR DE DVD AVEC DISQ...

Page 135: ... AV du téléviseur Allumez le GRAVEUR DE DVD AVEC DISQUE DUR le récepteur satellite magnétoscope ou le syntoniseur numérique et le téléviseur Réglez le mode Entrée sur AV2 Mode TV Appuyez sur le bouton TV DVD de la télécommande les lettres TV s affichent à l écran ou éteignez le GRAVEUR DE DVD AVEC DISQUE DUR Vous pouvez visionner les programmes à partir d un satellite ou du syntoniseur numérique co...

Page 136: ...AL ou Première reçues via le syntoniseur TV intégré sur le graveur Connectez les câbles d antenne RF comme indiqué Reliez le connecteur AV1 du graveur au connecteur Péritel AV du téléviseur à l aide d un câble Péritel Reliez le connecteur AV2 au connecteur Péritel AV du Décodeur Pour regarder ou enregistrer les programmes payants de CANAL réglez votre GRAVEUR DE DVD AVEC DISQUE DUR de manière à re...

Page 137: ...est utilisable que sur les téléviseurs prenant le balayage progressif en charge Sortie de balayage progressif modèle 576p Notez que tous les téléviseurs haute définition ne sont pas entièrement compatibles avec cet appareil et que des parasites peuvent apparaître à l écran lors de la lecture En cas de problèmes d image lors du balayage progressif 576 il est conseillé de raccorder l appareil à la so...

Page 138: ... câbles audio blanc et rouge entre les prises de sortie AUDIO OUT du GRAVEUR DE DVD AVEC DISQUE DUR et les prises d entrée AUDIO IN du téléviseur ou de l amplificateur AV Reportez vous aux pages 27 et 29 Après le raccordement reportez vous aux page 44 Assurez vous que les connexions codées couleur correspondent Les prises de sortie composant Y PB et PR de votre GRAVEUR DE DVD AVEC DISQUE DUR doiven...

Page 139: ...prises de sortie AV Cas 3 Raccordement à un amplificateur AV avec prise de sortie numérique Manufactured under license under U S Patent 5 451 942 other U S and worldwide patents issued pending DTS and DTS Digital Out are registered trademarks and the DTS logos and Symbol are trademarks of DTS Inc 1996 2009 DTS Inc All Rights Reserved Fabriqué sous licence de Dolby Laboratories Dolby et le symbole d...

Page 140: ...configuration raccordement configuration Cas 2 Raccordement à un amplificateur stéréo avec prises de sortie AV Si votre amplificateur stéréo possède uniquement des prises d entrée AUDIO INPUT L et R utilisez les prises de sortie AUDIO OUT Blanc Rouge Front L speaker Front R speaker ...

Page 141: ... à un amplificateur AV avec prise de sortie numérique Si votre amplificateur AV est équipé d un Décodeur numérique Dolby Digital MPEG2 ou DTS et d une prise d entrée numérique utilisez ce raccordement Pour profiter du son Dolby Digital MPEG2 ou DTS vous devrez configurer les paramètres audio En fonction de votre amplificateur branchez un câble optique ou un câble coaxial Reportez vous aux pages 41 42 ...

Page 142: ...ommande du téléviseur jusqu à ce que le signal HDMI du GRAVEUR DE DVD AVEC DISQUE DUR magnétoscope apparaisse à l écran Si l enregistreur de DVD avec disque dur est connecté à votre téléviseur en mode sortie HDMI 1080p vous devez utiliser un câble HDMI haut débit catégorie 2 Cas 2 Raccordement à un téléviseur prise DVI Utilisez un câble DVI non fournis pour raccorder la prise HDMI OUT située à le ...

Page 143: ...ffiche une image claire sur un téléviseur possédant une prise d entrée HDMI Descriptif du raccordement HDMI Connecteur HDMI données vidéo et audio numériques décompressées données LCPM ou flux de données Bien que le GRAVEUR DE DVD AVEC DISQUE DUR utilise un câble HDMI non fournis le GRAVEUR DE DVD AVEC DISQUE DUR n envoie qu un signal numérique pur au téléviseur Si le téléviseur ne prend pas en char...

Page 144: ...eur DV à la prise d entrée DV IN Cas 1 Raccordement d un magnétoscope d un boîtier Décodeur d un lecteur DVD ou d un caméscope aux prises AV 3 IN Connexion d un magnétoscope ou d un périphérique aux prises AV 3 IN du GRAVEUR DE DVD AVEC DISQUE DUR Vous pouvez enregistrer à partir d un appareil connecté magnétoscope boîtier Décodeur lecteur DVD ou caméscope La sélection de la prise AV 3 IN s effect...

Page 145: ...IPHÉRIQUES USB Ces instructions vous permettent de brancher votre ENREGISTREUR DE DVD AVEC DISQUE DUR sur les périphériques USB Branchement d une mémoire USB d un lecteur MP3 et d un appareil photo numérique sur le USB HOST Débrancher le câble USB pendant le transfert des données interrompt la communication et risque d endommager les données enregistrées dans la mémoire En cas d interruption de la...

Page 146: ...QUE DUR au téléviseur à l aide du câble RF et du câble Péritel Pour utiliser le câble HDMI non fournis branchez celui ci avant le câble d alimentation ou une fois la procédure de Configuration Plug Play effectuée Ne branchez pas le câble HDMI lorsque la procédure Configuration Plug Play est en cours Raccordez le GRAVEUR DE DVD AVEC DISQUE DUR à la prise murale AUTO clignote dans l affichage en façade...

Page 147: ... Installation Manuelle voir page 37 La fonction de configuration automatique peut être activée en appuyant sur le bouton STOP de l appareil d une manière continue durant 10 secondes au minimum lorsqu il est hors tension et qu aucun disque n est inséré Vérifiez la date et l heure Si elles sont exactes appuyez sur le bouton OK la date et l heure sont alors sauvegardées Si vous n appuyez pas sur le bou...

Page 148: ...n de la fonction Paramétrer horloge sélectionnez Arrêt 1 2 3 4 5 M PARAMÉTRER UN CANAL Balayage auto Cette fonction vous permet de régler manuellement le tuner à bande du GRAVEUR DE DVD AVEC DISQUE DUR sur l antenne ou le câble quel que soit le dispositif que vous avez branché sur la prise d entrée de l antenne lors de la configuration initiale Appuyez sur le bouton MENU appareil en mode Arrêt Appu...

Page 149: ...mme que vous souhaitez modifier supprimer ou changer puis appuyez sur le bouton de couleur Sélectionnez Édit Supprimer ou Swap Si vous choisissez Édit Bouton ROUGE A vous pouvez ajouter ou éditer les informations relatives au PR programme Après avoir modifié ces informations CH Nom Décodeur MFT Système sélectionnez Enreg puis appuyez sur le bouton OK CH Effectuez une syntonisation du canal à l aide ...

Page 150: ...our sélectionner l option du système souhaitée puis appuyez sur le bouton OK ou Appuyez sur les boutons pour sélectionner l élément souhaité puis appuyez sur le bouton OK ou Réglage de la mise hors tension automatique Cette fonction permet d éteindre automatiquement votre GRAVEUR DE DVD AVEC DISQUE DUR si aucun bouton n est activé pendant une période déterminée Appuyez sur les boutons pour sélecti...

Page 151: ...R DE DVD AVEC DISQUE DUR à l aide de la télécommande du téléviseur Boutons du téléviseur permettant de commander l ENREGISTREUR DE DVD AVEC DISQUE DUR les boutons et le bouton Lorsque vous appuyez sur le bouton Anynet situé sur la télécommande du téléviseur les éléments d affichage à gauche de l écran apparaissent Sélection appareil option permettant de choisir un périphérique Enregistrer option pe...

Page 152: ...ce Vidéo à la demande DivX R à l aide de votre code d enregistrement Pour plus d informations visitez le site www divx com vod DD DVD RECORDER Système DD Bibliothèque Enr par min Gestionnaire de Disque Paramétrer Paramétrer horloge Extinct auto Arrêt Anynet HDMI CEC Marche Enr DivX sSELECT rREVENIR eSORTIE OK Votre code d inscription est XXXXXXXX Pour en savoir plus www divx com vod DivX R Vidéo s...

Page 153: ...possède un Décodeur Dolby Digital ou MPEG 2 Le réglage de la sortie numérique s applique de manière égale aux deux systèmes audio Dolby Digital et MPEG 2 La piste son LPCM est toujours émise en mode PCM Elle n est liée au réglage de la sortie numérique Assurez vous de sélectionner la sortie numérique correcte ou le son ne sera pas perceptible ou sera au contraire très fort DTS Arrêt N émet aucun s...

Page 154: ...NICAM Stéréo NICAM Mono et Bilingue transmission dans une autre langue Les programmes NICAM sont toujours accompagnés d un son mono standard et vous pouvez sélectionner le son désiré en réglant NICAM Marche ou Arrêt Marche mode NICAM Arrêt réglez uniquement sur cette position pour enregistrer le son mono standard durant un programme NICAM si le son stéréo est déformé en raison de conditions de réc...

Page 155: ...haut et en bas de l écran 4 3 Panoramique Sélectionnez cette option pour les téléviseurs de taille classique lorsque vous souhaitez voir la partie centrale de l image au format 16 9 les côtés gauche et droit de l image sont coupés 16 9 Large Vous pouvez voir l image 16 9 en entier sur votre téléviseur à écran large Réduction bruit 3D réduction du bruit adaptable au déplacement Arrêt Normal Marche ...

Page 156: ...onible lorsque la sortie vidéo est composante Ce réglage vous permet de sélectionner le mode progressif Pour afficher le mode de balayage progressif commencez par connecter le câble composant Reportez vous en page 26 Assurez vous que les câbles Composant sont branchés correctement Progressif Le message Voulez vous rester en mode progressif Reverting in 10 seconds s affiche Sélectionnez Oui pour réin...

Page 157: ... via HDMI Réglez l entrée du téléviseur sur HDMI L élément de menu BD Wise apparaîtra seulement si le réglage de BD Wise est spécifié sur Marche La fonction BD wise est activée uniquement lorsque les produits Samsung compatibles BD Wise sont reliés entre eux à l aide du câble HDMI Le balayage progressif se met en route automatiquement dès que le câble HDMI est connecté Assurez vous que HDMI est ind...

Page 158: ... OK ou Appuyez sur les boutons pour sélectionner le niveau de contrôle souhaité puis appuyez sur le bouton OK ou Si vous sélectionnez les niveaux 1 à 6 par exemple les disques comportant un niveau 7 et 8 ne seront pas lus Un nombre plus élevé indique que le programme est réservé à un public adulte A propos du changement du code secret Appuyez sur les boutons pour sélectionner Modif Code Secret pui...

Page 159: ...est créé selon le mode d enregistrement sélectionné Un chapitre sera d une durée d environ 5 minutes en modes XP et SP et d environ 15 minutes en modes LP et EP Appuyez sur le bouton STOP pour arrêter l enregistrement Pour afficher les titres créés finalisez le disque voir page 98 puis appuyez sur le bouton TITLE MENU Le menu des titres s affiche Finalising is generally unnecessary when using a DVD R...

Page 160: ...registrement choisi reportez vous à la pages 49 50 Compatibilité V mode Cette caractéristique concerne la configuration des sélections audio lors d enregistrement d émission NICAM STEREO Multi audio sur le disque dur Elle n affecte pas l enregistrement DVD direct d un programme Arrêt Double G et Double D de l émission multi audio sont enregistrés sur le disque dur Les titres enregistrés sur le disq...

Page 161: ... de zone de ce GRAVEUR DE DVD AVEC DISQUE DUR est indiqué sur le panneau arrière de l appareil LOGOS DES DISQUES COMPATIBLES STEREO CREATOR Dolby Digital DTS Audio numérique Stéréo Système de diffusion adopté au Royaume Uni France Allemagne etc DivX MP3 TYPES DE DISQUE QUI PEUVENT ÊTRE LUS Types de disque Contenu du logo du disque Contenu enregistré Forme du disque Durée de lecture maximale ou min...

Page 162: ... standard 4 LP Lecture longue 6 ou 8 EP Etendu DVD R AUDIO VIDEO Monoface 12cm 4 7Go 1 XP Excellente qualité 2 SP Qualité standard 4 LP Lecture longue 6 ou 8 EP Etendu Double face 12cm 8 5Go 1 h 50 XP Excellente qualité 3 h 40 SP Qualité standard 7 h 20 LP Lecture longue 11 ou 14 h 40 EP Etendu DVD RW AUDIO VIDEO 12cm 4 7Go 1 XP Excellente qualité 2 SP Qualité standard 4 LP Lecture longue 6 ou 8 E...

Page 163: ...e ferme et la lecture du disque se lance automatiquement L enregistreur de DVD avec DISQUE DUR ne lit pas les disques automatiquement après sa mise en marche initiale Lorsque le graveur est mis sous tension alors qu un disque se trouve dans le tiroir l appareil est activé et en attente Appuyez sur PLAY pour lancer la lecture Pour lancer la lecture automatique lorsqu un disque se trouve dans le tir...

Page 164: ...DVD RAM RW VR Appuyez sur le bouton PLAYLIST Cette liste correspond à une plage de lecture créée en sélectionnant une scène dans la liste des titres Lors de la lecture de la liste seule la scène sélectionnée est lue puis la lecture s arrête Seules les informations nécessaires à la lecture d une scène particulière sont comprises dans une liste de lecture Ainsi même si cette liste est supprimée l en...

Page 165: ...CHERCHE 1 2 1 4 1 8 Si vous appuyez sur le bouton RECHERCHE 1 2 1 4 1 8 Pour repasser en lecture à vitesse normale appuyez sur le bouton PLAY La lecture du disque se fait à vitesse lente 1 4 lorsque vous appuyez longuement sur les boutons RECHERCHE en mode pause Si le bouton est relâché l appareil se remet en mode pause La vitesse de lecture réelle peut être différente de la vitesse indiquée pour ...

Page 166: ... Puis appuyez sur le bouton OK Il est possible que cette fonction ne soit pas compatible avec certains disques Lorsqu un CD CD DA audio ou un disque MP3 JPEG est inséré l affichage des informations peut ne pas s effectuer selon le type de disque La fonction de recherche temporelle n est pas compatible avec certains disques Pour que l écran disparaisse appuyez sur le bouton RETURN SÉLECTION DE LA LA...

Page 167: ...s de la lecture Appuyez sur les boutons pour sélectionner Angle Appuyez sur les boutons pour sélectionner l angle souhaité de votre choix Cette fonction dépend du disque et n est pas disponible avec tous les DVD Cette fonction n est pas disponible lorsqu un DVD a été enregistré à l aide d un appareil ne disposant pas d un système à angles de prise de vue multiples Permet d afficher l angle actuel l...

Page 168: ...fonction Lecture normale en appuyant sur le bouton EXIT Les CD Audio CD DA les disques MP3 et DivX ne prennent pas en charge la fonction de répétition A B ZOOM AVANT SZXCVKL Appuyez sur le bouton INFO au cours de la lecture Appuyez sur les boutons pour sélectionner Zoom puis sur le bouton OK ou s affiche Appuyez sur les boutons pour atteindre la zone que vous souhaitez agrandir Appuyez sur le bouto...

Page 169: ...s ne peuvent être ni réglés ni supprimés Seule la lecture est possible Lecture d un marqueur Appuyez sur le bouton MARKER au cours de la lecture Appuyez sur les boutons pour sélectionner une scène marquée Appuyez sur le bouton OK ou PLAY pour lire la scène sélectionnée Pour retourner au début du marqueur appuyez sur le bouton SAUT Appuyez à nouveau sur le bouton au bout de 3 secondes pour revenir ...

Page 170: ...cène est mémorisée Répétez ces étapes pour repérer d autres positions Vous pouvez repérer jusqu à 10 scènes Les signets disparaissent lorsque le tiroir disque est ouvert puis refermé Lecture d un signet Appuyez sur le bouton MARKER au cours de la lecture Appuyez sur les boutons pour sélectionner une scène mise en signet Appuyez sur le bouton OK ou PLAY pour lire la scène sélectionnée Effacement d ...

Page 171: ...lecture REPEAT REPETER 11 Bouton BLEU D permet de sélectionner un contenu disque MP3 uniquement Lecture d un CD audio CD DA Insérez un CD audio CD DA dans le tiroir disque Le menu CD audio s affiche et la lecture chansons démarre automatiquement Appuyez sur les boutons pour sélectionner chanson que vous souhaitez lire puis appuyez sur le bouton OK Eléments affichés à l écran CD Audio CD DA Piste act...

Page 172: ...de Pendant la lecture appuyez de façon répétée sur le bouton REPEAT pour sélectionner le mode de répétition que vous souhaitez Appuyez sur le bouton JAUNE C au cours de la lecture de la Liste musicale Appuyez sur les boutons pour sélectionner le mode de lecture souhaité puis appuyez sur OK ou le bouton Normal CD CD DA et fichier MP3 les pistes du disque sont lues dans l ordre de leur enregistrement...

Page 173: ...puyez sur le bouton OK ou Appuyez sur les boutons pour sélectionner les pistes dans l ordre où vous souhaitez les lire puis appuyez sur le bouton OK Si vous sélectionnez par erreur une piste qui ne vous intéresse pas appuyez sur les boutons pour sélectionner la piste à supprimer puis sur le bouton OK Pour enregistrer la liste de lecture appuyez à nouveau sur le bouton ROUGE A Une nouvelle liste de...

Page 174: ... de la lecture de la Liste musicale Appuyez sur les boutons pour sélectionner Liste de lecture puis appuyez sur le bouton OK ou Appuyez sur les boutons pour sélectionner la Liste de lecture que vous souhaitez modifier Appuyez sur le bouton VERT B en mode Playlist Liste de lecture Appuyez sur les boutons pour sélectionner les pistes dans l ordre où vous souhaitez les lire puis appuyez sur le bouton ...

Page 175: ...ma Appuyez sur le bouton BLEU D pour sélectionner Contenu Appuyez sur les boutons pour sélectionner Photo avec Mus puis sur le bouton OK ou La liste des photos s affiche voir page 64 Pour activer cette fonction sélectionnez le disque contenant à la fois des fichiers musicaux et des fichiers photo 1 1 2 M 1 2 M 1 2 M CD Liste de lecture Q TRACK04 U 1 4 eSORTIE No Titre Longueur Y PLAYLIST01 R TRACK04 ...

Page 176: ...ctionnée Vous pouvez accéder à la Liste de photos en appuyant sur le bouton JAUNE C Pour mettre fin au diaporama Appuyez sur le bouton VERT B STOP ou RETURN Tourner Pour la configuration suivez les étapes 1 et 4 ci dessus 5 1 Appuyez sur le bouton VERT B pour sélectionner Tourner Appuyez sur les boutons pour sélectionner l angle de rotation puis appuyez sur le bouton OK ou Une fois l angle de rotati...

Page 177: ...ectionner l élément souhaité puis appuyez sur le bouton OK ou Nom suivant l ordre alphabétique Taille en fonction de la taille des fichiers photo Vous pouvez procéder au tri en fonction du nom et de la taille La liste est à nouveau triée selon l ordre de copie en accédant à nouveau à la Liste de photos Sélection du Contenu Pour la configuration suivez les étapes 1 à 3 de la page 64 Appuyez sur le bo...

Page 178: ...us pour accélérer la vitesse de recherche X 2 X 4 X 8 Lecture lente En mode Pause appuyez sur le bouton RECHERCHE de la télécommande 1 2 1 4 1 8 La lecture arrière en vitesse lente n est pas disponible Lecture par étape En mode Pause appuyez sur le bouton SAUT de la télécommande La lecture arrière en mode pas à pas n est pas disponible Certains fichiers DivX créés sur ordinateur peuvent ne pas être...

Page 179: ...ur le bouton VERT B pour sélectionner Trier Appuyez sur les boutons pour sélectionner l élément souhaité puis appuyez sur le bouton OK ou Nom suivant l ordre alphabétique Taille en fonction de la taille des fichiers DivX Vous pouvez procéder au tri en fonction du nom et de la taille La liste est à nouveau triée selon l ordre de copie en accédant à nouveau à la Liste DivX Sélection du Contenu Appuye...

Page 180: ...Appareil d enregistrement Finalisation Enregistrement complémentaire dans l enregistreur Samsung DVD RAM Mode VR Samsung X Enregistrable Autre compagnie X Enregistrable DVD RW Mode VR Samsung finalisé Arrêt enregistrable non finalisé Enregistrable Autre compagnie finalisé Arrêt enregistrable non finalisé Enregistrable Mode V Samsung finalisé Arrêt enregistrable non finalisé Enregistrable Autre compagnie...

Page 181: ...ge démarre automatiquement DVD RW formatez le disque avant utilisation DVD RW initialisez le disque avant utilisation Si vous souhaitez changer le mode VR ou V reportez vous à la rubrique Formatage d un disque page 98 DVD R Le formatage d un disque n est pas nécessaire et seul l enregistrement en mode Vidéo est pris en charge DVD RAM DVD RW mode VR Ce mode permet des fonctions de modification multi...

Page 182: ...773 Recording Mode Mode d enregistrement Durées d enregistrement DD Disque dur 160Go DVD RAM RW R XP mode Haute qualité Env 33 heures Env 1 heure environ 8 5 Mbps SP mode Qualité standard Env 67 heures Env 2 heures environ 4 5 Mbps LP mode Enregistrement long Env 133 heures Env 4 heures environ 2 Mbps EP mode Etendu Env 199 heures Env 264 heures Env 6 heures environ 1 6 Mbps Env 8 heures environ 1...

Page 183: ...rôle de copie Les émissions de télévision contenant des signaux de contrôle de copie peuvent présenter l un des trois types de signaux suivants Copie libre Une seule copie et Aucune copie Si vous souhaitez enregistrer un programme du type Une seule copie utilisez un disque DVD RW avec CPRM en mode VR et un DVD RAM HDD Type de signal Support Copy Free Copie libre Copy Once Une seule copie Copy Neve...

Page 184: ...la vitesse d enregistrement qualité SP LP EP XP Appuyez sur le bouton REC Les informations concernant la chaîne s affichent à l écran et l enregistrement est lancé L icône REC apparaît sur la façade Enregistrement à partir d un appareil externe en cours de visionnage Appuyez sur le bouton INPUT SEL pour sélectionner la source d entrée en fonction du branchement effectué L affichage en façade change ...

Page 185: ...ra automatiquement si une image protégée contre la copie est sélectionnée Les disques DVD RAM RW peuvent être formatés avant de lancer l enregistrement La plupart des nouveaux disques sont vendus non formatés N utilisez pas de disques DVD R d auteur avec cet appareil COPIE À PARTIR D UN CAMÉSCOPE SXCVKL Vous pouvez commander votre caméscope à l aide de l interface IEEE1394 DV Raccordez la prise de...

Page 186: ...ez sur le bouton OPEN CLOSE et placez un disque enregistrable sur le tiroir disque Appuyez sur le bouton OPEN CLOSE pour fermer le tiroir disque Attendez la disparition de LOAD sur l affichage en façade Actionnez les boutons PROG ou les touches numériques pour sélectionner le programme que vous souhaitez enregistrer Appuyez sur le bouton REC pour lancer l enregistrement Appuyez sur le bouton REC de...

Page 187: ...on OK ou PLAY La lecture s effectue à partir du début du titre en cours d enregistrement Utilisation du bouton MENU Appuyez sur le bouton MENU pendant que l appareil est en mode enregistrement Sélectionnez le Titre à l aide des boutons et appuyez sur le bouton OK Appuyez sur les boutons SAUT pour sélectionner la liste de titres en cours d enregistrement puis sur le bouton OK ou Ainsi le titre que ...

Page 188: ...n est actuellement en cours Permet d afficher l état actuel Point de visionnage Durée de lecture actuelle 5 Point direct 6 Temps direct 7 Barre Programmation Boutons de la télécommande servant à la fonction Programmation Bouton PLAY lecture Bouton PAUSE interrompt le programme télévisé en cours Boutons RECHERCHE Fast play X 2 X 4 X 8 X 16 X 32 X 128 Bouton SKIP Bouton STOP Permet de passer au Point...

Page 189: ...mode d enregistrement le plus adapté est réglé automatiquement en fonction du temps restant sur le disque et de la durée de l enregistrement programmé Cette fonction est sélectionnée uniquement dans un mode parmi les modes XP SP LP et EP XP haute qualité Sélectionnez cette option lorsque la qualité vidéo est importante SP qualité standard Sélectionnez cette option pour enregistrer en qualité stand...

Page 190: ...es d enregistrement ou lorsque l enregistrement précédent se termine avec deux minutes d avance sur l heure de départ de l enregistrement suivant Vous pouvez effectuer jusqu à 12 enregistrements programmés Si le disque dur ne dispose plus d espace disponible pour l enregistrement clignote Cela signifie que le disque dur ne dispose plus d espace libre pour effectuer l enregistrement Si vous avez pro...

Page 191: ... section Réalisation d un enregistrement programmé en page 75 Appuyez sur les boutons pour sélectionner le numéro de la Liste programmée que vous souhaitez supprimer puis appuyez sur le bouton VERT B Vous serez sollicité par le message de confirmation de suppression Souhaitez vous supprimer Appuyez sur les boutons pour sélectionner Oui puis appuyez sur le bouton OK L entrée sélectionnée est supprim...

Page 192: ...ée 3 1 Appuyez sur le bouton JAUNE C 4 4 DD Liste enregistrée mDÉPLA sSELECT rREVENIR eSORTIE Supprimer Supprimer tout Liste programée No Vers Source Date Démarrage Fin Mode V P Statut 01 DD PR 01 Jan 01 17 30 18 30 SP Marche OK 02 DD PR 01 Jan 01 21 00 22 00 SP Marche OK 03 DD PR 01 Jan 01 23 15 23 45 SP Marche OK Souhaitez vous supprimer une liste enregistrée Non Oui DD Liste programmée Heure Ac...

Page 193: ... sélectionner une entrée que vous souhaitez renommer dans la Liste de titres puis appuyez sur le bouton ROUGE A Appuyez sur les boutons pour sélectionner Renommer puis appuyez sur le bouton OK ou L écran Renommer s affiche Sélectionnez les caractères nécessaires à l aide des boutons puis appuyez sur le bouton OK Espace Libre bouton ROUGE A Supprime le caractère précédent et fait reculer le curseur ...

Page 194: ...yez sur le bouton OK ou Appuyez sur les boutons pour sélectionner Marche puis appuyez sur le bouton OK L icône de verrouillage sur la fenêtre d information de l entrée sélectionnée passe à l état verrouillé 1 0 Si vous souhaitez annuler la protection sélectionnez Arrêt de l étape 5 et appuyez sur le bouton OK Le symbole du cadenas passe à l état déverrouillé 0 1 Sélectionner Sélect tout dans le me...

Page 195: ... affiche Appuyez sur les boutons pour sélectionner Oui puis appuyez sur le bouton OK Vous pouvez supprimer une entrée protégée Si vous souhaitez supprimer une entrée protégée sélectionnez Arrêt dans le menu Protection titre Reportez vous à la page 82 Lorsque la protection du disque est réglée sur Protégé vous ne pouvez pas supprimer des titres Reportez vous à la page 96 Une fois une entrée supprimé...

Page 196: ...lectionner une entrée que vous souhaitez modifier dans la Liste de titres puis appuyez sur le bouton ROUGE A Le point de fin ne peut pas précéder le point de début Appuyez sur les boutons pour sélectionner Suppression partielle puis appuyez sur le bouton OK ou N 1 2 3 4 5 6 N 1 2 3 DD Séparer JAN 01 2009 17 30 PR1 DÉPLA sSELECT rREVENIR eSORTIE Liste de titres No 001 Lect Pause BALAY Séparer 1 Sépar...

Page 197: ...ES SXCVKL Si vous souhaitez changer l ordre de tri de la Liste de titres Lorsque la liste des menus est affichée appuyez sur le bouton VERT B pour sélectionner Trier Appuyez sur les boutons pour sélectionner l élément souhaité puis appuyez sur le bouton OK ou Date en fonction de la date d enregistrement des titres Name suivant l ordre alphabétique Longueur en fonction de la longueur des titres enre...

Page 198: ...outon TITLE LIST appareil en mode Stop ou Lecture Appuyez sur les boutons pour sélectionner une entrée à lire dans la Liste de titres puis appuyez sur le bouton JAUNE C Appuyez sur les boutons pour sélectionner Navigation par Scène puis appuyez sur le bouton OK ou Appuyez sur les boutons pour sélectionner la scène souhaitée puis appuyez sur le bouton OK ou PLAY La Navigation par Scène ne fonctionn...

Page 199: ...cène s affiche Répétez les étapes 4 à 6 pour réaliser une scène pour la liste de lecture La nouvelle scène est ajoutée à la liste de lecture actuelle Vous pouvez vérifier et visualiser l ensemble des scènes sur l écran Édit la liste de lecture Reportez vous à la page 89 Création d une nouvelle liste de lecture Répétez les étapes 1 à 6 si vous souhaitez établir une nouvelle liste de lecture Appuyez s...

Page 200: ...bouton OK Espace Libre bouton ROUGE A Supprime le caractère précédent et fait reculer le curseur d une position Espace bouton VERT B Entre un espace et fait avancer le curseur d une position vers la droite Effacer bouton JAUNE C Supprime tous les caractères saisis Enreg bouton BLEU D Enregistre les caractères saisis Appuyez sur le bouton BLEU D pour sélectionner Enreg Le titre changé s affiche dans...

Page 201: ...t de départ s affichent dans la fenêtre de démarrage Sélectionnez le point de début ou de fin de la section que vous souhaitez modifier à l aide des boutons liés à la lecture PLAY RECHERCHE SAUT Appuyez sur le bouton OK au point final de la scène L image ainsi que l heure du point final s affichent dans la fenêtre Fin Appuyez sur les boutons pour sélectionner Changer puis appuyez sur le bouton OK La scè...

Page 202: ...le bouton OK au point final de la scène L image ainsi que l heure du point final s affichent dans la fenêtre Fin Pour annuler appuyez sur les boutons pour sélectionner Termi puis appuyez sur le bouton OK Appuyez sur les boutons pour sélectionner Ajout puis appuyez sur le bouton OK La partie que vous souhaitez ajouter est insérée avant la scène sélectionnée lors de l étape 4 1 d ajout d une scène Supp...

Page 203: ...VERT B pour sélectionner Trier Appuyez sur les boutons pour sélectionner l élément souhaité puis appuyez sur le bouton OK ou Date en fonction de la date de création des listes de lecture Nom suivant l ordre alphabétique Vous pouvez procéder au tri en fonction de la date et du nom La liste est à nouveau triée selon l ordre de copie en accédant à nouveau à la Liste de lecture N 1 2 3 4 5 M 1 2 M DD ...

Page 204: ...e LOAD sur l affichage en façade Vérifiez que le disque dispose de suffisamment d espace pour l enregistrement Sélectionnez le mode souhaité en appuyant sur le bouton HDD ou DVD de la télécommande Vous pouvez également sélectionner le mode souhaité en appuyant sur le bouton HDD DVD situé en façade de l appareil Appuyez sur le bouton TITLE LIST appareil en mode Stop ou Lecture Appuyez sur le bouton CO...

Page 205: ...s de copie du contenu Contenu HDD DVD ou USB DVD HDD ou USB USB HDD ou DVD MP3 Pris en charge Pris en charge Pris en charge JPEG photo Pris en charge Pris en charge Pris en charge DivX Pris en charge Pris en charge Pris en charge CD DA Arrêt pris en charge Pris en charge Arrêt pris en charge Disque CD R CD DA CD RW DVD RAM DVD R Finaliser DVD RW DVD RW Finaliser HDD ou USB HDD DVD R DVD RW V ou US...

Page 206: ...ez créer un nouveau dossier en appuyant sur le bouton VERT B Appuyez sur le bouton ROUGE A pour sélectionner Démarrer copie Le message Nombre d éléments x s affiche Appuyez sur les boutons pour sélectionner Démarrage puis sur le bouton OK La copie des fichiers démarre Les sous dossiers ainsi que les fichiers du dossier sélectionné sont copiés Pour annuler la copie en cours appuyez sur le bouton EXIT ...

Page 207: ... s affiche Sélectionnez les caractères de votre choix à l aide des boutons puis appuyez sur le bouton OK Espace Libre bouton ROUGE A supprime le caractère précédent et fait reculer le curseur d une position Espace bouton VERT B ajoute un espace et déplace le curseur vers l avant vers la droite Effacer bouton JAUNE C supprime tous les caractères saisis Enreg bouton bleu D enregistre les caractères s...

Page 208: ...U appareil en mode Arrêt Appuyez sur les boutons pour sélectionner Gestionnaire de Disque puis appuyez sur le bouton OK ou Appuyez sur les boutons pour sélectionner Protection puis appuyez sur le bouton OK Appuyez sur les boutons pour sélectionner Marche puis appuyez sur le bouton OK 1 2 3 4 5 M 1 2 3 4 DVD RAM Gestionnairede Disque DÉPLA sSELECT rREVENIR eSORTIE Nom du Disque DVD VR Espace utilis...

Page 209: ...résence d une entrée protégée La fonction Supprimer toutes les listes de titres ne fonctionne pas Néanmoins s il y a un titre contenant une image fixe cette fonction ne sera pas opérationnelle Si vous souhaitez supprimer une entrée protégée désactivez sa protection dans l élément Verrouiller Appuyez sur les boutons pour sélectionner Titre DivX Musique ou Photo puis sur le bouton OK Appuyez sur les ...

Page 210: ...RAM RW DVD RW DVD R Pour les disques DVD RW le format DVD Video mode V V et le format DVD Video enregistrement DVD enregistrement vidéo mode VR EV ne font aucune différence Finalisation d un disque CVL Après avoir enregistré les titres sur un disque DVD RW DVD R avec votre GRAVEUR DE DVD AVEC DISQUE DUR vous devez finaliser le disque avant de pouvoir le lire sur d autres appareils Appuyez sur le bo...

Page 211: ... puis appuyez sur le bouton OK Vous serez sollicité par le message de confirmation Souhaitez vous ne pas finaliser le disque Appuyez sur les boutons pour sélectionner Oui puis appuyez sur le bouton OK Le message Le disque ne sera pas finalisé Souhaitez vous continuer s affiche Appuyez sur les boutons pour sélectionner Oui puis appuyez sur le bouton OK Le disque n est pas finalisé Un DVD RW peut être fin...

Page 212: ...disponible pour le moment 4 Vous avez demandé un titre un chapitre ou une heure de balayage hors limites Les paramètres du mode lecture sont différents des paramètres configurés dans le menu Paramètres Le disque ne prend pas en charge toutes les fonctions sélectionnées Dans ce cas certains paramètres configurés dans le menu des paramètres peuvent ne pas fonctionner correctement Impossible de changer...

Page 213: ...charge le système HDMI Si l image qui s affiche à l écran est brouillée cela signifie que le téléviseur ne prend pas en charge le système de protection du contenu numérique à large bande passante HDCP Ecran de sortie HDMI anormal S il y a un bruit de neige à l écran cela veut dire que le téléviseur n est pas compatible au HDCP High bandwidth Digital Content Protection Scintillement à la sortie HDMI ...

Page 214: ...logique Sortie audio numérique optique coaxiale Vidéo Vidéo composite 1 prise de sortie vidéo 1 sortie composant Y 1 0Vp p Pb 0 70Vp p Pr 0 70Vp p at 75 load HDMI DVI 576p 720p 1080i 1080p Prise Péritel AV1 Péritel TV Vidéo Composite RVB Audio analogique Enregistrem ent Format de compression d image MPEG II Format de compression audio Dolby Digital 2 canaux 256Kbps MPEG II Qualité d enregistrement...

Page 215: ...r work which contains a notice placed by the copyright holder saying it may be distributed under the terms of this General Public License The Program below refers to any such program or work and a work based on the Program means either the Program or any derivative work under copyright law that is to say a work containing the Program or a portion of it either verbatim or with modifications and or ...

Page 216: ...e not required to accept this License since you have not signed it However nothing else grants you permission to modify or distribute the Program or its derivative works These actions are prohibited by law if you do not accept this License Therefore by modifying or distributing the Program or any work based on the Program you indicate your acceptance of this License to do so and all its terms and ...

Page 217: ... the start of each source file to most effectively convey the exclusion of warranty and each file should have at least the copyright line and a pointer to where the full notice is found One line to give the program s name and a brief idea of what it does Copyright C year name of author This program is free software you can redistribute it and or modify it under the terms of the GNU General Public ...

Page 218: ...a company cannot effectively restrict the users of a free program by obtaining a restrictive license from a patent holder Therefore we insist that any patent license obtained for a version of the library must be consistent with the full freedom of use specified in this license Most GNU software including some libraries is covered by the ordinary GNU General Public License This license the GNU Less...

Page 219: ...n supplied function or table used by this function must be optional if the application does not supply it the square root function must still compute square roots These requirements apply to the modified work as a whole If identifiable sections of that work are not derived from the Library and can be reasonably considered independent and separate works in themselves then this License and its terms...

Page 220: ...have already sent this user a copy For an executable the required form of the work that uses the Library must include any data and utility programs needed for reproducing the executable from it However as a special exception the materials to be distributed need not include anything that is normally distributed in either source or binary form with the major components compiler kernel and so on of t...

Page 221: ...LIBRARY TO THE EXTENT PERMITTED BY APPLICABLE LAW EXCEPT WHEN OTHERWISE STATED IN WRITING THE COPYRIGHT HOLDERS AND OR OTHER PARTIES PROVIDE THE LIBRARY AS IS WITHOUT WARRANTY OF ANY KIND EITHER EXPRESSED OR IMPLIED INCLUDING BUT NOT LIMITED TO THE IMPLIED WARRANTIES OF MERCHANTABILITY AND FITNESS FOR A PARTICULAR PURPOSE THE ENTIRE RISK AS TO THE QUALITY AND PERFORMANCE OF THE LIBRARY IS WITH YOU...

Page 222: ... ce produit 2 SAMSUNG ELECTRONICS FRANCE se réserve le droit de refuser la garantie si tout ou partie de ces mentions a été enlevé ou modifié après l acquisition du produit par le client chez le distributeur 3 Ce produit ne sera jamais considéré comme défectueux en matière ou en fabrication s il doit être adapté changé ou réglé afin d être conforme aux standards techniques ou de sécurité nationaux...

Page 223: ...it LUXEMBURG 02 261 03 710 www samsung com lu NETHERLANDS 0900 SAMSUNG 0900 7267864 0 10 Min www samsung com nl NORWAY 3 SAMSUNG 7267864 www samsung com no POLAND 0 801 1SAMSUNG 172678 022 607 93 33 www samsung com pl PORTUGAL 80820 SAMSUNG 726 7864 www samsung com pt SLOVAKIA 0800 SAMSUNG 726 7864 www samsung com sk SPAIN 902 1 SAMSUNG 902 172 678 www samsung com es SWEDEN 075 SAMSUNG 726 78 64 w...

Page 224: ... recyclage Les entreprises et professionnels sont invités à contacter leurs fournisseurs et à consulter les conditions de leur contrat de vente Ce produit et ses accessoires ne peuvent être jetés avec les autres déchets professionnels et commerciaux AK68 01787C Elimination des batteries de ce produit Applicable aux pays de l Union européenne et aux autres pays européens dans lesquels des systèmes ...

Page 225: ...n d e n b o r r e b e ongekende mogelijkheden Bedankt voor het aanschaffen van dit Samsung product Registreer uw product op www samsung com register voor een zo compleet mogelijke service DVD gebruiksaanwijzing DVD HR773 DVD HR775 DVD HR777 ...

Page 226: ...lektrische apparaten zoals radio s en televisies om elektromagnetische storingen te voorkomen BELANGRIJKE OPMERKING De voedingskabel van deze apparatuur wordt geleverd met een gegoten stekker die een zekering bevat De waarde van de zekering vindt u aan de kant van de polen van de stekker Als u de zekering van de stekker moet vervangen gebruik dan een zekering met dezelfde waarde die voldoet aan de...

Page 227: ...araat te verplaatsen om te voorkomen dat het toestel of het karretje kantelt en eventueel tot verwondingen leidt Haal de stekker van het apparaat uit het stopcontact tijdens onweer met bliksem of wanneer het apparaat langere tijd niet worden gebruikt Laat onderhoud en reparaties over aan een gekwalificeerde monteur Reparaties zijn nodig als het apparaat is beschadigd bijvoorbeeld als het stroomsnoe...

Page 228: ...n gegane gegevens niet worden hersteld De vaste schijf dient slechts voor tijdelijke opslag Gebruik van schijven Gebruik alleen schijven met een normale vorm Als een schijf met een speciale vorm wordt gebruikt kan deze HDD DVD RECORDER beschadigd raken Schijven vasthouden Raak het oppervlak van de schijf niet aan op de plaats waar de opname is uitgevoerd DVD RAM DVD RW en DVD R Reinig deze schijve...

Page 229: ...speeld Als de CD R RW niet in een afgesloten sessie is opgenomen kan een vertraging optreden tijdens de eerste afspeeltijd en worden mogelijk niet alle opgenomen bestanden afgespeeld Sommige CD R RW s kunnen mogelijk niet met dit apparaat worden afgespeeld Dit hangt af van het apparaat dat is gebruikt om deze CD R RW s te branden Voor de inhoud van cd s die voor persoonlijk gebruik op CD R RW s zi...

Page 230: ...en op deze recorder kan niet altijd op andere DVD spelers afgespeeld worden Zie de gebruiksaanwijzing voor de speler om de compatibiliteit met deze DVD RAM schijven te bepalen Verwijder bij DVD RAM schijven in cartridges de cartridge en gebruik alleen de schijf Schijf kopiëren Inhoud kopieerspecificaties Inhoud HDD DVD DVD HDD Titel opgenomen video Ondersteund Ondersteund Titel met kopieerbeveiligi...

Page 231: ...opnames Bij het gebruik van DVD RAM RW R schijven van slechte kwaliteit kunnen onverwachte problemen ontstaan met inbegrip van opnamefouten het verlies van opgenomen of bewerkt materiaal of beschadiging van de HDD DVD RECORDER Schijfindelingen MP3 schijven CD R RW DVD RAM RW R HDD USB schijven waarop MP3 bestanden zijn opgeslagen die zijn opgenomen in de indeling UDF ISO9660 of JOLIET kunnen worden...

Page 232: ...aten zoals digitale fotocamera s De USB hostpoort biedt de mogelijkheid tot USB2 0 verbinding en wederzijdse compatibiliteit met USB1 1 USB1 0 apparaten Ondersteunde apparaten voor hostpoort Apparaten voor massaopslag Digitale fotocamera MP3 speler Geheugenstick Kaartlezer met één of meer sleuven Externe vaste schijf ondersteunt alleen HDD s met FAT32 indeling Overige verwijderbare opslagapparaten...

Page 233: ...ie met vele andere USB apparaten kan worden gebruikt Digitale fotocamera Merk Type Samsung VP MS11 S800 Pro815 V20 V10 D60 UCA5 Sony DSC W50 DSC R1 DSC P200 DSC P150 Olympus C 70 zoom SP 700 FE5500 C 470Z Nikon Coolpix 7900 Coolpix p3 Coolpix S2 Panasonic DMC FX01 DMC LX1S DMC FZ5 Canon IXUS 60 IXUS 600 PowerShot A700 IXUS 700 A620 S80 Fuji Finepix F700 MP3 Merk Type i river N11 T30 T10 Mplayer Sa...

Page 234: ...Aansluiten op USB apparaten SYSTEEM INSTALLATIE 34 34 Menunavigatie op het TV scherm 34 PLUG PLAY instellen 36 De klok instellen 36 Zenderinstelling 38 De taalopties instellen 38 De systeemopties instellen 41 De geluidsopties instellen 43 De video opties instellen 46 Het kinderslot instellen 47 De opnameopties instellen AFSPELEN 49 49 Regiocode alleen DVD Video 49 Logo s van schijven die kunnen wo...

Page 235: ...g opnemen en afspelen 76 De functie Time Shift als live signaal 77 Een timer opname maken 79 Ga naar de Opnamelijst BEWERKEN 81 81 Basisbewerking Titellijst 85 De functie Sorteren gebruiken Titellijst 86 Navigatiemenu 87 Inhoud selecteren 87 Geavanceerd bewerken Afspeellijst 92 Kopiëren van HDD naar DVD of Vice versa 93 Het kopiëren van MP3 JPEG of Divx 95 De naam van een muziek foto of DivX besta...

Page 236: ...imer opnamen Als de modus FR Flexibele opname is geselecteerd wordt de beeldkwaliteit automatisch zodanig aangepast dat al het op te nemen beeldmateriaal op de vrije schijfruimte past zie pagina 44 Gegevens van een digitale camcorder kopiëren met behulp van een DV ingang Video van een DV apparaat via de DV ingang IEEE 1394 4pin 4pin opnemen op hdd of DVD RAM RW R schijven zie pagina 73 Progressief...

Page 237: ...beschikbare functie voor CD R RW DVD R RW RAM schijven of HDD A MP3 Een beschikbare functie voor CD R RW DVD R RW RAM schijven of HDD D DivX Een beschikbare functie voor CD R RW DVD R RW RAM schijven of HDD J Let op Een situatie waarin een functie niet werkt of instellingen mogelijk worden geannuleerd M OPMERKING Tips of aanwijzingen die de werking van elke functie bevorderen N Eenmaal drukken Een...

Page 238: ...ijf Formatteren niet nodig Bij gebruik van een DVD RAM Dit schijftype kan in de DVD video opnameindeling VR modus worden geformatteerd U kunt opgenomen beelden bewerken en een afspeellijst in de gewenste volgorde maken Bij gebruik van DVD RW Dit schijftype kan in de DVD video indeling V modus of de DVD Video opnameindeling VR modus worden geformatteerd Wanneer u een lege schijf plaatst wordt u gev...

Page 239: ...men vergrendelen Een afspeellijst maken DVD RAM RW in VR modus vaste schijf Met deze recorder kunt u een nieuwe afspeellijst op dezelfde schijf maken en bewerken zonder dat de originele opname wordt gewijzigd Stap 6 Afsluiten en op andere DVD apparaten afspelen Wanneer u de DVD op andere DVD apparaten wilt afspelen is het soms nodig deze af te sluiten Zorg dat u klaar bent met alle bewerkingen en ...

Page 240: ...recte polariteit en Schuif het batterijklepje weer op de afstandsbediening Als de afstandsbediening niet correct werkt Controleer de polariteit van de batterijen Dry Cell Controleer of de batterijen leeg zijn Controleer of de sensor van de afstandsbediening niet door voorwerpen wordt geblokkeerd Controleer of er tl verlichting in de directe omgeving is Gooi de batterijen weg volgens de milieuwette...

Page 241: ...rechtstreeks in De bovenstaande functies werken niet altijd bij alle televisies Als u problemen ondervindt gebruikt u de toetsen op de televisie zelf M M MERK TOETS SAMSUNG 01 02 03 04 05 06 07 08 09 AIWA 82 ANAM 10 11 12 13 14 15 16 17 18 BANG OLUFSEN 57 BLAUPUNKT 71 BRANDT 73 BRIONVEGA 57 CGE 52 CONTINENTAL EDISON 75 DAEWOO 19 20 23 24 25 26 27 28 29 30 31 32 33 34 EMERSON 64 FERGUSON 73 FINLUX ...

Page 242: ...lmodus Hiermee selecteert u voorgedefinieerde tv kanalen Stopmodus TOETS STOP Hiermee stopt u het afspelen van de schijf TOETS REC Hiermee start u de opname TOETS HDD DVD Hiermee selecteert u de HDD DVD modus SCHIJFLADE Deze kan worden geopend om een schijf te plaatsen USB host Een digitale fotocamera MP3 speler geheugenstick kaartlezer externe HDD of ander verwijderbaar opslagapparaat aansluiten 1...

Page 243: ...HDMI OUT Aansluiten op apparatuur met een HDMI ingang 6 DIGITAALAUDIO UIT OPTISCH Hierop sluit u een versterker met een digitale optische audio ingang aan 7 Aansluiting voor AV1 TV OUTPUT SCART stekker Aansluiten op apparatuur met een SCART ingang 8 AV AUDIO UIT Hierop sluit u de audio ingang van externe apparatuur met audiokabels aan 9 COMPONENT VIDEO UIT Hierop sluit u apparatuur met een compone...

Page 244: ...brandt DVD VIEW aanduiding brandt wanneer de DVD modus is geselecteerd HDD VIEW aanduiding brandt HDD modus wordt geselecteerd USB VIEW aanduiding brandt wanneer de USB modus wordt geselecteerd Aanduiding schijfmedia brandt wanneer er een DVD RW R schijf wordt geladen TIMER aanduiding Gaat branden bij timer opnamen HDMI aanduiding brandt wanneer HDMI is aangesloten REC aanduiding Gaat branden in d...

Page 245: ...mhoog naar links of naar rechts te gaan in het menu Toets EXIT Druk op deze knop om het instellingenmenu te verlaten Toets PLAY LIST TITLE MENU Hiermee keert u terug naar het Titelmenu of geeft u de lijst met opgenomen bestanden weer Toets REC MODE Druk hierop om de gewenste opnametijd en beeldkwaliteit in te stellen XP SP LP EP Toets REC PAUSE TIME SHIFT Druk hierop om te pauzeren tijdens het opn...

Page 246: ...HDD DVD RECORDER en de TV in Druk op de toets INPUT SEL op uw afstandbediening totdat op het scherm van uw tv het videosignaal van de HDD DVD RECORDER wordt weergegeven De RF kabelverbinding van dit product verzendt alleen tv signalen U moet audio videokabels aansluiten om een DVD schijf vanaf uw HDD DVD RECORDER te kunnen bekijken Als u de HDD DVD RECORDER uitzet kunt u programma s bekijken die v...

Page 247: ...aan op de SCART AV aansluiting op de tv Zet de HDD DVD RECORDER video satellietontvanger of digitale ontvanger en tv aan Stel de ingangsmodus in op AV2 TV modus Druk op de knop TV DVD op de afstandsbediening zodat TV wordt weergegeven op het voorpaneel of zet de HDD DVD RECORDER uit U kunt programma s bekijken van een satelliet of digitale tuner die is aangesloten op deze HDD DVD RECORDER zelfs al...

Page 248: ...en via de ingebouwde tv tuner in de HDD DVD RECORDER Sluit de RF antennekabels aan zoals is weergegeven Gebruik een SCART kabel om de AV1 aansluiting op deze recorder aan te sluiten op de AV SCART aansluiting op de tv Sluit de AV2 aansluiting aan op een AV SCART aansluiting op de decoderbox Als u naar betaaltelevisie kijkt zoals Canal programma s of deze opneemt moet u de HDD DVD RECORDER zodanig ...

Page 249: ... wordt verzonden wat resulteert in een stabieler flikkervrijer duidelijker beeld dan interlaced video Dit is alleen mogelijk bij TV s die progressief scannen ondersteunen Progressieve scanuitgang 576p niet iedere hoge definitie TV set is volledig compatibel met dit product Dit kan ervoor zorgen dat niet alle beelden juist worden weergegeven Als u problemen ondervindt met 576 progressive scan wordt u...

Page 250: ...ezette kleurweergave Gebruik audiokabels wit en rood om de audio uitgangen op de HDD DVD RECORDER aan te sluiten op de audio ingangen op de TV of AV versterker zie pagina 27 29 Raadpleeg na het aansluiten pagina 44 Zorg ervoor dat de kleurgecodeerde aansluitingen overeenkomen De Y PB PR componentuitgangen van de HDD DVD RECORDER moeten worden aangesloten op de exact overeenkomende componentingange...

Page 251: ...ker met AV uitgangen Situatie 3 Aansluiten op een AV versterker met een digitale uitgang Gefabriceerd onder licentie van het Amerikaanse patentnummer 5 451 942 en andere Amerikaanse en elders in de wereld verstrekte en aangevraagde patenten DTS en DTS Digital Out zijn geregistreerde handelsmerken en het DTS logo en symbool zijn handelsmerken van DTS Inc 1996 2009 DTS Inc Alle rechten voorbehouden ...

Page 252: ...r e b e 28_ aansluiten en instellen aansluiten en instellen Situatie 2 Aansluiten op een stereoversterker met AV uitgangen Gebruik de audio uitgangen als uw stereoversterker alleen audio ingangen L en R heeft Wit Rood Voorste speaker L Voorste speaker R ...

Page 253: ... Situatie 3 Aansluiten op een AV versterker met een digitale uitgang Gebruik deze aansluiting als uw versterker een Dolby Digital MPEG2 of DTS decoder en een digitale ingang heeft Voor Dolby Digital MPEG2 of DTS geluid moet u de geluidsinstellingen instellen Aansluiten op een optische kabel of coaxkabel afhankelijk van uw versterker zie pagina 41 42 ...

Page 254: ...ndsbediening waarmee u de ingang kunt selecteren totdat op het scherm van uw tv het HDMI signaal van de DVD Recorder wordt weergegeven Als de HDD DVD RECORDER op uw tv is aangesloten in de HDMI 1080p uitgangsmodus moet u een High Speed HDMI kabel categorie 2 gebruiken Situatie 2 Aansluiten op een tv met een DVI aansluiting Verbind met een DVI adapterkabel niet bijgeleverd het HDMI OUT contact aan ...

Page 255: ...uidskanalen ondersteunt Door middel van HDMI verzendt de DVDspeler een digitaal video en audiosignaal en wordt een helder beeld verkregen op een TV met een HDMI ingang Beschrijving HDMI aansluiting HDMI aansluiting Zowel nietgecomprimeerde videogegevens en digitale audiogegevens LPCM of Bit Streamgegevens Hoewel op de speler een HDMI kabel niet bijgeleverd is aangesloten wordt alleen een puur digi...

Page 256: ...raat aansluiten op de DV IN aansluiting Situatie 1 Een videorecorder set top box STB DVD speler of cam corder op de AV3 IN aansluitingen aansluiten Een videorecorder of extern apparaat op AV3 IN aansluitingen van de HDD DVD RECORDER aansluiten Het is mogelijk om van aangesloten apparatuur op te nemen videorecorder STB DVD speler of camcorder De selectie voor AV3 IN gebeurt automatisch Als de ingan...

Page 257: ...OP USB APPARATEN Hiermee kunt u uw HDD DVD RECORDER aansluiten op USB apparaten Een USB geheugen MP3 speler of digitale camera op de USB HOST aansluiten Wanneer u de USB kabel tijdens de gegevensoverdracht verwijdert wordt de communicatie beëindigd en kunnen gegevens die in het geheugen zijn opgeslagen beschadigd raken Wanneer de gegevenscommunicatie wordt onderbroken door statische elektriciteit ...

Page 258: ...scartkabel Voor het gebruik van de HDMI kabel dient u de kabel aan te sluiten voordat u het stroomsnoer in het stopcontact steekt of voordat u Plug Play instellen heeft voltooid Sluit de HDMI kabel niet aan terwijl Plug Play instellen bezig is Steek de stekker van de HDD DVD RECORDER in het stopcontact Op het display van het voorpaneel knippert AUTO Kies de gewenste taal met behulp van de cijferto...

Page 259: ...t menu Zenderinstelling Handmatig Installatie zie pagina 37 De functie Automatisch instellen kan worden uitgevoerd door 10 seconden of langer op de recorder op STOP te drukken terwijl het apparaat is uitgeschakeld en er geen schijf is geplaatst Controleer de datum en de tijd Als deze juist is drukt u op de toets OK om de datum en tijd op te slaan Als u niet op OK drukt worden de datum en tijd na 5...

Page 260: ...doorgegeven tussen de kanalen PR1 t m PR5 Als u de functie Klok instellen niet nodig hebt selecteert u Uit 1 2 3 4 5 M ZENDERINSTELLING Automatisch scannen Met deze functie kunt u de tunerband van de HDD DVD RECORDER automatisch naar de beschikbare zenders laten zoeken en deze opslaan Druk in de stopstand op de toets MENU Druk op de toetsen om Installen te selecteren en druk vervolgens op de toets...

Page 261: ...tsen om een PR programma te selecteren dat u wilt bewerken verwijderen of wisselen en druk vervolgens op de toets Kleur Selecteer Wijzigen Verw of Wissel In het geval van Wijzigen RODE toets A u kunt PR programma informatie toevoegen of bewerken Na de programma informatie te hebben gewijzigd CH Kanaal Naam Decoder MFT Systeem selecteert u Opslaan en drukt u vervolgens op OK CH Stel het kanaal af m...

Page 262: ...steemoptie te selecteren en druk op de toets OK of Druk op de toetsen om het gewenste item te selecteren en druk op de toets OK of Instelling voor automatisch uitschakelen Met deze functie wordt de HDD DVD RECORDER automatisch uitgeschakeld als u gedurende de geselecteerde tijd geen toets indrukt Druk op de toetsen om Automatisch uit te selecteren en druk op OK of op de toets Druk op de toetsen om...

Page 263: ...ormatie hierover U kunt nu de HDD DVD RECORDER met de afstandsbediening van de tv bedienen De volgende tv toetsen kunnen worden gebruikt voor het bedienen van de HDD DVD RECORDER En de toetsen en Als u op de afstandsbediening van de tv op de toets Anynet drukt wordt links de OSD weergegeven Apparaat selecteren gebruik deze optie om een apparaat te kiezen Opnemen gebruik deze optie om het opnemen t...

Page 264: ...het DivX R Video On Demand formaat hebt u uw registratiecode nodig Raadpleeg voor meer informatie www divx com vod HDD DVD RECORDER Systeem HDD Bibliotheek Tijdopname Schijfbeheer Installen Klok instellen Automatisch uit Uit Anynet HDMI CEC Aan DivX registratie sSelecteren rTERUG eEINDE OK Uw registratie code is XXXXXXXX Meer info op www divx com vod DivX R Video On Demand ...

Page 265: ...ver een Dolby Digital of MPEG 2 decoder beschikt De instelling voor digitale uitvoer geldt zowel voor Dolby Digital als MPEG 2 geluid De LPCM audiotrack wordt altijd als PCM uitgevoerd Selecteer de juiste digitale uitvoer anders hoort u geen geluid of hard geluid DTS Uit Verzendt geen DTS signaal Selecteer deze optie wanneer uw AV ontvanger of AV versterker niet voorzien is van een DTS decoder Aan...

Page 266: ...er u filmmuziek zachtjes afspeelt of met kleinere speakers kan het systeem de juiste compressie toepassen om de zachte inhoud verstaanbaarder te maken en om te voorkomen dat dramatische passages te hard klinken Uit U kunt de film bekijken met het standaard dynamisch bereik NICAM NICAM programma s worden verdeeld in 3 typen NICAM stereo NICAM mono en tweetalig transmissie in andere taal NICAM program...

Page 267: ...en onderkant van het scherm ziet u zwarte balken 4 3 Pan Scan Selecteer deze optie voor conventionele tv s als u het centrale deel van het 16 9 scherm wilt zien De uiterste rechter en linkerkant van het beeld worden afgesneden 16 9 Wide U ziet het volledige 16 9 beeld op uw breedbeeldtelevisie 3D ruisonderdrukking motion adaptive ruisonderdrukking Uit Normaal Aan Biedt een helderder beeld via ruis...

Page 268: ...n het geval van componentvideo uitvoer Met deze instelling kunt u de progressieve modus selecteren Als u de Progressieve scanmodus wilt weergeven moet eerst de componentkabel worden aangesloten Zie pagina 26 Controleer of de componentkabels juist zijn aangesloten Progressieve De melding Wilt u de modus Progressieve handhaven Terug over 10 sec wordt weergegeven Selecteer Ja om terug te keren naar d...

Page 269: ...MI Stel de TV ingang in op HDMI Het menu BD Wise is alleen beschikbaar als BD Wise op Aan is gezet De functie BD Wise wordt alleen geactiveerd wanneer Samsung producten met BD Wise op elkaar worden aangesloten met een HDMI kabel Progressief scannen wordt automatisch geactiveerd wanneer HDMI aangesloten is Controleer of HDMI op het voorpaneel van de HDD DVD RECORDER wordt aangegeven Raadpleeg de ge...

Page 270: ...ruk op de toetsen om het gewenste classificatieniveau te selecteren en druk op OK of op de toets Als u bijvoorbeeld niveau 6 kiest worden schijven van niveau 7 of 8 niet afgespeeld Een hoger cijfer geeft aan dat het programma alleen voor volwassenen is bestemd De toegangscode wijzigen Druk op de toetsen om Toegangscode wijzigen te selecteren en druk op OK of op de toets Voer de viercijferige toegan...

Page 271: ... wordt gemaakt op basis van de geselecteerde opnamemodus Een hoofdstuk duurt ongeveer 5 minuten in XP en SP en in de modi LP en EP 15 minuten Druk op de toets STOP om het opnemen te stoppen U geeft de gemaakte titels weer door de schijf af te sluiten zie pagina 98 en op de toets TITLE MENU te drukken Het titelmenu verschijnt Wanneer u een DVD RW schijf gebruikt hoeft de schijf doorgaans niet te wo...

Page 272: ...nd zie pagina 49 50 Compatibel met V modus Deze functie regelt de instelling voor de selectie van audio bij het opnemen van een NICAM STEREO Multi audio programma op de vaste schijf HDD De functie is niet van invloed op de directe opname van een programma op DVD Uit Zowel Dual L en Dual R van het multi audioprogramma worden op de vaste schijf HDD opgenomen Titels die op basis van een dergelijke in...

Page 273: ...VD RECORDER staat op de achterzijde van de recorder LOGO S VAN SCHIJVEN DIE KUNNEN WORDEN AFGESPEELD STEREO CREATOR Dolby Digital DTS Digitaal geluid Stereo PALtv systeem in Engeland Frankrijk Duitsland etc DivX MP3 U KUNT DE VOLGENDE TYPEN SCHIJVEN AFSPELEN Typen schijven Inhoud schijflogo Opgenomen inhoud Vorm van schijf Maximale speelduur DVD VIDEO AUDIO VIDEO Enkelzijdig 12cm 240 min Dubbelzijd...

Page 274: ...R AUDIO VIDEO Enkelzijdig 12cm 4 7GB 1 uur XP Uitstekende kwaliteit 2 uur SP Standaardkwaliteit 4 uur LP Langdurig afspelen 6 of 8 uur EP Verlengd Dubbelzijdig 12cm 8 5GB 1 uur 50 min XP Uitstekende kwaliteit 3 uur 40 min SP Standaardkwaliteit 7 uur 20 min LP Langdurig afspelen 11 of 14 uur 40 min EP Verlengd DVD RW AUDIO VIDEO 12cm 4 7GB 1 uur XP Uitstekende kwaliteit 2 uur SP Standaardkwaliteit ...

Page 275: ...jflade te sluiten De schijflade wordt gesloten en de schijf wordt automatisch afgespeeld De HDD DVD RECORDER speelt de schijven niet automatisch af nadat het apparaat wordt ingeschakeld Wanneer de recorder is ingeschakeld en de lade een schijf bevat wordt het apparaat gestart en ingesteld op de stopstatus Druk op PLAY om het afspelen te starten Als u wilt dat het apparaat automatisch afspeelt zodra ...

Page 276: ...Druk op de toets PLAYLIST Een afspeellijst ook wel playlist genoemd bestaat uit scènes die uit een titellijst zijn geselecteerd Wanneer een afspeellijst wordt afgespeeld wordt alleen de scène die door de gebruiker is geselecteerd afgespeeld en vervolgens beëindigd Omdat de afspeellijst alleen informatie bevat die nodig is voor het afspelen van een gewenste scène wordt de oorspronkelijke opname nie...

Page 277: ... u op de toets SEARCH drukt 1 2 1 4 1 8 Als u op de toets SEARCH drukt 1 2 1 4 1 8 Als u de normale afspeelsnelheid wilt hervatten drukt u op de toets PLAY Als u in de pauzestand SEARCH ingedrukt houdt wordt de schijf op een kwart van de normale snelheid afgespeeld Zodra u de toets loslaat wordt de pauzestand hervat De opgegeven snelheden in deze functie kunnen afwijken van de feitelijke afspeelsn...

Page 278: ...gorde van uren minuten en seconden in Druk vervolgens op OK Bij sommige schijven werkt dit niet Wanneer een audio CD CD DA of een mp3 JPEG schijf in de recorder is geplaatst wordt de informatie afhankelijk van het schijftype mogelijk niet weergegeven Op sommige schijven werkt de tijdzoekfunctie niet Het scherm verdwijnt als u op de toets RETURN drukt TAALKEUZE ONDERTITELING ZD Hiermee selecteert u...

Page 279: ...Beeldhoek selecteren Druk tijdens het afspelen op de toets INFO Druk op de toetsen om Beeldhoek te selecteren Druk op de toetsen om de gewenste beeldhoek te selecteren Deze functie hangt af van de schijf en werkt mogelijk niet bij alle DVD s Deze functie werkt niet als een DVD niet vanuit verschillende camerastandpunten is opgenomen Het huidige camerastandpunt en het totaal aantal camerastandpunte...

Page 280: ...fspelen ook activeren door op de toets EXIT te drukken Muziek CD s CD DA mp3 schijven en DivX ondersteunen de functie Herhalen A B niet INZOOMEN SZXCVKL Druk tijdens het afspelen op de toets INFO Druk op de toetsen om Zoom te selecteren en druk op OK of op de toets wordt weergegeven Druk op de toetsen om naar het gedeelte te gaan dat u wilt vergroten Druk op OK Het scherm wordt tweemaal zo groot w...

Page 281: ...den ingesteld of worden verwijderd Het is alleen mogelijk om af te spelen Een markering afspelen Druk tijdens het afspelen op de toets MARKER Druk op de toetsen om een gemarkeerde scène te selecteren Druk op OK of op PLAY om af te spelen vanaf de geselecteerde scène Wanneer u op de toets SKIP drukt gaat de recorder terug naar het begin van de markering Door binnen 3 seconden nogmaals op de toets t...

Page 282: ...cène wordt in het geheugen opgeslagen Herhaal bovenstaande procedure om andere posities te markeren U kunt maximaal 10 scènes markeren Als de schijflade wordt geopend en vervolgens gesloten verdwijnen de favorieten Een favoriet afspelen Druk tijdens het afspelen op de toets MARKER Druk op de toetsen om een gemarkeerde scène te selecteren Druk op OK of op PLAY om af te spelen vanaf de geselecteerde ...

Page 283: ...len 11 BLAUWE toets D hiermee selecteert u inhoud alleen MP3 schijven Een Audio CD CD DA afspelen Plaats een audio CD CD DA in de schijflade Het audio CD menu wordt weergegeven en de tracks nummers worden automatisch afgespeeld Druk op de toetsen om de gewenste track nummer te selecteren en druk vervolgens op OK Onderdelen van het audio CD scherm CD DA Huidige track het nummer van de track die op h...

Page 284: ... op de toets REPEAT om de gewenste herhaalmodus te selecteren Druk tijdens het afspelen van de muzieklijst op de GELE toets C Druk op de toetsen om de gewenste afspeelmodus te selecteren en druk vervolgens op OK of op de toets Normaal CD CD DA MP3 de tracks op de schijf worden afgespeeld in de volgorde waarin ze op de schijf zijn opgenomen Nummer herhalen CD CD DA MP3 Map herhalen MP3 Alles herhal...

Page 285: ...f op de toets Druk op de toetsen om tracks te selecteren in de volgorde waarin u ze wilt afspelen en druk op OK Als u een verkeerde track in de afspeellijst hebt opgenomen drukt u op de toetsen om de verkeerde track te selecteren en vervolgens op OK Druk op de RODE toets A om de afspeellijst op te slaan Er wordt een nieuwe Afspeellijst gemaakt 1 2 3 4 5 6 M 1 2 3 4 CD Afspeellijst maken mVERPL sTo...

Page 286: ...tijdens het afspelen van de muzieklijst op de RODE toets A Druk op de toetsen om Afspeellijst te selecteren en druk vervolgens op OK of op de toets Druk op de toetsen om de afspeellijst te selecteren die u wilt bewerken Druk in de afspeellijst modus op de GROENE toets B Druk op de toetsen om tracks te selecteren in de volgorde waarin u ze wilt afspelen en druk op OK Als u een verkeerde track in de...

Page 287: ...oppen om Foto met muziek te selecteren en druk op OK of op de knop De fotolijst wordt weergegeven Zie pagina 64 Voor deze functie moet u een schijf selecteren die zowel muziekbestanden als afbeeldingsbestanden bevat 1 1 2 M 1 2 M 1 2 M CD Afspeellijst Q TRACK04 U 1 4 eEINDE Nr Titel Lengte Y PLAYLIST01 R TRACK04 4 03 002 TRACK02 3 57 003 TRACK06 5 08 004 TRACK01 4 19 Afspeell Bew Nieuwe afspeel Mu...

Page 288: ...t en wordt met de geselecteerde snelheid afgespeeld U opent de Fotolijst met de GELE toets C De diashow stoppen Druk op de GROENE toets B of op de toets STOP of RETURN Draaien Volg stappen 1 en 4 hierboven om de betreffende instellingen weer te geven 5 1 Druk op de GROENE toets B om Draaien te selecteren Druk op de toetsen om de gewenste rotatiehoek te selecteren en druk op OK of op de toets U kun...

Page 289: ...de toets OK of Naam In alfabetische volgorde Omvang In volgorde van het formaat van de foto s U kunt sorteren op Naam en Grootte Gesorteerde lijsten zullen worden weergegeven in gekopieerde volgorde wanneer deze in de Fotolijst worden geplaatst Inhoud selecteren U voert instellingen in door stap 1 t m 3 op pagina 64 te volgen Druk op de BLAUWE toets D om Inhoud te selecteren Druk op de toetsen om ...

Page 290: ...oor een hogere zoeksnelheid X 2 X 4 X 8 Vertraagd afspelen Druk tijdens pauze op de toets SEARCH Zoeken van de afstandsbediening 1 2 1 4 1 8 De functie achteruit vertraagd afspelen is niet beschikbaar Beeld voor beeld afspelen Druk tijdens pauze op de toets SKIP Overslaan van de afstandsbediening De functie achteruit beeld voor beeld afspelen is niet beschikbaar Sommige DivX bestanden die op een p...

Page 291: ... toets B om Sorteren te selecteren Druk op de toetsen om het gewenste item te selecteren en druk op de toets OK of Naam In alfabetische volgorde Omvang In volgorde van het formaat van de DiVX bestanden U kunt sorteren op Naam en Grootte Gesorteerde lijsten zullen worden weergegeven in gekopieerde volgorde wanneer deze in de DivX lijst worden geplaatst Inhoud selecteren Druk op de BLAUWE toets D om...

Page 292: ...n via Samsung recorder DVD RAM VR modus Samsung X Opneembaar Andere fabrikant X Opneembaar DVD RW VR modus Samsung Afgesloten Niet opneembaar Niet afgesloten Opneembaar Andere fabrikant Afgesloten Niet opneembaar Niet afgesloten Opneembaar V modus Samsung Afgesloten Niet opneembaar Niet afgesloten Opneembaar Andere fabrikant Afgesloten Niet opneembaar Niet afgesloten Niet opneembaar DVD R V modus ...

Page 293: ...iezen die het beste aan uw voorwaarden voldoet DVD RAM R Het formatteren wordt automatisch gestart DVD RW Gebruiken nadat de schijf is geformatteerd DVD RW Gebruiken nadat de schijf is geïnitialiseerd Raadpleeg Een schijf formatteren op pagina 98 als u de modus VR of V wilt wijzigen DVD R een DVD R hoeft niet te worden geformatteerd en alle en opnemen in videomodus wordt ondersteund DVD RAM RW VR ...

Page 294: ... timer opnamen gebruiken DVD HR773 Opnamemodus Duur van opname HDD 160GB DVD RAM RW R XP Hoge kwaliteitsmodus Ong 33 uur Ong 1 uur ong 8 5 Mbps SP Standaardkwaliteitsmodus Ong 67 uur Ong 2 uur ong 4 5 Mbps LP Lange opnamemodus Ong 133 uur Ong 4 uur ong 2 Mbps EP Verlengde modus Ong 199 uur Ong 264 uur Ong 6 uur ong 1 6 Mbps Ong 8 uur ong 1 2 Mbps FR flexibele opnamemodus Ong 33 uur 264 uur Ong 1 8 ...

Page 295: ...gingssignalen Tv uitzendingen met kopieerbeveiligingssignalen kunnen een van de volgende drie typen signalen bevatten vrij kopiëren éénmaal kopiëren en nooit kopiëren Als u een programma van het type vrij kopiëren wilt opnemen gebruikt u een DVD RW met CPRM in VR modus DVD RAM HDD Type signaal Vrij kopiëren Eenmaal kopiëren Nooit kopiëren Medium DVD RW Ver 1 1 O DVD RW Ver 1 1 met CPRM VR modus V ...

Page 296: ...t in te stellen SP LP EP XP Druk op de toets REC Op het scherm wordt informatie over de gekozen zender weergegeven waarna de opname wordt gestart Het pictogram REC wordt op het voorpaneel weergegeven Opnemen van externe apparaten waarnaar u kijkt Druk op de toets INPUT SEL om de invoerbron te selecteren waarmee u de recorder hebt verbonden Het display van het voorpaneel wordt in de volgende volgor...

Page 297: ... kopiëren beveiligde beelden zijn geselecteerd DVD RAM RW schijven moeten voor de opname eerst worden geformatteerd De meeste nieuwe schijven worden niet geformatteerd verkocht Gebruik geen DVD R authoringschijven voor dit apparaat VAN EEN CAMCORDER KOPIËREN SXCVKL U kunt de camcorder regelen met de interface IEEE1394 DV Verbind de DV uitgang van de camcorder met behulp van een DV kabel met de DV ...

Page 298: ...eselecteerd drukt u op de toets OPEN CLOSE en plaatst u een opneembare schijf in de schijflade Druk op de toets OPEN CLOSE om de schijflade te sluiten Wacht tot LOAD niet meer op het display van het voorpaneel wordt weergegeven Ga met de PROG of de cijfertoetsen naar de zender van het tv programma dat u wilt opnemen Druk op de toets REC om het opnemen te starten Druk herhaaldelijk op REC om de gewen...

Page 299: ...emen bent wordt afgespeeld De toets MENU gebruiken Druk in de opnamestand op de toets MENU Druk op de toetsen om Titel te selecteren en druk vervolgens op OK Het scherm Title List Titellijst verschijnt Druk op de toetsen SKIP Overslaan om de titel te selecteren die momenteel wordt opgenomen en druk vervolgens op de toets OK of De titel die u momenteel aan het opnemen bent wordt afgespeeld Afspelen...

Page 300: ... is Geeft de huidige status weer Kijkpunt Huidige afspeeltijd 5 Live punt 6 Live tijd 7 Tijdbalk Time Shift Knoppen op de afstandsbediening voor de functie Time Shift Toets PLAY afspelen Toets PAUSE tv uitzending onderbreken De toetsen SEARCH Versneld afspelen X 2 X 4 X 8 X 16 X 32 X 128 De toetsen SKIP en STOP Gaat naar Live point Toets STOP Als u in Live point op deze knop drukt verschijnt er ee...

Page 301: ... in de modi XP SP LP en EP XP hoge kwaliteit selecteer deze optie wanneer de videokwaliteit belangrijk is SP standaardkwaliteit selecteer deze optie om met standaardkwaliteit op te nemen LP lage kwaliteit selecteer deze optie wanneer er een lange opnametijd nodig is EP verlengd selecteer deze optie wanneer er een langere opnametijd nodig is VPS PDC functie VPS Video Programme System of PDC Program...

Page 302: ...pen of wanneer de vorige opname 2 minuten voor de begintijd van de volgende opname eindigt U kunt voor maximaal 12 programma s timer opnamen instellen Als er op de vaste schijf onvoldoende schijfruimte aanwezig is knippert Dit betekent dat de vaste schijf geen opslagruimte heeft om op te nemen Als u de timer opname heeft ingesteld door middel van VPS PDC kan de ventilator nog altijd aanstaan en wa...

Page 303: ...rwijderen te bevestigen Druk op de toetsen om Ja te selecteren en druk vervolgens op OK Het geselecteerde item wordt uit de lijst verwijderd Druk op de toets EXIT nadat de bewerking is voltooid Het scherm Geplande lijst verdwijnt GA NAAR DE OPNAMELIJST SXCVKL U kunt een lijst bekijken met de opgenomen programma s De toets TIMER gebruiken Druk in de stopstand op de toets TIMER Druk op de toetsen om...

Page 304: ...ijst naar de Geplande lijst 3 1 Druk op de GELE toets C 4 4 HDD Geplande lijst Actuele tijd 10 54 VERPL sSelecteren rTERUG eEINDE Opnamelijst Nr Naar Bron Datum Begin Einde Modus VPS PDC Opnametijd HDD 105 44 SP Een lijst toevoegen HDD Opnamelijst mVERPL sSelecteren rTERUG eEINDE Verw Alles verw Geplande lijst Nr Naar Bron Datum Begin Einde Modus V P Status 01 HDD PR 01 Jan 01 17 30 18 30 SP Aan O...

Page 305: ...aam wilt wijzigen en druk vervolgens op RODE toets A Druk op de toetsen om Hernoemen te selecteren en druk vervolgens op OK of op de toets Het scherm Hernoemen verschijnt Selecteer de gewenste tekens met de toetsen en druk vervolgens op de toets OK Backspace RODE toets A Verwijdert het teken links naast de cursor en zet de cursor een positie terug Spatie GROENE toets B Voegt een spatie in en zet d...

Page 306: ... toets Druk op om Aan te selecteren en druk vervolgens op OK Het sleutelpictogram op het informatievenster voor de geselecteerde titel verandert in de vergrendelde status 1 0 Om de vergrendeling uit te schakelen selecteert u in stap 5 Uit en drukt u op de toets OK Het pictogram met de sleutel wordt gewijzigd naar de status ontgrendeld 0 1 U markeert alle titels door in het menu Wijzigen Alles sele...

Page 307: ...de melding Wilt u verwijderen Druk op om Ja te selecteren en druk vervolgens op OK Het is niet mogelijk een beveiligde titel te verwijderen Als u een beveiligde titel wilt verwijderen selecteert u Uit in het menu Titelbeveiliging zie pagina 82 Als de schijf beveiligd is kunnen er geen titels worden verwijderd zie pagina 96 Wanneer een titel eenmaal uit de titellijst is verwijderd kan deze niet mee...

Page 308: ...e u wilt bewerken en druk vervolgens op RODE toets A Het menu Wijzigen wordt weergegeven Druk op de toetsen om Gedeeltelijk verwijderen te selecteren en druk op OK of op de toets N 1 2 3 4 5 6 N 1 2 3 HDD Opsplitsen JAN 01 2009 17 30 PR1 VERPL sSelecteren rTERUG eEINDE Titellijst Nr 001 Afsp Pauze SCAN Opsplitsen 1 Opsplitsen 2 00 00 00 00 00 20 00 00 20 Opsplitsen Selecteren Terug HDD Opsplitsen ...

Page 309: ...lijst Druk terwijl het lijstmenu wordt weergegeven op de GROENE toets B om Sorteren te selecteren Druk op de toetsen om het gewenste item te selecteren en druk op de toets OK of Datum In volgorde van wanneer de titels zijn opgenomen Naam In alfabetische volgorde Lengte In volgorde van lengte van de opgenomen titels Kanaalinformatie In volgorde van kanaalinformatie U kunt sorteren op Datum Naam Len...

Page 310: ...op de toets TITLE LIST Druk op de toetsen om in de titellijst de titel te selecteren die u wilt afspelen en druk vervolgens op de GELE toets C Druk op de toetsen om Scènenavigatie te selecteren en druk vervolgens op OK of op de toets Druk op de toetsen om de gewenste scène te selecteren en druk vervolgens op OK of op PLAY De functie Scènenavigatie werkt niet wanneer de geselecteerde titel geen mar...

Page 311: ...ap 4 6 om een scène voor een afspeellijst te maken Er wordt nu een nieuwe scène aan de huidige afspeellijst toegevoegd U kunt de afspeellijst controleren door alle scènes op het scherm Afspeellijst bewerken weer te geven zie pagina 89 Een Nieuwe afspeel maken Herhaal stap 1 6 als u een Nieuwe afspeel wilt maken Druk op om Terug te selecteren en druk vervolgens op OK om de bewerking te voltooien U ...

Page 312: ...E toets A Verwijdert het teken links naast de cursor en zet de cursor een positie terug Spatie GROENE toets B Voegt een spatie in en zet de cursor een positie verder naar rechts Verwijdere GELE toets C Verwijdert alle ingevoerde tekens Opslaan BLAUWE toets D Slaat de invoer op Druk op de BLAUWE toets D om Opslaan te selecteren De gewijzigde titel wordt weergegeven in het titelveld van het geselect...

Page 313: ...de tijd van het startpunt worden weergegeven in het startvenster Selecteer de start of het eindpunt van de sectie die u wilt wijzigen met de afspeeltoetsen PLAY SEARCH SKIP Druk bij het eindpunt van de scène op OK Het beeld en de tijd van het eindpunt worden weergegeven in het eindvenster Druk op de toetsen om Wijzigen te selecteren en druk vervolgens op OK De scène die u wilt wijzigen is vervange...

Page 314: ...indpunt van de scène op OK Het beeld en de tijd van het eindpunt worden weergegeven in het eindvenster Druk op om Terug te selecteren en druk vervolgens op OK Druk op de toetsen om Toevoegen te selecteren en druk vervolgens op OK De sectie die u wilt toevoegen wordt vóór de scène ingevoegd die in stap 4 1 van Een scène toevoegen op de vorige pagina is geselecteerd Een scène verwijderen U voert ins...

Page 315: ...uk op de toetsen om het gewenste item te selecteren en druk op de toets OK of Datum In volgorde van wanneer de afspeellijsten zijn gemaakt Naam In alfabetische volgorde U kunt sorteren op Datum en Naam Gesorteerde lijsten zullen worden weergegeven in gekopieerde volgorde wanneer deze in de Afspeellijst worden geplaatst N 1 2 3 4 5 M 1 2 M HDD Afspeellijst JAN 02 2009 13 47 1 3 a Markeren eEINDE Nr...

Page 316: ... display van het voorpaneel wordt weergegeven Controleer of de schijf over voldoende beschikbare opnameruimte beschikt Selecteer de gewenste modus door op de afstandsbediening op de toetsen HDD of DVD te drukken U kunt de gewenste modus ook selecteren door op de HDD DVD toets op het voorpaneel te drukken Druk in de stopstand afspeelstand op de toets TITLE LIST Druk op de toets COPY Het scherm Kopi...

Page 317: ...pecificaties Inhoud HDD DVD of USB DVD HDD of USB USB HDD of DVD MP3 Ondersteund Ondersteund Ondersteund JPEG foto Ondersteund Ondersteund Ondersteund DivX Ondersteund Ondersteund Ondersteund CD DA Niet ondersteund Ondersteund Niet ondersteund Schijf CD R CD DA CD RW DVD RAM DVD R Afsluiten DVD RW DVD RW Afsluiten HDD of USB HDD DVD R DVD RW V of USB USB HDD of DVD R DVD RW V PTP USB is niet beschi...

Page 318: ...ets B Druk op de RODE toets A om Start kopie te selecteren De melding Itemnummer x wordt weergegeven Druk op de toetsen om Begin te selecteren en druk op de toets OK Het kopiëren van de mappen wordt gestart Submappen en bestanden in de geselecteerde map worden gekopieerd Als u het kopiëren wilt annuleren drukt op de toets EXIT 6 7 8 9 1 2 3 4 5 6 7 8 CD Kopiëren Geselecteerde items 9 68MB 2 Beschi...

Page 319: ...oemen wordt weergegeven Selecteer de gewenste tekens met de toetsen en druk vervolgens op de toets OK Backspace RODE toets A Verwijdert het teken links naast de cursor en zet de cursor een positie terug Spatie GROENE toets B Voegt een spatie in en zet de cursor een positie verder naar rechts Verwijdere GELE toets C Verwijdert alle ingevoerde tekens Opslaan BLAUWE toets D Slaat de invoer op Druk op...

Page 320: ...op de toetsen om Schijfbeheer te selecteren en druk vervolgens op OK of op de toets Druk op de toetsen om Beveiliging te selecteren en druk vervolgens op OK Druk op om Aan te selecteren en druk vervolgens op OK 1 2 3 4 5 M 1 2 3 4 DVD RAM VR Schijfbeheer VERPL sSelecteren rTERUG eEINDE Schijfnaam DVD VR Gebruikte ruimte 00 17 0 52 GB Beschikbare ruimte 01 54 SP 3 85 GB Info schijfbeveiliging Niet ...

Page 321: ...n titel bevat met een stilstaand beeld zal die functie niet werken Als u een beveiligde titel wilt verwijderen schakelt u de beveiliging ervoor uit om het item te ontgrendelen Druk op de toetsen om Titel DivX Muziek of Foto te selecteren en druk vervolgens op OK Druk op om Ja te selecteren en druk vervolgens op OK Alle titellijsten DivX lijsten muzieklijsten of fotolijsten worden verwijderd 1 2 3 ...

Page 322: ... schijven is er geen verschil tussen de DVD video indeling V modus en DVD video opname indeling VR modus Een schijf afsluiten CVL Nadat u titels op een DVD RW R schijf hebt opgenomen met uw HDD DVD RECORDER dient deze te worden afgesloten voordat deze kan worden afgespeeld op externe apparaten Druk in de stopstand op de toets MENU Druk op de toetsen om Schijfbeheer te selecteren en druk vervolgens...

Page 323: ... annuleren te selecteren en druk vervolgens op OK De melding Wilt u afsluiten schijf ongedaan maken verschijnt Druk op om Ja te selecteren en druk vervolgens op OK Ook wordt de melding Afsluiten schijf wordt ongedaan gemaakt Wilt u doorgaan getoond Druk op om Ja te selecteren en druk vervolgens op OK Het afsluiten van de schijf wordt ongedaan gemaakt Een DVD RW kan worden afgesloten of het afsluit...

Page 324: ... titel hoofdstuknummer of zoektijd gevraagd buiten het toegestane bereik De instellingen van de afspeelmodus zijn anders dan de instellingen die met het instellingenmenu Installen zijn geconfigureerd De schijf ondersteunt niet alle geselecteerde functies In dit geval werken sommige functies niet goed die u met het instellingenmenu Installen hebt geconfigureerd Ik kan de beeldverhouding niet wijzigen...

Page 325: ... opnieuw aan te sluiten Zie Compatibele USB apparaten voor hostpoort op pagina 8 Er is geen HDMI uitvoer Controleer of HDMI voor de videouitgang is ingeschakeld Controleer de aansluiting tussen de TV en de HDMI aansluiting van de DVD recorder Controleer of uw tv HDMI ondersteunt Abnormaal HDMI uitvoerscherm Als er sneeuw te zien is op het scherm betekent dit dat de TV geen HDCP High bandwidth Digi...

Page 326: ...oeraansluitingen x 1 Optische Coaxiale digitale audio uitvoer Video Composiet video Video uitvoeraansluiting x 1 Componentuitgang x 1 Y 1 0Vp p Pb 0 70Vp p Pr 0 70Vp p at 75Ω belasting HDMI DVI 576p 720p 1080i 1080p Scart aansluiting AV1 Scart TV Video Composiet RGB Audio Analoog Opnemen Indeling beeldcompressie MPEG II Indeling audiocompressie Dolby Digital 2ch 256Kbps MPEG II Opnamekwaliteit XP ...

Page 327: ...r work which contains a notice placed by the copyright holder saying it may be distributed under the terms of this General Public License The Program below refers to any such program or work and a work based on the Program means either the Program or any derivative work under copyright law that is to say a work containing the Program or a portion of it either verbatim or with modifications and or ...

Page 328: ...e not required to accept this License since you have not signed it However nothing else grants you permission to modify or distribute the Program or its derivative works These actions are prohibited by law if you do not accept this License Therefore by modifying or distributing the Program or any work based on the Program you indicate your acceptance of this License to do so and all its terms and ...

Page 329: ... the start of each source file to most effectively convey the exclusion of warranty and each file should have at least the copyright line and a pointer to where the full notice is found One line to give the program s name and a brief idea of what it does Copyright C year name of author This program is free software you can redistribute it and or modify it under the terms of the GNU General Public ...

Page 330: ...a company cannot effectively restrict the users of a free program by obtaining a restrictive license from a patent holder Therefore we insist that any patent license obtained for a version of the library must be consistent with the full freedom of use specified in this license Most GNU software including some libraries is covered by the ordinary GNU General Public License This license the GNU Less...

Page 331: ...n supplied function or table used by this function must be optional if the application does not supply it the square root function must still compute square roots These requirements apply to the modified work as a whole If identifiable sections of that work are not derived from the Library and can be reasonably considered independent and separate works in themselves then this License and its terms...

Page 332: ...have already sent this user a copy For an executable the required form of the work that uses the Library must include any data and utility programs needed for reproducing the executable from it However as a special exception the materials to be distributed need not include anything that is normally distributed in either source or binary form with the major components compiler kernel and so on of t...

Page 333: ...LIBRARY TO THE EXTENT PERMITTED BY APPLICABLE LAW EXCEPT WHEN OTHERWISE STATED IN WRITING THE COPYRIGHT HOLDERS AND OR OTHER PARTIES PROVIDE THE LIBRARY AS IS WITHOUT WARRANTY OF ANY KIND EITHER EXPRESSED OR IMPLIED INCLUDING BUT NOT LIMITED TO THE IMPLIED WARRANTIES OF MERCHANTABILITY AND FITNESS FOR A PARTICULAR PURPOSE THE ENTIRE RISK AS TO THE QUALITY AND PERFORMANCE OF THE LIBRARY IS WITH YOU...

Page 334: ...ies uitgevoerd door niet erkende Samsung dealers of niet erkende servicecentra Alle daaruit voortvloeiende schades vallen niet onder deze garantie 4 Aanpassingen aan het product die noodzakelijk zijn om te voldoen aan landelijke of plaatselijke technische of veiligheids voorschriften die gelden in enig land anders dan dat waarvoor het product oorspronkelijk is ontworpen en gefabriceerd worden niet...

Page 335: ...res de service non reconnus par Samsung Chaque endommagement qui en résulte n est pas couvert par cette garantie 4 Les adaptations nécessaires pour répondre aux normes techniques ou aux normes de sécurité locales ou nationales autres que pour le pays pour lequel l appareil a été originalement développé ne sont pas considérés comme des défauts de fabrication ou de matériel 5 La garantie ne couvre p...

Page 336: ... 710 www samsung com lu NETHERLANDS 0900 SAMSUNG 0900 7267864 0 10 Min www samsung com nl NORWAY 3 SAMSUNG 7267864 www samsung com no POLAND 0 801 1SAMSUNG 172678 022 607 93 33 www samsung com pl PORTUGAL 80820 SAMSUNG 726 7864 www samsung com pt SLOVAKIA 0800 SAMSUNG 726 7864 www samsung com sk SPAIN 902 1 SAMSUNG 902 172 678 www samsung com es SWEDEN 075 SAMSUNG 726 78 64 www samsung com se U K ...

Page 337: ...ncier en de algemene voorwaarden van de koopovereenkomst nalezen Dit product en zijn elektronische accessoires mogen niet met ander bedrijfsafval voor verwijdering worden gemengd AK68 01787C Correcte behandeling van een gebruikte accu uit dit product Van toepassing op de Europese Unie en andere Europese landen met afzonderlijke inzamelingssystemen voor accu s en batterijen Dit merkteken op de accu...

Reviews: