background image

ENG-39

ENG-38

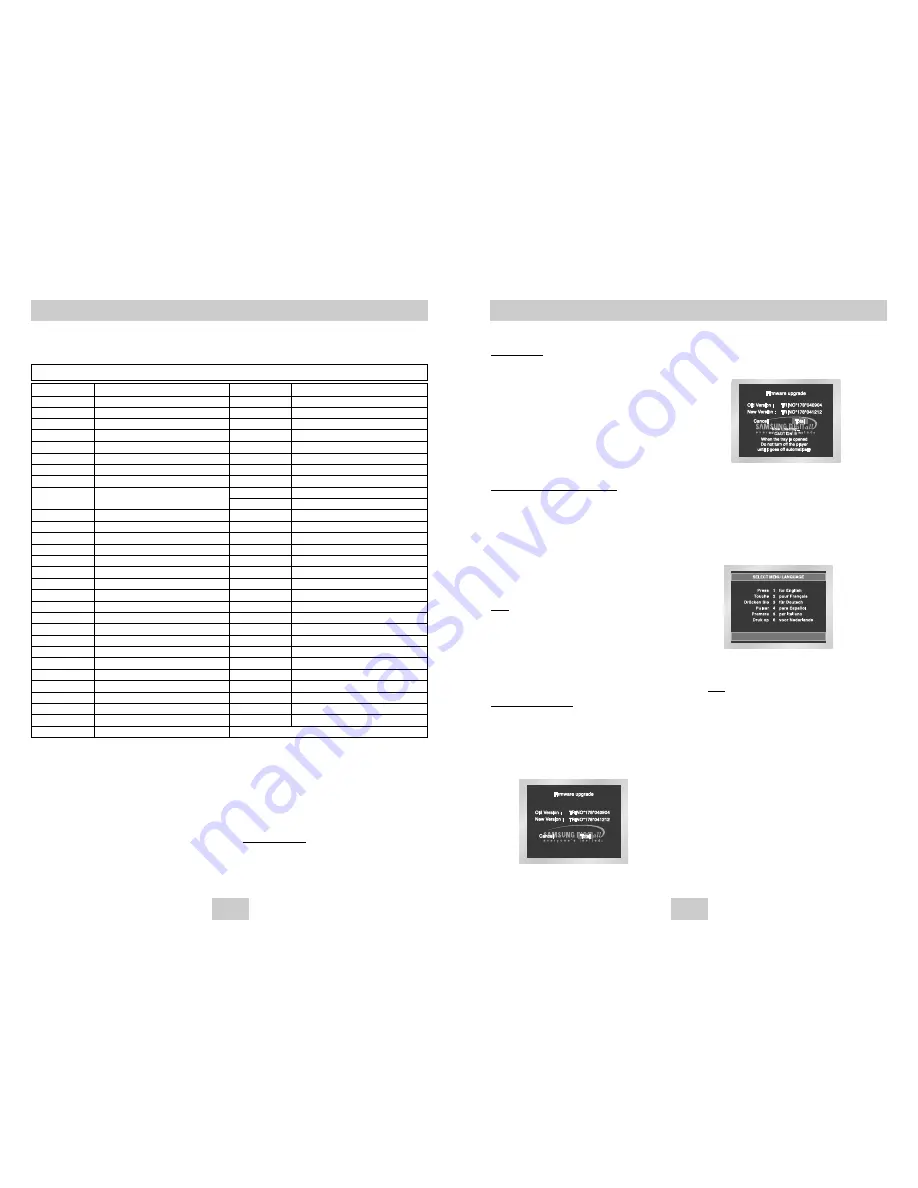
Controlling a TV with the Remote

The remote can also be set up to control most TVs. To program the remote, use the code that
corresponds to your brand.

BRAND

CODE

ANAM

10, 11, 12, 13, 14, 15, 16, 17, 18

AIWA

82

BANG&OLUFSEN

57

BLAUPUNKT

71

BRANDT

73

BRIONVEGA

57

CGE

52

CONTINENTAL EDISON

75

DAEWOO

19, 20, 23, 24, 25, 26, 27, 28, 29,
30 , 31, 32, 33, 34

EMERSON

64

FERGUSON

73

FINLUX

06, 49, 57

FORMENTI

57

FUJITSU

84

GRADIENTE

70

GRUNDIG

49, 52, 71

HITACHI

60, 72, 73, 75

IMPERIAL

52

JVC

61, 79

LG

06, 19, 20, 21, 22, 78

LOEWE

06, 69

LOEWE OPTA

06, 57

MAGNAVOX

40

METZ

57

MITSUBISHI

06, 48, 62, 65

MIVAR

52, 77

NEC

83

NEWSAN

68

NOBLEX

66

BRAND

CODE

NORDMENDE

72, 73

NOKIA

74

PANASONIC

53, 54, 74, 75

PHILPS

06, 55, 56, 57

PHONOLA

06, 56, 57

PIONEER

58, 59, 73, 74, 75

RADIOLA

06, 56

RADIOMARELLI

57

RCA

45, 46

REX

74

SABA

57, 72, 73, 74, 75

SALORA

74

SAMSUNG

01, 02, 03, 04, 05, 06, 07, 08, 09

SANYO

41, 42, 43, 44, 48

SCHNEIDER

06

SELECO

74

SHARP

36, 37, 38, 39, 48

SIEMENS

71

SINGER

57

SINUDYNE

57

SONY

35, 48

TELEAVA

73

TELEFUNKEN

67, 73, 75, 76

THOMSON

72, 73, 75

THOMSON ASIA

80, 81

TOSHIBA

47, 48, 49, 50, 51, 52

WEGA

57

YOKO

06

ZENITH

63

TV Codes

1. Turn on the TV.

2. Point the DVD’s remote at the TV.

3. While holding the TV POWER button down, enter

the code for your brand.

e.g) For Samsung 2 TVs

While holding down the TV POWER button, 
enter 0 and then 1.

4. If the TV turns off, setup is complete.

Enter other codes of the same brand if the first
code does not work.

5. To operate the TV, use the “TV Function Buttons”

described on page 8.

Important Note

• The remote may not be able to control every

model TV of the brands listed.

• If you replace the remote control's batteries, set

the brand code again.

Firmware upgrade

4. Press the ENTER button.

Firmware upgrade starts

5. In the middle of the writing, the tray will open

automatically. After taking out the disc, please
wait for about 2 minutes.

6. If the unit was successfully updated, the unit will

turn off and on after closing the tray automatically.
When the unit turns on, this screen will display.

7. Select the desired language.

Note • If the “Select Menu Language” does't

appears, please contact to “Samsung
Service Center”.

• Do not press any button and unplug

the power code during upgrade.

• The upgrade procedure may change,

refer to the web site
(www.samsung.com).

Introduction

Samsung will often support the software upgrade to
improve the performance of this unit to the latest
status, through Samsung Internet Site
(www.samsung.com).
Because the specially new mpeg4 codec continues
and it is appearing. What improvements are made
depends on the upgrade software you are using as
well as the software that your DVD-player contained
before the upgrade.

How to make an upgrade disc

Write the downloaded file onto a blank CD-R or 
CD-RW disc, using the following settings:

1. You have to download a new file through

Download Center of Samsung Internet Site
(www.samsung.com).

2. Write the file to Disc using CD-RW of your

computer.

Note

• File System CD-ROM ISO Level

• Character set ISO 9660

• Finalized, single session

• Write speed low

Upgrade procedure

1. Press OPEN/CLOSE to open the disc tray.

2. Insert the upgrade CD-R disc, label facing up.

3. Press OPEN/CLOSE to close the disc tray.

Firmware upgrade appears on the display

Summary of Contents for DVD-HD745

Page 1: ...DVD Player Lecteur DVD DVD Speler DVD HD745 AK68 00421G 01 DEU FRA NL ENG ...

Page 2: ...s proper operating voltage Install your player in a cabinet with adequate ventilation holes 7 10cm Do not block ventilation holes on any of the components for circulation of air Do not push the disc tray by the hand Do not stack components Be sure to turn all components off before moving the player Before connecting other components to this player be sure to turn them off Be sure to remove the dis...

Page 3: ...ith violence adult subject matter etc Various On Screen Menu Functions You can select various languages Audio Subtitle and screen angles while enjoying movies EZ VIEW DVD Easy View can convert Letter Box images to full screen viewing on your conventional TV Digital Photo Viewer JPEG You can view Digital Photos on your TV Repeat You can repeat a song or movie simply by pressing the REPEAT button MP...

Page 4: ...o S Video will not work If Component I SCAN Video Output is selected in Setup Menu progressive scan and DVI mode will not work 8 SCART JACK Connect to a TV scart input jack Important Note Consult your TV User s Manual to find out if your TV supports Progressive Scan If Progressive Scan is supported follow the TV User s Manual s instructions regarding Progressive Scan settings in the TV s menu syst...

Page 5: ... s power on or off 19 CLEAR Button Use to remove menus or status displays from the screen 20 INSTANT SKIP Button This function skips playback ahead 10 seconds 21 INSTANT REPLAY Button This function is used to replay the previous 10 seconds of a movie from the current position 22 CH buttons Channel selection 23 OPEN CLOSE Button To open and close the disc tray 24 DVI SEL Button DVI Output resolutio...

Page 6: ...o Digital Video DVI Audio Input Component Jacks Digital Video Out ENG 10 Choosing a Connection Connection to a TV For Video TV Normal Widescreen Projection etc 1 Connect a cable with the desired method 2 Turn on your TV and DVD Player 3 Set your TV the correct video input by pressing TV VIDEO button on See page 38 4 Select the video output according to the cable connection If you use the VIDEO SEL...

Page 7: ...ss the PLAY PAUSE button to resume normal play This icon indicates an invalid button press ENG 12 Choosing a Connection DVI VIDEO Specifications When you press the DVI SEL button in case of PAL TV system in setup menu 576p 720p 768p 1080i 50Hz are selected in order When you press the DVI SEL button in case of NTSC TV system in setup menu 480p 720p 768p 1080i 60Hz are selected in order The first pr...

Page 8: ...laying a DVD VCD CD 1 During play press the INFO button on the remote 2 Use the UP DOWN buttons to select the desired item 3 Use the LEFT RIGHT buttons to make the desired setup and then press ENTER You may use the number buttons of the remote control to directly access a title chapter or to start the playback from the desired time 4 To make the screen disappear press the INFO button again Using t...

Page 9: ...orks See page 14 PROGRAM RANDOM PROGRAM RANDOM PROGRAM 01 Track 05 06 07 08 09 10 11 12 13 14 15 16 Program Order 01 02 03 04 CLEAR Slow Repeat Play ENG 16 Repeat Play Repeat the current track chapter title a chosen section A B or all of the disc 1 Press the REPEAT button on the remote Repeat screen appears 2 Select Chapter Title or A B using the LEFT RIGHT buttons Chapter repeats the chapter that...

Page 10: ...bottom left and right of the screen are cut off and the central portion of the screen is enlarged Vertical Fit When a 4 3 DVD is viewed on a 16 9 TV black bars will appear at the left and right of the screen in order to prevent the picture from looking horizontally stretched If you are using a 4 3 TV 1 For 16 9 aspect ratio discs 4 3 Letter Box Displays the content of the DVD title in 16 9 aspect ...

Page 11: ...ode only this function works See page 14 Depending on a disc the Bookmark function may not work ENG 20 Using the Instant Replay Skip Function Changing the Camera Angle When a DVD contains multiple angles of a particular scene you can use the ANGLE function Using the ANGLE button If the disc contains multiple angles the ANGLE mark appears on the screen 1 Press the ANGLE button then ANGLE icon will ...

Page 12: ...here is more than one in the disc Allows playback from a desired time You must enter the starting time as a reference ENG 22 Using the Zoom Function Using the Zoom Function DVD VCD 1 During play or pause mode press the ZOOM button on the remote A Zoom mark will be displayed on screen 2 Use the UP DOWN or LEFT RIGHT buttons to select the part of the screen you want to zoom in on 3 Press the ENTER b...

Page 13: ...e included with the DVD AUDIO you can see this icon To access the desired page you can use this Function If a slide show is included with the DVD AUDIO you can see this icon In this case you cannot use PAGE PRE NEXT buttons If a video zone is included with the DVD AUDIO you can see this icon In this case you cannot use PAGE PRE NEXT buttons Allows playback of the music from a desired time by using...

Page 14: ... title that is playing A B repeats a segment of the file that you select Off FD 01 A B REPEAT ENTER T F F T CD R MP3 WMA discs When you record MP3 or WMA files on CD R please refer to the following Your MP3 or WMA files should be ISO 9660 or JOLIET format ISO 9660 format and Joliet MP3 or WMA files are compatible with Microsoft s DOS and Windows and with Apple s Mac This format is the most widely ...

Page 15: ...on is small it scales up automatically So you can see the larger screen Title Time Audio Subtitle Size Using the Display Function 1 During play press the INFO button on the remote 2 Use the UP DOWN buttons to select the desired item 3 Use the LEFT RIGHT buttons to make the desired setup and then press ENTER You may use the number buttons of the remote control to directly access a title or to start...

Page 16: ...th the unit in Stop mode press the MENU button on the remote Select Setup using UP DOWN buttons then press the RIGHT or ENTER button Language Setup Setup of the Language Audio Setup Setup of the Audio Options Display Setup Setup of the Display Options Use to select which type of screen you want to watch and several display options Parental Setup Setup of the Parental Level Allows users to set the ...

Page 17: ...make the SETUP menu disappear or return to menu screen during set up Press RETURN or LEFT button Manufactured under license from Dolby Laboratories Dolby and the double D symbol are trademarks of Dolby Laboratories DTS and DTS Digital Out are trademarks of Digital Theater Systems Inc DVD AUDIO Outputs 2 channel digital audio only Some DVD AUDIO discs do not downmix so they will not output 2 channe...

Page 18: ...ff TV System 1 NTSC Disc In case of using NTSC disc If your TV system only has PAL Video input you must choose PAL When you choose PAL Interlace output format is PAL 60 Hz output If your TV system only has NTSC input you must choose NTSC Output If you set up the NTSC TV system DVI output frame rate is 60 Hz 2 PAL Disc In case of using PAL disc If your TV system only has NTSC Video input you must c...

Page 19: ...DOWN buttons Press ENTER button The Change Password screen appears Enter your new password Enter the new password again Note How to make the SETUP menu disappear or return to menu screen during set up Press RETURN or LEFT button If you have forgotten your password see page 40 Setting Up the Rating Level 1 With the unit in Stop mode press the MENU button 2 Select Setup using UP DOWN buttons then pr...

Page 20: ...e remote may not be able to control every model TV of the brands listed If you replace the remote control s batteries set the brand code again Firmware upgrade 4 Press the ENTER button Firmware upgrade starts 5 In the middle of the writing the tray will open automatically After taking out the disc please wait for about 2 minutes 6 If the unit was successfully updated the unit will turn off and on ...

Page 21: ...up Menu may not work properly if the disc is not encoded with the corresponding function The Screen Ratio is fixed on your DVDs Make sure you have selected the correct Digital Output in the Audio Options Menu Press power on from a cold start with no disc in the unit Press the SEARCH SKIP button on the front panel for 5 second The SELECT MENU LANGUAGE display will appear Select the number button of...

Page 22: ... Reading Speed 4 8 5 6 m sec Maximum Play Time 20 min Reading Speed 4 8 5 6 m sec Maximum Play Time 74 min Video Audio 1 channel 1 0 Vp p 75 Ω load R Red 0 7 Vp p 75 Ω load G Green 0 7 Vp p 75 Ω load B Blue 0 7 Vp p 75 Ω load Composite Video 1 0 Vp p 75 Ω load Luminance Signal 1 0 Vp p 75 Ω load Color Signal 0 3 Vp p 75 Ω load Y 1 0 Vp p 75 Ω load Pr 0 70 Vp p 75 Ω load Pb 0 70 Vp p 75 Ω load Lumi...

Reviews: