background image

22

23

The 

DHR uses one set of controls to operate DVD & HDD. The

following buttons are helpful in successfully controlling each one.

1

Press the STANDBY/ON button on the remote control or the front
panel to turn on the 

DHR

.

2

Press the DVD button on the remote control or on the front
panel when you want to control the DVD deck. 
• The DVD indicator will light on the Front Panel Display to show 

that the DVD deck is selected.

3

Press again the HDD button on the remote control or on the
front panel when you want to control the HDD.
• The HDD indicator will light on the Front Panel Display to show 

that the HDD is selected. 

DVD/HDD View

Follow these instructions to playback a DVD.

1

Open disc drawer.
•  Press the Open/Close button on the remote control or front panel.

2

Insert disc.
•  Place the disc in the drawer with the label side of the disc facing 

up. If the disc has two sides, orient the disc with the desired label

facing up.

3

Close disc drawer.
•  Press the Open/Close button on the remote control or front panel 

to close the disc drawer.

4

Press the 

II(Play/Pause) button on the remote control or front

panel.
•  Many discs will begin playback automatically when the disc drawer

closes.

•  If the DVD has a disc menu, or more than one title, the disc menu

may appear.

5

Additional DVD options.

•  See pages 44~55.

Basic DVD Playback

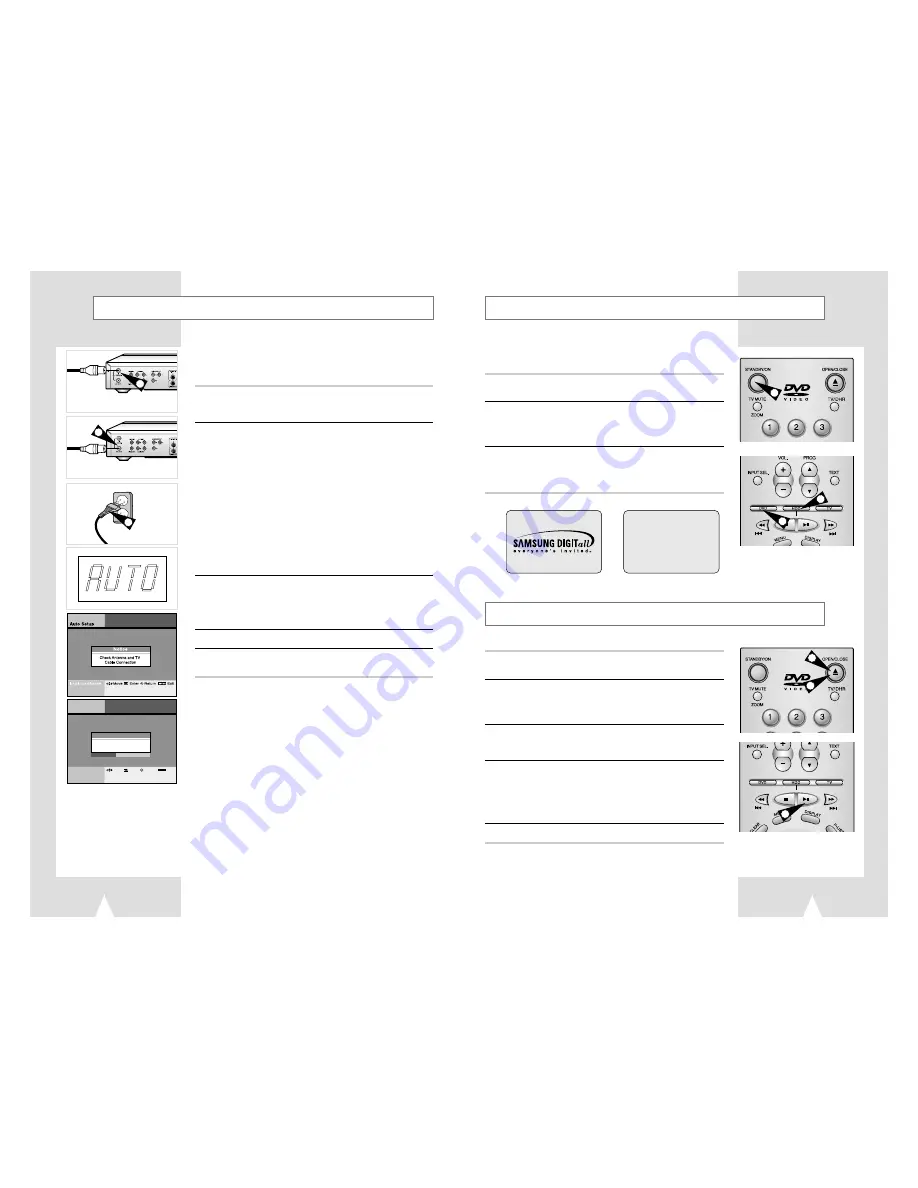
In this section, you will connect the 

DHR to your television and run

Auto Setup, which automatically searches for channels and sets the 
player’s internal clock.

1

Connect the RF antenna cable from your indoor/outdoor antenna
or cable wall outlet to the IN(FROM ANT.) jack on the rear panel 
of the 

DHR

2

Choose one of the following methods to connect the 

DHR to

your TV:

RF Connection:
Connect the supplied RF antenna cable from the OUT(TO TV) jack 
on the rear panel of the 

DHR to your television’s Antenna Input.

Line Connection:
Connect an RCA-type audio/video cable(red, white, yellow) from
the LINE OUT jacks on the rear panel of the 

DHR to your television’s

Line In jacks. 
Use red for right audio, white for left audio, and yellow for video.

It is recommended that you use the Line Connection if your TV
is equipped with RCA jacks.

3

Connect the 

DHR power cord to a standard 110~240V/50Hz

wall outlet. Then power is automatically turned on.
•  Don’t press any buttons on the DHR or remote during auto setup.

“AUTO” blinks while the DHR runs an auto  setup procedure,
where it will automatically search for all active channels. 

4

Press the STANDBY/ON button on your TV.

5

Set TV to Channel 21~69 or AV.
Be sure to use the same channel you selected.

◆ 

Even if you plan to use the S-Video Output, you MUST
connect the 

DHR to your television with either the

standard RF or the AV Out connection.
This enables you to operate the 

DHR setup menu.

Basic Connections/Auto Setup

1

from antenna 

or cable

To TV’s

Antenna Input

2

3

1

2

3

3

4

1

LOADING

LINE1

DVD INITIAL SCREEN

HDD INITIAL SCREEN

Auto Setup

Audio Options

Display Options

Auto CH Search

Please Wait

46%

lnstructions

Enter

Return

Menu

Exit

Move

Summary of Contents for DVD-H40A

Page 1: ...THIS APPLIANCE IS DISTRIBUTED BY www samsungdvd com AK68 00076U ELECTRONICS User s Manual DVD HDD Recorder DVD H40A DVD H40S ...

Page 2: ... USE IN INDUSTRIAL ENVIRONMENTS Use of controls adjustments or performance of procedures other than those specified herein may result in hazardous radiation exposure CAUTION INVISIBLE LASER RADIATION WHEN OPEN AND INTERLOCKS DEFEATED AVOID EXPOSURE TO BEAM This symbol indicates that dangerous voltage which can cause electric shock is present inside this unit This symbol alerts you to important ope...

Page 3: ...what you missed on the live TV broadcasting Simply press the Pause button II when you leave and when you return DVD H40 will instantly replay what you missed while you were away 2 Recorded Program List If customer record the video program Program List will be generated automatically for easy understanding of the recorded program This program list includes Title Name Date and Length Title name can ...

Page 4: ...ry time DVD H40 allows MP3 music from CD to be downloaded into HDD as many as consumer wants Max capacity of HDD for MP3 10GB If user include his her favorite photos in the same music folder then user can enjoy the music slide show also At the edit mode user can generate his her own music folder like as CLASSIC JAZZ POP SONG and so on Play list lnstructions Repeat All Slide Show Mark Total 012 Nam...

Page 5: ... at the below GUI screen 8 Connection to DVC or DSC Connecting DSC or DVC through A V Input port enables to enjoy and edit those video programs simply through TV screen Limited to 20 string Indicates selected file Indicates selected file Pushed enter key then pop up menu will be display After delay time setting started slide show Time setting range 3 sec 10 sec Store Edit in HDD Enjoy through TV I...

Page 6: ...ge 46 Set the parental lock 47 Change the lock password 48 Using the Disc Title Menu 49 3D Sound Function 49 Selecting the Audio Language 50 Selecting the Subtitle Language 50 Using the Display Function 51 Special Playback Features 52 A B Repeat 53 Using the Zoom DVD VCD 54 Changing the Camera Angle 54 Using the Bookmark Function DVD VCD 55 Juke Box View the MP3 file list in HDD CD 57 Edit the MP3...

Page 7: ... naming your MP3 files do not exceed 15 characters and place mp3 as the file extension General name format of Title mp3 When composing your title make sure that you use 15 characters or less Use a decompression transfer rate of at least 128 Kbps when recording MP3 files Sound quality with MP3 files basically depends on the rate of compression decompression you choose Getting audio CD quality sound...

Page 8: ...NNA INPUT RF OUT TO TV Rear View of the DHR DVD HDD Recorder Accessaries You have just purchased a SAMSUNG DHR Together with your DHR you will find the following accessaries in the box REMOTE CONTROL BATTERIES AUDIO VIDEO CABLE USER S MANUAL S VIDEO CABLE COAXIAL CABLE 1 2 3 4 5 6 7 8 9 11 13 14 14 15 16 10 12 1 DVD Deck mode indicator 2 Disc type indicator 3 JPEG file indicator 4 MP3 file indicat...

Page 9: ...on 27 PLAY LIST button 28 RETURN button 29 MARK button 30 ANGLE button 31 AUDIO button 32 JOG SHUTTLE F W D 1 2 3 4 7 6 5 8 9 10 11 12 13 14 15 16 29 30 31 19 20 21 22 23 24 25 26 27 32 28 17 18 You must insert or replace the batteries in the remote control when you Purchase the DHR Find that the remote control is no longer working correctly 1 Push the tab in the direction of the arrow to release ...

Page 10: ...n indoor aerial A cable television network A satellite receiver Make sure that both the television and the DHR are switched off before connecting the cables 1 Remove the aerial or network input cable from the television 2 Connect this cable to the 75Ω coaxial socket marked IN PROM ANT on the rear of your DHR 3 Plug the coaxial cable supplied into the socket marked OUT TO TV on your DHR 4 Plug the ...

Page 11: ...il you find one that works When you change the batteries in the remote control you must reprogram the code following the same procedure You can control the television using the following buttons Button Function STANDBY ON Used to switch the television on and off INPUT SEL Used to select an external source VOL or Used to adjust the volume of the television PROG Up or Down Used to select the require...

Page 12: ...which automatically searches for channels and sets the player s internal clock 1 Connect the RF antenna cable from your indoor outdoor antenna or cable wall outlet to the IN FROM ANT jack on the rear panel of the DHR 2 Choose one of the following methods to connect the DHR to your TV RF Connection Connect the supplied RF antenna cable from the OUT TO TV jack on the rear panel of the DHR to your te...

Page 13: ...conventional Audio CD CDDA is inserted it is automatically played back as the File List is displayed on the screen For MP3 or Photo CDs a desired file must be selected for playback once the File List is displayed on the screen 4 Press the STOP button to stop play When you stop disc play the player remembers where you stopped so when you press PLAY again it will pick up where you left off unless th...

Page 14: ...t language 1 Press the MENU button 2 Select Set Up using buttons then press the ENTER or buttons 3 Select Language using buttons then press the ENTER or buttons 4 Select language you want to change using buttons then press the ENTER or buttons Set language would be changed to selected language Menu Photo Album Set Up Digital Recorder lnstructions DVD Player Juke Box Enter Return Menu Exit Move Men...

Page 15: ...Player Channel Juke Box Clock Setting Auto Set up Manual Set up Output CH TV System Buffer Time HDD Format Move Set the clock Set Up Set the time shift buffering time Set Up You can adjust present time and see it thru front panel display To use timer recording you have to set the clock 1 Press the MENU button 2 Select Set Up using buttons then press the ENTER or buttons 3 Select Clock Setting usin...

Page 16: ...reen Off Not displays playing status icon or message on screen Menu Digital Recorder DVD Player Juke Box Photo Album Set Up lnstructions Language Channel Clock Setting Buffer Time Audio Options Display Options Aspect Ratio OSD Message Front Display Video Out System HDD Format Move Enter Return Menu Exit Front Display On Off Front Display On Turn on display panel all the time Off Turn off display p...

Page 17: ...dren see page 35 36 Edit the recorded program in HDD You can combine divide delete or partial delete saved programs see page 37 40 Record TV program You can record TV programs by timer recording function see page 41 43 Menu Photo Album Set Up Digital Recorder lnstructions DVD Player Juke Box Enter Return Menu Exit Move Buffer Time Audio Options Display Options Language Channel Clock Setting HDD Fo...

Page 18: ...hlight play Select program then press the P LIST button The selected program will be played for 5 seconds in every 5 minutes length 5 Press Text button to change title Press the RETURN button to go back to the previous menu Press the MENU button to close menu mode Press the P LIST button to see program list in direct digest mode See the key Feature part page 5 Virtual keyboard Select character usi...

Page 19: ...s to one so play programs continuously 1 Press the MENU button 2 Select Digital Recorder then press the ENTER or buttons 3 Select Edit using buttons then press the ENTER or buttons 4 Select Combine then press the ENTER or buttons 5 Select a program to combine using buttons then press the ENTER button Selected programs are displayed at below window Up to 6 programs can be selected The same program ...

Page 20: ...orded program in HDD Delete White Unselected part Blue Selected part Red Current playback position Digital Recorder Edit the recorded program in HDD Divide Digital Recorder Live TV control will be stopped at the Edit mode The program can be broken or erased in case of sudden power off or plug off during Edit mode Combine divide delete partial delete using Make sure select the END point before move...

Page 21: ...tion Edit the recorded program in HDD Partial Delete Digital Recorder Original file Delete parts After delete A A B C A A A You can record TV programs in the HDD Make sure present time is set 1 Press the MENU button 2 Select Digital Recorder then press the ENTER or buttons 3 Select Recording using buttons then press the ENTER or buttons 4 Select Timer Recording then press the ENTER button If clock...

Page 22: ...es to increase the recording time From 30 min to 8 hours 6 If you wish to cancel the recording before the end press STANDBY ON You can save watching TV program or DVD title in HDD 1 Press the REC button to save current watching TV program or DVD title 2 REC mark is displayed on the screen Recording contents will be saved automatically You can check saved programs in program list 3 Press the STOP b...

Page 23: ...le s audio language see page 46 Subtitle You can select DVD title s subtitle language see page 46 Parental Lock You can lock adult or violent DVD titles for children see page 47 48 The language change functions support only to multi language menu included DVD titles Menu lnstructions Move Enter Return Menu Exit Digital Recorder DVD Player Juke Box Photo Album Set Up Disc Language Audio Language Su...

Page 24: ...word down and keep it in safe place in case you need it to change your setting later Initial password is set as 5 Select Lock setting using buttons then press the ENTER or buttons 6 Adjust rate using buttons then press the ENTER button If you adjust rating up to 6 level upper 7 8 level titles are not played The higher level is the closer to adult or violent titles This function supports only to DV...

Page 25: ...anguage Lock Setting Change Password Enter Return Menu Exit Move Menu lnstructions Digital Recorder DVD Player Juke Box Photo Album Set Up Audio Language Sub Title Parental Lock Disc Language Lock Setting Change Password Change Password New Password Confirm Password Enter Return Menu Exit Move Menu lnstructions Digital Recorder DVD Player Juke Box Photo Album Set Up Audio Language Sub Title Parent...

Page 26: ...us or select options 1 Press the Display button during DVD playing 2 Select submenu to change using buttons then change option using buttons If you would like to save changes or escape menu press the Return or Display buttons again The display submenu can be changed if you use VCD using Title Display current playback title s status and move to a title Chapter Display current playback chapter s sta...

Page 27: ...kward Picture Search While a disc is in Play mode press and the Forward Backward buttons on the remote control or front panel to visually search forward backward at 2X 4X 8X 16X 32X 64X 128X speed Press ll PLAY PAUSE button to resume normal speed Slow Motion During playback press the ll PLAY PAUSE button to Pause the image Then use the Search Forward to play in slow motion at variable speeds Each ...

Page 28: ...een 1 Press the Angle button when an angle icon is shown at the upper right hand corner then angle selection icon will be appeared at the upper left hand corner 2 Select desired screen angle using buttons 3 To turn off the display press the ANGLE button again 1 1 The Bookmark function lets you select parts of a DVD or VCD MENU OFF mode so that you can quickly find the section at a later time 1 Pre...

Page 29: ...ation Below step is an example of HDD PlayList 1 Press the MENU button 2 Select Juke Box using buttons then press the ENTER or buttons 3 Select HDD Playlist using buttons then press the ENTER or buttons 4 Select Folder or file using buttons then press the ENTER button Press the ENTER button again to cancel file selection If you select folder then it shows you included files in folder 5 Press the P...

Page 30: ... buttons 6 In case of move Select folder to move using buttons then press the ENTER button Select Execute using buttons then press the ENTER button In case of making new folder 1 Select Make New Folder using buttons then press the ENTER button 2 Enter a new folder name using ENTER buttons 3 Press the RETURN button to cancel 4 Select OK to save folder name on the virtual keyboard then press the ENT...

Page 31: ... step is an example of HDD playlist 1 Press the MENU button 2 Select Photo Album using buttons then press the ENTER or buttons 3 Select HDD Playlist using buttons then press the ENTER or buttons 4 Select Folder or file using buttons then press the ENTER button You can preview the selected file at the right side window Press the ENTER button again to cancel file selection If you select folder then ...

Page 32: ...nu lnstructions Digital Recorder DVD Player Juke Box Photo Album Set Up HDD Playlist HDD Edit Copy Photo CD to HDD CD Playlist Enter Return Menu Exit Move Select All Select all files Clear All Unselect all files Move file Move files to another folder And after move existed file would be deleted Delete file Delete files Make Folder Make new folder Rename Change file or folder name Enter the new fil...

Page 33: ... interruption during timer recording the recording will have been cancelled 5 The picture is paused or an earlier broadcast than the current time is showing The DHR has the Time Shift function see page 29 so that you can pause the incoming broadcast signal and resume watching the program later Press the PLAY PAUSE ll button while watching a TV broadcast to pause the picture To resume viewing the b...

Page 34: ...on selected in the Setup Menu may not work properly if the disc is not encoded with the corresponding function 13 The screen ratio cannot be changed The screen ratio is fixed on your DVDs See page 31 14 No audio Make sure you have selected the correct Digital Output in the Audio Option Menu See page 30 15 If you experience other problems Go the contents and find the section of the instruction book...

Reviews: