background image

Français


_5

  INFORMATIONS PRÉALABLES

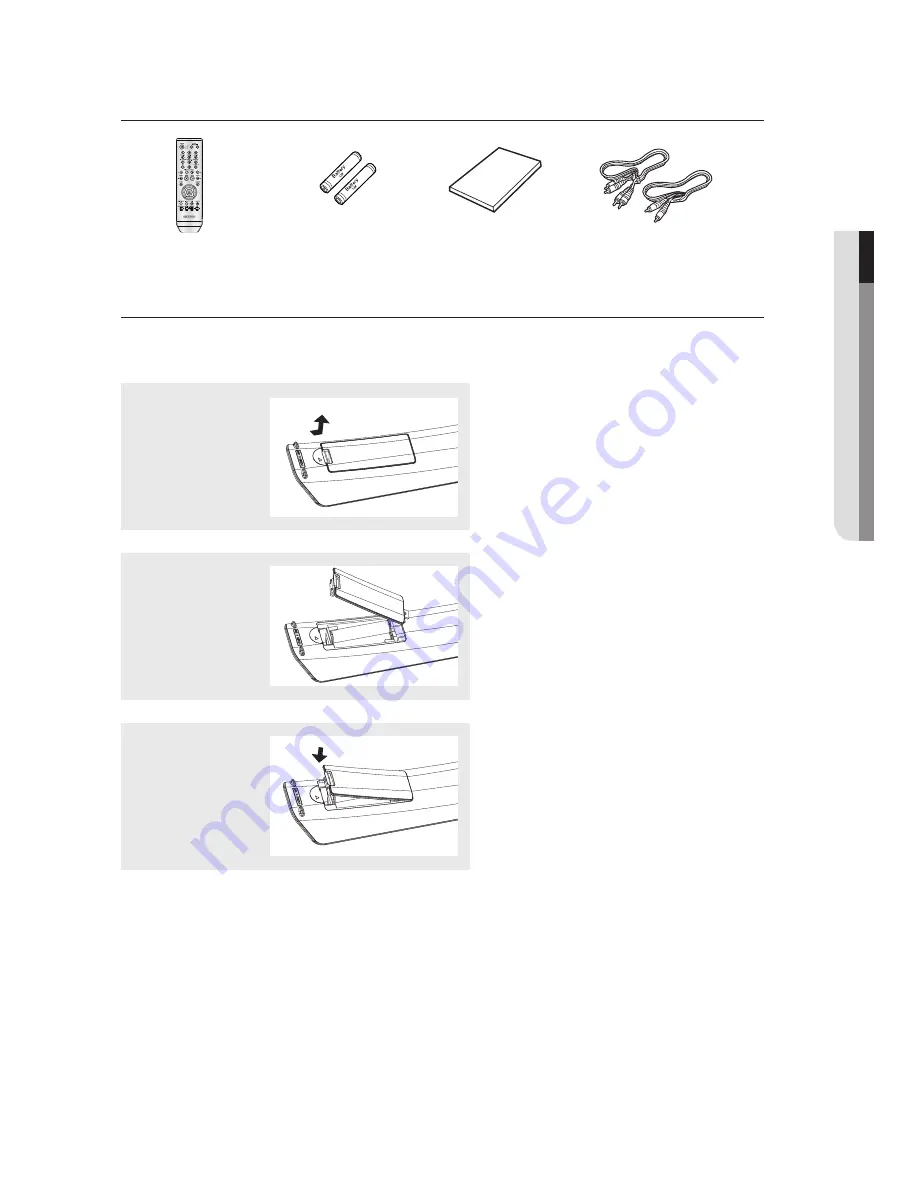
Installation des piles dans la télécommande

1

Enlevez le 
couvercle du 
compartiment 
des piles de la 
face arrière de la 
télécommande.

2

Insérez 2 nouvelles 
piles de type “AAA”.
Assurez-vous qu’elles 
sont bien placées en
accord avec la polarité 
indiquée.

3

Refermez le 
couvercle du 
compartiment.

Télécommande

Piles pour la

télécommande 

(AAA)

Mode d’emploi

Câble de 

connexion

Vidéo/Audio 

(Cinch)

Si la télécommande ne fonctionne pas:

- Vérifiez la polarité des piles.
- Vérifiez l’état d’usure des piles.
- Vérifiez que le capteur de la télécommande n’est pas obstrué.
- Vérifiez l’absence de lumière fluorescente à proximité.

Avant de commencer

Accessoires


Summary of Contents for DVD-1080PR

Page 1: ...ossibilities Thank you for purchasing this Samsung product To receive more complete service please register your product at www samsung com global register DVD Player user manual DVD 1080P9 DVD 1080PR AK68 01750B 01 ...

Page 2: ...lug does not fit into your outlet consult an electrician for replacement of the obsolete outlet 10 Protect the power cord from being walked on or pinched particularly at plugs convenience receptacles and the point where they exit from the apparatus 11 Only use attachments accessories specified by the manufacturer 12 Use only with cart stand tripod bracket or table specified by the manufacturer or ...

Page 3: ...his equipment into an outlet on a circuit different from that to which the receiver is connected Consult the dealer or an experienced radio TV technician for help This class B digital apparatus meets all requirements of the Canadian Interference Causing Equipment Regulations CLASS 1 LASER PRODUCT KLASSE 1 LASER PRODUKT LUOKAN 1 LASER LAITE KLASS 1 LASER APPARAT PRODUCTO LÁSER CLASE 1 Note to CATV ...

Page 4: ...EC 13818 3 used or sold in combination with this product unit The license only covers the use of this product unit to encode and or decode audio files conforming to the ISO IEC 11172 3 or ISO IEC 13818 3 No rights are granted under this license for product features or functions that do not conform to the ISO IEC 11172 3 or ISO IEC 13818 3 Handling Cautions Before connecting other components to thi...

Page 5: ...re aligned correctly 3 Replace the battery cover If the remote control doesn t operate properly Check the polarity of the batteries Check if the batteries are drained Check if the remote control sensor is blocked by obstacles Check if there is any fluorescent lighting nearby Before you start Accessories Remote Control Batteries for Remote Control AAA Size User s Manual Video Audio Cable ...

Page 6: ...lay CONNECTIONS 12 12 Choosing a Connection 12 Connecting to a TV with HDMI Jack 12 Connecting to a TV with DVI Jack 14 Connecting to a TV Progressive 15 Connecting to a TV Interlace 16 Connecting to a TV Video 17 Connecting to an Audio System 2 Channel Amplifier 18 Connecting to an Audio System Dolby digital MPEG2 or DTS Amplifier GETTING STARTED 3 3 Precautions 5 Before you Start 7 General featu...

Page 7: ...files from a disc into MP3 format on a USB device Audio CD only CD DA Note Discs which cannot be played with this player DVD ROM DVD RAM CD ROM CDV CDI CVD CDGs play audio only not graphics Ability to play back may depend on recording conditions DVD R R CD RW DVD RW RW V mode The unit may not play certain CD R CD RW and DVD R due to the disc type or recording conditions COPY PROTECTION Many DVD di...

Page 8: ...al and MPEG 2 system Various screen and audio functions can be easily selected through the on screen menu Disc Types Logos Recording Types Disc Size Max Playing Time Characteristics DVD 5 3 1 2 74 min 20 min Audio CD contains Digital content with better audio quality less distortion and less deterioration of audio quality over time AUDIO CD Disc Markings DIGITAL SOUND STEREO NTSC Play Region Numbe...

Page 9: ...layer memory stick Card reader and other removable storage devices 9 STANDBY ON Turn On Off the DVD Player Front Panel Display DVD CD RW HDMI 1080iP720P 2 3 4 7 6 1 USB 5 1 Disc Indicator DVD Video Audio CD CD R RW DVD R RW RAM DVD R RW 2 DVD VIEW indicator 3 CD indicator 4 USB indicator 5 Disc Media indicator DVD R DVD RW DVD R DVD RW 6 HDMI indicator HDMI 480P HDMI HDMI 720P HDMI 720P HDMI 1080i...

Page 10: ... set to ON in Video Output of the Setup Menu interlaced scan mode will work 5 HDMI OUT JACK Use an HDMI cable to connect this jack to the HDMI jack on your television for the best quality picture If an HDMI cable is connected to an HDMI compatible TV HDMI will be output automatically from the player about 10 seconds later Note Consult your TV User s Manual to find out if your TV supports Progressi...

Page 11: ...ent disc mode 14 DISC MENU Button Brings up the Disc menu 15 OPEN CLOSE Button To open and close the disc tray 16 HDMI SEL Button HDMI Output resolution setup 17 DVD Button Use to operate DVD 18 TV Button Use to operate a Samsung TV 19 EZ VIEW Number 6 Button The aspect ratio of a picture can easily be adjusted according to the screen size of your TV 16 9 or 4 3 20 AUDIO Number 5 Button Use this b...

Page 12: ...n the rear of the DVD player to the HDMI IN jack of your TV 2 Press the input selector button on your TV remote control until the HDMI signal from the DVD player appears on your TV screen HDMI cable Not Included Connecting to a TV with DVI Jack 1 Using an HDMI DVI cable not included connect the HDMI OUT jack on the rear of the DVD player to the DVI IN jack of your TV 2 Using the audio cables conne...

Page 13: ...audio connection with a single cable Using HDMI the DVD player transmits a digital video and audio signal which displays a vivid picture on a TV having an HDMI input jack HDMI connection description HDMI connector Video and audio are transferred digitally without compression LPCM or Bit Stream data The player outputs a pure digital signal to the TV through an HDMI cable If your TV does not support...

Page 14: ...e 2 Using the audio cables connect the AUDIO red and white OUT jacks on the rear of the DVD player to the AUDIO red and white IN jacks of your TV Turn on the DVD player and TV 4 Press the input selector button on your TV remote control until the Component signal from the DVD player appears on the TV screen 3 Set the Video Output to P SCAN in the Display Setup menu See pages 51 to 52 You can also u...

Page 15: ...urer The number and position of the jacks may vary depending on the TV set Please refer to the user s manual of your TV 1 Using Component video cables not included connect the COMPONENT VIDEO OUT jacks on the rear of the DVD player to the COMPONENT IN jacks of your TV 2 Using the audio cables connect the AUDIO red and white OUT jacks on the rear of the DVD player to the AUDIO red and white IN jack...

Page 16: ...Please refer to the user s manual of your TV If there is one audio input terminal on the TV connect it to the AUDIO OUT left white jack of the DVD player If you press the VIDEO SEL button when the DVD Player is in stop mode or no disc is inserted the Video Output mode changes in the following sequence I SCAN P SCAN RED WHITE YELLOW RED WHITE YELLOW Audio Cable Included Video Cable Included 3 Set t...

Page 17: ...nect the AUDIO red and white OUT jacks on the rear of the DVD player to the AUDIO red and white IN jacks of the Amplifier 2 Using the video signal cable s connect the HDMI COMPONENT or VIDEO OUT jacks on the rear of the DVD player to the HDMI DVI COMPONENT or VIDEO IN jack of your TV as described on pages 12 to 16 3 Turn on your DVD player TV and Amplifier 4 Press the input select button of the Am...

Page 18: ...ing a Coaxial cable not included connect the DIGITAL AUDIO COAXIAL jack on the rear of the DVD player to the DIGITAL AUDIO IN COAXIAL jack of the Amplifier 2 Using the video signal cable s connect the HDMI COMPONENT or VIDEO OUT jacks on the rear of the DVD player to the HDMI DVI COMPONENT or VIDEO IN jack of your TV as described on pages 12 to 16 3 Turn on your DVD player TV and Amplifier 4 Press...

Page 19: ...ff Therefore make sure that you select the language you want to use Once you select a menu language you can change it by pressing the button on the front panel of the unit for more than 5 seconds with no disc in the unit Then the SELECT MENU LANGUAGE window appears again where you can reset your preferred language Playback 1 Press the OPEN CLOSE button the tray opens 2 Place a disc gently into the...

Page 20: ... PLAY button once again Note If the player is left for about 5 minutes in pause mode it will stop 7 Step Motion Play Except CD Press the STEP button on the remote control during play Each time the button is pressed a new frame will appear No sound is heard during STEP mode Press the PLAY button to resume normal play You can only perform step motion play in the forward direction No sound is heard d...

Page 21: ...ferent from the actual playback speed No sound is heard during search mode Except CD DVD CD 2X 4X 64X 128X 2X 4X 8X Skipping Tracks When playing a DVD if you press the SKIP button it moves to the next chapter If you press the SKIP button it moves to the beginning of the chapter Pressing the Skip button twice makes the DVD move to the beginning of the previous chapter When playing a CD if you press...

Page 22: ...ng play press the INFO button on the remote control You can select Info in the function menu by pressing the MENU button 2 Press the π buttons to select the desired item DVD 3 To make the screen disappear press the INFO button again MPEG4 1 2 1 8 0 00 13 ENG 5 1CH Off 1 2 1 1 0 00 13 MP3 1 1 Off ...

Page 23: ...from a desired time You must enter the starting time as a reference The time search function does not operate on some discs Refers to the film s soundtrack language In the example the soundtrack is played in English 5 1CH A DVD disc can have up to eight different soundtracks Refers to the subtitle languages available in the disc You will be able to choose the subtitle languages or if you prefer tu...

Page 24: ...aying Disc repeats the disc that is playing Off Using the A B Repeat function 1 Press the REPEAT A B button on the remote control 2 Press the REPEAT A B button at the point where you want repeat play to start A 3 Press the REPEAT A B button at the point where you want repeat play to start B 4 To return to normal play press the REPEAT A B button again Note A B REPEAT allow you to set point B direct...

Page 25: ...at scenes containing sports dancing musical instruments being played etc so you can study them more closely When playing a DVD 1 During play press the PAUSE button 2 Press the SEARCH button to choose the play speed between 1 2 1 4 1 8 and 1 16 of normal speed during PAUSE mode ...

Page 26: ... the black bars at the top and bottom of the screen will disappear The picture will look vertically stretched Depending on a type of disc the black bars may not disappear completely ZOOM FIT The top bottom left and right of the screen are cut off and the central portion of the screen is enlarged For 4 3 aspect ratio discs Normal Wide Displays the content of the DVD title in 16 9 aspect ratio The p...

Page 27: ...nd a full screen appears The picture will look vertically stretched ZOOM FIT The top bottom left and right of the screen are cut off and the central portion of the screen is enlarged For 4 3 aspect ratio discs Normal Screen Displays the content of the DVD title in 4 3 aspect ratio SCREEN FIT The top and bottom portions of the screen are cut off and the full screen appears The picture will look ver...

Page 28: ...encoded on the disc This function may not work with all DVDs A DVD disc can contain up to 8 audio languages To have the same audio language come up whenever you play a DVD refer to Using the Audio Language on page 46 1 Press the AUDIO button The Audio changes when the button is pressed repeatedly The audio languages are represented by abbreviations DVD Press the AUDIO button on the remote control ...

Page 29: ...ubtitles are encoded on the disc This function may not work with all DVDs A DVD disc can contain up to 32 subtitle languages To have the same subtitle language come up whenever you play a DVD Refer to Using the Subtitle Language on page 47 DVD English Changing the Camera Angle When a DVD contains multiple angles of a particular scene you can use the ANGLE function Using the ANGLE function DVD If t...

Page 30: ...ou reach the scene you want to mark press the ENTER button Up to three scenes may be marked at a time Note Depending on the disc the Bookmark function may not work Bookmark Play Clear Bookmark Play Clear TT 01 CH 05 Time 0 39 23 1 Recalling a Marked Scene 1 During play press the BOOKMARK button on the remote control 2 Press the or π buttons to select a marked scene 3 Press the PLAY button to skip ...

Page 31: ...During play press the BOOKMARK button on the remote control 3 Press the CANCEL button to delete a bookmark number Bookmark Play Clear TT 01 CH 05 Time 0 39 23 1 2 3 Using the Zoom Function Using the Zoom Function DVD 1 During play DVD play or pause mode press the ZOOM button on the remote control repeatedly to zoom in 2X 3X 4X ...

Page 32: ...Name of currently playing file Current Playback Mode There are four modes They can be selected in order by pressing the REPEAT button Off Normal Playback Track Repeats the current track Folder Repeats the current folder Random Files in the disc will be played in random order AUDIO ICON STOP ICON ú PLAY ICON Ø PAUSE ICON MP3 file icon WMA file icon JPEG file icon AVI file icon CDDA file icon Folder...

Page 33: ...ack 1 Press the REPEAT button to change the playback mode There are four modes Off Track Folder and Random Off Normal Playback Track Repeats the current song file Folder Repeats the song files which have the same extension in the current folder Random Song files which have the same extension will be played in random order 001 004 0 00 28 0 03 30 128Kbps track 1 track 2 track 3 track 4 MP3 Track 1 ...

Page 34: ...ecompression rates below 128 Kbps will not be played properly Use a decompression transfer rate of at least 64Kbps when recording WMA files Sound quality with WMA files basically depends on the rate of compression decompression you choose Getting CD audio sound requires an analog digital sampling rate that is conversion to WMA format of at least 64Kbps and up to 192Kbps Conversely files with decom...

Page 35: ...viD and then press the ENTER button Repeat and Repeat A B Playback Folder repeats the AVI files which have the same extension in the current folder Track repeats the track that is playing Off No Repeat mode Press the REPEAT A B button to set the point where you want repeat play to start A Press the REPEAT A B button again at the point where you want the repeat play to stop B To return to normal pl...

Page 36: ...ivX4 XviD DivX5 Bitrate may fluctuate Device may skip decoding the high bitrate portions and begin decoding again when Bitrate returns to normal 720 x 480 30fps 720 x 576 25fps Maximum bitrate 4Mbps CD R AVI file This unit can play the following video compression formats within the AVI file format DivX 3 11 contents DivX 4 contents Based on MPEG 4 Simple Profile DivX 5 contents MPEG 4 simple profi...

Page 37: ...partitioned press the button to select one of partitions then press ENTER 3 Press the π or buttons to select a file in the USB device Press ENTER to Open the file Safe USB Removal To prevent damage to the memory stored in the USB device perform safe removal before disconnecting the USB cable Press the STOP button Remove the USB cable Skip Forward Back During playback press the k K button When ther...

Page 38: ...cognized Supported Formats File name File extension Bit rate Version Pixel Sampling Fre quency Still Picture JPG JPG JPEG 640X480 Music MP3 MP3 80 384kbps 44 1kHz WMA WMA 56 128kbps V8 44 1kHz Movie VCD MPG MPEG 1 5Mbps VCD1 1 VCD2 0 320X480 44 1kHz WMV WMV 4Mbps V1 V2 V3 V7 720X480 44 1KHz 48KHz DivX AVI ASF 4Mbps DivX3 11 DivX5 1 XviD 800X600 44 1KHz 48KHz CBI Control Bulk Interrupt is not suppo...

Page 39: ...ns Bitrate press ENTER to change 128kbps 192kbps 128kbps Standard 128kbps Better Quality 192kbps Device selection press ENTER to change between partitions on the USB device max 4 Select Unselect press ENTER to change from Select all files or Select none To cancel the copying in progress press the CANCEL button 001 004 0 00 00 0 00 00 TRACK01 TRACK02 TRACK03 TRACK04 TRACK05 TRACK06 Ripping CD TRACK...

Page 40: ...ockwise Each time the π button is pressed the picture rotates 180 degree Each time the button is pressed the picture will reverse to the right side to show a mirror image Zoom Each time Zoom button is pressed the picture is enlarged Zoom mode 100 125 150 200 100 Slide Show When you press ENTER PLAY when viewing a JPEG file it will go to full screen mode and the slide show automatically start Note ...

Page 41: ...ip Picture Press the k or K button to select previous or next picture Slide Show Press the PLAY button to start the SLIDE show Press the STOP button to stop the SLIDE show Note Depending on the file size the amount of loading time each picture may be different The image may be displayed at a smaller size depending on the picture size when displaying images in HD JPEG mode It is recommended to set ...

Page 42: ... in the pictures folder can be played Kodak Picture CD The JPEG files in the pictures folder can be played automatically Konica Picture CD If you want to see the Picture select the JPEG files in the clips menu Fuji Picture CD If you want to see the Picture select the JPEG files in the clips menu QSS Picture CD The unit may not play QSS Picture CD If the number of files in 1 Disc is over 500 only t...

Page 43: ...e Parental Level Allows users to set the level necessary to prevent children from viewing unsuitable movies such as those with violence adult subject matter etc HDMI Setup Setup of HDMI option 1 Press the MENU button on the remote control Press the buttons to select Setup then press the or ENTER button 2 Press the π buttons to access the different features Press the or ENTER button to access the s...

Page 44: ... Player Menu then press the or ENTER button 4 Press the π buttons to select the desired language then press the ENTER button The language is selected and the screen returns to the Language Setup Page To make the setup menu disappear press the MENU button Language Setup Page Player Menu ENG Disc Menu ENG Audio ENG Subtitle AUTO DivX Subtitle Western Language Setup Page Player Menu ENG Disc Menu ENG...

Page 45: ...up Page To make the setup menu disappear press the MENU button 1 Press the MENU button 2 Press the buttons to select Language Setup Page then press the or ENTER button 3 Press the π buttons to select Disc Menu then press the or ENTER button Language Setup Page Player Menu ENG Disc Menu ENG Audio ENG Subtitle AUTO DivX Subtitle Western Language Setup Page Player Menu ENG Disc Menu ENG Audio ENG Sub...

Page 46: ...MENU button 1 Press the MENU button 4 Press the π buttons to select the desired language then press the ENTER button 2 Press the buttons to select Language Setup Page then press the or ENTER button 3 Press the π buttons to select Audio then press the or ENTER button Language Setup Page Player Menu ENG Disc Menu ENG Audio ENG Subtitle AUTO DivX Subtitle Western Language Setup Page Player Menu ENG D...

Page 47: ...on 1 Press the MENU button 4 Press the π buttons to select the desired language then press the ENTER button 2 Press the buttons to select Language Setup Page then press the or ENTER button 3 Press the π buttons to select Subtitle then press the or ENTER button Language Setup Page Player Menu ENG Disc Menu ENG Audio ENG Subtitle AUTO DivX Subtitle Western Language Setup Page Player Menu ENG Disc Me...

Page 48: ...R button 2 Press the buttons to select Language Setup Page then press the or ENTER button 3 Press the π buttons to select DivX Subtitle then press the or ENTER button Language Setup Page Player Menu ENG Disc Menu ENG Audio ENG Subtitle AUTO DivX Subtitle Western Language Setup Page Player Menu ENG Disc Menu ENG Audio ENG Subtitle AUTO DivX Subtitle Western Language Setup Page Player Menu ENG Disc ...

Page 49: ... to select Audio Setup Page then press the or ENTER button To make the setup menu disappear press the MENU button Audio Setup Page Dolby Digital Out PCM MPEG2 Digital Output PCM Dynamic Compression On PCM Down Sampling On Power On Music On Audio Setup Page Dolby Digital Out PCM MPEG2 Digital Output PCM Dynamic Compression On PCM Down Sampling On Power On Music On Audio Setup Page Dolby Digital Out...

Page 50: ...ream when connecting to a Dolby Digital Decoder MPEG2 Digital Output PCM Converts to PCM 2CH audio Bitstream Converts to MPEG 2 Digital Bitstream 5 1 or 7 1 CH Select Bitstream when using the Digital Audio Output Note When play disc that have MPEG Audio at bitstream selection the coaxial may not have Audio output its depend on the AV Receiver Dynamic Compression On To select dynamic compression Th...

Page 51: ...tem then press the or ENTER button 1 Press the MENU button 2 Press the buttons to select DIsplay Setup Page then press the or ENTER button To make the setup menu disappear press the MENU button Display Setup Page TV Aspect Wide Screen Message On Video Output I SCAN Black Level Off DivX VOD Display Setup Page TV Aspect Wide Screen Message On Video Output I SCAN Black Level Off DivX VOD ...

Page 52: ...isc inserted the Video output mode is changed in the following order P SCAN I SCAN If the Yes No selection in the Display Setup sub Menu is not made within 10 seconds the screen returns to the previous menu Black Level Adjusts the brightness of the screen On or Off It does not function in Progressive mode DivX VOD Select DivX VOD then or ENTER button Press OK to see the DivX Registration Number If...

Page 53: ...have been assigned a rating which helps you control the types of DVDs that your family watches There are up to 8 rating levels on a disc Parental Page Parental Password Parental Page Parental Password Parental Page Parental Password 2 G 3 PG 4 PG 13 5 PGR 6 R 7 NC17 8 ADULT Parental Page Parental Password Note KID SAFE G General Audiences All Ages Admitted PG Parental Guidance suggested Some mater...

Page 54: ...ress the MENU button 2 Press the buttons to select Parental Page then press the or ENTER button Note If you have forgotten your password see Forgot Password in the Troubleshooting Guide To make the setup menu disappear press the MENU button Parental Page Parental Password Parental Page Parental Password 4 Select Change Password then press ENTER button Enter your password By default the password is...

Page 55: ...re Quality BD Wise Off HDMI Page HDMI Auto Anynet HDMI CEC On Picture Quality BD Wise Off Resolution 480p 720 x 480 720p 1280 x 720 1080i 1920 x 1080 1080p 1920 x 1080 HDMI Page HDMI Auto Anynet HDMI CEC On Picture Quality BD Wise Off Auto 480p 720p 1080i 1080p Note The resolutions available for HDMI output depend on the connected TV or projector For details see the user s manual of your TV or pro...

Page 56: ...nnecting the DVD player to a SAMSUNG TV using an HDMI Cable see pages 12 13 This is only available with SAMSUNG TVs that support Anynet To operate Anynet you must turn Anynet HDMI CEC On in the Setup Menu 5 Set the Anynet function on your Samsung TV See your TV instruction manual for more information When you press Anynet button on the TV remote control the OSD to the right will appear View TV Sel...

Page 57: ... Same as MENU button on the DVD Player remote control Device Operation Same as INFO button on the DVD Player remote control Note While watching TV your TV screen will change to the play screen when you press the PLAY button of the DVD player If you play a DVD when the TV power is off the TV will power On If you turn the TV off the DVD Player will power off automatically If you change from HDMI to ...

Page 58: ...I Auto Anynet HDMI CEC On Picture Quality BD Wise Off HDMI Page HDMI Auto Anynet HDMI CEC On Picture Quality BD Wise Off Picture Quality Page Brightness Level 3 Contrast Level 3 Color Saturation Level 3 Note Brightness Level 1 Level 5 Contrast Level 1 Level 5 Color Saturation Level 1 Level 5 Picture Quality Page Brightness Level 3 Contrast Level 3 Color Saturation Level 3 Level 1 Level 2 Level 3 L...

Page 59: ... On HDMI Page HDMI Auto Anynet HDMI CEC On Picture Quality BD Wise Off How to turn Off the BD Wise If you wish to change to other resolution when BD Wise On Please choose a method between these two as follows Method 1 2 Press the buttons to select HDMI Page then press the or ENTER button 1 Press the MENU button HDMI Page HDMI BD Wise Anynet HDMI CEC On Picture Quality BD Wise On 2 Press the button...

Page 60: ... BD Wise On Yes No Do you want to turn off BD Wise Mode and change to selected Resolution 3 Press the π buttons to select BD Wise then press the or ENTER button Press the π buttons to select Off then press the ENTER button The HDMI resolution will be changed to maximum resolution supported by your TV Method 2 2 Press the buttons to select HDMI Page then press the or ENTER button 1 Press the MENU b...

Page 61: ...ge doesn t appear please contact Samsung Customer Service Do not press any button or unplug the power cord during the upgrade The upgrade procedure may change refer to the web site www samsung com When software is upgrade video and audio settings you have made will return to their default factory settings We recommend you write down your settings so that you can easily reset them after the upgrade...

Page 62: ...tton on the front panel for more than 5 seconds with no disc inside All settings will revert to the factory settings Press the button on the panel for more than 5 seconds with no disc inside All settings including the password will revert to the factory settings Don t use this unless absolutely necessary Go to the contents and find the section of the instruction book that contains the explanations...

Page 63: ... 5 C to 35 C 10 to 75 Reading Speed 3 49 4 06 m sec Approx Play Time Single Sided Single Layer Disc 135 min Reading Speed 4 8 5 6 m sec Maximum Play Time 74 min Reading Speed 4 8 5 6 m sec Maximum Play Time 20 min 1 channel 1 0 Vp p 75 Ω load Y 1 0 Vp p 75 Ω load Pr 0 70 Vp p 75 Ω load Pb 0 70 Vp p 75 Ω load 480p 720p 1080i 1080p 2Vrms 20Hz 20kHZ Coaxial terminal S PDIF General Disc Video Output A...

Page 64: ...URG 02 261 03 710 www samsung com lu NETHERLANDS 0900 SAMSUNG 726 7864 0 10 Min www samsung com nl NORWAY 815 56 480 www samsung com no POLAND 0 801 801 881 022 607 93 33 www samsung com pl PORTUGAL 80820 SAMSUNG 726 7864 www samsung com pt SLOVAKIA 0800 SAMSUNG 726 7864 www samsung com sk SPAIN 902 1 SAMSU 72678 www samsung com es SWEDEN 0771 400 200 www samsung com se U K 0845 SAMSUNG 7267864 ww...

Page 65: ... It must be presented to the authorized service center at the time service is requested This warranty does not cover damage due to accident fire flood and or other acts of God misuse incorrect line volt age improper installation improper or unauthorized repairs commercial use or damage that occurs in shipping Exterior and interior finish lamps glass are not covered under this warranty Customer adj...

Page 66: ...68 01750B 01 QUESTIONS OR COMMENTS COUNTRY CALL OR VISIT US ONLINE AT WRITE IN THE US 1 800 SAMSUNG 7267864 www samsung com Samsung Electronics America Inc 105 Challenger Road Ridgefield Park NJ 07660 0511 ...

Page 67: ...bilités Merci d avoir choisi Samsung Pour bénéfi cier d un service plus complet enregistrez votre produit sur le site www samsung com global register Lecteur DVD Manuel d utilisation DVD 1080P9 DVD 1080PR AK68 01750B 01 ...

Page 68: ...ème broche de la fiche avec mise à la masse sont prévues par mesure de sécurité Si la fiche fournie ne convient pas à la prise murale consultez un électricien et faites remplacer la prise 10 Protégez le cordon d alimentation Placez le de telle sorte qu on ne puisse pas marcher dessus ni l écraser Prenez grand soin du cordon en particulier au niveau de la fiche de la prise murale et à la sortie de ...

Page 69: ... Pour prévenir une interférence électromagnétique avec des appareils électriques tels que poste de radio ou téléviseur utilisez les câbles et connecteurs prévus pour la connexion L appareil ne droit pas être exposé aux gauttes ou aux éclaboussures et aucun objet contenant du liquide comme un vase ne doit être posé sur l appareil Utilisez un adaptateur approprié si l alimentation est du type 240V C...

Page 70: ...18 3 utilisés ou vendus en complément de ce produit La licence ne couvre que l utilisation de ce produit pour encoder et ou décoder des fichiers audio conformément aux normes ISO IEC 11172 3 ou ISO IEC 13818 3 Aucun droit n est accordé par cette licence concernant des fonctions ou des caractéristiques du produit non conformes aux normes ISO IEC 11172 3 ou ISO IEC 13818 3 Attention Avant de connect...

Page 71: ...t bien placées en accord avec la polarité indiquée 3 Refermez le couvercle du compartiment Télécommande Piles pour la télécommande AAA Mode d emploi Câble de connexion Vidéo Audio Cinch Si la télécommande ne fonctionne pas Vérifiez la polarité des piles Vérifiez l état d usure des piles Vérifiez que le capteur de la télécommande n est pas obstrué Vérifiez l absence de lumière fluorescente à proxim...

Page 72: ...ecture lente BRANCHEMENTS 12 12 Choix de la connexion 12 Connexion à un téléviseur prise HDMI 12 Connexion à un téléviseur prise DVI 14 Raccordement à un téléviseur balayage progressif 15 Raccordement à un téléviseur affichage entrelacé 16 Raccordement à un système audio sortie Video 17 Connexion à un système audio amplificateur deux canaux 18 Raccordement à un système audio amplificateur Dolby Di...

Page 73: ...idéo audio numérique entre le lecteur et votre TV Extraction audio du CD Cette fonction vous permet de copier des fichiers audio à partir d un disque vers un appareil USB au format MP3 CD audio uniquement CD DA Remarque Disques ne pouvant être lus par ce lecteur DVD ROM DVD RAM CD ROM CDV CDI CVD Disques CDG uniquement lecture audio sans les graphiques La capacité de lecture dépend des conditions ...

Page 74: ...lente qualité audio et vidéo Les fonctions vidéo et audio peuvent être facilement sélectionnées sur le menu à l écran Type de disque Type d enregistrement Taille des disques Durée maximale de lecture Caractéristiques DVD 5 31 2 74 min 20 min Audio Les disques compacts étant enregistrés avec un signal numérique la qualité sonore est irréprochable avec moins de distorsion et sans risque d usure ou d...

Page 75: ... numérique le lecteur MP3 la clé USB à mémoire flash le lecteur de carte ou tout autre support de stockage amovible 9 STANDBY ON Tournez le sur On Off pour allumer éteindre le lecteur Afficheur 1 Témoin In Disc Disque présent DVD vidéo CD audio CD R RW DVDR RW RAM DVD R RW 2 Témoin DVD VIEW VISIONNER DVD 3 Témoin CD 4 Témoin USB 5 Disc Media indicator DVD R DVD RW DVD R DVD RW 6 Témoin HDMI HDMI 4...

Page 76: ...I Utilisez le câble HDMI ou HDMI DVI pour relier cette prise à la prise HDMI ou DVI de votre téléviseur pour augmenter la qualité de l image Si le câble HDMI est branché sur un téléviseur doté d une sortie HDMI le mode HDMI s active automatiquement au bout de 10 secondes Remarque Référez vous au manuel de l utilisateur de votre récepteur pour savoir si votre TV prend en charge le balayage progress...

Page 77: ... lecture d un disque d un instant Aàun instant B 23 Touche STEP TV SOURCE Pour avancer la lecture image par image Appuyez sur cette touche pour sélectionner une source de téléviseur disponible en mode TV 24 Touches TV CH Sélection de lla chaîne 25 Touche PAUSE Pour suspendre la lecture 26 Touche PLAY Pour commencer la lecture 27 Touche RETURN Pour revenir au menu précédent 28 Touche EXIT Pour quit...

Page 78: ... OUT située à l arrière du lecteur DVD à la prise HDMI IN de votre téléviseur 2 Appuyez sur le sélecteur d entrée de la télécommande de votre téléviseur jusqu à ce que le signal HDMI du lecteur DVD apparaisse à l écran Connexion à un téléviseur prise DVI 1 À l aide d un câble HDMI DVI non compris raccordez la prise HDMI OUT située à l arrière du lecteur DVD à la prise DVI IN de votre téléviseur 2 ...

Page 79: ...nal numérique pur depuis le lecteur jusqu à votre TV Qu est ce HDCP HDCP High bandwidth Digital Content Protection est un système de protection contre la copie du contenu du DVD émis par HDMI DVI Il fournit un lien numérique sécurisé entre la source PC DVD etc et le dispositif d affichage TV projecteur etc Le contenu est encrypté sur le dispositif source afin d empêcher des copies non autorisées S...

Page 80: ...d utilisation du téléviseur relatives aux réglages du balayage progressif dans les menus du téléviseur En fonction du modèle de votre téléviseur le branchement peut différer de celui représenté sur le schéma ci dessus 2 A l aide des câbles audio raccordez les sorties AUDIO OUT rouge et blanche situées à l arrière du lecteur DVD aux entrées AUDIO IN rouge et blanche de votre téléviseur Allumez le l...

Page 81: ... varier en fonction de votre téléviseur Veuillez vous reporter au manuel d utilisation de celui ci pour plus de détails 1 À l aide de câbles de composant vidéo non compris raccordez les prises COMPONENT VIDEO OUT situées à l arrière du lecteur DVD aux prises COMPONENT IN de votre téléviseur 2 A l aide des câbles audio raccordez les sorties AUDIO OUT rouge et blanche situées à l arrière du lecteur ...

Page 82: ...z vous à la rubrique Raccordement d un amplificateur voir pp 17 18 Le nombre et l implantation des prises peuvent varier en fonction de votre téléviseur Veuillez vous reporter au manuel d utilisation de celui ci pour plus de détails Si votre téléviseur est équipé d une entrée audio raccordez la à la sortie AUDIO OUT prise blanche de gauche du lecteur DVD Si vous appuyez plusieurs fois sur le bouto...

Page 83: ... deux canaux 1 A l aide des câbles audio raccordez les sorties AUDIO OUT rouge et blanche situées à l arrière du lecteur DVD aux entrées AUDIO IN rouge et blanche de votre téléviseur 2 À l aide du ou des câble s vidéo raccordez les prises HDMI COMPONENT ou VIDEO OUT situées à l arrière du lecteur DVD à la prise VIDEO COMPONENT ou DVI IN de votre téléviseur de la façon décrite aux pages 12 à 16 3 A...

Page 84: ...ou DTS 1 Si vous utilisez un câble coaxial non fourni raccordez la sortie DIGITAL AUDIO OUT COAXIAL située à l arrière du lecteur DVD à l entrée DIGITAL AUDIO IN COAXIAL de votre amplificateur 2 À l aide du ou des câble s vidéo raccordez les prises HDMI COMPONENT ou VIDEO OUT situées à l arrière du lecteur DVD à la prise VIDEO COMPONENT ou DVI IN de votre téléviseur de la façon décrite aux pages 1...

Page 85: ...ue d affichage souhaitée Après validation vous pouvez néanmoins la modifier en appuyant sur le bouton situé en façade de l appareil pendant plus de cinq secondes aucun disque n étant chargé L écran SELECT MENU LANGUAGE SELECTION DE LA LANGUE D AFFICHAGE réapparaît afin que vous puissiez activer la langue de votre choix Lecture 1 Appuyez sur la touche OPEN CLOSE et le tiroir à disque s ouvre 2 Plac...

Page 86: ...on Pour reprendre appuyez à nouveau sur la touche PLAY Remarque Si vous laissez le lecteur en pause l appareil se met en position arrêt après 5 minutes 7 Lecture pas à pas Sauf CD Appuyez sur la touche STEP incrément sur la télécommande durant la lecture A chaque pression sur la touche une image vient remplacer la précédente En mode STEP le son est coupé Appuyez sur PLAY pour retourner au mode nor...

Page 87: ...érente de la vitesse indiquée pour cette fonction Aucun son n est émis en mode Recherche sauf si l appareil lit un CD Saut des plages Si vous appuyez sur SKIP pendant la lecture d un DVD vous passerez au chapitre suivant Si vous appuyez sur SKIP vous retournerez au début du chapitre En appuyant de nouveau sur la touche vous passerez au début du chapitre précédent Lors de la lecture d un CD si vous...

Page 88: ...ure appuyez sur la touche INFO de la télécommande Vous pouvez sélectionner Info dans le menu de fonctions en appuyant sur le bouton MENU 2 Servez vous des boutons π pour sélectionner l élément souhaité 3 Pour fermer l écran appuyez à nouveau sur la touche INFO DVD MPEG4 1 2 1 1 0 00 13 ENG 5 1CH Non 1 1 1 1 0 00 13 MP3 1 1 Non ...

Page 89: ...u film à l heure désirée Pour cela vous devez indiquer l heure de début comme référence La fonction de recherche temporelle n est pas compatible avec certains disques Indique la langue de la piste sonore du film Dans l exemple la piste sonore en lecture en mode 5 1CH est en anglais Un disque DVD peut comporter un maximum de huit pistes sonores Indique la langue des sous titres sur le disque Vous p...

Page 90: ...intégralité du disque en cours de lecture Non Fonction A B Repeat 1 Appuyez sur le bouton REPEAT A B de la télécomande 2 Appuyez sur le bouton REPEAT A B à l instant A où vous souhaitez faire démarrer la lecture répétée 3 Appuyez sur le bouton REPEAT A B à l instant B où la lecture répétée doit s arrêter 4 Pour repasser en lecture normale appuyez sur le bouton REPEAT A B Remarque La fonction A B R...

Page 91: ...de la danse de la musique etc de façon à pouvoir les visualiser plus précisément Pendant la lecture d un DVD 1 Lors de la lecture appuyez sur la touche PAUSE 2 Appuyez sur la touche SEARCH et maintenez le enfoncé pour choisir la vitesse de lecture 1 2 1 4 1 8 ou 1 16 moitié de la vitesse normale en mode PAUSE ...

Page 92: ...ichage du DVD au rapport 16 9 L image s étire verticalement Ajustement à l écran Des bandes noires cachent les parties supérieure et inférieure de l écran L image remplit l espace entre les deux bandes et a l apparence étirée à la verticale Elargissement Les extrémités et les parties supérieure et inférieure de l écran sont amputées alors que la partie centrale de l écran s agrandit Ajustement Ver...

Page 93: ...rticale Elargissement Les extrémités et les parties supérieure et inférieure de l écran sont amputées alors que la partie centrale de l écran s agrandit Les disques au rapport d aspect 4 3 Format Classique Le contenu des DVD s affiche au rapport 4 3 SCREEN FIT Des bandes noires cachent les parties supérieure et inférieure de l écran L image remplit l espace entre les deux bandes et a l apparence é...

Page 94: ...régé 2 Pour retirer l icône AUDIO appuyez sur le bouton CANCEL ou RETURN Remarque Cette fonction varie en fonction des langues audio présentes sur le disque et peut ne pas fonctionner Un disque DVD peut proposer jusqu à 8 langues d écoute Pour bénéficier de la même langue audio à chaque fois que vous lisez un DVD Voir la rubrique Choix de la langue de la bande sonore à la page 46 Appuyez sur le bo...

Page 95: ...cette fonction dépend de la langue enregistrée sur le disque Un disque DVD peut proposer jusqu à 32 langues Pour bénéficier de la même langue de sous titre à chaque fois que vous lisez un DVD Voir la rubrique Choix de la langue des sous titres à la page 47 DVD English Sélection de l angle de prise de vue à l écran Certains DVD permettent de voir une séquence sous plusieurs angles de vue Modificati...

Page 96: ...lecture appuyez sur la touche BOOKMARK 2 Lorsque vous avez trouvé la séquence que vous voulez repérer appuyez sur la touche ENTER Vous pouvez marquer simultanément jusqu à trois scènes différentes Signet Lecture Clear Signet TT 01 CH 05 Time 0 39 23 1 Lecture Clear Rappel d une séquence repérée 1 Pendant la lecture appuyez sur la touche BOOKMARK 2 Appuyez sur les boutons ou π pour sélectionner une...

Page 97: ...ure appuyez sur la touche BOOKMARK 3 Appuyez sur la touche CANCEL pour effacer le numéro du signet Signet TT 01 CH 05 Time 0 39 23 1 2 3 Lecture Clear Utilisation des fonctions avancées Utilisation des fonctions avancées DVD 1 En mode lecture pause d un DVD appuyez plusieurs fois sur la touche ZOOM de la télécommande pour passer en mode zoom 2x 3x et 4x ...

Page 98: ...e Il y a 4 modes activés grâce à la touche REPEAT Non Lecture normale Plage Répétition de la piste actuelle Repertoire Répétition du dossier actuel Aléatoire Les fichiers du disque sont lus dans un ordre aléatoire Icône d un fichier AUDIO Icône d un fichier STOP ú Icône d un fichier PLAY Ø Icône d un fichier PAUSE Icône d un fichier MP3 Icône d un fichier WMA Icône d un fichier JPEG Icône d un fic...

Page 99: ...léatoire 1 Appuyez sur la touche REPEAT pour modifier le mode de lecture Il y a quatre modes Non Plage Folder et Aléatoire Non Lecture normale Plage Répétition du fichier musical actuel Repertoire Répétition des fichiers musicaux ayant la même extension dans le dossier actuel Aléatoire Les fichiers musicaux ayant la même extension sur le disque sont lus dans un ordre aléatoire 001 004 0 00 28 0 03...

Page 100: ... l inverse les fichiers comportant des fréquences d échantillonnage inférieures à 128 Kbps ne seront pas correctement lus Utilisez un taux de compression d au moins 64 Kpbs pour l enregistrement des fichiers WMA La qualité sonore des fichiers WMA dépend principalement du taux de compression ou de décompression choisi L obtention d un CD audio de bonne qualité sonore nécessite une fréquence d échan...

Page 101: ...yez sur le touche REPEAT pour changer de mode de lecture Il existe 3 modes Non Folder Titre Folder répète les fichiers AVI possédant la même extension dans le dossier actuel Titre répète le titre en cours de lecture Appuyez sur le bouton REPEAT A B à l instant A où vous souhaitez faire démarrer la lecture répétée Appuyez sur le bouton REPEAT A B à l instant B où la lecture répétée doit s arrêter P...

Page 102: ... PC ne puissent pas être lus Seuls les types de Codec les versions et les résolutions correspondants aux spécifications sont pris en charge Cet appareil prend en charge les CD R et les CD RW enregistrés dans un format MPEG 4 conforme à la norme ISO9660 Fichier AVI d un CD R Cet appareil peut lire les formats de compression vidéo suivants dans le format de fichier AVI DivX 3 11 DivX 4 profil simple...

Page 103: ...artitionné appuyez sur la touche pour sélectionner l une des partitions et appuyez sur ENTER 3 Appuyez sur les touches π ou pour sélectionner le fichier USB Appuyez sur ENTER pour ouvrir le fichier Retrait sécuritaire du support USB Afin d empêcher tout dommage à la mémoire du support USB effectuez le retrait sécuritaire de ce dernier avant d en débrancher le câble USB Appuyez sur la touche STOP A...

Page 104: ...illis Nom de fichier Extension de fichier Débit binaire Version Pixel Fréquence d échantillonnage Photo JPG JPG JPEG 640X480 Musique MP3 MP3 80 384kbps 44 1kHz WMA WMA 56 128kbps V8 44 1kHz Film VCD MPG MPEG 1 5Mbps VCD1 1 VCD2 0 320X480 44 1kHz WMV WMV 4Mbps V1 V2 V3 V7 720X480 44 1KHz 48KHz DivX AVI ASF 4Mbps DivX3 11 DivX5 1 XviD 800X600 44 1KHz 48KHz CBI Control Bulk Interrupt n est pas accuei...

Page 105: ...binaire appuyez sur ENTER pour passer de 128kbps 192kbps 128kbps Standard 128kbps Better Quality 192kbps Sélection des appareils appuyez sur ENTER pour passer d un appareil à l autre max de 4 Sélectionner dessélectionner appuyez sur Entrée pour passer de Sélectionner tout à Sélectionner aucun Pour annuler la copie en cours appuyez sur la touche CANCEL ANNULER 001 004 0 00 00 0 00 00 TRACK01 TRACK0...

Page 106: ... sélectionnées Si vous n appuyez sur aucune touche par défaut le diaporama démarre automatiquement par intervalle de 8 secondes 001 004 0 00 00 0 00 00 JPEG 4 Non Rotation À chaque fois que vous appuyez sur la touche l image pivote de 90 degrés en sens horaire À chaque fois que vous appuyez sur la touche π l image pivote de 180 degrés À chaque fois que vous appuyez sur la touche l appareil produit...

Page 107: ...tionner l image précédente ou suivante Diaporama Appuyez sur le bouton PLAY pour lancer la fonction SLIDE Diaporama Appuyez sur le bouton STOP á cet instant pour arrêter la fonction SLIDE Diaporama Remarque En fonction de la taille du fichier le temps écoulé entre chaque image peut être différent de l intervalle de temps défini En fonction de la taille de l image celle ci peut s afficher avec des ...

Page 108: ...D d images Kodak Les fichiers JPEG dans le dossier images peuvent être lus automatiquement CD d images Konica Si vous souhaitez voir l image sélectionnez les fichiers JPEG dans le menu clips CD d images Fuji Si vous souhaitez voir l image sélectionnez les fichiers JPEG dans le menu clips CD d images QSS L unité ne peut pas lire le CD d images QSS Si le nombre de fichiers sur le disque 1 dépasse la...

Page 109: ...eurs de définir le seuil au delà duquel ils désirent interdire à leurs enfants de regarder certains films comprenant des scènes de violence ou réservés aux adultes etc HDMI Page Réglage de la HDMI 1 L unité étant en mode Stop arrêt appuyez sur la touche MENU de la télécommande Utilisez les boutons pour sélectionner Setup puis appuyez sur ou sur ENTER 2 Appuyez sur les boutons π pour accéder aux di...

Page 110: ...nner Menus du lecteur puis appuyez sur ou sur ENTER 4 Appuyez sur les boutons π pour sélectionner la langue souhaitée puis appuyez sur le bouton ENTER La langue est sélectionnée et l écran revient au menu d installation Pour faire disparaître le menu de configuration appuyez sur le bouton MENU Réglage de la Langue Page Menus du lecteur FRE Menus du disque FRE Audio FRE Sous titre AUTO DivX Sous ti...

Page 111: ...angue est sélectionnée et l écran revient au menu d installation Pour faire disparaître le menu de configuration appuyez sur le bouton MENU 1 Appuyez sur la touche MENU 2 Utilisez les boutons pour sélectionner Réglage de la Langue Page puis appuyez sur ou sur ENTER Réglage de la Langue Page Menus du lecteur FRE Menus du disque FRE Audio FRE Sous titre AUTO DivX Sous titre Western Réglage de la Lan...

Page 112: ...est sélectionnée et l écran revient au menu d installation Pour faire disparaître le menu de configuration appuyez sur le bouton MENU 1 L unité étant en mode Stop arrêt appuyez sur la touche MENU 2 Utilisez les boutons pour sélectionner Réglage de la Langue Page puis appuyez sur ou sur ENTER Réglage de la Langue Page Menus du lecteur FRE Menus du disque FRE Audio FRE Sous titre AUTO DivX Sous titr...

Page 113: ... sur le disque le système sélectionne la langue d origine préenregistrée La langue est sélectionnée et l écran revient au menu d installation Pour faire disparaître le menu de configuration appuyez sur le bouton MENU 1 L unité étant en mode Stop arrêt appuyez sur la touche MENU 2 Utilisez les boutons pour sélectionner Réglage de la langue Page puis appuyez sur ou sur ENTER Réglage de la Langue Pag...

Page 114: ...onfiguration appuyez sur le bouton MENU 1 L unité étant en mode Stop arrêt appuyez sur la touche MENU 3 Utilisez les boutons π pour sélectionner Réglage de la langue Page puis appuyez sur ou sur ENTER Réglage de la Langue Page Menus du lecteur FRE Menus du disque FRE Audio FRE Sous titre AUTO DivX Sous titre Western Réglage de la Langue Page Menus du lecteur FRE Menus du disque FRE Audio FRE Sous ...

Page 115: ...yez sur le bouton ou ENTER 1 L unité étant en mode Stop arrêt appuyez sur la touche MENU Pour faire disparaître le menu de configuration appuyez sur le bouton MENU Option Audio Page Dolby Digital PCM MPEG 2 Digital PCM Compression dynamique Oui Sous Echantillonnage PCM Oui Musique en demarrage Oui Option Audio Page Dolby Digital PCM MPEG 2 Digital PCM Compression dynamique Oui Sous Echantillonnage...

Page 116: ...udio numérique Remarque Si vous tentez de lire un disque contenant des données audio au format MPEG à l aide de la sortie coaxiale réglée sur Bitstream il est possible que certains récepteurs AV ne puissent reproduire le son Compression Dynamique Oui Pour sélectionner la compression dynamique Non Pour sélectionner la gamme standard Sous Echantillonnage PCM Oui Sélectionnez cette option lorsque l a...

Page 117: ... ENTER 3 Appuyez sur les boutons π pour sélectionner l élément souhaité puis appuyez sur le bouton ou ENTER 1 L unité étant en mode Stop arrêt appuyez sur la touche MENU Pour faire disparaître le menu de configuration appuyez sur le bouton MENU Option D affichage Page Format écran Large Messages écran Oui Sortie Vidéo I SCAN Niveau des noirs Non DivX VOD Option D affichage Page Format écran Large ...

Page 118: ... basculé sur Pas de disque en une séquence régulière P SCAN I SCAN Niveau des noirs Ajuste la luminosité de l écran Oui Activé ou NON Désactivé Ne fonctionne pas en mode Balayage progressif DivX VOD Sélectionner DivX VOD puis appuyez sur ou sur ENTER Appuyez sur OK pour visionner le numéro d enregistrement Divx Si vous appuyez sur OK le menu de configuration disparaît OK OK OK DivX R Vidéo sur Dem...

Page 119: ...mple si vous choisissez niveau 6 les niveaux 7 et 8 ne seront pas lus 5 Composez un code secret Parental Page Parental Code secret Parental Page Parental Code secret Parental Page Parental Code secret 2 G 3 PG 4 PG 13 5 PGR 6 R 7 NC17 8 Adulte Parental Page Parental Code secret Remarque Tout Public G Auditoire général personnes de tout âge PG Surveillance parentale conseillée certaines scènes ne s...

Page 120: ...s appuyez sur ou sur ENTER Remarque Si vous avez oublié votre mot de passe reportez vous à la rubrique Mot de passe oublié dans le Guide de dépannage Problèmes et solutions Pour faire disparaître le menu de configuration appuyez sur le bouton MENU Parental Page Parental Code secret Parental Page Parental Code secret Parental Page Parental Code secret Changer 5 Veuillez changer le mot de passe 0000...

Page 121: ...C Oui Qualité d Image BD Wise Non HDMI Page HDMI Auto Anynet HDMI CEC Oui Qualité d Image BD Wise Non Résolution 480p 720 x 480 720p 1280 x 720 1080i 1920 x 1080 1080p 1920 x 1080 HDMI Page HDMI Auto Anynet HDMI CEC Oui Qualité d Image BD Wise Non Auto 480p 720p 1080i 1080p Remarque Les résolutions disponibles pour les sorties HDMI varient selon la TV ou le projecteur connecté e Pour plus de détai...

Page 122: ...léviseur SAMSUNG à l aide d un câble HDMI Voir les pages 12 et 13 Ce mode n est disponible qu avec les téléviseurs Samsung pouvant accueillir Anynet Sélectionnez On Activée lorsque le DVD 1080P9 est raccordé à un téléviseur Samsung pouvant accueillir l option Anynet 5 Réglez l option Anynet sur votre téléviseur Reportez vous au manuel de l usager de votre téléviseur pour plus de détails Lorsque vo...

Page 123: ... Composite Composantes etc de votre téléviseur en cours de lecture d un DVD le lecteur DVD s arrête La télécommande du téléviseur vous permet d exploiter le lecteur DVD Touches du téléviseur utilisées pour contrôler le lecteur DVD et touches touches Select Device Sélectionnez l appareil Utilisez cette option pour sélectionner un appareil Menu on Device Menu de l appareil Même résultat avec la touc...

Page 124: ...ité d Image Éclat Niveau 3 Contraste Niveau 3 Saturation en Couleur Niveau 3 Remarque Éclat Niveau 1 Niveau 5 Contraste Niveau 1 Niveau 5 Saturation en couleur Niveau 1 Niveau 5 Page de Qualité d Image Éclat Niveau 3 Contraste Niveau 3 Saturation en Couleur Niveau 3 Niveau 1 Niveau 2 Niveau 3 Niveau 4 Niveau 5 Réglage de l option Qualité d Image HDMI Page HDMI Auto Anynet HDMI CEC Oui Qualité d Im...

Page 125: ...lity en réglant la fonction BD Wise à On Activé HDMI Page HDMI Auto Anynet HDMI CEC Oui Qualité d Image BD Wise Non HDMI Page HDMI Auto Anynet HDMI CEC Oui Qualité d Image BD Wise Oui 2 Utilisez les boutons pour sélectionner HDMI Page puis appuyez sur ou sur ENTER 1 Appuyez sur la touche MENU HDMI Page HDMI BD Wise Anynet HDMI CEC Oui Qualité d Image BD Wise Oui Pour désactiver BD Wise Si vous vou...

Page 126: ...les boutons π pour sélectionner BD Wise puis appuyez sur ou sur ENTER Utilisez les boutons π pour sélectionner Non puis appuyez sur ENTER La résolution HDMI passera à la résolution maximale prise en charge par votre téléviseur Oui Non Voulez vous désactiver le mode Wise BD et de chargement que la résulution choisie HDMI Page HDMI BD Wise Anynet HDMI CEC Oui Qualité d Image BD Wise Oui HDMI Page HD...

Page 127: ...iciel démarre Le tiroir s ouvre automatiquement pendant l écriture Attendez 2 minutes après avoir retiré le disque Lorsque la mise à jour est réussie le lecteur s éteint et se remet en marche après la fermeture automatique du tiroir 3 Appuyez sur les touches numériques pour sélectionner la langue souhaitée Remarque Veuillez contacter votre Centre de service technique Samsung si le message Sélectio...

Page 128: ...euvent ne pas fonctionner correctement si le code du disque ne correspond pas à la fonction Le format d écran est fixé en fonction de son enregistrement sur le DVD Vérifiez si la sélection Sortie numérique dans le Menu options audio est correcte Appuyez sur le bouton Sur le panneau avant pendant plus de 5 secondes en l absence de disque Tous les réglages sont réinitialisés sur les valeurs usine Ap...

Page 129: ...45 15 09 pi sec Durée approximative de lecture Disque mono face Disque mono couche 135 min Vitesse de lecture 15 75 18 37 pi sec Durée maximale de lecture 74 min Vitesse de lecture 15 75 18 37 pi sec Durée maximale de lecture 20 min 1 canaux 1 0 Vcc impédance de75 Ω Y 1 0 Vcc impédance de 75 Ω Pr 0 70 Vcc impédance de 75 Ω Pb 0 70 Vcc impédance de 75 Ω 480p 720p 1080i 1080p 2Vrms 20 Hz à 20 kHz Bo...

Page 130: ...www samsung com it LUXEMBURG 02 261 03 710 www samsung com lu NETHERLANDS 0900 SAMSUNG 726 7864 0 10 Min www samsung com nl NORWAY 815 56 480 www samsung com no POLAND 0 801 801 881 022 607 93 33 www samsung com pl PORTUGAL 80820 SAMSUNG 726 7864 www samsung com pt SLOVAKIA 0800 SAMSUNG 726 7864 www samsung com sk SPAIN 902 1 SAMSU 72678 www samsung com es SWEDEN 0771 400 200 www samsung com se U ...

Page 131: ...aration sous garantie Cette garantie ne couvre pas les dommages causés par un accident un incendie une inondation un cas de force majeure un mauvais usage ou une tension incorrecte La garantie ne couvre pas une mauvaise installation une mauvaise réparation une réparation non autorisée et tout usage commercial ou dommages survenus durant le transport Le fini extérieur et intérieur de même que les l...

Page 132: ...AK68 01750B 01 ...

Reviews: