background image

68

Setting up the play back function using the LCD monitor

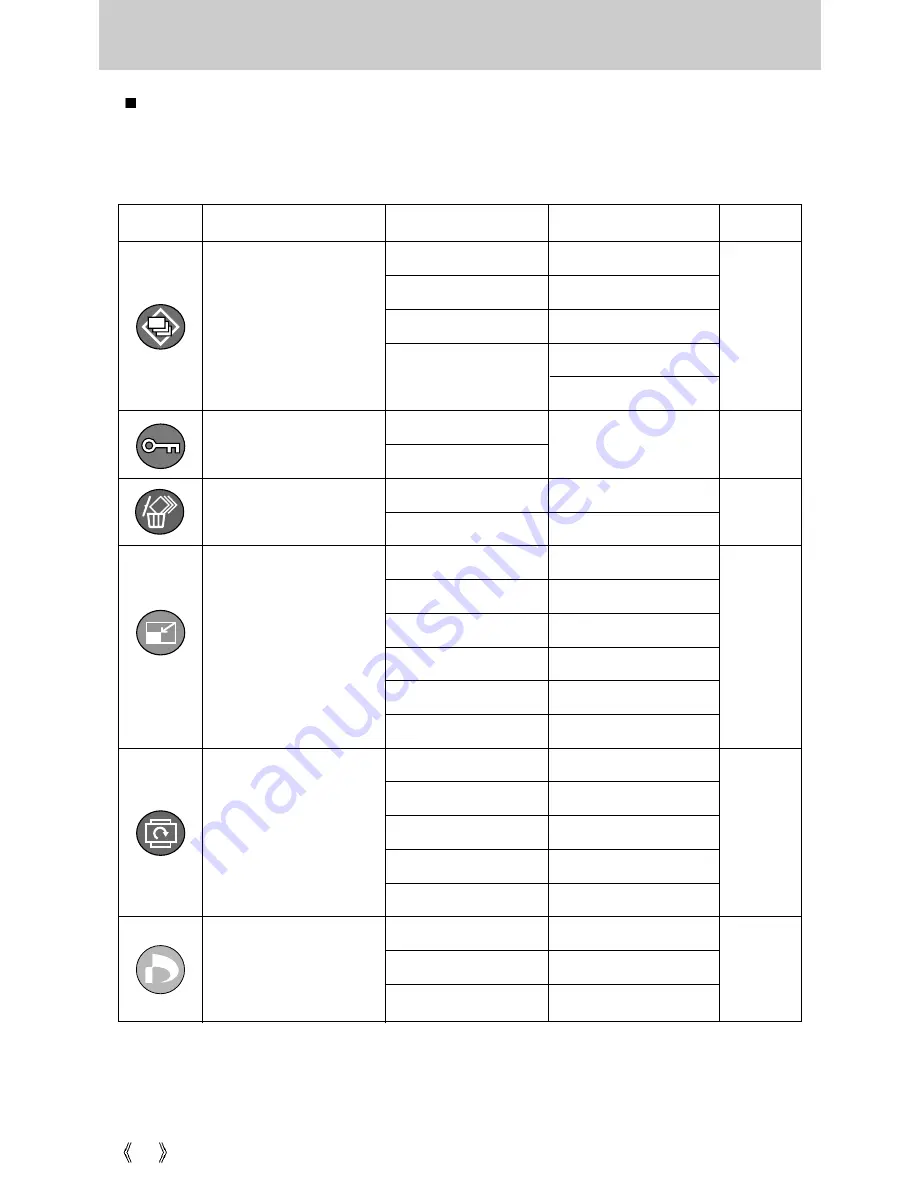
PLAY mode functions can be changed by using the LCD monitor. In the PLAY mode,
pressing the MENU button displays the menu on the LCD monitor. The menus you can set
up in Play mode are as follows. To capture an image after setting up the play menu, press
the PLAY mode button or shutter button.

Menu tab

Main menu

Sub menu

Secondary menu

Page

-

-

-

-

-

-

-

-

-

-

-

-

-

Slide

p. 73

p. 72

p. 71

-

1, 3, 5, 10sec

Off / On

Cancel

Effect 1, 2, 3, 4

Right 90˚

Left 90˚

180˚

Horizontal

Vertical

Start

Interval

Repeat

DPOF

Standard 

Index

Size

Select/ All Pics/ Cancel

No/ Yes

Select/ All Pics/ Cancel

Protect

Delete

Effect

Select  

All Pics

Select 

All Pics

Unlock / Lock

Resize

Rotate

p. 74

p. 75

p. 75

2272 x 1704

2048 x 1536

1600 x 1200

1024 x 768

640 x 480

User Image

Summary of Contents for Digimax u-ca5

Page 1: ...ung Camera This manual will guide you through using the camera including capturing images downloading images and using the application software Please read this manual carefully before using your new camera ENGLISH User s Manual ...

Page 2: ...rt and the camera s USB connection terminal p 117 Check the camera s power If the power is turned off press the camera button to turn it on p 27 Take a picture Check the camera s power Check Removable Disk Open Window s EXPLORER and search for Removable Disk p 118 If you use a card reader to copy the images on the memory card to your PC the images could be damaged When transferring the images take...

Page 3: ...recording mode 23 Recording a Movie clip 23 Pausing while recording a movie clip 24 Recording Voice 25 Recording a still image 25 Things to Watch Out for When Taking Pictures 26 Using the camera buttons to adjust the camera 27 POWER button 27 SHUTTER button 27 ZOOM W T button 27 Voice memo UP button 29 Macro Down button 30 Focus lock 31 Flash Left button 32 Self timer Remote Right button 35 MENU O...

Page 4: ...etup menu 83 File name 84 Auto power off 85 Language 86 Formatting a memory card 86 Setting up the Date Time Date type 87 Imprinting the recording date 87 Sound 88 Connecting an External Device USB 88 Function lamp 89 Auto Focus lamp 90 LCD brightness 90 Selecting Video out type 91 Quick view 93 Initialisation 93 Setting up the Mycam menu 94 Start up image 94 Start up sound 95 Shutter sound 95 Imp...

Page 5: ...ft Windows and Windows logo are registered trademarks of Microsoft Corporation incorporated in the United States and or other countries All brand and product names appearing in this manual are registered trademarks of their respective companies This manual contains instructions on using this camera that will help you to use this camera safely and correctly This will help prevent danger and injury ...

Page 6: ...not use the flash in close proximity to people or animals Positioning the flash too close to your subject s eyes may cause eyesight damage When taking photographs never point the lens of the camera directly into very strong light This may result in permanent damage to your eyesight For safety reasons keep this product and accessories out of reach of children or animals to prevent accidents e g Swa...

Page 7: ...ords or cables and cause a fire or electric shock An FCC warning This device has been tested in accordance with the limits of a class B digital device under item 15 of the FCC rules These limits are designed to provide protection against harmful interference in commercial installation This equipment generates absorbs and can emit radio frequency energy If it is not installed and used in accordance...

Page 8: ...on To buy the optional equipment contact your nearest Samsung dealer or Samsung service centre Pouch User manual Product warranty Camera strap Remote control Software CD see p 105 106 SD memory card see p 18 DPOF compatible printer see p 75 Rechargeable battery SLB 1137 Cradle SAC 41 for both Charger and AC adapter AC cord Included items ...

Page 9: ...xels 16 bit colour display compatible monitor 24 bit colour display recommended For Macintosh Power Mac G3 or later Mac OS 9 2 10 3 Minimum 64MB RAM 110MB of available hard disk space USB port CD ROM drive QuickTime player DivX for movie clip System Requirements When you connect the camera to a computer printer or external monitor you have to use the USB AV cable supplied with the camera or the ex...

Page 10: ...CD monitor LCD button Strap eyelet Zoom T button Digital zoom Zoom W button Thumbnail Play mode button Tripod socket DC USB AV connection terminal Cradle connector DELETE button M button Album button Function lamp Self timer lamp The play mode button is lower than other camera buttons to prevent the camera from unwanted power on and wasting the battery power ...

Page 11: ...cradle Refer to page 15 78 117 Battery holder Memory card slot Battery chamber Battery chamber cover FLASH LEFT button MENU OK button Macro DOWN button Play Pause button SELF TIMER REMOTE RIGHT button Voice memo UP button Side 5 function button Cradle Camera connection terminal USB port AV connection terminal DC input connection point ...

Page 12: ...s long as the available recording time of the memory capacity allows Image size and type are listed below Image size 640X480 320X240 160X128 user selectable Movie clip file type avi MPEG 4 A voice recording can be recorded for as long as the available recording time of the memory capacity allows Max 1 hour File type wav Movie clip mode You can select the desired working mode by using the mode swit...

Page 13: ...terval Transmitting Data The lamp blinks For the first 8 seconds the lamp blinks at 1 second intervals For the final 2 seconds the lamp blinks quickly at 0 25 second intervals The lamp will function while using the self timer even if the configuration is set to off the lamp Based on 10 second Self timer see p 35 While the self timer is functioning When the USB cable is inserted The lamp lights up ...

Page 14: ...he camera is not used turn off the camera power Do not use the non rechargeable batteries It may cause an explosion Please remove the batteries if the camera will not be used for long periods Batteries can lose power over time and are prone to leaking if kept inside the camera Low temperatures below 0 C can affect the performance of the batteries and you may experience reduced battery life Batteri...

Page 15: ... you use the SAC 41 for both Charger and AC adapter with the correct specification for the camera Failure to do so may affect your warranty Do not use the flash frequently or take many pictures with the fully discharged rechargeable battery charged for a short time Even if the charger is inserted the camera power may be turned off because the rechargeable battery is discharged again DANGER Chargin...

Page 16: ...time When the camera is turned off Using the cradle About 150MIN Using the SAC 41 About 150MIN If the camera power is turned on and the Off sub menu of the Power Off menu is selected the charging time extends to about 6 hours When you charge the battery set the Power off menu to on If you use the cradle for transferring data the automatic power off function will not operate and the charging time e...

Page 17: ...status Battery indicator The batteries are fully charged Prepare new batteries There is no battery capacity Replace with new batteries There are 3 indicators for battery condition that are displayed on the LCD monitor Removing the battery 1 Turn off the camera power Open the battery chamber cover and move the battery holder aside The battery will be released 2 Take out the battery and close the ba...

Page 18: ...ld this happen clean the memory card with a soft cloth Please keep the memory card in its case when not in use During and after periods of extended use you may notice that the memory card is warm This is perfectly normal Do not use a memory card that is used in another digital camera To use the memory card in this camera format first the memory card by using this camera Do not use a memory card fo...

Page 19: ...he bottom of the SD memory card the data will be protected By sliding the switch to the top of the SD memory card the data protection will be cancelled Slide the switch to the top of the SD memory card before taking a picture When using a 32MB SD memory card the specified shooting capacity will be as follows These figures are approximate as image capacities can be affected by variables such as sub...

Page 20: ... of the camera lens and the card pins toward the back of the camera LCD monitor and then push the memory card into the card slot until you hear a click 1 Turn off the camera s power and pull the battery chamber cover in the direction of the arrow to open 1 Turn the power off using the power button Open the battery chamber cover and press the memory card as shown in the image and release 2 Remove t...

Page 21: ...ain menu if the cursor is at the first item of the date and time setup In all other instances the cursor will be shifted to the left of its current position UP DOWN button changes the value of each item You can select 18 languages These are listed below English Korean French German Spanish Italian S Chinese T Chinese Japanese Russian Portuguese Dutch Danish Swedish Finnish Thai BAHASA MALAY INDONE...

Page 22: ...nd selections Image Full Status No Description Icons Page 1 Battery p 17 3 Continuous shot p 49 4 Flash p 32 5 Self timer p 35 6 Voice memo p 29 7 Macro p 30 8 Metering p 49 9 Sharpness p 50 10 Auto focus frame 11 Camera shake warning p 26 12 Date Time 2005 01 01 01 00 PM Recording mode 2 p 12 ...

Page 23: ...Press the shutter button once and movie clips are recorded for as long as the available recording time allows Movie clips will still be recorded if the shutter button is released If you wish to stop recording press the shutter button again Image size and type are listed below Image size 640X480 320X240 160X128 Selectable File type avi MPEG 4 MOVIE CLIP mode 13 Exposure compensation p 41 14 White B...

Page 24: ...rding Steps from 1 6 are the same as those for MOVIE CLIP mode 7 Point the camera towards the subject and compose the image by using the LCD monitor Press the shutter button and movie clips are recorded for as long as the available recording time Movie clips will still be recorded if the shutter button is released 8 Press the Pause button to pause recording 9 Press the Pause button again to resume...

Page 25: ... to capture an image clearly INFORMATION A distance of 40cm between you and the camera microphone is the best distance to record sound INFORMATION Recording Voice Steps from 1 4 are the same as those for recording a movie clip 5 Select the VOICE RECORDING mode by sliding the mode switch 6 Press the shutter button to record a voice Press the shutter button once and voice is recorded for as long as ...

Page 26: ...shot avoid facing the sun as the image may be dark because of the strong backlight To take a picture against the sun please use the Backlight in the scene shooting mode see page 38 Fill in flash see page 32 Spot metering see page 49 or Exposure compensation see page 41 Avoid obstructing the lens or the flash when you capture an image Under certain conditions the auto focus system may not perform a...

Page 27: ...ll deactivate the start up sound and sound function Used for taking an image or recording voice in the RECORDING STILL IMAGE VOICE RECORDING MOVIE CLIP mode In MOVIE CLIP mode Pressing the shutter button down fully starts the process for recording a movie clip Press the shutter button once and the movie clip is recorded for as long as the available recording time in the memory allows If you wish t...

Page 28: ...ressingthe ZOOMTbutton WIDE Zoom Optical zoom WIDE Pressing the ZOOM W button This will zoom out from the subject i e the subject will appear further away Pressing the ZOOM W button continuously will set the camera to its minimum zoom setting i e the subject appears at its furthest from the camera Digital zoom WIDE When the digital zoom is in operation pressing the ZOOM W button will reduce the di...

Page 29: ... the image is dim turn the camera power off and on again to modify the lens position Take care not to press the lens as this may cause a camera malfunction When the camera is turned on take care not to touch the camera s moving lens parts as this may cause the resulting image to be dim and unclear Take care not to touch the lens during zoom operation as this may cause damage INFORMATION Voice memo...

Page 30: ... occur If this is the case use a tripod to eliminate this When you take a picture within 30cm MACRO focus select the FLASH OFF mode INFORMATION While the menu is showing press the DOWN button to move from the main menu to a submenu or to move down the submenu cursor When the menu is not showing you can use the MACRO DOWN button to take macro pictures within the distance range of 5 80 cm The auto m...

Page 31: ...SHUTTER button still pressed down only halfway move the camera to recompose your picture as desired and then press the SHUTTER button completely to take the picture If you release your finger from the SHUTTER button the focus lock function will be cancelled 1 The image to be captured 2 Press the SHUTTER button halfway and focus on the subject 3 Recompose the picture and fully depress the SHUTTER b...

Page 32: ... monitor Use the correct flash to suit the environment When the flash is charging a flash mode icon red colour will blink on the LCD monitor Using the flash frequently will reduce the life of the batteries Under normal operating conditions the charging time for the flash is normally within 5 5 seconds If the batteries are weak the charging time will be longer During the continuous shot and movie c...

Page 33: ...ake warning indicator will display on the LCD monitor The flash fires regardless of available light The intensity of the flash will be controlled according to the prevailing conditions The brighter the background or subject is the less intense the flash will be The flash does not fire Select this mode when capturing images in a place or situation where flash photography is prohibited When you capt...

Page 34: ...ge use the auto flash mode 6 If the subject is moving the final image captured may be blurred 7 As the SF uses the camera s digital processor images taken using the SF may take a little longer for the camera to process When you use the SF continuous shooting special effect and digital zoom at the same time there are restrictions of using the functions Refer to the below table for more information ...

Page 35: ...electing a self timer When you press the SHUTTER button the picture will be taken after the specified time has elapsed and the self timer function will be cancelled Selecting a remote mode Pressing the shutter button of remote control will allow an interval of 2 seconds before the image is taken In the remote mode the shutter button of the camera can t be activated After taking a picture the remot...

Page 36: ...r the remote control Make sure the polarity is toward the top and the polarity is toward the bottom while installing batteries for the remote control Replace batteries for the remote control in the local service centre Use the CR 2025 3V batteries If you operate the Mode switch and Self timer button during the self timer operation the self timer function is cancelled Use a tripod to prevent the ca...

Page 37: ...e LCD to the initial display A menu option can be displayed when the following are selected MOVIE CLIP and STILL IMAGE mode There is no menu available when the VOICE RECORDING mode is selected OK button When the menu is displayed on the LCD monitor this button is used for shifting the cursor to the sub menu or for confirming data Mode Auto Manual Scene Pressing the MENU button 2592 ...

Page 38: ... be selected 1 Press the M button in the still image mode 2 Select the Scene menu by pressing the Up Down button 3 Select a desired sub menu by pressing the Left Right button 4 Press the OK button and the desired camera mode will be selected Sub menu Icon Description Night Use this for shooting still images at night or in other dark conditions Portrait To take a picture of a person Children To tak...

Page 39: ... value of each icon 3 When you press the button again the value you set will be saved and RGB setup mode will end You can use the button to adjust the values for the RGB ISO white balance exposure compensation and Long Time shutter speed When the SF is selected ISO value is fixed as AUTO and Exposure value is fixed as 0 0EV Main menu Sub menu Available camera mode RGB R Red G Green B Blue ISO AUTO...

Page 40: ...WN buttons to select the white balance icon The white balance menu bar will appear as shown 2 Use the LEFT and RIGHT buttons to set the white balance to the desired value The value you set will be displayed on the LCD monitor AUTO The camera automatically selects the appropriate white balance settings depending on the prevailing lighting conditions DAYLIGHT For taking images outside CLOUDY For tak...

Page 41: ...re Shutter Exposure compensation This camera automatically adjusts the exposure according to the ambient lighting conditions You can also select the exposure value by using the button Compensating Exposure 1 Press the button and then use the UP and DOWN buttons to select the exposure compensation icon The exposure compensation menu bar will appear as shown 2 Use the LEFT and RIGHT buttons to set t...

Page 42: ...hutter value with the up down left right button Up Down Button Select the iris shutter speed Left Right Button Change the value Available iris value options depending on zoom step will be displayed on the menu 4 Press the button again The value you set will be saved and the mode will switch to NIGHT SCENE mode Press the SHUTTER button to take the picture Press left button Aperture Value Small Larg...

Page 43: ...mera isn t operated during the specified time about 30 SEC the camera power will be idle LCD monitor OFF Button lamp Blinking automatically To use the camera again press any of the camera buttons except the power button If there is no operation during the specified time the camera power will be turned off automatically to save battery life Refer to page 85 for more information about the auto power...

Page 44: ...button is being operated While image data is being processed When there is no battery capacity INFORMATION The following functions are available depending on the mode you have selected The items indicated by are default settings Menu tab Main menu Sub menu Camera working mode Page Auto Manual 2592X1944 2272X1704 2048X1536 1600X1200 1024X768 640X480 640X480 320X240 160X128 S Fine Fine Normal 30FPS ...

Page 45: ...Continuous Soft Normal Vivid Normal B W Sepia Negative Off Range 1 Range 2 Range 3 Off 2 Parts 3 Parts 4 Parts Off Frame 1 Frame 2 Frame 3 Off On Shooting Effect Special Effect Photo Frame HighLight Composite Sharpness Stabilizer p 49 p 50 p 50 p 54 p 51 p 52 p 53 p 49 Menus are subject to change without prior notice Metering ...

Page 46: ... Manual Selecting the automatic mode will configure the camera with optimal settings You can still manually configure all functions except the aperture value and shutter speed Scene Use the menu to easily configure optimal settings for a variety of shooting situations The selected Scene sub menu will be displayed on the LCD monitor To change the sub menu or to get more information about the scene ...

Page 47: ...024X768 640X480 640X480 320X240 160X128 The higher the resolution the lower the number of available shots will be because high resolution images require more memory than lower resolution images INFORMATION STILL IMAGE mode Mode MOVIE CLIP mode STILL IMAGE mode MOVIE CLIP mode Size 2592X1944 2272X1704 2048X1536 1600X1200 2592 Size 640X480 320X240 160X128 640 30FPS ...

Page 48: ...is the lowest setting Choose the setting appropriate for your needs This file format complies with the DCF Design rule for Camera File system JPEG Joint Photographic Experts Group JPEG is the image compression standard developed by the Joint Photographic Experts Group This type of compression is most commonly used for compressing photos and graphics because it can compress the files efficiently wi...

Page 49: ...hting The default metering mode is Multi pattern metering If the subject is not the centre of the focus area do not use the spot metering as this may result in an exposure error In this circumstance It is better to use exposure compensation INFORMATION Continuous shot Select the number of pictures in continuous shooting Single Take one picture only Continuous Images will be taken continuously unti...

Page 50: ...t to take You cannot check the sharpness effect on the LCD monitor before you take a picture because this function is applied only when the captured image is stored on the memory MANUAL mode Sub menu Icon Description The edges of the image are softened This effect is suitable for editing images on your PC The edges of the image are sharp This is suitable for printing The edges of the image are emp...

Page 51: ...ct stand out from its surroundings The subject will be sharp and in focus while making the rest out of focus 1 Select the MANUAL mode and press the menu button 2 Press the LEFT RIGHT button and select the Special Effect menu tab 3 Select the HighLight menu by pressing the UP DOWN button and press the Right button 4 Select a desired sub menu by pressing the UP DOWN button and press the OK button Of...

Page 52: ...l disappear 6 The number of frames you selected in step 4 is displayed on the LCD monitor Press the shutter button to start the composite shooting Pressing the shutter button Pressing the shutter button Special Effect Highlight Composite Photo Frame Off Off Off NOR Move Change You can use the flash button self timer button macro button voice memo button button and the Zoom W T button during the co...

Page 53: ...Select the Photo Frame menu by pressing the UP DOWN button and press the Right button 4 Select a desired sub menu by pressing the UP DOWN button and press the OK button Off The photo frame will not be added 5 Press the menu button twice and the menu will disappear If you select the Frame 1 3 menu the preset focus frame area will appear Frame1 Frame2 Frame3 Special Effect Highlight Composite Photo ...

Page 54: ...menu 2 Select a desired sub menu by pressing the Up Down button and press the OK button Off Movie clip frame stabilizer function becomes disabled On Prevents camera shake during movie recording The recording frame range will become narrower than when you select the Off menu Pre view frames may not display smoothly on the LCD monitor but stored movie clips have no problems Stabilizer Off On NOR Whe...

Page 55: ...ttons and LCD monitor If you press the PLAY button to switch to Play mode the camera lens will retract into the camera body for protection of the lens after about 10 seconds Playing back a still image 1 Select the PLAY mode by pressing the play mode button 2 The last image stored on the memory is displayed on the LCD monitor 3 Select an image that you want to view by pressing the LEFT RIGHT button...

Page 56: ... LEFT button To fast forward the movie clip press the RIGHT button To stop playback of the movie clip press the play pause button and then press the LEFT or RIGHT button How to capture the movie clip Steps 1 2 are the same as those for playing back a still image 3 Select the recorded movie clip that you want to play back by using the LEFT RIGHT button 4 Press the Play Pause button to play the movi...

Page 57: ...you wish the extracted file to stop 7 Press the T button and a confirmation window will display 8 Select a desired sub menu by pressing the UP DOWN button and press the OK button Trimming The extracted frames are saved as a new file name Cancel The movie trimming will cancel If you want to extract the movie clip at the beginning of the frame press the Zoom T button before starting the movie clip T...

Page 58: ...played on the LCD monitor 4 Press the play pause button to play back a recorded voice file To pause a recorded voice file while playing it back press the play pause button again To resume playback of the voice file press the play pause button To rewind the voice file while it is playing press the LEFT button To fast forward the voice file press the RIGHT button To stop playback of the voice file p...

Page 59: ...5 Protect indicator p 72 6 DPOF indicator p 75 7 Stored image number 9 Size 2592X1944 Size Av F2 8 Aperture value Tv 1 60 Shutter speed ISO 100 ISO sensitivity Flash Off Whether or not the flash is used Date 2005 01 01 Recording date Size 2592X1944 Av F2 8 Tv 1 60 ISO 100 Flash Off Date 2005 01 01 If you press the LCD button you can check the following recording information ...

Page 60: ...ot an enlarged view the indicator will not be displayed You can also check the area of enlargement Movie clips and WAV files can t be enlarged If an image is enlarged a loss of quality may occur Normal display mode Thumbnail display mode Pressing the thumbnail button Pressing the enlargement button Highlighted image You can view multiple pictures enlarge a selected picture and crop and save a sele...

Page 61: ... If there is little memory space to save the trimmed image the image can t be trimmed To delete the enlarged image during the trimming function press the delete button Image size 2592 2272 2048 1600 1024 640 Maximum enlargement rate X10 1 X8 8 X8 0 X6 2 X4 0 X2 5 Voice memo Up button When the menu is displayed on the LCD monitor pressing the UP button makes the menu cursor move up When the menu is...

Page 62: ...e saved in wav format but has the same file name as the still image to which it corresponds If you add a new voice memo to the still image that already has a voice memo the existing voice memo will be erased Play Pause Down button In Play mode the play pause down button works as follows If the menu is displayed Press the DOWN button to move from the main menu to a sub menu or to move down the sub ...

Page 63: ...urn the LCD to the initial display OK button When the menu is displayed on the LCD monitor the OK button is used for confirming data that is changed by using the 5 function button The shooting information will be displayed on the LCD monitor The last image stored in the memory is displayed on the LCD monitor by pressing the play mode button Pressing the LCD button in the PLAY mode will change the ...

Page 64: ... to 100 images The album menu loading time depends on the memory card type How to use the album Selecting the album 1 In the play mode press the M button 2 Select the Select menu by pressing the Up Down button and press the Right button 3 Select a desired album by pressing the Up Down Left Right buttons and press the OK button Inserting still images into the album 1 Select an album 2 Select the Ad...

Page 65: ...elect an album 2 Select Remove menu by pressing the Up Down button and press the Right button 3 Select a desired sub menu and press the OK button All All of the still images in the album will be removed Select Specific still images in the album can be removed If Select is selected Select images that you want to remove by pressing the Up Down Left Right buttons and press the Zoom T button marks are...

Page 66: ...d press the Right button You can select Start Interval Repeat and Effect menus Start Start the slide show Interval Set the slide show play interval Repeat Choose to repeat the slide show after finishing the first cycle Effect Unique screen effects can be used for the slide show 3 Select Start menu by pressing the Up Down button and press the OK button to start the slide show 4 Press the MENU OK bu...

Page 67: ...nu values by pressing the UP DOWN button and then press the OK button If Delete is selected deletes the selected images If Cancel is selected cancels Delete Image Deleting Images in Play Mode 1 Select an image that you want to delete by pressing the LEFT RIGHT button and press the DELETE button 2 A message will display as shown alongside on the LCD monitor 3 Select the submenu values by pressing t...

Page 68: ...tting up the play menu press the PLAY mode button or shutter button Menu tab Main menu Sub menu Secondary menu Page Slide p 73 p 72 p 71 1 3 5 10sec Off On Cancel Effect 1 2 3 4 Right 90 Left 90 180 Horizontal Vertical Start Interval Repeat DPOF Standard Index Size Select All Pics Cancel No Yes Select All Pics Cancel Protect Delete Effect Select All Pics Select All Pics Unlock Lock Resize Rotate p...

Page 69: ...Postcard 4X6 2L A4 Letter A3 Auto Full 1 2 4 8 9 16 Auto Plain Photo Fastphoto Auto Set Custom Set Images p 80 p 80 p 79 No Yes Size Layout Type One Pic All Pics This menu is available while the camera is connected to a PictBridge supporting printer direct connection to the camera sold separately with a USB cable ...

Page 70: ...nitor Quality Menu tab Main menu Sub menu Secondary menu Page Auto Draft Normal Fine Auto Off On Auto Off On Standard Index No Yes No Yes Print Custom Set p 81 p 81 p 82 p 80 File Name Date DPOF Print Reset Menus are subject to change without prior notice ...

Page 71: ...RIGHT button Setting play interval Set the slide show play interval 1 Select the Interval sub menu by pressing the UP DOWN button and press the RIGHT button 2 Use the Up Down buttons to select the desired interval 3 Press the OK button to save the configuration Repeat setting setting the slide show to repeat after the first cycle 1 Use the Up Down buttons to select the Repeat menu and press the Ri...

Page 72: ...ed Lock It also unprotects images that have been previously protected Unlock Protecting Images 1 Press the play mode button and press the menu button 2 Press the LEFT RIGHT button and select the Protect menu tab 3 Select a desired sub menu by pressing the UP DOWN button and press the OK button Select Selection window for an image to be protected released is displayed Up Down Left Right Select an i...

Page 73: ...emory card Deleting images 1 Press the play mode button and press the menu button 2 Press the LEFT RIGHT button and select the Delete menu tab 3 Select a desired sub menu by pressing the UP DOWN button and press the OK button Select Selection window for an image to delete is displayed Up Down Left Right Select an image Zoom T Button Select the image for deletion mark OK Button Press the OK Button ...

Page 74: ...n change the resolution of only those files compressed in the JPEG 4 2 2 format The resized image will have a new file name The User Image image is stored not on the memory card but on the internal memory Only two User Image images can be saved If you save a new User Image image the existing startup image will be deleted in order If the memory capacity is insufficient to store the resized image a ...

Page 75: ...ght of the image Right 90 Rotate picture in a clock wise direction Left 90 Rotatepictureina counter clock wisedirection 180 Rotate picture 180 degrees Horizontal Rotate picture horizontally Vertical Rotate picture vertically DPOF DPOF Digital Print Order Format allows you to embed printing information on your memory card s MISC folder Select the pictures to be printed and how many prints to make T...

Page 76: ...e button and press the menu button 2 Press the LEFT RIGHT button and select the DPOF menu tab 3 Select the Standard menu by pressing the UP DOWN button and press the RIGHT button 4 Select a desired sub menu by pressing the UP DOWN button and press the OK button Select Selection window for an image to print is displayed Up Down Left Right Select an image to print Zoom W T Button Select the number o...

Page 77: ...desired sub menu by pressing the UP DOWN button and press the OK button Select Selection window for an image to be changed printed size is displayed Up Down Left Right Select an image Zoom W T Button Change the print size OK button Your changes will be saved and the menu will disappear All Pics Change print size of all saved images W T button Select a print size OK button Confirm the changed setti...

Page 78: ...button and press the RIGHT button 4 Select Printer menu by pressing the UP DOWN button and press the OK button Connecting the Camera to a Printer Using the USB cable with Cradle Connect the camera and the cradle Connect the cradle to a printer s USB port with the supplied USB cable Using the USB cable with Camera Connect the camera to a printer s USB port with the supplied USB cable If you selecte...

Page 79: ...F Print Printing the DPOF files Reset Initializing the PictBridge functions You can set up the following settings from the PictBridge menu When One Pic is selected When All Pics is selected Press the Up Down button to select the number of prints Use the Left Right button to select another picture and select the number of prints for another picture After setting the number of prints press the OK bu...

Page 80: ...stom Set are automatically changed Some menu options are not supported in all manufacturer and printer models If not supported the menus are still displayed in the LCD but are not selectable If the setting values are not changed in the automatic manual setting the setting values are automatically kept Custom Set You can select the Paper Size Print Format Paper Type Print Quality Date Print and Fil...

Page 81: ...ng Pictures 1 Use the LEFT and RIGHT buttons to select the Print menu tab 2 Use the UP and DOWN buttons to select the desired submenu value and then press the OK button Standard Print the pictures stored in the memory card in set numbers One picture is printed on one piece of paper Index Print multiple images on one sheet of paper 3 The screen shown on the right will appear and the picture will be...

Page 82: ...ons to select the desired submenu value and then press the OK button If No is selected Settings will not be reset If Yes is selected All print and image settings will be reset Default print setting varies depending on the printer manufacturer For your printer s default setting refer to the user s guide that came with your printer Reset Move No Yes ...

Page 83: ...tings Menu tab Main menu Sub menu Secondary menu Page Reset Series Power Off Off 1 3 5 10 min p 85 ENGLISH P CCK PORTUGUÊS FRANÇAIS DUTCH DEUTSCH DANSK ESPAÑOL SVENSKA p 86 ITALIANO SUOMI BAHASA No Yes 05 01 01 13 00 yy mm dd dd mm yy mm dd yy Off Imprint Date p 87 D Time Off Low Medium High Computer Printer File Language Format D Time Sound p 84 p 86 p 87 p 88 p 88 USB ...

Page 84: ...ion the next file name will be set from 0001 even after formatting deleting all or inserting a new memory card Series New files are named using numbers that follow the previous sequence even when a new memory card is used or after formatting or after deleting all pictures 5 Press the menu button twice and the menu will disappear File name Menus are subject to change without prior notice Menu tab M...

Page 85: ...cording playing back a movie clip and the Composite shooting INFORMATION Auto power off Setting Power Off 1 In any mode with the exception of Voice Recording mode press the MENU button 2 Press the LEFT RIGHT button and select the Setup menu tab 3 Select the Power Off menu by pressing the UP DOWN button and press the RIGHT button 4 Select a desired sub menu by pressing the UP DOWN button and press ...

Page 86: ... the menu button twice and the menu display will disappear If Yes is selected A Please Wait message appears and the memory card will be formatted If you ran FORMAT in Play mode a No Image message will appear There is a choice of languages that can be displayed on the LCD monitor Even if the batteries or AC adapter are removed and inserted again the language setting will be preserved Formatting a m...

Page 87: ...pear There is an option to include DATE TIME on still images Date Imprinting 1 In any mode with the exception of Voice Recording mode press the MENU button 2 Press the LEFT RIGHT button and select the Setup menu tab 3 Select the Imprint menu by pressing the UP DOWN button and press the RIGHT button 4 Use the UP and DOWN buttons to select the desired date imprint type and then press the OK button O...

Page 88: ...ect an external device to which you want to connect the camera using the USB cable Selecting an External Device 1 In any mode with the exception of Voice Recording mode press the MENU button 2 Press the LEFT RIGHT button and select the Setup menu tab 3 Select the USB menu by pressing the UP DOWN button and press the RIGHT button 4 Select a desired sub menu by pressing the UP DOWN button and press ...

Page 89: ...n the camera is ready to take a picture The lamp blinks while saving the image data and turns off when the camera is ready to take a picture While movie recording The lamp blinks at a 2 second interval While voice recording The lamp blinks at a 2 second interval When the USB cable is inserted The lamp lights up Transmitting Data The lamp blinks While the self timer is functioning After taking a pi...

Page 90: ...turn on and off the Auto Focus lamp How to set up the lamp 1 In any mode with the exception of Voice Recording mode press the MENU button 2 Press the LEFT RIGHT button and select the Setup menu tab 3 Select the AF Lamp menu by pressing the UP DOWN button and press the RIGHT button 4 Select a desired sub menu by pressing the UP DOWN button and press the OK button If Off is selected The AF lamp will...

Page 91: ...ressing the UP DOWN button and press the RIGHT button 4 Select a desired sub menu by pressing the UP DOWN button and press the OK button Video Out sub menu NTSC PAL 5 Press the menu button twice and the menu will disappear Connecting to an external monitor Using the AV cable with Cradle Connect the camera and the cradle Connect the cradle to an external monitor with the supplied AV cable Using the...

Page 92: ...sing a TV as an external monitor you will need to select the external or AV channel of the TV There will be a digital noise on the external monitor but it is not a malfunction If the image is not in the centre of the screen use the TV controls to centre it When the camera is connected to an external monitor the menu will be visible on the external monitor and the menu functions are the same as tho...

Page 93: ...played during the selected time 5 Press the menu button twice and the menu will disappear Initialisation All camera menu and function settings will be restored to their default values However values for DATE TIME LANGUAGE and VIDEO OUT will not be changed Initialising the Camera 1 In any mode with the exception of Voice Recording mode press the MENU button 2 Press the LEFT RIGHT button and select ...

Page 94: ...mage 1 In any mode with the exception of Voice Recording mode press the MENU button 2 Press the LEFT RIGHT button and select the Mycam menu tab 3 Select the S Image menu by pressing the UP DOWN button and press the RIGHT button 4 Select a desired sub menu by pressing the UP DOWN button and press the OK button 5 Press the menu button twice and the menu will disappear Start up image Use a saved imag...

Page 95: ...an select the sound that is activated whenever the camera is turned on Selecting the Shutter Sound 1 In any mode with the exception of Voice Recording mode press the MENU button 2 Press the LEFT RIGHT button and select the Mycam menu tab 3 Select the SH Sound menu by pressing the UP DOWN button and press the RIGHT button 4 Select a desired sub menu by pressing the UP DOWN button and press the OK b...

Page 96: ... get inside the unit when using it on beaches coastal dunes or other areas where there is lots of sand Doing so may result in failure or may permanently render the unit unusable Handling the camera Never drop the camera or subject it to severe shocks or vibrations This camera is not waterproof To avoid dangerous electrical shocks never hold or operate the camera with wet hands If you use this came...

Page 97: ... Do not allow this camera to come into contact with solvent materials such as benzol insecticide thinners etc This may damage the body shell of the camera and also affect its performance Rough handling can damage the LCD monitor Take care to avoid damage and keep the camera in its protective carry case at all times when not in use Do not attempt to disassemble or modify the camera Under certain co...

Page 98: ...rn off the camera power and turn it on again Card Locked The memory card is locked SD memory card Slide the write protect switch to the top of the memory card Card Full There is insufficient memory capacity to take an image Insert a new memory card Delete unnecessary image files to free up some memory No Image There are no images stored on the memory card Take images Insert a memory card that is h...

Page 99: ...y Batteries are inserted incorrectly with the reverse polarities Insert the batteries according to the polarity marks The rechargeable battery is not inserted Insert the battery and turn on the camera An AC Power Adapter is not connected Connect an AC Power Adapter The camera power ceases while in use The batteries are exhausted Insert charged battery The Camera is turned off automatically Turn of...

Page 100: ... Insert the batteries according to the polarity marks The camera suddenly stops working while in use The camera was stopped due to a malfunction Remove re insert batteries and switch the camera on The images are unclear A picture was taken within 0 8 m from the subject without setting an appropriate macro mode If the subject is closer than 0 8m select macro shot mode Taking a picture beyond the fl...

Page 101: ...ages are too bright Exposure is excessive Reset exposure compensation No image on external monitor The external monitor has not been connected properly with the camera Check the connection cables There are incorrect files in the memory card Insert a memory card that has correct files When using the PC s explorer the Removable Disk file does not show Cable connection is incorrect Check the connecti...

Page 102: ...rging Time Approx 5 5 sec Sharpness Soft Normal Vivid Effect Normal B W Sepia Negative RGB Auto Daylight Cloudy Fluorescent_H Fluorescent_L Tungsten Custom Voice Recording max 1 hour Voice Memo in Still Image max 10 sec Date Imprinting Date Time Date Off user selectable Modes Auto Manual Scene Scene Night Portrait Children Landscape Text Close up Sunset Dawn Backlight Fireworks Beach Snow Continuo...

Page 103: ...connector 4 2V Rechargeable battery 1 x Li ion SLB 1137 Adaptor DC 4 2V 750mA SAC 41 Included power source may vary depending on sales region Dimensions W X H X D 102 2 x 54 7 X 29 6mm excluding the projecting parts of the camera Weight Approx 130 6g without batteries and card Operating Temperature 0 40 C Operating Humidity 5 85 Camera Driver Storage Driver Windows98 98SE 2000 ME XP Mac OS 9 2 10 ...

Page 104: ...ropriate use Using a Hand made PC or a PC and OS that has not been guaranteed by the manufacturer is not covered by the Samsung warranty Before reading this manual you should have a basic knowledge of computers and O S Operating Systems System Requirements For Windows For Macintosh Power Mac G3 or later Windows 98 98SE 2000 ME XP Mac OS 9 2 10 3 Minimum 32MB RAM XP 128MB Minimum 64MB RAM 140MB of ...

Page 105: ...A USB Driver for MAC is not included with the Application CD But you can use the camera with Mac OS 9 2 10 3 XviD codec This makes movie clips MPEG 4 recorded with this camera play back on a PC To play back a movie clip recorded with this camera you must install the XviD codec If a movie clip recorded with this camera does not play well install this code This software is only compatible with Windo...

Page 106: ...how run the Windows Explorer and select Samsung exe in the CD ROM Drive root directory INFORMATION Digimax Reader Text recognition program You can save an image file that was captured in the TEXT mode as a text file with this program This software is only compatible with Windows PhotoImpression Image editing program You can edit or store still images that you download from the camera This software...

Page 107: ... The camera driver is installed automatically Close other programs before installing the application software Before installing the application software disconnect the USB connection INFORMATION 2 Installation is complete Click the Finish button Click Click 3 A windows to check whether the PC has XviD codec or not will display Preview You can check the movie clip display condition Install The XviD...

Page 108: ...U General Public License and everyone can copy distribute and change this codec For more information see the License documents Click 4 If an error listed below takes place during the preview click the Install button to install the XviD codec Only a voice plays back An error message displays and the movie clip does not play back A window shown alongside may display according to the system requireme...

Page 109: ...ther folder click Browse and choose a folder you want Click Click 10 The Select Additional Tasks window will display Select the additional tasks and click the Next button 9 A window will open asking you to choose a folder to which program icons will be added Click Next button If you want to add the program icons to a different folder choose another folder and then click Next button Click Click ...

Page 110: ... you select Exit at step 13 the application program installation will be cancelled INFORMATION 13 A window where you can choose the program you want to install will appear Click Install For information on application software please refer to page 105 106 14 The Digimax Viewer 2 1 installation window will be displayed as shown alongside Click the Next button Click Click ...

Page 111: ...8 Digimax Viewer installation is successfully completed Click the Finish button to install Digimax Reader The system will not reboot even the Yes I want to restart the computer now option is selected The real frame 18 can be different with the illustration according to the system requirements 17 A window will open asking you to choose a folder to which program icons will be added Click Next button...

Page 112: ...d a window for installing PhotoImpression will be displayed 20 A window will open Click the Next N button Click Click 22 A destination selection window will open Click Next To copy to the files to another folder click Browse and choose a folder you want 21 The Software License Agreement window will be displayed If you agree to this click Yes the window will then move to the next step If you disagr...

Page 113: ...l be displayed Click the Next button Click Click 24 The PhotoImpression installation window will be displayed as shown alongside Click the OK button Click 23 Digimax Reader Installation is completed Click the Finish button and PhotoImpression installation will be started The system will not reboot even if the Yes I want to restart the computer now option is selected The real frame 23 can be differ...

Page 114: ...you to choose a folder to which program icons will be added Click Next button If you want to add the program icons to a different folder choose another folder and then click Next button Click Click Click 30 PhotoImpression Installation is completed Click the Finish button The system will not reboot even if the Yes I want to restart the computer now option is selected The real frame 30 can be diffe...

Page 115: ...ognise the camera If you have ever installed an image viewer program or your OS is Windows XP an image viewer program will open If the image viewer program opens the camera driver was setup successfully 32 After restarting the computer connect the PC to the camera with the USB cable 34 If you can see Removable Disk under My computer the camera driver installation was successful Now you can transfe...

Page 116: ... you connect the camera to the PC before installing the camera driver the Found New Hardware Wizard will open In this case cancel the Found New Hardware Wizard and disconnect the camera Install the camera driver and connect the camera to the PC again Should the computer not find the camera driver after installation please try one or more of the following measures 1 Delete the camera driver p 120 a...

Page 117: ...tton and press the RIGHT button 4 Use the UP and DOWN buttons to select Computer and then press the OK button Using the USB cable with Cradle Using the USB cable with Camera If you selected Printer in Step 4 when you connect the camera to your printer the Connecting Printer message will display and the connection will not be established In this case disconnect the USB cable and then follow the pro...

Page 118: ...mages You can download the still images stored on the camera to your PC s hard disk and print them or use a photo editing software to edit them 1 Connect the camera to your PC with the USB cable 2 On your computer s desktop display select My computer and double click Removable Disk DCIM 100SSCAM The image files will then be displayed 5 Click a folder where you want to paste the file ...

Page 119: ...se button and a pop up menu will open Click Paste 7 An image file is transferred from the camera to your PC By using Digimax Viewer you can see the stored images in the memory directly on the PC monitor and you can copy or move the image files ...

Page 120: ...hown below 1 Trace Start Settings and click Control Panel Click 4 Uninstallation is complete Click the Finish button and the window will disappear 2 Double click Add Remove programs 3 The Add Remove Programs Properties window will open Click Digimax U CA5 and click the Add Remove button Click ...

Page 121: ...ning images directly from the removable disk may be subject to unexpected disconnection When uploading images from the PC to the camera ensure that the uploaded file names are not the same as those already stored on the memory When you upload a file that is not taken by this camera to Removable Disk the File Error message will be displayed on the LCD monitor in the PLAY mode and nothing is display...

Page 122: ... S 1 Check whether the camera and PC are transferring a file If the icon located upper left side of the LCD monitor blinks you have to wait until the icon illuminates 2 Double click the Unplug or Eject Hardware icon on the task bar 3 The Unplug or Eject Hardware window will open Select the USB Mass Storage Device and click the Stop button 4 The Stop a Hardware device window will open Select the US...

Page 123: ...he MAC Using the USB Driver for MAC Setting up the USB Driver for MAC 1 Double click a new icon on the desktop and the folder in the memory will be displayed 2 Select an image file and copy or move it to MAC For Mac OS 10 0 or later First complete uploading from computer to camera and then remove the removable disk with the Extract command If a movie clip can t play back on the Mac OS please visit...

Page 124: ...nt Slide show Export Sending e mail On line print Web album etc Before deleting images from the camera you should download images to your computer that you wish to keep Refer to the Help menu in Digimax viewer 2 1 for further information INFORMATION This software is only compatible with Windows 1 To open Digimax Viewer click the Start Programs Samsung Digimax Viewer 2 1 Digimax Viewer 2 1 and Digi...

Page 125: ... Windows To start the program click Start Programs Digimax Reader Eng The following screen will appear How to use the Digimax Reader 1 Connect the camera and the PC with a USB cable and download the images that were stored in the camera to the PC Please see page 117 119 for details on Connecting a camera and PC Downloading images 2 Run the Digimax Reader 3 Click the Open icon as shown alongside ...

Page 126: ...n be opened 5 Click the Area Analysis icon to scan the image 6 Part of the image you selected will be displayed as shown 7 Click the Character Recognition icon The part selected in the previous step will be recognized as text 8 To save the section as a text click the Save icon A window as shown alongside will be displayed ...

Page 127: ...mpression 4 The following screen will appear Command Button Tool Bar Help Button To get an image that can be recognized as a text Keep a distance of 20cm between the subject and the camera The subject need to be centered Avoid the camera shake to get a good image Refer to the Help menu in Digimax Reader for further information INFORMATION 9 Select a file type that you want to Selectable file type ...

Page 128: ... or Layer Performs Insert Frame Insert Borders Insert Calendar Insert Greeting Cards Insert Template or Connect with Other Software Saves the edited picture and sends an e mail or uses it as the background image Outputs the edited picture according to your preferences Tool Bar Button Description Button Description Resize Layer Flip Layer Horizontally Undo Copy Delete Layer Rotate Layer Rotate All ...

Page 129: ... plug in the USB cable again and then turn on the camera Case 5 There is an unexpected error during file transfer Turn the camera power off and on again Transfer the file again Case 6 How do I know my computer supports a USB Interface Check the USB port in your computer or keyboard Check the OS version A USB Interface is available in Windows 98 98SE 2000 ME XP Check Universal Serial Bus controller...

Page 130: ... may malfunction when it is connected to the PC at the same time as another USB cable In this case disconnect the other USB cable and connect only one USB cable to the camera Case 9 When I open the Device Manager by clicking Start Settings Control Panel Performance and Maintenance System Hardware Device Manager there are Unknown Devices or Other Devices entries with a yellow question mark beside t...

Page 131: ...ge and a window for downloading the DivX codec will display 3 Select Mac OS you use and click the Download button Save it on a folder you want to 4 Run the downloaded file and the codec for playing back the movie clip will be installed When the DirectX 8 1 or later is not installed Install the DirectX 8 1 or later 1 Insert the CD provided with the camera 2 Run the windows explorer and select CD RO...

Page 132: ... manufacturers and some BIOS menus don t have Legacy USB Support If you can t change the menu by yourself contact to the PC manufacturer or BIOS manufacturer If the movie clip can t be deleted removable disk can t be extracted or an error message displays during the file transfer If you install only the Digimax Viewer the problems mentioned above occasionally happen Close the Digimax Viewer progra...

Page 133: ...133 MEMO ...

Page 134: ...134 MEMO ...

Page 135: ...135 MEMO ...

Page 136: ...UKonly UKServiceHotline 01932455320 www samsungcamera co uk SAMSUNGOPTO ELECTRONICSGMBH AMKRONBERGERHANG6 D 65824SCHWALBACH TS GERMANY TEL 49 6196665303 FAX 49 6196665366 www samsungcameras de SAMSUNGFRANCES A S BP51TOURMAINEMONTPARNASSE 33 AV DUMAINE 75755 PARISCEDEX15 FRANCE HOTLINEPHOTONUMÉRIQUE 0080022263727 NuméroVert AppelGratuit TEL 33 1 4279 2200 FAX 33 1 4538 6858 www samsungphoto fr SAMS...

Reviews: