E-
39
ENGLISH
I
NSTALLING THE
O
UTDOOR
U
NIT
Checking Correct Earthing
If the power distribution circuit does not have an earth or the earth
does not comply with specifications, an earthing electrode must be
installed. The corresponding accessories are not supplied with the air
conditioner.
1
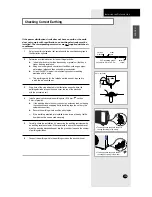
Select an earthing electrode that complies with the specifications given in
the illustration opposite.
2
Determine a suitable location for the earthing electrode:
◆
In damp hard soil rather than loose sandy or gravel soil that has a
higher earthing resistance
◆
Away from underground structures or facilities, such as gas pipes,
water pipes, telephone lines and underground cables
◆
At least 2m(6ft 7in) away from a lightening conductor earthing
electrode and its cable
➢
The earthing wire for the telephone line cannot be used to
earth the air conditioner.
3
Dig a hole of the size indicated in the illustration opposite, drive the
earthing electrode into position and cover the top of the electrode
with the excavated soil.
4
Install a green/yellow insulated earthing wire (Ø1.6 mm/ ˝, section
2 mm
2
or greater):
◆
If the earthing wire is too short, connect an extension lead, soldering
the connection and wrapping it with insulating tape (do not bury the
soldered connection)
◆
Secure the earthing wire in position with staples
➢
If the earthing electrode is installed in an area of heavy traffic,
its wire must be connected securely.
5
Carefully check the installation, by measuring the earthing resistance with
an earthing resistance tester. If the resistance is above the required level,
drive the earthing electrode deeper into the ground or increase the number
of earthing electrodes.
6
Connect the earthing wire to the earthing screw on the air conditioner.
Carbon
plastic
Steel
core
PVC-insulated green/
yellow wire, 2mm
2
x 3.5 m
To
earthing
screw
(11
)
30
3
4
(19
)
50
3
4
❊
The designs and shape are subject to
change according to the model.
❊
The designs and shape are subject
to change according to the model.
1
16
Unit : cm(inch)
Summary of Contents for DIGIMAX A6
Page 26: ...E 26 INSTALLATION MANUAL...


