C
HAPTER
T
WO
: I
NSTALLATION
2
.5
I
N S TA L L AT I O N
1
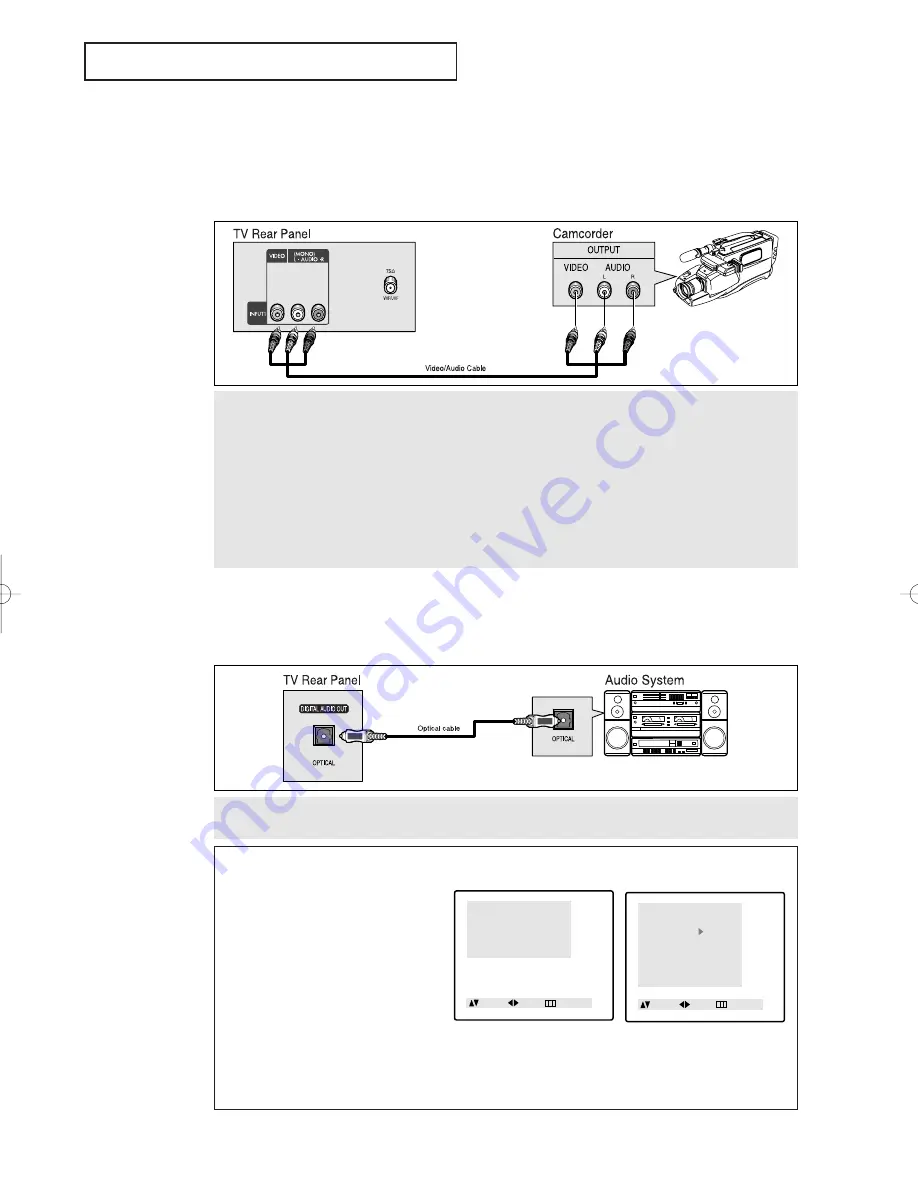
Locate the A/V output jacks on the camcorder. They are usually found on the side or rear of the camcorder.
2
Connect an video/audio cable between the VIDEO/AUDIO OUTPUT jack on the camcorder and the
VIDEO/AUDIO terminals on the front of the TV.
If you have mono camcorder, connect L(mono) to camcorder audio out using only one audio cable.
The audio-video cables shown here are usually included with a Camcorder. (If not, check your local electron-
ics store.) If your camcorder is stereo, you need to connect a set of two cables.
Connecting a Camcorder
The side panel jacks on your TV make it easy to connect a camcorder to your TV. They allow
you to view the camcorder tapes without using a VCR. (Also see “Viewing a VCR or
Camcorder Tape” on page 3.17)
Connect an optical cable between the DIGITAL AUDIO IN jacks on the AUDIO and the DIGITAL AUDIO OUT
jack on the TV.
Connecting an Audio System
(When playing a DVD)
The DIGITAL AUDIO OUT connector is used for equipment, such as an audio system (to
take full advantage of the Surround sound effect).
Setting the Optical jack On/Off
1. Press the
MENU
button.
2. Press the UP/DOWN
▲▼
buttons to
select “Sound”, then press the
LEFT/RIGHT
œ√
buttons.
3. Press the UP/DOWN
▲▼
buttons to
select “Optical”, then press the
LEFT/RIGHT
œ√
buttons to select “On”
or “Off”.
4. Press the
MENU
button to exit.
Note: The Optical On/Off function in the menu doesn’t appear while a normal TV channel
(RF channel) is being watched.
Menu
Picture
Sound
Channel
Function
Move Sel. Exit
Sound
Mode
: Custom
Adjust
Bass plus
: Off
Auto volume
: Off
MTS
: Mono
Optical
: On
Move Sel. Menu
01640A(E)-CHAPTER 2 4/13/05 10:27 AM Page 5
Summary of Contents for CSL 2097DV
Page 71: ...APPENDIX A 2 MEMO ...


