background image

C

HAPTER

T

WO

: I

NSTALLATION

2

.3

I

N S TA L L AT I O N

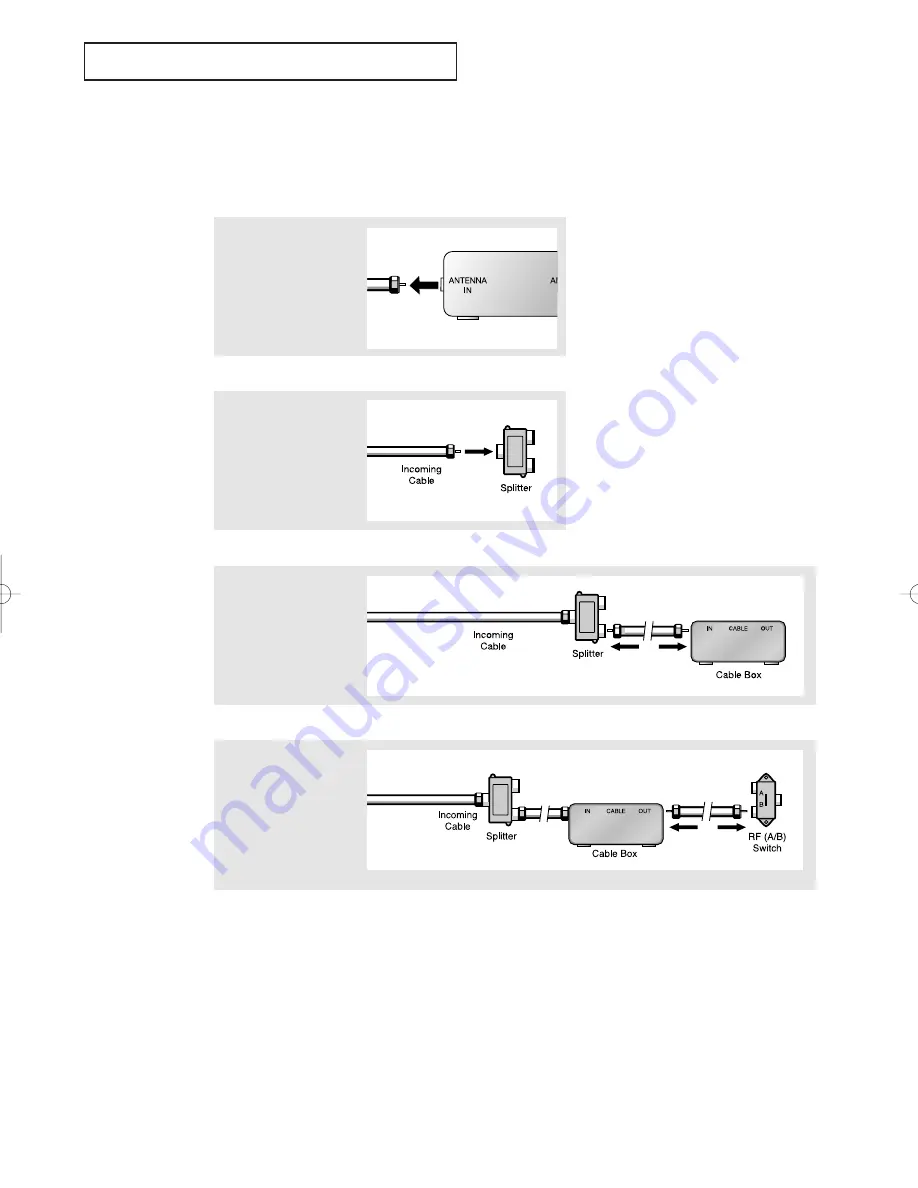
Connecting to a Cable Box that Descrambles Some Channels

If your cable box descrambles only some channels (such as premium channels), follow the
instructions below. You will need a two-way splitter, an RF (A/B) switch, and four lengths of
coaxial cable. (These items are available at most electronics stores.)

1

Find and disconnect the
cable that is connected
to the ANTENNA IN 
terminal on your 
cable box.

This terminal might be labeled

“ANT IN,” “VHF IN,” or simply,
“IN.”

2

Connect this cable to a
two-way splitter. 

3

Connect a coaxial cable
between an OUTPUT
terminal on the splitter
and the IN terminal on
the cable box.

4

Connect a coaxial cable
between the ANTENNA
OUT terminal on the
cable box and the B–IN
terminal on the A/B
switch.

continued...

01640A(E)-CHAPTER 2  4/13/05  10:27 AM  Page 3

Summary of Contents for CSL 2097DV

Page 1: ...Owner s Instructions DVD TELEVISION CSL2099DV CSL2097DV AA68 01640A ENG 01640A E FRONT COVER 4 13 05 10 21 AM Page 1 ...

Page 2: ...cable entry as practical Caution FCC CSA regulations state that any unauthorized changes or modifica tions to this equipment may void the user s authority to operate it Caution To prevent electric shock match the wide blade of plug to the wide slot and fully insert the plug Attention pour eviter les chocs electriques introduire la lame le plus large de la fiche dans la borne correspondante de la p...

Page 3: ...acket or table where it can fall A falling TV can cause serious injury to a child or adult and serious damage to the appliance Use only with a cart stand tripod bracket or table recommended by the manu facturer or sold with the TV Follow the manufacturer s instruc tions when mounting the unit and use a mounting accessory rec ommended by the manufacturer Move the TV and cart with care Quick stops e...

Page 4: ...trode Do not attempt to service the TV yourself Refer all servicing to qualified service personnel Unplug the unit from the wall outlet and refer servicing to qualified service personnel under the following conditions when the power supply cord or plug is damaged if liquid has been spilled on the unit or if objects have fallen into the unit if the TV has been exposed to rain or water if the TV doe...

Page 5: ...corder 2 5 Connecting an Audio System 2 5 Installing Batteries in the Remote Control 2 6 Chapter 3 Operation 3 1 Turning the TV On and Off 3 1 Viewing the Menus and On Screen Displays 3 1 Viewing the Menus 3 1 Viewing the Display 3 1 Selecting a Menu Language 3 2 Memorizing the Channels 3 3 Selecting the Video Signal source 3 3 Storing Channels in Memory Automatic Method 3 4 Adding and Erasing Cha...

Page 6: ...ter the V Chip Blocks a Channel Emergency Escape 4 15 Chapter 5 Playing a Disc 5 1 Playing a Disc 5 1 Using the Search and Skip Functions 5 3 Using the Display Function 5 4 Repeat Play 5 6 Program Play and Random Play 5 7 Using the Disc View Function VCD 5 8 Selecting the Audio Language 5 9 Selecting the Subtitle Language 5 11 Using the Master Volume Control Function 5 12 Changing the Camera Angle...

Page 7: ...mer to turn the DVD TV on and off Adjustable picture and sound settings that can be stored in the DVD TV s memory Automatic channel tuning for up to 181 channels A special filter to reduce or eliminate reception problems Fine tuning control for the sharpest picture possible A built in multi channel sound decoder for stereo and bilingual listening Built in dual channel speakers A special sleep time...

Page 8: ...ontrol Sensor Aim the remote control towards this spot on the TV ˇ SKIP SEARCH Press to skip or search the title chapter or track PLAY PAUSE Press to play or pause the disc ˆ STOP Press to stop the disc Ø OPEN CLOSE Press to open and close the disc tray MENU Press to see an on screen menu of your TV s fea tures VOLUME Press to increase or decrease the volume Also used to select items on the on scr...

Page 9: ...ed to connect a video signal from a camcorder or video game ˇ HEADPHONE JACK Connect a set of external headphones to this jack for private listening Side Panel Jacks You can use the side panel jacks to connect an A V component that is used only occasionally such as a camcorder or video game For information on connecting equipment see pages 2 1 2 9 ...

Page 10: ...mcorder For more information on connecting equipment see pages 2 1 2 9 Œ AUDIO INPUTS Used to connect audio signals from VCRs laserdisc players and similar devices VIDEO INPUTS Used to connect video signals from VCRs laserdisc players and similar devices ˇ DIGITAL AUDIO OUTPUT Connect to a compatible dolby digital receiver VHF UHF Connect to an antenna or to a cable TV system ...

Page 11: ...picture by selecting one of the preset factory settings or select your personal cus tomized picture settings MENU Displays the main on screen menu Control the cursor in the menu Allows move to items TV DVD selection Press to switch between TV and DVD mode PRE CH Tunes to the previous channel Ô SLEEP Press to select a preset time inter val for automatic shutoff CH and CH Channel Down Up Press CH or...

Page 12: ...he selected area of a scene ANGLE Press to access various camera angles on a DVD PROGRAM For random and program play BOOKMARK Press to memorize scenes for replay Ô Play pause Press to play or pause disc play Skip Press to skip the title chapter or track Ò TOP MENU Press to display the top menu on a DVD or CD VCD disc Ú RETURN Press to return to a previous menu or exit Æ SUBTITLE Press to display t...

Page 13: ... 2 2 Antennas with 300 ohm Flat Twin Leads If you are using an off air antenna such as a roof antenna or rabbit ears that has 300 ohm twin flat leads follow the directions below Chapter Two INSTALLATION 1 Place the wires from the twin leads under the screws on the 300 75 ohm adaptor not sup plied Use a screwdriver to tighten the screws 2 Plug the adaptor into the VHF UHF terminal on the bottom of ...

Page 14: ...eparate VHF and UHF Antennas If you have two separate antennas for your TV one VHF and one UHF you must combine the two antenna signals before connecting the antennas to the TV This procedure requires a an optional combiner adaptor available at most electronics shops 1 Connect both antenna leads to the combiner Connecting to a Cable Box that Descrambles All Channels 1 Find the cable that is connec...

Page 15: ...ble These items are available at most electronics stores 1 Find and disconnect the cable that is connected to the ANTENNA IN terminal on your cable box This terminal might be labeled ANT IN VHF IN or simply IN 2 Connect this cable to a two way splitter 3 Connect a coaxial cable between an OUTPUT terminal on the splitter and the IN terminal on the cable box 4 Connect a coaxial cable between the ANT...

Page 16: ... on the VCR and the VIDEO AUDIO jacks on the TV If you have a mono VCR connect L mono to VCR audio out using only one audio cable Follow the instructions in Viewing a VCR or Camcorder Tape on page 3 12 to view your VCR tape 5 Connect another cable between the other OUT terminal on the splitter and the A IN terminal on the RF A B switch 6 Connect the last coaxial cable between the OUT terminal on t...

Page 17: ...rder tapes without using a VCR Also see Viewing a VCR or Camcorder Tape on page 3 17 Connect an optical cable between the DIGITAL AUDIO IN jacks on the AUDIO and the DIGITAL AUDIO OUT jack on the TV Connecting an Audio System When playing a DVD The DIGITAL AUDIO OUT connector is used for equipment such as an audio system to take full advantage of the Surround sound effect Setting the Optical jack ...

Page 18: ...using the remote control for a long time The remote control can be used up to about 23 feet from the TV Assuming typical TV usage the bat teries last for about one year 2 Install two AA size batteries Make sure to match the and ends of the batteries with the diagram inside the compartment Installing Batteries in the Remote Control 1 Slide the cover out completely ...

Page 19: ... item s sub menu 3 Press the MENU button to exit Chapter Three OPERATION Turning the TV On and Off Press the POWER button on the remote control You can also use the Power button on the front panel CHAPTER THREE OPERATION 3 1 Viewing the Display The display identifies the current channel and the status of certain audio video settings The on screen displays disappear after about ten seconds 1 Press ...

Page 20: ...ge Press the LEFT RIGHT œ œ buttons to select the appropriate language English Spanish or French Function Time Caption V Chip Language English Move Sel Menu 1 Press the MENU button to display the menu Press the UP DOWN buttons to select Function Press the LEFT RIGHT œ œ buttons Menu Picture Sound Channel Function Move Sel Exit V Chip USA only ...

Page 21: ...s you must specify the type of signal source that is connected to the TV i e an antenna or a cable system 1 Press the MENU button to display the menu Press the UP DOWN buttons to select Channel Press the LEFT RIGHT œ œ buttons Menu Picture Sound Channel Function Move Sel Exit 2 Press the UP DOWN buttons to select ANT CATV Repeatedly press the LEFT RIGHT œ œ buttons to cycle through these choic es ...

Page 22: ...pt the memorization process and return to the Channel menu 2 Press the UP DOWN buttons to select Auto Program Channel TV AV TV ANT CATV ANT Auto Program Fine tune 00 Add Erase Erased Move Sel Menu 1 First select the correct signal source ANT STD HRC IRC See steps 1 2 on previous page Press the UP DOWN buttons to select Channel then press the LEFT RIGHT œ œ buttons Menu Picture Sound Channel Functi...

Page 23: ...ress 2 then 7 The TV will change channels when you press the second number Press the PRE CH button The TV will switch to the last channel viewed When you press the CH or CH buttons the TV changes channels in sequence You will see all the channels that the TV has memorized The TV must have memorized at least three channels You will not see channels that were either erased or not memorized To quickl...

Page 24: ...Adjusting the Volume Using Mute At any time you can temporarily cut off the sound using the Mute button 1 Press the MUTE button and the sound cuts off The word Mute will appear in the lower left corner of the screen 2 To turn mute off press the MUTE button again or simply press either the VOL or VOL buttons ...

Page 25: ...lish Move Sel Menu When selecting the hours be sure to select the proper time of day AM or PM 3 Press the LEFT RIGHT œ œ buttons again the hours digits will be highlighted Press the UP DOWN buttons repeatedly until the correct hour appears Time Clock 06 00 Pm On Time Am Off Off Time Am Off Sleep Timer Off On time volume 10 Adj Sel Menu 4 Press the LEFT RIGHT œ œ buttons the minute digits will be h...

Page 26: ...to personal preference Alternatively you can use one of the automatic settings See next page 3 Press the UP DOWN buttons to select particu lar item Press the LEFT RIGHT œ œ buttons increase or decrease the value of a particular item Press the MENU button to exit Contrast 70 2 Press the UP DOWN buttons to select Adjust then press the LEFT RIGHT œ œ buttons Adjust Contrast 50 Bright 50 Sharpness 50 ...

Page 27: ...ure settings Standard Natural and Mild that are preset at the factory You can activate either Standard Natural or Mild by pressing P STD or by making a selection from the menu Or you can select Custom which automati cally recalls your personalized picture settings Choose Standard for the standard factory settings Natural Optimal indoor screen condition Choose Mild Mild Contrast when viewing the TV...

Page 28: ...use one of the automatic settings See next page 2 Press the UP DOWN buttons to select Adjust the press the LEFT RIGHT œ œ buttons Sound Mode Custom Adjust Bass plus Off Auto volume Off MTS Mono Move Sel Menu 3 Press the UP DOWN buttons to select a partic ular item Adjust Bass 50 Treble 50 Balance L 50 R 50 Move Adj Menu 4 Press the LEFT RIGHT œ œ buttons increase or decrease the value of a particu...

Page 29: ...ress the MENU button to exit Sound Mode Standard Adjust Bass plus Off Auto volume Off MTS Mono Move Sel Menu 1 Press the MENU button to display the menu Press the UP DOWN buttons to select Sound then press the LEFT RIGHT œ œ buttons OPERATION Menu Picture Sound Channel Function Move Sel Exit Choose Standard for the standard factory settings Choose Music when watching music videos or concerts Choos...

Page 30: ...order signal on the TV Menu Picture Sound Channel Function Move Sel Exit 2 Press the LEFT RIGHT œ œ buttons You will switch between viewing the sig nals coming from equip ment connected to the TV s A V jacks and the TV signal Press the MENU button to exit Channel TV AV AV ANT CATV ANT Auto Program Fine tune 00 Add Erase Erased Move Sel Menu Simply press the TV VIDEO button on the remote control on...

Page 31: ...ss the UP DOWN buttons to select Fine tune Press the LEFT RIGHT œ œ buttons to adjust the fine tuning Channel TV AV TV ANT CATV ANT Auto Program Fine tune 03 Add Erase Erased Add Erase Adj Menu 3 To store the fine tuning set ting in the TV s memory press the UP button An asterisk will appear To reset the fine tuning to 00 press the DOWN button Channel TV AV TV ANT CATV ANT Auto Program Fine tune 0...

Page 32: ...creen 1 Press the MENU button to display the menu Press the LEFT RIGHT œ œ buttons to display the Picture menu Menu Picture Sound Channel Function Move Sel Exit 2 Press the UP DOWN buttons to select Digital NR Press the LEFT RIGHT œ œ buttons to select Digital NR On Picture Mode Custom Adjust Color Tone Cool Size Normal Digital NR On Move Sel Menu Pressing the LEFT RIGHT œ œ buttons will alternate...

Page 33: ...to Zoom mode 1 Press the MENU button to display the menu Press the LEFT RIGHT œ œ buttons to display the Picture menu Menu Picture Sound Channel Function Move Sel Exit 2 Press the UP DOWN buttons to select Size Press the LEFT RIGHT œ œ buttons to select Normal or Zoom Picture Mode Custom Adjust Color Tone Cool Size Zoom Digital NR Off Move Sel Menu 3 Press the MENU button to exit ...

Page 34: ... Picture menu Menu Picture Sound Channel Function Move Sel Exit 2 Press the UP DOWN buttons to select Color Tone Press the LEFT RIGHT œ œ buttons to select Normal Warm or Cool according to per sonal preference Picture Mode Custom Adjust Color Tone Warm Size Normal Digital NR Off Move Sel Menu Changing the Color Tone 3 Press the MENU button to exit ...

Page 35: ... Press the UP DOWN buttons to select On Time Press the RIGHT button to highlight the On time hours Press the UP DOWN buttons repeatedly to select the appropriate hours i e the hour when the TV will turn on Time Clock 06 00 Pm On Time 05 00 Am Off Off Time Am Off Sleep Timer Off On time volume 10 Adj Sel Menu 4 Press the RIGHT button to highlight the On time minutes Press the UP DOWN buttons repeat...

Page 36: ...Time Clock 06 00 Pm On Time 05 30 Am On Off Time Am Off Sleep Timer Off On time volume 10 Adj Sel Menu 7 To set the Off time press the UP DOWN buttons to select Off Time Press the RIGHT button and set the hours and min utes Follow the same pro cedure as in steps 1 6 above Time Clock 06 00 Pm On Time 05 00 Am On Off Time Am Off Sleep Timer Off On time volume 10 Move Sel Menu 6 When finished press t...

Page 37: ...Time Caption V Chip Language English Move Sel Menu 3 Press the UP DOWN buttons to select Sleep Timer Press the RIGHT button repeatedly until the appro priate time interval appears any of the preset values from Off to 180 Press the MENU button to exit Time Clock 06 00 Pm On Time 05 00 Am On Off Time Am Off Sleep Timer Off On time volume 10 Move Sel Menu Simply press SLEEP repeat edly until the appr...

Page 38: ...ting in stereo Choose SAP to listen to the Separate Audio Program which is usually a foreign language translation You can also change the MTS setting by pressing the MTS button on the remote control When you change channels MTS is set to Stereo automatically To listen in SAP or Mono change the MTS setting 1 Press the MENU button to display the menu Press the UP DOWN buttons to select Sound Press t...

Page 39: ...the sound output when the modu lation signal is high or by raising the sound output when the modulation signal is low 1 Press the MENU button to display the menu Press the UP DOWN buttons to select Sound Press the LEFT RIGHT œ œ buttons Menu Picture Sound Channel Function Move Sel Exit 2 Press the UP DOWN buttons to select Auto volume Press the LEFT RIGHT œ œ buttons to select On Sound Mode Custom...

Page 40: ...U button to display the menu Press the UP DOWN buttons to select Sound Press the LEFT RIGHT œ œ buttons Menu Picture Sound Channel Function Move Sel Exit 2 Press the UP DOWN buttons to select Bass plus Press the LEFT RIGHT œ œ buttons to select On Sound Mode Custom Adjust Bass plus On Auto volume Off MTS Mono Move Sel Menu 3 Press the MENU button to exit ...

Page 41: ...hannel 1 may have subtitles in English while Channel 2 has subtitles in Spanish 1 Press the MENU button to display the menu Press the UP DOWN buttons to select Function Press the LEFT RIGHT œ œ buttons Function Time Caption V Chip Language English Move Sel Menu 2 Press the UP DOWN buttons to select Caption Press the LEFT RIGHT œ œ buttons Function Time Caption V Chip Language English Move Sel Menu...

Page 42: ...T œ œ buttons 3 After entering a valid PIN number the V chip mode screen will appear Press the UP DOWN buttons to select Change pin 4 While the Change pin field is selected press the LEFT RIGHT œ œ buttons The Change pin screen will appear Choose any 4 digits for your PIN and enter them Note If you forget the PIN press the remote control buttons in the following sequence which resets the pin to 0 ...

Page 43: ...unction Time Caption V Chip Language English Move Sel Menu 2 Press the UP DOWN buttons to select V Chip Press the LEFT RIGHT œ œ buttons The Enter pin screen will appear Enter your 4 digit PIN number 3 After entering a valid PIN number the V chip mode screen will appear To enable the V Chip fea ture press the LEFT RIGHT œ œ buttons so that the V Chip lock field is Yes Pressing the LEFT RIGHT œ œ b...

Page 44: ... D Dialog L L S Sexual situation V Violence Note 2 The V Chip will automatically block certain categories that are more restrictive For example if you block TV Y category then TV Y7 will automatically be blocked Similarly if you block the TV G category then all the categories in the young adult group will be blocked TV G TV PG TV 14 and TV MA The sub ratings D L S V work together similarly See nex...

Page 45: ... for each sub rating While the U or B is selected press the UP DOWN buttons to change the sub rating Press the LEFT RIGHT œ œ buttons to save the TV guidelines A TV Rating will be selected To select a different TV Rating press the UP DOWN buttons and then repeat the process Note The V chip will automatically block certain categories that are More restrictive For example if you block L sub rating i...

Page 46: ...Chip Lock 5 Repeatedly press the UP DOWN buttons to select a particular MPAA category Pressing the UP DOWN buttons will cycle through the MPAA categories G General audience no restrictions PG Parental guidance suggested PG 13 PG 13 Parents strongly cautioned R R Restricted Children under 17 should be accompanied by an adult NC 17 No children under age 17 X X Adults only NR Not rated 3 The V chip m...

Page 47: ...d so when you press the PLAY again it will pick up where you left off unless the disc is removed the STOP button is pressed twice or the set is unplugged If the player is left for 2 minutes in pause mode it will stop This icon indicates an invalid button press Stopping Playback Press the STOP but ton during playback Removing Disc Press the OPEN CLOSE button Pausing Playback Press the PLAY PAUSE or...

Page 48: ...SE button to resume normal playback You can only perform step motion playback in the forward direction Slow Motion Playback Except CD Press the FWD SEARCH button on the remote control during PAUSE or STEP mode By pressing the FWD SEARCH button you can select slow motion playback for 1 2 1 4 or 1 8 of normal speed No sound is heard during slow mode Press the PLAY PAUSE button to resume normal playb...

Page 49: ...button it moves to the beginning of the chapter One more press makes it move to the beginning of the previous chapter When playing a VCD 2 0 in MENU OFF mode a VCD1 1 or a CD if you press the NEXT SKIP button it moves to next track If you press the BACK SKIP button it moves to the the beginning of the track One more press makes it move to the beginning of the previous track If a track exceeds 15 m...

Page 50: ...02 47 3 To enter the time from which you want to start press the LEFT RIGHTœ œ button to select then press the Number buttons to enter the time Then press the ENTER button DVD T 01 C 01 0 03 30 4 Press the DISPLAY button twice Current audio subtitle and volume control will appear To make the screen disap pear press the DISPLAY button again 64 ENG On ENG 5 1CH What is a Chapter Each Title on a DVD ...

Page 51: ...select a track Press the UP DOWN buttons or Number buttons to enter a different track number then press the ENTER button VCD T 01 0 02 47 64 CD T 01 0 02 47 64 3 To enter the time from which you want to start press the LEFT RIGHT œ buttons to select then press the Number buttons to enter the time Press the ENTER button VCD T 01 0 03 30 64 When Playing a CD VCD VCD VCD CD T 01 0 03 30 64 CD CD CD ...

Page 52: ...Repeat Œ Press the REPEAT button Select A B on screen with the LEFT RIGHTœ œ buttons Press the ENTER button at the point where you want the repeat play to start A The B is automatically highlighted ˇ Press the ENTER button at the point where you want the repeat play to stop B The A B Repeat that you set plays until you turn Repeat off Note DVD repeats playback by chapter or title CD and VCD repeat...

Page 53: ...yed back in random order PROGRAM RANDOM 3 Press the LEFT RIGHT œ buttons to select the first chapter or track to add to the program Press the ENTER button The selection numbers appear in the Program Order box PROGRAM 01 RETURN CLEAR ENTER PLAY Program Order Chap T 01 01 02 03 4 Press the PLAY PAUSE button The disc will be played back in programmed order Depending on the disc the Program and Random...

Page 54: ... View Press the ENTER button ENTER Disc View 1 Track View 2 Index View 3 Select the desired view by pressing the UP DOWN or LEFT RIGHT œ but tons Press the ENTER button 01 02 03 TRACK VIEW 01 02 03 04 05 06 07 08 09 INDEX VIEW When pressing the TOP MENU button with a DVD the disc s TITLE MENU function comes up A disc must have at least two titles for the TITLE MENU function to work When pressing t...

Page 55: ...language on a DVD The audio languages are represented by abbrevia tions ENG DOLBY DIGITAL 5 1CH 3 Press the UP DOWN buttons to select Stereo Right or Left On VCD CD Stereo This function depends on what languages are encoded on the disc and may not work with all DVDs A DVD disc can contain up to 8 audio languages How to have the same audio lan guage come up whenever you play back a DVD Refer to Usi...

Page 56: ... Player Menu English 2 Disc Menu English 3 Audio English 4 Subtitle Automatic 5 Parental Unlocked 6 Audio Options 7 Display Options 4 Press the UP DOWN buttons to select appropri ate language then press the ENTER button Press the RETURN button to exit AUDIO LANGUAGE RETURN ENTER 1 English 2 Français 3 Deutsch 4 Español 5 Italiano 6 Nederlands 7 Original 8 Others Select Original if you want the def...

Page 57: ...resented by abbrevia tions 3 Press the LEFT RIGHT œ buttons to determine whether or not the subtitle will be displayed Initially the subtitling will not appear on screen The subtitle languages are rep resented by abbreviations This function depends on what languages are encoded on the disc and may not work with all DVDs A DVD disc can contain up to 32 subtitle languages How to have the same subtit...

Page 58: ...ANGUAGE RETURN ENTER 1 Automatic 2 English 3 Français 4 Deutsch 5 Español 6 Italiano 7 Nederlands 8 Others Using the Master Volume Control Function Press the DISPLAY button once or twice then press the LEFT RIGHT œ buttons to select master volume control Press the UP DOWN but tons to select a suitable vol ume Master Volume Control function lets you adjust the volume of the player s output This is ...

Page 59: ...tton To turn off the display press the ANGLE button again 1 6 1 When an ANGLE mark is shown press the ANGLE button then an ANGLE select icon will appear at the upper left hand corner of the screen Using the Zoom Function DVD VCD 2 Press the UP DOWN or LEFT RIGHT œ buttons to select the part of the screen you want to zoom Press the ENTER button 1 During playback or pause mode press the ZOOM but ton...

Page 60: ...to move to the desired bookmark icon ENTER 2 Press the LEFT RIGHT œ buttons to select a marked scene ENTER 1 2 3 PLAY CLEAR 3 When you reach the scene you want to mark press the ENTER button The icon will change to a number 1 2 or 3 Press the BOOKMARK but ton to turn off the display ENTER 1 PLAY CLEAR 3 Press the PLAY PAUSE button to skip to the marked scene 1 During playback press the BOOKMARK bu...

Page 61: ... 1 2 3 PLAY CLEAR 3 Press the CLEAR button to delete a bookmark number Press the BOOKMARK but ton to turn off display 1 During playback press the BOOKMARK button A marker will be displayed Up to three scenes may be marked at the same time When in VCD 2 0 mode Menu On mode this function does not work Depending on the disc the Bookmark function may not work ...

Page 62: ... DVDP Setup Press the LEFT RIGHT œ buttons The SETUP MENU is dis played Menu Picture Sound Channel Function DVDP Setup Move Sel Exit 3 Press the UP DOWN buttons to select Player Menu then press the ENTER button SETUP MENU RETURN ENTER 1 Player Menu English 2 Disc Menu English 3 Audio English 4 Subtitle Automatic 5 Parental Unlocked 6 Audio Options 7 Display Options 4 Press the UP DOWN buttons to s...

Page 63: ...xit 3 Press the UP DOWN buttons to select Disc Menu then press the ENTER button SETUP MENU RETURN ENTER 1 Player Menu English 2 Disc Menu English 3 Audio English 4 Subtitle Automatic 5 Parental Unlocked 6 Audio Options 7 Display Options 4 Press the UP DOWN buttons to select the appro priate language then press the ENTER button Press the RETURN button to exit DISC MENU LANGUAGE RETURN ENTER 1 Engli...

Page 64: ...unction DVDP Setup Move Sel Exit 3 Press the UP DOWN buttons to select Parental then press the ENTER button SETUP MENU RETURN ENTER 1 Player Menu English 2 Disc Menu English 3 Audio English 4 Subtitle Automatic 5 Parental Unlocked 6 Audio Options 7 Display Options 4 Press the LEFT RIGHT œ buttons to select Yes if you want to use a pass word then press the ENTER button The Enter Password screen app...

Page 65: ... PARENTAL CONTROL RETURN ENTER 1 Use Password Yes 2 Rating Level 6 3 Change Password RATING LEVEL RETURN Level 8 Adult Level 7 Level 6 Level 5 Level 4 Level 3 Level 2 Level 1 Kids Safe ENTER To cancel the rating level press the LEFT RIGHT œ buttons button to select No in Use Password 7 About Change Password ŒPress the UP DOWN buttons to select Change Password The Change Password screen appears Ent...

Page 66: ... to select the desired item then press the LEFT RIGHT œ buttons AUDIO OPTIONS RETURN 1 Dolby Output PCM 2 DTS Off Dolby Out PCM Converts to PCM 2CH 48kHz 16Bit audio Select PCM when using the Analog Audio Outputs Bitstream Converts to Dolby Digital BITSTREAM 5 1CH if MPEG 2 7 1CH Select BIT STREAM when using the Digital Audio Output DTS On Outputs DTS BITSTREAM via digital output only Select DTS w...

Page 67: ...ill Mode Auto 3 Screen Messages Off ENTER TV ASPECT RETURN ENTER 1 4 3 Letter Box 2 4 3 Pan Scan 3 16 9 Wide TV Aspect 4 3 Letter Box Select when you want to see the total 16 9 ratio screen DVD supplies even though you have a TV with a 4 3 ratio screen Black bars will appear at the top and bottom of the screen 4 3 Pan Scan Select this for conventional size TVs when you want to see the central port...

Page 68: ...D ROMs CD R etc Insert a DVD a VIDEO CD or a CD 5 1 channel sound is reproduced only when the fol lowing conditions are met 1 The DVD player is connected with the proper amplifier 2 The disc is recorded with 5 1 channel sound Check whether the disc being played has the Dolby 5 1 ch mark on the outside Check if your audio system is connected and working properly If the TV seems to have a problem fi...

Page 69: ...sc in the unit Press the OPEN CLOSE button or PLAY button Press the STOP and PLAY buttons simultaneously on the front panel for three seconds Select the Parental Mode The Parental Mode is now unlocked as indicated on the display Press the UP DOWN button to select Parental Press the ENTER button and the Create Password display will appear You can now set your rating level and change your password t...

Page 70: ...or touch the parts inside Wipe your TV with a clean dry cloth Never use water cleaning fluids wax or chemicals Do not put heavy objects on top of the cabinet Temperature If your TV is suddenly moved from a cold to a warm place unplug the power cord and allow at least two hours for moisture that may have formed inside the unit to dry completely Using Your TV in Another Country If you plan to take y...

Page 71: ...APPENDIX A 2 MEMO ...

Reviews: