background image

23

ENG

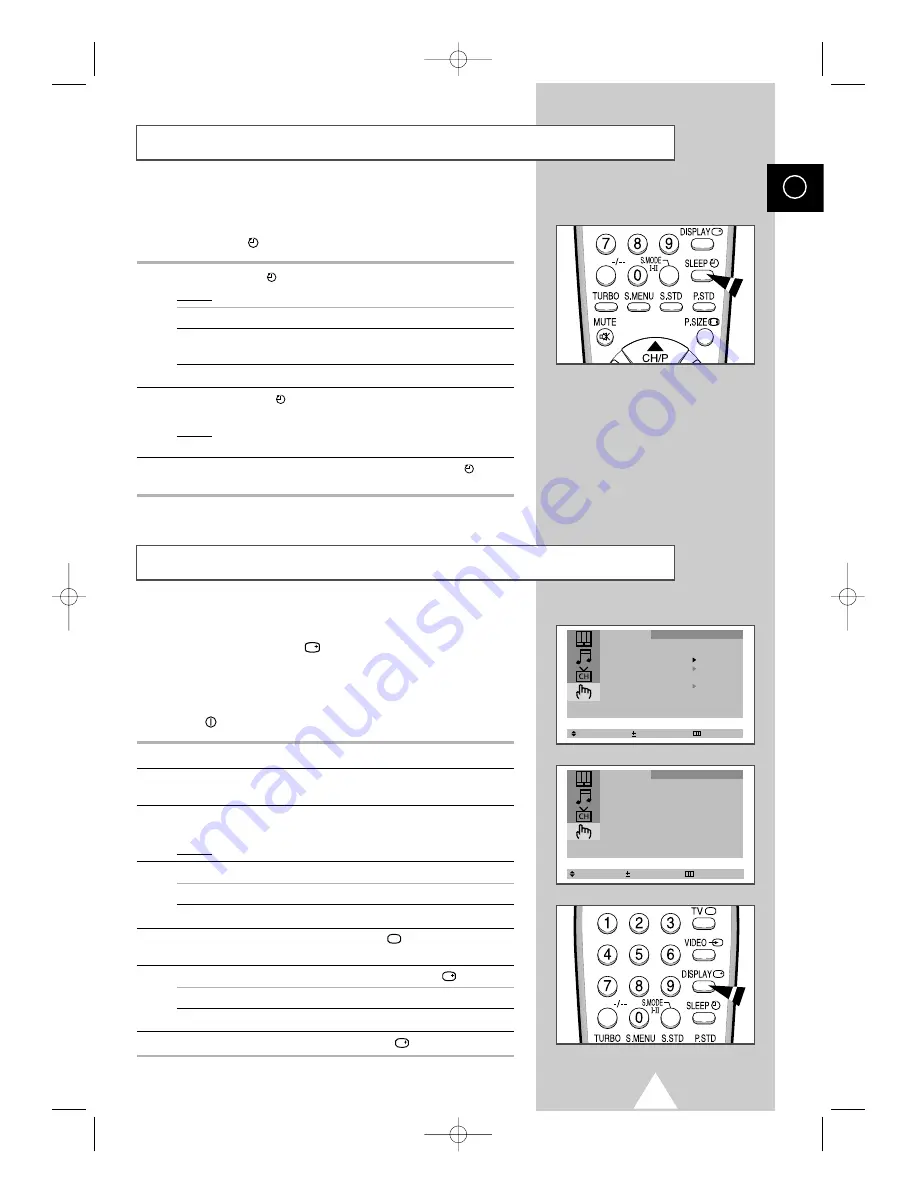
You can select a time period of between 30 and 180 minutes after
which the television automatically switches to Standby mode by
pressing the "SLEEP

" button.

1

Press the SLEEP

button on the remote control.

Result:

If the sleep timer is...

The screen displays...

Already set

Time remaining before the television 
will be placed in standby mode.

Not yet set

Word “Off”.

2

Press the SLEEP

button repeatedly and cycle through the

preset time intervals (30, 60, 90, 120, 150, 180).

Result:

The television automatically switches to standby mode
when the timer reaches 0.

3

To cancel the sleep timer function, press the SLEEP

button

repeatedly and select “Off”.

Setting the Sleep Timer

You can set the television’s clock so that the current time is displayed
when you press the “DISPLAY

” button.

You must also set the time if you wish to use the automatic On/Off
timers.

The clock setting will be re-activated when pressing the

” (ON/OFF) button on the front panel.

1

Press the MENU button.

2

Press the 

or 

button to select the “Function” and press the 

-

or

+

button.

3

Press the 

or 

button to select the “Time”, and press the 

-

or 

+

button.

Result:

The “Time” menu is displayed with the “Clock” selected.

4

To...

Press the...

Move to the hour or minute

-

or 

+

button.

Set the hour or minute

or 

button.

5

When you have finished, press the TV

button or, press the

MENU button repeatedly to return to normal viewing.

6

To display the...

Press the DISPLAY

button...

Channel information

Once.

Current time

Twice.

7

To remove the display, press the DISPLAY

button again.

Setting and Displaying the Current Time

(depending on the model)

Select       Enter         Exit

Language : English

Time

Plug & Play
Blue Screen       : Off
Child Lock
Low Noise AMP     : Off

Function

Select       Adjust        Exit

Time

Clock         11 : 35

Timer           Off

Function

Clock

11

: 00  AM

Timer

Off

Adjust   

Move      

Exit


01602B_ENG_GAME  3/12/02  5:01 PM  Page 23

Summary of Contents for CS21B2

Page 1: ...e operating the unit please read this manual thoroughly and retain it for future reference ENG REMOTE CONTROL ON SCREEN MENUS ENJOY GAME depending on the model TELETEXT FUNCTION depending on the model ELECT 01602B_ENG_GAME 3 12 02 5 01 PM Page 1 ...

Page 2: ...ervice personnel During a storm conditions especially when there is lightning unplug the television from the mains socket and aerial If the remote control is not used for a long period of time remove the batteries and store it in a cool dry place Mode System CS PAL B G D K I SECAM B G D K I NTSC4 43 NTSC3 58 option CB PAL B G CD PAL D K WARNING TO PREVENT DAMAGE WHICH MAY RESULT IN FIRE OR SHOCK H...

Page 3: ...he Picture Settings 18 Changing the Sound Standard 19 Adjusting the Sound Settings 20 Adjusting the Volume 20 Extra Sound Settings Auto Volume Melody Pseudo Stereo Turbo Sound 21 Selecting the Sound Mode 22 Switching the Sound Off Temporarily 22 Setting the Sleep Timer 23 Setting and Displaying the Current Time 23 Switching the Television On and Off Automatically 24 Activating the Child Lock 25 Ex...

Page 4: ... no longer works or you have lost it you can use the controls on the front panel of the television to Switch on the television when it is in Standby mode and select channels CH Access the main menu MENU Adjust the volume VOL Buttons on the front panel have the same function as corresponding buttons on the remote control MENU DISPLAY VOLUME ADJUSTMENT CHANNEL SELECTION STAND BY INDICATOR REMOTE CON...

Page 5: ...OUTPUT INPUT VIDEO AUDIO RCA AUDIO VIDEO INPUT CONNECTORS Front or Side of TV Connecting earphones headphones You can connect a set of earphones headphones to your television if you wish to watch a television programme without disturbing the other people in the room Prolonged use of earphones headphones at a high volume may damage your hearing INPUT MONITOR OUT VIDEO AUDIO INPUT MONITOR OUT VIDEO ...

Page 6: ...D ON OFF OPTION TEMPORARY SOUND SWITCH OFF VOLUME DECREASE PREVIOUS CHANNEL DIRECT CHANNEL SELECTION TUNER CABLE NETWORK SELECTION EXTERNAL INPUT SELECTION ON SCREEN DISPLAY AUTOMATIC SWITCH OFF PICTURE SIZE NEXT CHANNEL VOLUME INCREASE PICTURE STANDARD OPTION SOUND STANDARD OPTION SOUND MODE SELECTION OPTION MENU DISPLAY Buttons and markings are subject to change GAME DISPLAY OPTION 01602B_ENG_GA...

Page 7: ... TOPIC SELECTION TELETEXT NEXT PAGE TELETEXT PREVIOUS PAGE TELETEXT DISPLAY MIX LIST FLOF MODE SELECTION TELETEXT REVEAL TELETEXT STORE PICTURE SIZE TELETEXT SUB PAGE PROGRAMME SELECTION BY NAME Buttons and markings are subject to change 01602B_ENG_GAME 3 12 02 5 01 PM Page 7 ...

Page 8: ...emote control on the battery with on the remote control 3 Replace the cover by pushing it in the direction of the arrow PRESS To view television channels correctly a signal must be received by the set from one of the following sources An outdoor aerial A cable television network Plug the aerial or cable network input cable to the 75Ω coaxial socket on the rear of the television Inserting the Batte...

Page 9: ...sion in Standby mode Your television can be placed in Standby mode in order to reduce Power consumption Wear of the cathode ray tube The Standby mode can be useful when you wish to interrupt viewing temporarily during a meal for example The television is placed automatically in Standby mode when you turn it on 1 Press the POWER button on the remote control Result The screen is turned off and the S...

Page 10: ...annels Automatically on page 12 Result The horizontal bar is displayed and then channels are stored in an order which reflects their positions in the frequency range 4 When searching and storing is complete the Time menu is displayed 5 Press the or button to move to the hour or minute Set the hour or minute by pressing the or button refer to Setting and Displaying the Current Time on page 23 6 Whe...

Page 11: ...e 4 Select a particular language by pressing the or button repeatedly 5 When you have finished press the TV button or press the MENU button repeatedly to return to normal viewing Select Adjust Exit Language English Time Plug Play Blue Screen Off Child Lock Low Noise AMP Off Function Select Enter Exit Mode Custom Adjust Size Normal Picture Select Enter Exit Language English Time Plug Play Blue Scre...

Page 12: ...ally allocated numbers may not correspond to those by which you wish to identify the channels If this is the case refer to Sorting the Stored Channels on page 16 1 Press the MENU button 2 Press the or button to select the Channel 3 Press the or button to select the Auto Store 4 Press the or button again Result The horizontal bar is displayed and then channels are stored in an order which reflects ...

Page 13: ... 7 To assign a programme number to the channel select the Prog No Press the or button until you find the correct number 8 To store the channel and associated programme number select the Store and press the or button Result OK is displayed 9 Repeat Steps 6 to 8 for each channel to be stored 10 When you have finished manual storage press the TV button or press the MENU button repeatedly to return to...

Page 14: ...or button Result The Add Erase menu is displayed 4 Press the or button to select the required channel 5 To add or erase the desired channel by pressing the or button 6 When you have finished adding and erasing channels press the TV button or press the MENU button repeatedly to return to normal viewing 14 ENG Select Adjust Exit Add Erase P 0 Erased P 1 Added P 2 Added P 3 Added Channel Select Enter...

Page 15: ...e and Result The horizontal bar s good sound quality cursor moves to the left or right memorise adjusted or button to select the Store picture or sound or button Result OK is displayed erase adjusted or button to select the Erase picture or sound or button Result OK is displayed 5 When you have finished press the TV button or press the MENU button repeatedly to return to normal viewing Fine tuning...

Page 16: ... the channel is displayed Result The selected channel is exchanged with the one previously stored to the chosen number Example If you select P 1 for the From and P 3 for the To Channel 1 becomes channel 3 Channel 3 becomes channel 1 7 To Press the Confirm the exchange or button to select the Store of channel numbers or button Result OK is displayed You can exchange other channel numbers by selecti...

Page 17: ...he Picture Standard Select Adjust Exit Mode Custom Adjust Size Normal Picture Selecting the Picture Format depending on the model You can select the picture format which best corresponds to your viewing requirements The following picture formats are available in the order given Normal Zoom 16 9 option 1 Press the MENU button Result The Picture menu is displayed 2 Press the or button 3 Press the or...

Page 18: ...ress the MENU button repeatedly to return to normal viewing The television has an automatic degaussing system that is activated if magnetic interference is present To degauss the television screen switch power off by pressing the ON OFF button on the front panel refer to Automatic Degaussing to Remove Color Patches on page 31 If you make any changes to the Adjust settings the picture standard is a...

Page 19: ... selected 3 Select to satisfy your preference by pressing the or button 4 When you have been finished press the TV button or press the MENU button repeatedly to return to normal viewing You can select the required sound effect by simply pressing the S STD Sound standard button on the remote control 19 ENG Changing the Sound Standard depending on the model Select Adjust Exit Mode Custom Adjust Auto...

Page 20: ... the MENU button repeatedly to return to normal viewing You can display the sound adjust menu directly by pressing the S MENU Sound menu button on the remote control Select Enter Exit Mode Custom Adjust Auto Volume Off Melody Off Pseudo Stereo Off Turbo Sound Off Sound Balance L 49 R 51 Select Adjust Exit Adjust Bass 50 Treble 50 Balance L 50 R 50 Sound Adjusting the Volume You can adjust the volu...

Page 21: ...Music Movie and Speech Turbo Sound You can enjoy more magnificent and dynamic sound when watching music movie or other channel Turbo Sound suitably emphasizes both higher and lower bands of sound and includes other effects 1 Press the MENU button 2 Press the or button to select the Sound and press the or button 3 To Press the Change an option or button Select the required option On Off or button 4...

Page 22: ...no sound comes out only from the left speaker then press the S MODE I II button Switching the Sound Off Temporarily You can switch the sound off temporarily for example you may wish to answer the telephone 1 Press the MUTE button Result The sound is switched off and is displayed 2 When you wish to turn the sound back on at the same volume as before press the MUTE button again or either of the volu...

Page 23: ...if you wish to use the automatic On Off timers The clock setting will be re activated when pressing the ON OFF button on the front panel 1 Press the MENU button 2 Press the or button to select the Function and press the or button 3 Press the or button to select the Time and press the or button Result The Time menu is displayed with the Clock selected 4 To Press the Move to the hour or minute or bu...

Page 24: ...e hour or minute or button Adjust the hour or minute or button 8 In the same way set the time at which you wish the television to be switched Off 9 When you have finished setting the On Off time press the TV button or press the MENU button repeatedly to return to normal viewing Fuzzy Power Off If no function buttons including remote control buttons or front panel buttons are operated for three hou...

Page 25: ...sing the or button 6 Press the or button to select the Lock and press the or button Result Locked is displayed 7 When you have finished press the TV button or press the MENU button repeatedly to return to normal viewing If any channel is locked you cannot enter the Channel menu the message Not available is displayed Activating the Child Lock depending on the model Select Enter Exit Language Englis...

Page 26: ...ed on current channel additional 1 Press the MENU button 2 Press the or button to select the Function and press the or button 3 To Press the Change an option or button Select the required option On Off or button 4 When you are satisfied with the settings press the TV button or press the MENU button repeatedly to return to normal viewing Extra Function Settings depending on the model Select Enter E...

Page 27: ...ggs i e 50 100 150 if any broken egg exists one egg can be restored When five eggs are lost the game will be over and simultaneously the final score window will be displayed 5 If you want to stop during the game press the MENU button Then the final score window will be displayed 6 If you want to re start the game press the MENU or button Then the final score window will be switched to the READY wi...

Page 28: ...y time but signal reception must be good Otherwise Information may be missing Some pages may not be displayed To activate the teletext mode and display the contents page 1 Using the or button select the channel providing the teletext service 2 Press the TTX MIX button to activate the teletext mode Result The contents page page 100 is displayed It can be redisplayed at any time by pressing the INDE...

Page 29: ...eze the display on a given page press the HOLD Press the HOLD again to resume 3 Using the various display options To display Press the Both teletext information and TTX MIX the normal broadcast Hidden text REVEAL answers to quiz games for example The normal screen REVEAL again A secondary page SUB PAGE by entering its 4 digit number The next page PAGE UP The previous page PAGE DOWN Double size let...

Page 30: ...FLOF mode The various topics included in the teletext pages are color coded and can be selected by pressing the colored buttons on the remote control 1 Display the teletext contents page by pressing the TTX MIX button 2 Press the colored button corresponding to the topic that you wish to select The available topics are listed on the status information line Result The page is displayed with additio...

Page 31: ...ve been made 2 Switch the television on and if necessary press the VIDEO button one or more times until the required input is displayed Depending on the source selected the pictures may appear automatically To watch television programmes again press the TV button and select the number of the channel required Viewing Pictures From External Sources 01602B_ENG_GAME 3 12 02 5 01 PM Page 31 ...

Page 32: ...ding on the model Front or Side of TV depending on the model AV cable depending on the model Video disc player Decoder Video game device Camcorder The Audio Video connector on the front or side of the television is used for equipment such as camcorders video disc players and certain video games When both the front or side and rear connectors are connected to external equipment the front or side AV...

Page 33: ...place the remote control batteries Clean the upper edge of the remote control transmission window Check the battery terminals Troubleshooting Before Contacting Service Personnel No sound or picture Normal picture but no sound No picture or black and white picture Sound and picture interference Blurred or snowy picture distorted sound Remote control malfunctions A degaussing coil is mounted around ...

Page 34: ...34 ENG Memo 01602B_ENG_GAME 3 12 02 5 01 PM Page 34 ...

Page 35: ...35 ENG Memo 01602B_ENG_GAME 3 12 02 5 01 PM Page 35 ...

Page 36: ... Do not hesitate to contact your retailer or service agent if a change in the performance of your product indicates that a faulty condition may be present AA68 01602B ENG ELECTRONICS 01602B_ENG_GAME 3 12 02 5 01 PM Page 36 ...

Reviews: