background image

20

EN

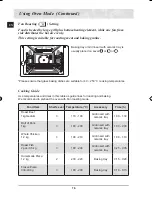
dual Grill ( 

 ) Setting

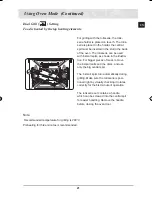
Food is heated by the top heating elements. we recommend this mode for grilling 

steaks and sausages as well as cheese toasts.

For grilling, ceramic tray with grill insert is  
usually placed on Level   or   .

*Please ensure that glass baking dishes are suitable for 40 ~ 250 °C cooking temperatures .

Cooking Guide

Use temperatures and times in this table as guide lines for grilling 

Set 220°C grill temperature, preheat for 3 minutes .

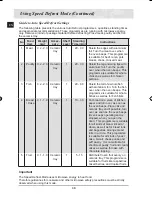
Food Item

Shelf Level

Time (Min) 

1

st

 side

Time (Min)  

2

nd

 side

Accessory

Kebab Spits

4

8 - 10

6 - 8

Grill insert with 

ceramic tray

Pork Steaks

4

7 - 9

5 - 7

Grill insert with 

ceramic tray

Sausages

4

4 - 6

3 - 5

Baking tray

Chicken Pieces

4

10 - 15

8 - 10

Grill insert with 

ceramic tray

Salmon Steaks

4

8 - 12

6 - 10

Grill insert with 

ceramic tray

Sliced Vegetables

5

5 - 7

3 - 5

Baking tray

Toast

5

1½ - 2½

1 - 2

Grill insert with 

ceramic tray

Cheese Toasts

4

3 - 5

-

Grill insert with 

ceramic tray


Note

 Recommended temperature for grilling is 200 °C .  

Preheating for three minutes is recommended .

Using Oven Mode  (Continued)

CQ4250_HAC-00087A-01_EN.indd   20

2009-01-15     10:39:02

Summary of Contents for CQ4250

Page 1: ...Operating Instructions and Cooking Guide SPEED COOK OVEN CQ4250 Owner s Manual ...

Page 2: ......

Page 3: ...eservation Function 25 Using Speed Menu Mode 26 Setting Speed Menu Mode 26 Guide to Auto Speed Menu Settings 27 Using Speed Defrost Mode 29 Setting Speed Defrost Mode 29 Guide to Auto Speed Defrost Settings 30 How a Microwave Oven Works 31 Using Microwave Mode 32 Setting Microwave Mode 32 Guide to Microwave Power Levels 33 Microwave Cookware Guide 34 Microwave Cooking Guide 36 Switching Off the Be...

Page 4: ... to operate the oven with the door open or to tamper with the safety interlocks door latches or to insert anything into the safety interlock holes b Do not place any object between the oven door and front face or allow food or cleaner res idues to accumulate on sealing surfaces Ensure that the door and door sealing surfaces are kept clean by wiping after use with first a damp cloth and finally wit...

Page 5: ...lames Microwave heating of beverages can result in delayed eruptive boiling therefore care must be taken when handling the container To prevent this situation ALWAYS allow a standing time of at least 20 seconds after the oven has been switched off so that the temperature can equalize Stir during heating if necessary and ALWAYS stir after heating In the event of scalding follow these FIRST AID inst...

Page 6: ...oven gloves when removing a dish from the oven to avoid unintentional burn DO NOT touch heating elements or interior oven walls until the oven be cooled down Do not immerse the power cable or plug in water and keep the power cable away from heated surfaces Do not operate this appliance if it has a damaged power cable or plug Stand at arms length from the oven when opening the door Reason The hot a...

Page 7: ... surface which may result in shattering of the glass If provided WARNING If the door or door seals are damaged the oven must not be operated until it has been re paired by a competent person WARNING It is hazardous for anyone other than a comperent person to carry out any service or repair operation which involves the removal of a cover which gives protection against exposure to microwave energy W...

Page 8: ... is damaged it must be replaced by a special cord or assembly available from the manufacturer or its service agent For your personal safety plug the cable into a 3 pin 230 Volt 50 Hz AC earthed socket If the power cable of this appliance is damaged it must be replaced by a special cable Do not install the microwave oven in hot or damp surroundings like next to a traditional oven or radiator The po...

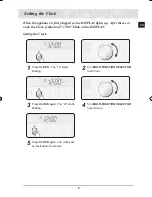
Page 9: ...bol and 12 00 blink on the DISPLAY Setting the Clock Press CLOCK The 12 starts blinking Turn MULTI FUNCTION SELECTOR to set hour Press CLOCK again The 00 starts blinking Turn MULTI FUNCTION SELECTOR to set minute Press CLOCK again The clock sets by itself within 5 seconds 1 2 3 4 5 Setting the Clock ...

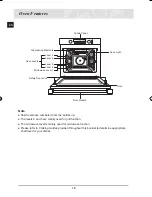
Page 10: ...wave level is mainly used for microwave function Please refer to Cooking Guides provided throughout this booklet to determine appropriate shelf level for your dishes Oven Features Contro Panel Top Heating Elements Oven Levels Microwave Level 1 Safety Door Lock Door Handle Door Oven Light Level 5 Level 4 Level 3 Level 2 ...

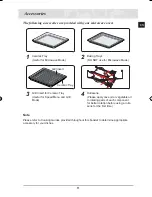
Page 11: ...ll insert Grill Insert for Ceramic Tray Useful for Speed Menu and Grill Mode Rotisserie Please apply olive oil or vegetable oil to rotating parts of each component for better rotation before using a rotis serie for the first time Note Please refer to Cooking Guides provided throughout this booklet to determine appropriate accessory for your dishes 1 2 3 4 Accessories ...

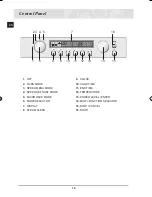
Page 12: ...1 OFF 2 OVEN MODE 3 SPEED MENU MODE 4 SPEED DEFROST MODE 5 MICROWAVE MODE 6 MODE SELECTOR 7 DISPLAY 8 STEAM CLEAN 9 CLOCK 10 COOK TIME 11 END TIME 12 TEMPERATURE 13 POWER LEVEL ENTER 14 MULTI FUNCTION SELECTOR 15 STOP CANCEL 16 START Control Panel ...

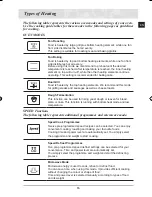
Page 13: ...sages as well as cheese toasts Dough Fermentation This function can be used for rising yeast dough or leaven for bread pizza or cake This function is running with bottom heat mode and low temperature SPEED Functions The following table represents additional programmes and microwave mode Speed Cook Programmes Twelve pre programmed speed recipes can be selected You can enjoy convenient cooking roast...

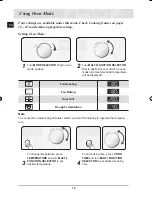
Page 14: ...desired oven mode The oven mode and recommended temperature will be displayed Fan Roasting Fan Baking Dual Grill Dough Fermentation Note The convection heater and grill heater switch on and off constantly to regulate the tempera ture To change temperature press TEMPERATURE and turn MULTI FUNCTION SELECTOR to set desired temperature To set cooking time press COOK TIME and turn MULTI FUNCTION SELECT...

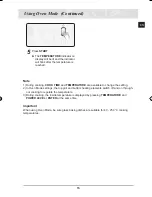
Page 15: ...RATURE are available to change the setting 2 In Oven Mode settings the top grill and bottom heating elements switch off and on through out cooking to regulate the temperature 3 During cooking the inside temperature is displayed by pressing TEMPERATURE and POWER LEVEL ENTER at the same time Important When using Oven Mode be sure glass baking dishes are suitable for 40 250 C cooking temperatures 5 ...

Page 16: ...es and times in this table as guide lines for roasting and baking We recommend to preheat the oven with Fan roasting mode Food Item Shelf Level Temperature C Accessory Time h Roast Beef 1kg medium 3 170 190 Grill insert with ceramic tray 1 00 1 30 Roll of Pork 1kg 3 180 200 Grill insert with ceramic tray 1 30 2 00 Whole Chicken 1 2 kg 3 190 210 Grill insert with ceramic tray 1 00 1 10 Roast Fish 2...

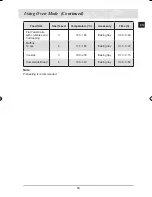
Page 17: ...0g pre cooked 2 200 220 Baking tray 0 20 0 30 Potato Gratin 600g pre cooked 2 170 180 Baking tray 0 25 0 35 Frozen Oven Chips 4 190 210 Baking tray 0 25 0 30 Frozen Potato Croquettes 3 180 200 Baking tray 0 20 0 25 Note Preheating is recommended Using Oven Mode Continued ...

Page 18: ...ed on Level or Please ensure that glass baking dishes are suitable for 40 250 C cooking temperatures Cooking Guide Use temperatures and times in this table as guide lines for baking We recommend to preheat the oven with Fan baking mode Food Item Shelf Level Temperature C Accessory Time h Fresh Bread Rolls Croissants 3 170 180 Baking tray 0 15 0 20 Lemon Cake square mould 3 160 170 Baking tray 0 30...

Page 19: ...e C Accessory Time h Flat Yeast Cake with crumbles and fruit topping 3 160 180 Baking tray 0 30 0 40 Muffins 12 pcs 2 170 180 Baking tray 0 15 0 20 Cookies 3 180 200 Baking tray 0 10 0 15 Homemade Bread 2 190 210 Baking tray 0 40 0 50 Note Preheating is recommended ...

Page 20: ...mperature preheat for 3 minutes Food Item Shelf Level Time Min 1st side Time Min 2nd side Accessory Kebab Spits 4 8 10 6 8 Grill insert with ceramic tray Pork Steaks 4 7 9 5 7 Grill insert with ceramic tray Sausages 4 4 6 3 5 Baking tray Chicken Pieces 4 10 15 8 10 Grill insert with ceramic tray Salmon Steaks 4 8 12 6 10 Grill insert with ceramic tray Sliced Vegetables 5 5 7 3 5 Baking tray Toast ...

Page 21: ...bigger pieces of meat remove the 6 small spits and the discs and use only the big central spit The 6 small spits turn automatically during grilling Make sure the rotisserie is posi tioned right by visually checking it rotates correctly for the first minute of operation The rotisserie set contains a handle which can be screwed into the central spit for easier handling Remove the handle before closi...

Page 22: ... Baking tray is often used on Level Cooking Guide Use times in this table as guide lines for rising dough Cover heat resistant bowl with cling film This function is running with bottom heat mode Food Item Shelf Level Time min Accessory Pizza Dough 2 20 30 Baking tray Yeast dough 2 30 40 Baking tray Leaven 2 40 50 Baking tray Note Preheating is recommended Using Oven Mode Continued ...

Page 23: ...ELECTOR to set desired cook time 1 After 5 seconds setting cook time ends automatically and START blinks 2 Press COOK TIME to end setting cook time Press START the oven will start promptly When the set time has elapsed an audible signal sounds and the oven switches itself off Note More Less function During cooking you can adjust the pre set cooking time with MULTI FUNCTION SELECTOR for better cook...

Page 24: ... is 13 00 Desired end time is 14 00 Cooking time 1 00 is displayed Press START to start the oven The oven will start promptly Note 1 The cooking time will count down in the time display When the set time has elapsed an audible signal sounds and the oven switches itself off 2 During cooking you can adjust the preset cooking time with the MULTI FUNCTION SELECTOR for better cooking performance 3 Duri...

Page 25: ...sired cook time 2 00 Press END TIME The Cook Time is added to the current time and 14 00 is displayed Enter the desired End Time 18 00 Press END TIME The oven automatically starts at the reserved time of 16 00 The Cook Time is displayed at the start of cooking Note End Time is displayed when reservation is completed Cook Time and End Time can be changed before the reserved time 1 2 3 4 ...

Page 26: ...MULTI FUNCTION SELECTOR to select desired Speed Menu setting Refer to table on pages 27 28 for a description of the 12 Speed Menu settings Press the POWER LEVEL ENTER to change weight or Turn MULTI FUNCTION SELECTOR to select desired weight Press START Note Some of the speed menus are continuous Others require the food to be turned over the oven will beep to prompt you The oven temperature set dur...

Page 27: ...rt button to continue process 3 Frozen Croquettes 0 4 0 5 0 5 0 6 Grill insert with ceramic tray 3 Put frozen potato croquettes evenly on grill insert with ce ramic tray Turn over as soon as the oven beeps Push start button to continue process 4 Frozen Lasagne 0 3 0 4 0 5 0 6 0 7 0 8 Ceramic tray 3 Put frozen lasagne in a suit able glass pyrex or ceramic dish After reheating stand for 3 4 min 5 Fr...

Page 28: ...ocess After cook ing wrap in aluminium foil and let stand for 5 10 min 10 Baked Potatoes 0 2 0 4 0 4 0 6 0 6 0 8 0 8 1 0 Grill insert with ceramic tray 4 Wash and clean potatoes and pierce with a fork Put pota toes each 200 250g side by side on grill insert with ceramic tray After cooking stand for 3 5 min 11 Cake 0 5 0 6 0 7 0 8 0 9 1 0 Baking tray 2 Put dough into suitable sized round glass pyre...

Page 29: ... desired defrost item Refer to table on page 29 for a description of the 5 Speed Defrost settings Select the food weight by turning the MULTI FUNCTION SELECTOR Press START to start cooking When cooking has finished the oven will beep and flash End four times The oven will then beep once every minute for 3 minutes Result Defrosting begins The oven beeps half way through defrosting to remind you to ...

Page 30: ...fish with aluminium foil Turn the fish over when the oven beeps This programme is suitable for whole fishes as well as for fish fillets 4 Bread Cake 0 1 1 0 Ceramic tray 1 10 30 Put bread on a piece of kitchen paper and turn over as soon as the oven beeps Place cake on ceramic tray and if possible turn over as soon as the oven beeps Oven keeps operating and is stopped when you open the door This p...

Page 31: ...od up to a depth of about 1 inch 2 5 cm Cooking then continues as the heat is dissipated within the food 3 Cooking times vary according to the container used and the properties of the food Quantity and density Water content Initial temperature Refrigerated or not Important As the centre of the food is cooked by heat dissipation cooking continues even when you have taken the food out of the oven St...

Page 32: ...eat cooks the food Setting Microwave Mode Turn MODE SELECTOR to micro wave position Time and power level will appear on DISPLAY Turn MULTI FUNCTION SELECTOR to set desired cooking time When cooking time is set START will blink If you do not wish to change power level press START to start cooking To change power level press POWER LEVEL ENTER and turn MULTI FUNCTION SELECTOR to desired level Refer t...

Page 33: ...p liquids HIGH LOW 83 750 For heating up and cooking food MEDIUM HIGH 67 600 For heating up and cooking food MEDIUM 50 450 For cooking meat and heating up delicate foods MEDIUM LOW 33 300 DEFROST 20 180 For defrosting and continued cooking LOW 11 100 For defrosting delicate foods Using Microwave Mode Continued ...

Page 34: ...l is too close to the oven wall or if too much foil is used Crusting Plate Do not preheat for more than 8 minutes China and Earthenware Porcelain pottery glazed earthenware and bone china are usually suitable un less decorated with a metal trim Disposable Polyester Cardboard Dishes Some frozen foods are packaged in these dishes Fast Food Packaging Polystyrene cups containers Paper bags or newspape...

Page 35: ...er plastics may warp or discolour at high temperatures Do not use Melamine plastic Can be used to retain moisture Should not touch the food Take care when removing the film as hot steam will escape Only if boilable or oven proof Should not be airtight Prick with a fork if necessary Wax or Grease proof Paper Can be used to retain moisture and prevent spattering Note Arcing is the microwave term for...

Page 36: ... suitable cling film Standing Times After cooking it is important to let food stand for the recommended standing time to allow the temperature to even out within the food COOKING GUIDE FOR FROZEN VEGETABLES Use a suitable glass Pyrex bowl with lid Cook covered for the minimum time See table Continue cooking to get the result you prefer Stir twice during cooking and once after cooking Add salt herb...

Page 37: ... 3 Add 60 75 ml 5 6 tbsp water Carrots 250 4 5 3 Cut carrots into even sized slices Cauliflower 250 500 4 5 7 8 3 Prepare even sized florets Cut big florets into halves Arrange stems to the centre Courgettes 250 3 4 3 Courgettes into slices Add 30 ml 2 tbsp water or a knob of butter Cook until just tender Egg Plants 250 3 4 3 Cut egg plants into small slices and sprinkle with 1 tablespoon lemon ju...

Page 38: ... oven will reheat food in a fraction of the time a conventional oven takes Arranging and Covering Avoid reheating large items such as joints of meat since they tend to overcook and dry out before the centre is piping hot You will have more success reheating smaller pieces Keeping food covered while heating will also help prevent drying Power Levels Different power levels can be used for reheating ...

Page 39: ...ost frozen food in a short period of time This can be a great advantage if unexpected guests suddenly show up Frozen poultry must be thoroughly thawed before cooking Remove any metal ties and take it out of any wrapping to allow thawed liquid to drain away Put the frozen food on a dish without a cover Turn over half way drain off any liquid and remove any giblets as soon as possible Check the food...

Page 40: ...parts like wings and ends with aluminium foil Turn over after half of defrosting time Fish Fish Fillets Whole Fish 200 g 400 g 6 7 11 13 10 25 Put frozen fish in the middle of ce ramic plate Arrange the thinner parts under the thicker parts Shield narrow ends of fillets and tail of whole fish With aluminium foil Turn over after half of defrosting time Fruit Berries 300 g 6 7 5 10 Spread fruit on a...

Page 41: ...50 ml of cold water Cook uncovered in a glass Pyrex bowl using 900W until glaze icing is transparent about 3 to 4 minutes Stir twice during cooking Cooking Jam Put 600 g of fruits such as mixed berries in a suitably sized glass Pyrex bowl Add 300 g of preserving sugar and stir well Cook covered for 10 12 minutes using 900W Stir several times during cooking Empty directly into small jam glasses wit...

Page 42: ...the end of cooking and End blinks 4 times on the display To switch beeper off press STOP CANCEL and START at the same time and hold for one second To switch beeper back on press STOP CANCEL and START again at the same time and hold for one second 1 2 ...

Page 43: ... against unintended use To Lock Oven To Unlock Oven Press steam clean and CLOCK at the same time and hold for 3 seconds Lock symbol appears on DISPLAY indicating all functions locked 1 2 Press steam clean and CLOCK at the same time and hold for 3 seconds Lock symbol disappears indicating functions unlocked 1 2 ...

Page 44: ...LECTOR to Off position Pour about 100 ml water onto the floor of the empty oven Press STEAM CLEAN The oven will start automatically After 15 minutes the oven will stop automatically Wipe it out with a dry cloth Important Use this feature only when oven has cooled completely to room temperature DO NOT use distilled water 1 2 ...

Page 45: ...the inside Important Take special care NOT to spill water in the vents NEVER use abrasive products or chemical solvents ALWAYS ensure that door seals are clean to prevent particles from building up so that the door can close properly Storing and Repairing Your Microwave Oven Repairs should only be made by a qualified service technician If oven requires servicing unplug the oven and contact the nea...

Page 46: ...interference with radios or televisions Slight interference on televisions or radios may occur when the oven is operating To minimize this effect try to install oven away from televisions radios and aerials Electronic interference causes DISPLAY to be reset Disconnect the power plug and reconnect it Reset the time Condensation appears inside the oven This is a normal occurrence Simply wipe away af...

Page 47: ...during operation cancellation TEMP SENSOR SHORT In case the value of the temperature sensor is less than 5 C during operation cancellation OVER 210 C DURING OPERATION OF MWO In case the temperature rises over 210 C during operation of MWO FIRE sensed DAMPER S W In case it fails to sense the DAMPER to open or close for 2 minutes ...

Page 48: ...0 Power Source 230 V 50 Hz Power Consumption Fan Roasting Microwave Bottom Heater Dual Grill Maximum power 3200 W 1650 W 400 W 2800 W 3200 W Output Power 100 W 900 W IEC 705 Operating Frequency 2450 MHz Magnetron OM75P 20 Cooling Method Cooling fan motor Dimensions W x H x D Outside Oven cavity 557 x 431 x 578 mm 429 x 229 x 430 mm Volume 42 liter Weight Net Shipping 33 0 kg approx 39 0 kg approx ...

Page 49: ...49 EN Note ...

Page 50: ...50 EN Note ...

Page 51: ...51 EN Note ...

Page 52: ...Code No DG68 00087A 02 ...

Reviews: