background image


means of an external timer or separate 
remote-control system. 


This product is a Group 2 Class A ISM equipment. The 
definition of group 2 which contains all ISM equipment in 
which radio-frequency energy is intentionally generated 
and/or used in the form of electromagnetic radiation for 
the treatment of meterial, and EDM and arc welding 
equipment. For Class A equipment is equipment suitable 
for use in all  establishments  other than domestic and 
those directly connected to a low voltage power supply 
network which supplies buildings used for domestic 
purposes.   

Warning: 

Class  A equipment is intended for use in 

industrial environment. There may be potential 
difficulties in ensuring electromagnetic compatibility in 
other environments, due to conducted as well as 
radiated disturbances. 


Summary of Contents for CM1109

Page 1: ...imagine the possibilities Thank you for purchasing this Samsung product Please register your product at www samsung com register Microwave Oven COMMERCIAL Owner s instructions Cooking guide CM1109 ...

Page 2: ...ND ICONS Hazards or unsafe practices that my result in severe personal injury or death Hazards or unsafe practices that my result in minor personal injury or property damag Warning Fire hazard Warning Hot surface Warning Electricity Warning Explosive material Do NOT attempt Do NOT touch Do NOT disassemble Follow directions explicitly Unplug the power plug Make sure the machine is from the wall soc...

Page 3: ...ed by a competent person WARNING It is hazardous for anyone other than a competent person to carry out any service or repair operation that involves the removal of a cover which gives protection against exposure to microwave energy WARNING Liquids and other foods must not be heated in sealed containers since they are liable to explode This appliance is intended to be used in household only WARNING...

Page 4: ...out supervision when adequate instructions have been given so that the child is able to use the oven in a safe way and understand that hazards of improper use Only use utensils that are suitable for use in microwave ovens When heating food in plastic or paper containers keep an eye on the oven due to the possibility of ignitions The microwave oven is intended for heating food and beverages Drying ...

Page 5: ...microwave ovens since they may explode even after microwave heating has ended The oven should be cleaned regularly and any food deposites removed Failure to maintain the oven in a clean condition could lead to deterioration of the surface that could adversely affect the life of the appliance and possibly result in a hazardous situation The appliance is not intended for installing in road vehicles ...

Page 6: ... in order to avoid a hazard Warning Liquids or other foods must not be heated in sealed containers since they are liable to explode The appliance should not be cleaned with a water jet This oven should be positioned proper direction and height permitting easy access to cavity and control area Before using the oven first time oven should be operated with the water during 10 minute and then used If ...

Page 7: ...e oven under adult supervision due to the temperatures generated During use the appliance becomes hot Care should be taken to avoid touching heating elements inside the oven Warning Accessible parts may become hot during use Young children should be kept away A steam cleaner is not to be used Warning Ensure that the appliance is switched off before replacing the lamp to avoid the possibility of el...

Page 8: ...is a safe way and understand the hazards involved Children shall not play with the appliance Cleaning and user maintenance shall not be made by children without supervision Do not use harsh abrasive cleaners or sharp metal scrapers to clean the oven door glass since they can scratch the surface which may result in shattering of the glass The temperature of accessible surfaces may be high when the ...

Page 9: ... treatment of meterial and EDM and arc welding equipment For Class A equipment is equipment suitable for use in all establishments other than domestic and those directly connected to a low voltage power supply network which supplies buildings used for domestic purposes Warning Class A equipment is intended for use in industrial environment There may be potential difficulties in ensuring electromag...

Page 10: ... Turntable type model only 4 This microwave oven has to be positioned so that the plug is accessible If the supply cord is damaged it must be replaced by the manufacturer its service agent or similarly qualified persons in order to avoid a hazard For your personal safety plug the cable into a proper AC earthed socket Do not install the microwave oven in hot or damp surroundings like next to a trad...

Page 11: ...he life of the appliance and possibly result in a hazardous situation 1 Clean the outside surfaces with a soft cloth and warm soapy water Rinse and dry 2 Remove any splashes or stains on the inside surfaces of oven with a soapy cloth Rinse and dry 3 To loosen hardened food particles and remove smells place a cup of diluted lemon juice in the oven and heat for ten minutes at maximum power 4 Wash th...

Page 12: ...11 Clean the microwave oven cavity right after each use with a mild detergent solution but let the microwave oven cool down before cleaning in order to avoid injury ...

Page 13: ...sing from the oven If the oven is faulty and needs servicing or you are in doubt about its condition Unplug it from the wall socket Contact the nearest after sales service centre If you wish to store your own away temporatily choose a dry dustfree place Reason Dust and damp may adversely affect the working parts in the oven This microwave oven is not intended for commercial use This light bulb sho...

Page 14: ...not touch the power plug with wet hands Do not turn the appliance off by unplugging the power plug while an operation is in progress Do not insert fingers or foreign substances if any foreign substance such as water has entered the appliance unplug the power plug and contact your nearest service centre Do not apply excessive pressure or impact to the appliance Do not place the oven over a fragile ...

Page 15: ...yed eruptive boiling therefore care must be taken when handling the container To prevent this situation ALWAYS allow a standing time of at least 20 seconds after the oven has been switched off so that temperature can equalize Stir during heating if necessary and ALWAYS stir after heating In the event of scalding follow these FIRST AID instructions Immerse the scalded area in cold water for at leas...

Page 16: ...h cloth or paper They may catch fire as hot air escapes from the oven The oven may also overheat and switch itself off automatically and will remain off until it cools sufficiently Always use oven mitts when removing a dish from the oven To avoid unintentional burns Stir liquids halfway during heating or after heating ends and allow the liquid stand at least 20 seconds after heating to prevent eru...

Page 17: ...ment fuse cover is required it must be of the same colour as the pin face of the plug Replacement covers are available from your Dealer If the fitted plug is not suitable for the power points in your house or the cable is not long enough to reach a power point you should obtain a suitable safety approved extension lead or consult your Dealer for assistance However if there is no alternative to cut...

Page 18: ...s particularly important that the oven door closes properly and that there is no damage to the 1 door bent 2 door hinges broken or loose 3 door seals and sealing surfaces d The oven should not be adjusted or repaired by anyone other than a properly qualified microwave service technician trained by the manufacturer Samsung will charge a repair fee for replacing an accessory or repairing a cosmetic ...

Page 19: ...IAL ELECTRONIC EQUIPMENT Applicable in countries with separate collection systems This marking on the product accessories or literature indicates that the product and its electronic accessories e g charger headset USB cable should not be disposed of with other household waste at the end of their working life To prevent possible harm to the environment or human health from uncontrolled waste dispos...

Page 20: ...19 Samsung com uk aboutsamsung samsungelectronics corporatecitizenship data_corner html ...

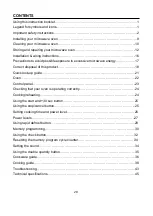
Page 21: ... disposal of this product 18 Quick look up guide 21 Oven 22 Control panel 23 Checking that your oven is operating correctly 24 Cooking reheating 24 Using the start and 30 sec button 25 Using the stop cancel button 25 Setting cooking time and power level 26 Power levels 27 Using rapid defrost button 28 Memory programming 30 Using the check button 32 Resetting the memory program cycle counter 34 Set...

Page 22: ...ton Result Cooking starts The oven beeps four times when cooking is over If you want to defrost some food 1 Place the frozen food in the oven Press the Defrost button 2 Select the cooking time by pressing the Number buttons as required Max 30mins 3 Press Start button Result Cooking starts The oven beeps four times when cooking is over If you want to adjust the cooking time Leave the food in the ov...

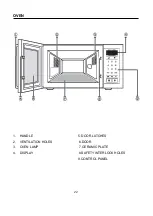
Page 23: ...22 OVEN 1 HANDLE 5 DOOR LATCHES 2 VENTILATION HOLES 6 DOOR 3 OVEN LAMP 7 CERAMIC PLATE 4 DISPLAY 8 SAFETY INTERLOCK HOLES 9 CONTROL PANEL ...

Page 24: ...23 CONTROL PANEL 1 DISPLAY 7 DEFROST BUTTON 2 POWER LEVEL BUTTON 8 SOUND BUTTON 3 NUMBER 9 DOUBLE QUANTITY BUTTON 4 CHECK BUTTON 10 30S BUTTON 5 PROGRAMME BUTTON 11 START BUTTON 6 STOP CANCEL BUTTON ...

Page 25: ...l socket The ceramic plate must be in position in the oven If a power level other than the maximum is used the water takes longer to boil Auto energy saving function If you do not select any function when appliance is in the middle of setting or operating with temporary stop condition function is canceled and the display will be turned off after 10 minutes Oven Lamp will be turned off after 5 minu...

Page 26: ...rements at the High power level 1 Press the 30s button once for each 30sec Press Start Button For example press 30s button twice for one minute The time will display and press Start button 2 Add Second to a program in progress by pressing the 30s button for each 30sec you want to add USING THE STOP CANCEL BUTTON The Stop Cancel button allows you to clear instructions you have entered It also allow...

Page 27: ...essing the Power Level button repeatedly you can select the power level HI MED or LO 2 Use the Number buttons to enter the cooking time You can set a time from one second to 30 minutes To set a time over one minute enter the second as well For example to set 10 minutes enter 1 0 0 0 3 Press the Start button to begin cooking The maxium allowable cooking time is 30mins If the time exceed 30 mins the...

Page 28: ... 1 0 0 0 3 Repeat step 1 and 2 for II or III stage cooking 4 Press the Start button to begin cooking POWER LEVELS You can choose among the power levels below Power Level On Sec Off Sec HIGH HI 100 33 0 MEDIUM MED 70 23 10 LOW LO 50 16 17 DEFROST 33 10 23 If you select higher power level the cooking time must be decreased If you select lower power level the cooking time must be increased The maxium...

Page 29: ...irst place the frozen food in the centre of the ceramic plate and close the door 1 Press the Rapid Defrost button 2 Press the Number buttons to set the defrosting time You can set a time from one second to 30 minutes 3 Press the Start button The maxium allowable cooking time is 30 mins If the time exceed 30mins the display will show E3 then press Stop Cancel button and repeat the steps ...

Page 30: ...wer By pressing the Power Level button repeatedly you can select the power level HI MED or LO 4 Press the Number buttons to set the cooking time You can set a time from one second to 30 minutes 5 Repeat step 3 and 4 for II or III stage memory memory programming 6 Press the Start button The maxium allowable cooking time is 30 mins If the time exceed 30 mins the display will show E3 then press Stop ...

Page 31: ... repeatedly you can select the power level HI MED or LOW 4 Use the Number buttons to enter the cooking time You can set a time from one second to 30 minutes To set a time over one minute enter the seconds as well For example to set 10 minutes enter 1 0 0 0 5 Pressing the Program PROG button to complete setting the memory The display will show 0 The maxium allowable cooking time is 30 mins If the t...

Page 32: ... MED or LOW 4 Use the Number buttons to enter the cooking time You can set a time from one second to 30 minutes To set a time over one minute enter the seconds as well For example to set 10 minutes enter 1 0 0 0 5 Repeat step 3 and 4 for II or III stage memory memory programming 6 Pressing the Program PROG button to complete setting the memory The display will show 0 The maxium allowable cooking t...

Page 33: ...program 1 Clear all operations by pressing the Stop Cancel button Press theCheck CHECK button to enter Check mode 2 Using the Number buttons enter the program number from 1 to 20 For example suppose you press 5 for the Memory Program 5 which is HI Power Level I stage cooking with a time of 6 minutes and 30 seconds 6 30 First 5 will be displayed but will change to show the 6 30 3 After one second t...

Page 34: ...es the display will show 10 As the display uses units of 10 the cycle counts are approximate The cycle count displayed increases every ten cycles For example if the cycle count were 90 99 9 would be displayed The 9 would change to 10 on the 100 th cycle The cycle counter function has a limit of 99 999 cycles Once that number is exceed the cycle counter will automatically clear and start again from...

Page 35: ...d confirming the reset operation If you press clearing number the display will show 0 3 Press the Stop Cancel button to exit the Resetting mode SETTING THE SOUND 1 Press the Sound button to adjust sound volume The basic sound volume is HI and when you press the button repeatedly the sound volume changes in the following order LO MED HI OFF one by one 2 Press the Start button to exit Sound mode The...

Page 36: ... for Memory Program 5 which is HI Power Level I Stage cooking with a time of 6 minutes and 30 seconds 6 30 3 The Memory Program then Operates for double the user programmed time which in this case makes 13 minutes The maxium allowable cooking time is 30 mins If doubling the programmed time exceeds the maximum allowable cooking time the display will show E3 then press Stop Cancel button ...

Page 37: ...otect areas against overcooking Arcing can occur if the foil is too much foil is used China and earthenware Porcelain pottey glazed earthenware and bone china are usually suitable unless deco rated with a metal trim Disposable polyester cardboard dishes Some frozen foods are packaged in these dishes Fast food packaging Polystyrene cups Containers Paper bags or newspapare Recycled paper of metal tr...

Page 38: ...tainers Cling film Freezer bags Particularly if heat resistant thermoplastic Some other plastics may wrap or discolour at high temperatures Do not use Melamine plastic Can be used to retain moisture Should not touch the food Take care when removing the film as hot steam will escape Only if boilable or oven proof Should not be airtight Prick with a fork if necessary Wax or grease proof paper Can be...

Page 39: ...eal of 2 chilled components on a ceramic dish g g rice and curry Reheat covered MEDIUM 4 5 3 Pasta with sauce chilled 350 g Put pasta e g spaghetti or egg noodles into a deep ceramic plate Reheat covered Stir during reheating HIGH 4 5 3 Filled pasta in sauce chilled 350 g Put filled pasta e g ravioli tortellini in a deep ceramic plate Reheat covered Stir occasionally during reheating MEDIUM 4 5 3 ...

Page 40: ... Stew Use the power levels and times in this table as guide lines for reheating Food Portion Method Power Time min Standing time min Soup chilled 250 g Pour into a deep ceramic plate Reheat covered Stir during reheating HIGH 3 3 2 3 Stew chilled 250 g 500 g Pour into a deep ceramic plate or bowl Reheat covered Stir during reheating MEDIUM 4 4 5 6 2 3 Bean stew canned 350 g Pour into a deep ceramic...

Page 41: ...bled eggs 2 eggs Beat eggs add salt and 2 tpsp milk Put in a deep ceramic plate Stir several times during cooking LO ca 2 1 Baked beans canned 250 g Put the beans in a deep ceramic plate Reheat covered Stir during reheating MEDIUM 2 3 1 2 Reheating Snacks Use the power levels and times in this table as guide lines for cooking Food Portion Method Power Time min Standing time min Cheeseburger chille...

Page 42: ...ceramic plate MEDIUM 2 2 2 3 Croissants 60 g 2 pcs Put the croissants on kitchen paper on a ceramic plate Serve croissants directly after warming MEDIUM 1 Defrosting and Cooking Desserts Use the power levels and times in this table as a guide lines for cooking Food Portion Method Power Time min Standing time min Berries in sauce 250 g Put frozen fruits in a glass pyrex bowl with lid Reheat covered...

Page 43: ...le as a guide lines for cooking Food Portion Method Power Time min Standing time min Baguettes 150 g 1 pc Put the baguette widthways on kitchen paper in the oven DEFROST ca 3 5 Breasd rolls 50 g 4 pcs Put the rolls side by side on kitchen paper in the oven DEFROST ca 3 3 5 Fruit cake 120 g 1 pc Put pieces of cake on a ceramic plate DEFROST 3 3 5 10 ...

Page 44: ...aught between the buttons Remove the foreign matter and try again For touch models Moisture is on the exterior Wipe the moisture from exterior Child lock is activated Deactivated Child lock The time is not displayed Power is not supplied Make sure power is supplied The oven doesn t work Power is not supplied Make sure power is supplied The door is open Close the door and try again The door open sa...

Page 45: ...Total cooking time setting over 30 mins Reset the microwave oven and try again or plug out firstly and then plug in and try again If the above guidelines do not enable you to solve the problem contact your local dealer or SAMSUNG after sales services ...

Page 46: ...er instructions are thus subject to change without notice Model CM1109 Power source 230 240V 50Hz Power consumption Microwave 1500W Output Power 1000W Operating frequency 2450 MHz Cooling method Cooling fan motor Dimensions W x H x D Outside Oven cavity 521X312X450 364X212X335 Volume 25 Liter Weight Net Gross 17 7 kg 19 3 kg ...

Page 47: ...227 515 www samsung com fi support FRANCE 01 48 63 00 00 www samsung com fr support GERMANY 0180 6 SAMSUNG bzw 0180 6 7267864 0 2 Anruf aus dem dt Festnetz aus dem Mobilfunk max 0 60 Anruf www samsung com de support ITALIA 800 SAMSUNG 800 7267864 www samsung com it support CYPRUS 8009 4000 only from landline toll free www samsung com gr support GREECE 80111 SAMSUNG 80111 726 7864 only from land li...

Page 48: ...NG www samsung com se support SWITIZERLAND 0800 726 78 64 0800 SAMSUNG www samsung com ch support German www samsung com ch_fr support French UK 0330 SAMSUNG 7267864 www samsung com uk support EIRE 0818717100 www samsung com ie support ...

Reviews: