background image

23

GB

Cookware Guide

To cook food in the microwave oven, the microwaves must be able to
penetrate the food, without being reflected or absorbed by the dish
used.

Care must therefore be taken when choosing the cookware. If the
cookware is marked microwave-safe, you do not need to worry.

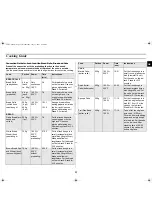
The following table lists various types of cookware and indicates
whether and how they should be used in a microwave oven.

Cookware

Microwave-
Safe

Comments

Aluminium foil

✓ ✗

Can be used in small quantities to
protect areas against overcooking.
Arcing can occur if the foil is too close
to the oven wall or if too much foil is
used.

Crusting plate

Do not preheat for more than
8minutes.

China and earthenware

Porcelain, pottery, glazed earthenware
and bone china are usually suitable,
unless deco-rated with a metal trim.

Disposable polyester
cardboard dishes

Some frozen foods are packaged in
these dishes.

Fast-food packaging

Polystyrene cups
containers

Paper bags or
newspaper

Recycled paper or
metal trims

Can be used to warm food.
Overheating may cause the
polystyrene to melt.
May catch fire.

May cause arcing.

Glassware

Oven-to-table
ware

Fine glassware

Glass jars

Can be used, unless decorated with a
metal trim.
Can be used to warm foods or liquids.
Delicate glass may break or crack if
heated suddenly.
Must remove the lid. Suitable for
warming only.

Metal

Dishes

Freezer bag twist
ties


May cause arcing or fire.

Paper

Plates, cups,
napkins and
Kitchen paper

Recycled paper

For short cooking times and warming.
Also to absorb excess moisture.

May cause arcing.

Plastic

Containers

Cling film

Freezer bags

✓ ✗

Particularly if heat-resistant
thermoplastic. Some other plastics
may warp or discolour at high
temperatures. Do not use Melamine
plas-tic.
Can be used to retain moisture. Should
not touch the food. Take care when
removing the film as hot steam will
escape.
Only if boilable or oven-proof. Should
not be airtight. Prick with a fork, if
necessary.

Wax or grease-proof
paper

Can be used to retain moisture and
prevent spattering.

Ck135-GB.fm Page 23 Wednesday, July 11, 2001 4:34 PM

Summary of Contents for CK137B

Page 1: ...g 10 Adjusting the Cooking Time 11 Using the Auto Reheat Cook Feature 11 Using a Crusting Plate 13 Using the Auto Defrost Feature 14 Setting a Standing Time 15 Multistage Cooking 15 Choosing the Accessories 16 Preheating the Oven 16 Cooking by Convection 17 Grilling 17 Choosing the Heating Element Position 18 Spit Roasting 18 Using The Vertical Multi Spit 19 Combining Microwaves and the Grill 19 C...

Page 2: ...isplayed Select the cooking time by turning the dial knob as required 3 Press Start 1min button Result Cooking starts When cooking has finished the oven will beep and flash 0 four times The oven will then beep one time per minute 1 Place the frozen food in the oven Select the food category by pressing the AUTO DEFROST button one or more times 2 Select the weight by turning the dial knob as require...

Page 3: ...he main cooking surface it can be easily removed for cleaning 4 Metal racks High rack Low rack to be placed on the turntable Purpose The metal racks can be used to cook two dishes at the same time A small dish may be placed on the turntable and a second dish on the rack The metal racks can be used in grill convection and combination cooking 5 Roasting spit Coupler Barbecue and Skewer to be placed ...

Page 4: ...rmful exposure to microwave energy a Under no circumstances should any attempt be made to operate the oven with the door open or to tamper with the safety interlocks door latches or to insert anything into the safety interlock holes b Do not place any object between the oven door and front face or allow food or cleaner residues to accumulate on sealing surfaces Ensure that the door and door sealin...

Page 5: ...from the power supply 8 Take particular care when heating liquids and baby foods ALWAYS allow a standing time of at least 20 seconds after the oven has been switched off to allow the temperature to equalize Stir during heating if necessary and ALWAYS stir after heating To prevent eruptive boiling and possible scalding you should stir before during and after heating In the event of scalding follow ...

Page 6: ... appliance must be Properly earthed 3 pin plug Plugged into a standard 230 Volt 50 Hz AC earthed socket Never block the air vents as the oven may overheat and automatically switch itself off It will remain inoperable until it has cooled sufficiently Plug the cable into a 3 pin earthed socket If the power cable of this appliance is damaged it must be replaced by a special cable references I SHENG S...

Page 7: ...r time 1 Press the Language button immediately after plugging in your microwave or immediately after a power outage Result If you continue to press the Language button the settings will cycle in the following order ENGLISH LBS ENGLISH KG FRENCH GERMAN SPANISH ITALIAN DUTCH RUSSIAN 2 When you have selected the language and display you want to use press the Start 1min button to end this procedure 1 ...

Page 8: ...t page The oven must be plugged into an appropriate wall socket The turntable must be in position in the oven If a power level other than the maximum 100 900 W is used the water takes longer to boil Open the oven door by pulling the handle on the right side of the door Place a glass of water on the turntable Close the door 1 The microwaves generated by the magnetron are distributed uniformly as th...

Page 9: ...y If the above guidelines do not enable you to solve the problem take a note of The model and serial numbers normally printed on the rear of the oven Your warranty details A clear description of the problem Then contact your local dealer or SAMSUNG aftersales service Cooking Reheating The following procedure explains how to cook or reheat food ALWAYS check your cooking settings before leaving the ...

Page 10: ...u can Check the food Turn the food over or stir it Leave it to stand Power Level Percentage Output HIGH MEDIUM HIGH MEDIUM MEDIUM LOW DEFROST LOW 100 67 50 33 20 11 900W 600W 450W 300W 180W 100W If you select a Then the cooking time must be Higher power level Lower power level Decreased Increased To stop the cooking Then Temporarily Open the door Result Cooking stops To resume cooking close the do...

Page 11: ...he cooking time of your food press the Start 1min button once for each minute that you wish to add Example To add three minutes press the Start 1min button three times 2 During the cooking to increase or decrease the cooking time of your food turn the knob right or left 1 Select the type of food that you are cooking by pressing the Auto Reheat Cook button and turn the dial knob to select the prope...

Page 12: ...ay and place it on the turntable 5 1 2 3 Jacket Potato 2 x 200 g 4 x 200 g 6 x 200 g 4 5min Take potatoes with similar size and weight of circa 200g per potato Wash and prick the skin with a fork Put 2 potatoes opposite to each other and 4 or 6 potatoes in a circle on the high rack Turn over when the oven beeps 6 1 2 3 4 5 6 7 Roast chicken 700 g 900 g 1100 g 1300 g 1500 g 1700 g 1900 g 5 10min Br...

Page 13: ...Preheat the crusting plate as described above Use oven gloves at all times as the crusting plate will become very hot 2 Brush the plate with oil if you are cooking food such as bacon and eggs in order to brown the food nicely 3 Place the food on the crusting plate Do not place any recipients on the crusting plate that are not heat resistant plastic bowls for example 4 Place the crusting plate on t...

Page 14: ... and flash 0 four times The oven will then beep one time per minute Code Food Serving Size Standing Time Recommendations 1 Steaks Chops Minced Meat Chicken Pieces 200 1200g 10 60 min Shield the edges with aluminium foil When the oven beeps turn the plieces over This programme is suitable for flat pieces of meat or poultry like steaks chops chicken legs chicken or duck breast and minced meat 2 Meat...

Page 15: ...sult The follwing indication isdisplayed Hold Delay mode 2 Select the standing time by turning the dial knob 3 Press Start 1min button Result The oven beeps when the standing time is over 1 Press the Auto Defrost button and set the weight by turning the dial knob the appropriate number of times 1 8 kg in the example 2 Press the Hold Delay button and set the standing time by turning the dial knob t...

Page 16: ... cooking does not require any special cookware You should however use only cookware that you would use in your normal oven Microwave safe recipients are not usually suitable for convection cooking don t use plastic containers dishes paper cups towels etc If you wish to select a combined cooking mode microwave and grill or convection use only recipients that are microwave safe and oven proof Metall...

Page 17: ... they will be very hot You can get better cooking and grilling if you use the high rack Check that the heating element is in the horizontal position and that the appropriate rack is in position 1 Press the OVEN C button Result The following indications are displayed convection mode 250 C temperature 2 Press the OVEN C button one or more times to set the temperature 3 Set the cooking time by turnin...

Page 18: ...ng only CK137B CK137BM CK138F CK138FM CK139FS Pull down on the heating element Push it towards the back of the oven until it is parallel with the back wall Horizontal position convection cooking and grilling Pull the heating element towards you Push it upwards until it is parallel with the roof of the oven 1 Make sure that the heating element is in the horizontal position 2 Push the roasting spit ...

Page 19: ... cleaning in the dishwasher Therefore clean it with warm water and washing up liquid by hand Remove the vertical multi spit from the oven after use Combining Microwaves and the Grill You can also combine microwave cooking with the grill to cook quickly and brown at the same time ALWAYS use microwave safe and oven proof cookware Glass or ceramic dishes are ideal as they allow the microwaves to pene...

Page 20: ...heating element must be in the horizontal position If you would like to know the current temperature of the oven cavity press the OVEN C button 1 Press the MW OVEN button Result The following indications are displayed microwave convection combi mode 250 C temperature 2 Press the MW OVEN button one or more times to set the required temperature 3 Select the appropriate power level by pressing the PO...

Page 21: ...eed and 55555 means the high scroll speed 1 Press the Grill and Power Level buttons at the same time about three seconds Result The oven is locked The icon is displayed 2 To unlock the oven press the Grill and Power Level buttons again at the same time about three seconds Result The icon is no longer displayed The oven can be used normally 1 Press the Grill and Convection buttons at the same time ...

Page 22: ...e fire or damage to the unit Don t press the Turntable on off button during the cooking process The turntable would not rotate when the button light ON 1 Press the Turntable Convection and Power Level buttons at the same time about three seconds Result The oven does not beep to indicate the end of a function 2 To switch the beeper back on press the Convection and Power Level buttons again at the s...

Page 23: ...tainers Paper bags or newspaper Recycled paper or metal trims Can be used to warm food Overheating may cause the polystyrene to melt May catch fire May cause arcing Glassware Oven to table ware Fine glassware Glass jars Can be used unless decorated with a metal trim Can be used to warm foods or liquids Delicate glass may break or crack if heated suddenly Must remove the lid Suitable for warming on...

Page 24: ...ass pyrex bowl with lid Cook covered for the minimum time see table Continue cooking to get the result you prefer Stir twice during cooking and once after cooking Add salt herbs or butter after cooking Cover during standing time Cooking Guide for rice and pasta Rice Use a large glass pyrex bowl with lid rice doubles in volume during cooking Cook covered After the cooking time is over stir before s...

Page 25: ...cooking time and add extra heating time if necessary Heating and standing times When reheating food for the first time it is helpful to make a note of the time taken for future reference Always make sure that the reheated food is piping hot throughout Allow food to stand for a short time after reheating to let the temperature even out The recommended standing time after reheating is 2 4 minutes un...

Page 26: ...utes Before serving stir well and check the temperature carefully Baby milk 100ml 200ml 300W 30 40sec 1min 10 sec to 1min 20sec 2 3 Stir or shake well and pour into a sterilised glass bottle Place into the centre of turntable Cook uncovered Shake well and stand for at least 2 minutes Before serving shake well and check the temperature carefully Food Portion Power Time min Standing Time min Instruc...

Page 27: ...Remember this hint while freezing and defrosting food For defrosting of frozen food with a temperature of about 18 to 20 C use the following table as a guide All frozen food should be defrosted using defrosting power level 180 W Food Portion Time min Standing Time min Instructions Meat Minced beef Pork steaks 500g 250g 13 15 7 8 15 30 Place the meat on a flat ceramic plate Shield thinner edges wit...

Page 28: ...wning e g baked pasta as well as foods which require a short cooking time to brown the top of the food Also this mode can be used for thick food portions that benefit from a browned and crispy top e g chicken pieces turning them over half way through cooking Please refer to the grill table for further details IMPORTANT REMARK Whenever the combination mode microwave grill is used make sure that the...

Page 29: ... stand for 2 3 minutes Lasagne chilled 800 g 600W Grill 17 18 Put the fresh lasagne into a big rectangular glass pyrex dish Put the dish on the low rack After cooking stand for 2 3 minutes Baked Apples 4 apples ca 800g 300W Grill 13 15 Core the apples and fill them with raisins and jam Put some almond slices on top Put apples on a flat glass pyrex dish Place the dish directly on the low rack Chick...

Page 30: ...on cooking All kinds of meats and poultry as well as casseroles and gratin dishes sponge cakes and light fruit cakes pies and crumbles roast vegetables scones and breads Convection Guide for fresh food like Pie Quiche Pizza and Meat Preheat the convection with the preheating function to the desired temperature Use the power levels and times in this table as guide lines for convection cooking Fresh...

Page 31: ...east dough 750g 180 W 220 C without preheating 21 23 Put the fresh dough in a small rectangular black metal dish length 25cm Make a shallow cut lengthways Put the bread on the low rack Stand for 5 10 minutes Brown Bread Rye and Wheat fresh leaven with yeast 750g 180 W 220 C without preheating 28 30 Put the fresh dough in a small rectangular black metal dish length 25cm Make a shallow cut lengthway...

Page 32: ...nstructions Bread Rolls ready baked 6 pc each ca 50 g 180 W 200 C 6 7 Arrange rolls in a circle on the low rack Stand for 2 5 minutes Bread Rolls pre baked 6 pc each ca 50 g 180 W 200 C 6 7 Arrange rolls in a circle on the low rack Stand for 2 5 minutes Croissants ready baked 4 pc each ca 50 g 180 W 200 C 4 5 Put the croissants on the low rack After baking stand for 2 3 minutes Baguettes Garlic Br...

Page 33: ...ing 900 W Stir several times during cooking Empty directly into small jam glasses with twist off lids Stand on lid for 5 minutes COOKING PUDDING Mix pudding powder with sugar and milk 500 ml by following the manufacturers instructions and stir well Use a suitable sized glass pyrex bowl with lid Cook covered for 6 to 7 minutes using 900 W Stir several times well during cooking BROWNING ALMOND SLICE...

Page 34: ...the vents NEVER use any abrasive products or chemical solvents Take particular care when cleaning the door seals to ensure that no particles Accumulate Prevent the door from closing correctly Storing and Repairing Your Microwave Oven A few simple precautions should be taken when storing or having your microwave oven serviced The oven must not be used if the door or door seals are damaged Broken hi...

Page 35: ... 230V 50 Hz AC Power consumption Maximum power Microwave Grill heating element Convection heating element 3200 W 1500 W 1300 W 1700 W Output power 100 W 900 W 6 levels IEC 705 Operating frequency 2450 MHz Dimensions W x D x H Outside Oven cavity 625 x 575 x 390 mm 369 x 391 7 x 252 mm Volume 1 3 Cubic feet Weight Shipping Net 28 kg approx 26 kg approx Ck135 GB fm Page 35 Wednesday July 11 2001 4 3...

Page 36: ...Ck135 GB fm Page 36 Wednesday July 11 2001 4 34 PM ...

Reviews: