background image

14

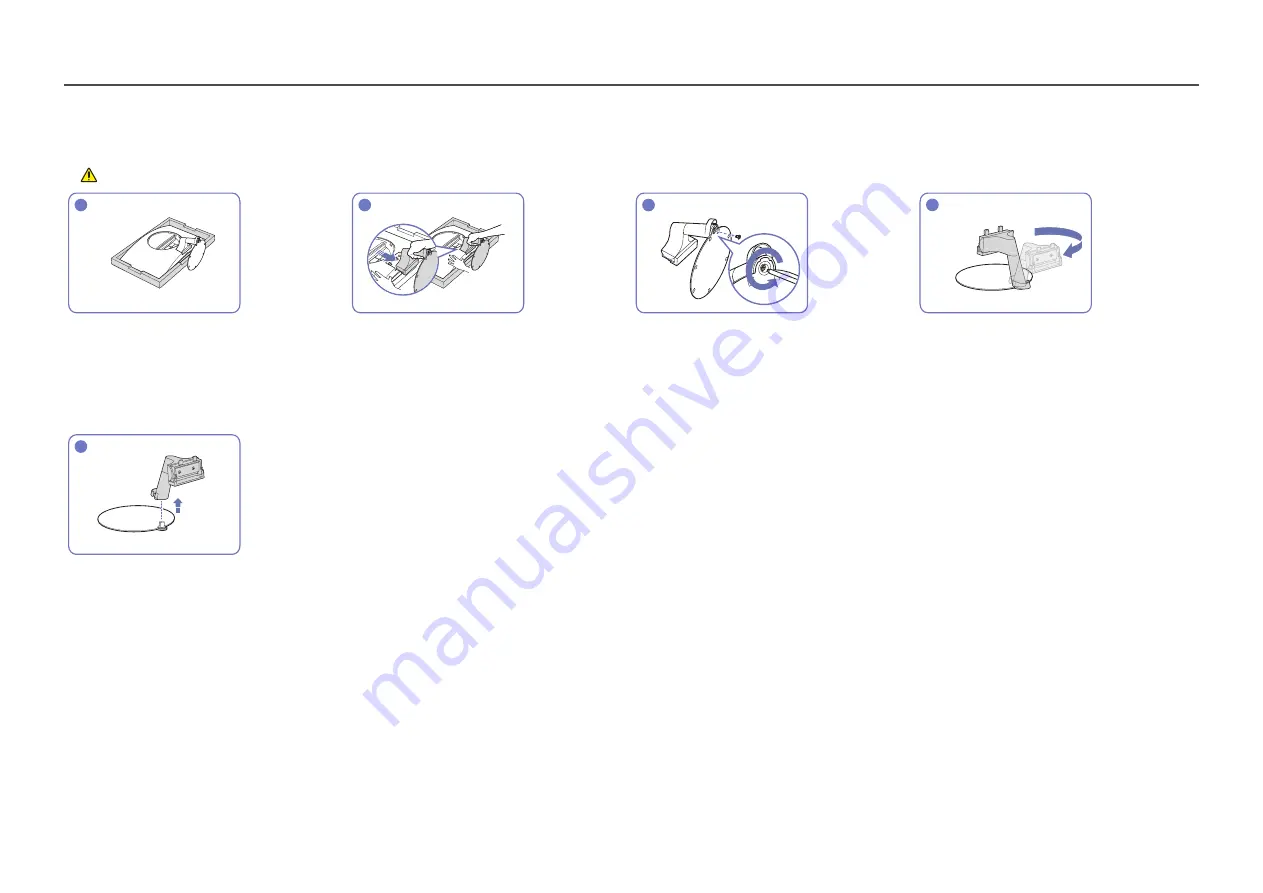
Removing the Stand


Before removing the stand from the product, place the product on a flat and stable surface with the screen facing down.

  The product is curved. Placing pressure on the product when on a flat surface may damage the product. When the product is on the ground facing up or down, do not put pressure on it.

1

2

3

4

Place the protective Styrofoam (cushion) 
included in the package on the floor and place 
the product facing down on the Styrofoam, as 
shown in the image. If Styrofoam is unavailable, 
use a thick sitting mat.

Press the lower part of the monitor with one 
hand, and pull the stand with the other hand in 
the direction of the arrow as shown in the figure.

Remove the stand neck from the stand base 
by turning the screw in the arrow direction as 
shown in the figure.

Turn the stand neck 180°.

5

Remove the stand neck from the stand in the 
direction shown in the figure.

Summary of Contents for C27T55 Series

Page 1: ...ty without the authorization of Samsung Electronics is prohibited Trademarks other than that of Samsung Electronics are owned by their respective owners An administration fee may be charged in the following situations a An engineer is called out at your request but it is found that the product has no defect i e where the user manual has not been read b You bring the unit to a repair centre but it ...

Page 2: ... 21 Black Level 22 Eye SaverMode 22 Game Mode 22 Response Time 22 Screen Ratio 23 Screen Adjustment 23 Adjusting OSD On Screen Display settings Transparency 24 Position 24 H Position 24 V Position 24 Language 24 Display Time 24 Connecting and Using a Source Device Read below before installing the product 16 Connecting and Using a PC 16 Connection Using the D SUB Cable Analogue Type 16 Connection U...

Page 3: ...allation 31 System Requirements 31 Troubleshooting Guide Requirements Before Contacting Samsung Customer Service Centre 32 Product diagnosis Screen issue 32 Checking the Resolution and Frequency 32 Check the following 32 Q A 34 Setup and Reset FreeSync 25 Sound 26 Volume 26 Sound Mode 26 Select Sound 26 Volume 26 Eco Saving Plus 26 Dynamic Brightness 27 Off TimerPlus 27 PC AV Mode 27 Source Detect...

Page 4: ...O USER SERVICEABLE PARTS INSIDE REFER ALL SERVICING TO QUALIFIED PERSONNEL This symbol indicates that high voltage is present inside It is dangerous to make any kind of contact with any internal part of this product AC voltage Rated voltage marked with this symbol is AC voltage This symbol indicates that this product has included important literature concerning operation and maintenance DC voltage...

Page 5: ...th to wipe the exterior of the product clean 5 Connect the power cord to the product when cleaning is finished 6 Power on the product and PC Electricity and Safety Warning Do not use a damaged power cord or plug or a loose power socket Do not use multiple products with a single power socket Do not touch the power plug with wet hands Insert the power plug all the way in so it is not loose Connect t...

Page 6: ...ren Edible oil such as soybean oil may damage or distort the product Keep the product away from oil pollution And do not install or use the product in the kitchen or near the kitchen stove Caution Do not drop the product while moving Do not set down the product on its front When installing the product on a cabinet or shelf make sure that the bottom edge of the front of the product is not protrudin...

Page 7: ...rm power off the product and remove the power cable Do not drop objects on the product or apply impact Do not move the product by pulling the power cord or any cable If a gas leakage is found do not touch the product or power plug Also ventilate the area immediately Do not lift or move the product by pulling the power cord or any cable Do not use or keep combustible spray or an inflammable substan...

Page 8: ...y heating apparatus Otherwise a fire may result Keep the AC DC adapter in a well ventilated area If you place the AC DC power adapter hanging with the cord input facing upwards water or other foreign substances could enter the Adapter and cause the Adapter to malfunction Make sure to rest the AC DC power adapter flat on a table or the floor Do not hold the product upside down or move it by holding...

Page 9: ...icator and works as Power On Power button Power LED Off Power saving mode Power LED Blinking Power Off Power button Power LED On The Power LED operation can be swapped by changing in the menu System PowerLED On Function Key Guide may vary depending on the function or product model Please refer to the actual product Press the power button on the JOG button to turn it on or off Function Key Guide Pr...

Page 10: ...u to maintain the current settings or prevent other users from changing settings Enable Disable To enable or disable the on screen display menu lock display the Menu screen move the JOG button to the right to go to the next stage and then press and hold the button to the left for10 seconds until the Function Key Guide disappears If the on screen display menu lock is enabled Brightness and Contrast...

Page 11: ...option UP Adjust Brightness Contrast DOWN Adjust Volume Mute LEFT Adjust Source RIGHT Adjust Auto Adjustment Changing the resolution in Display Properties will activate the Auto Adjustment function This function is only available in Analog mode PRESS ENTER Display Function Key Guide HDMI DisplayPort mode Brightness Volume Source Eye Saver Mode Off Features HDMI DisplayPort mode option UP Adjust Br...

Page 12: ... using the D SUB cable DC19V Connects to the AC DC adapter Anti theft Lock An anti theft lock allows you to use the product securely even in public places The locking device shape and locking method depend on the manufacturer Refer to the user guide provided with your anti theft locking device for details To lock an anti theft locking device 1 Fix the cable of your anti theft locking device to a h...

Page 13: ...n the figure Turn the stand neck 180 into normal position Align the stand with the stand neck guide and then turn the screw on the bottom of the stand to fix the stand Place the protective Styrofoam cushion included in the package on the floor and place the product facing down on the Styrofoam as shown in the image If Styrofoam is unavailable use a thick sitting mat 5 6 Hold the main body of the p...

Page 14: ...rotective Styrofoam cushion included in the package on the floor and place the product facing down on the Styrofoam as shown in the image If Styrofoam is unavailable use a thick sitting mat Press the lower part of the monitorwith one hand and pull the stand with the other hand in the direction of the arrow as shown in the figure Remove the stand neck from the stand base by turning the screw in the...

Page 15: ... product Do not hold the product upside down only by the stand Hold the lower corners or edges of the product when moving it Adjusting the Product Tilt The colour and shape of parts may differ from what is shown Specifications are subject to change without notice to improve quality 3 0 2 0 20 2 0 The product tilt can be adjusted Hold the lower part of the product and adjust the tilt carefully ...

Page 16: ...er all signal cables have been properly connected connect the power cables back to the product and the external device 4 After installation is completed make sure you read the user guide to acquaint yourself with the product functions precautions and other information required to use the product properly Connecting and Using a PC Select a connection method suitable foryour PC Connecting parts may ...

Page 17: ...ted using the HDMI DVI cable The optimum resolution may not be available with an HDMI DVI cable If you connect a PC using a HDMI DVI cable set to DVI PC System PC AV Mode HDMI Connection Using an DP Cable DP IN A DP cable shorter under1 5 m in length is recommended Using a cable longer than 1 5 m can affect the picture quality Connecting to headphones or earphones Use headphones when activating so...

Page 18: ...Then connect the AC DC adapter to the DC19V port on the back of the product 2 Next connect the power cable to the power outlet 3 Press the JOG button at the bottom of the product to turn it on The input voltage is switched automatically Tidying Up the Connected Cables 1 2 3 4 5 ...

Page 19: ...or blink frequently then eye fatigue will be relieved Driver Installation You can set the optimum resolution and frequency for this product by installing the corresponding drivers To install the latest version of the product driver download it from the Samsung Electronics website at http www samsung com Setting Optimum Resolution An information message about setting optimum resolution will appear ...

Page 20: ...quired Standard Obtain a picture quality suitable for editing documents or using Internet Cinema Obtain the brightness and sharpness of monitors suitable for enjoying video and DVD content Dynamic Contrast Obtain balanced brightness through automatic contrast adjustment In AV mode When the external input is connected through HDMI DP and PC AV Mode is set to AV Picture Mode has four automatic pictu...

Page 21: ... of the screen This menu is not available when Picture Mode is set to Cinema or Dynamic Contrast mode This menu is not available when Game Mode is enabled This menu is not available when Eye SaverMode is enabled ColorTone Select a colour tone that best suits yourviewing needs Cool 2 Set the colour temperature to be cooler than Cool1 Cool1 Set the colour temperature to be cooler than Normal mode No...

Page 22: ...tion for products which meet requirements for lower blue light levels When Eye SaverMode is On the blue light that wavelength is around 400nm will decrease and it will provide an optimum picture quality suitable for eye relaxation At the same time the blue light level is lower than in the default settings and it was tested by TÜV Rheinland and certified as it met the requirements of TÜV Rheinland ...

Page 23: ...e input source is 480p 576p 720p or1080p and product can display normally Not every model can support all of these signals This can only be set when the external input is connected through HDMI DP and PC AV Mode is set to AV This option is available when FreeSync is disabled Screen Adjustment Connection Using the HDMI DP Cable This option is only available when PC AV Mode is set to AV This menu is...

Page 24: ...ice to improve quality Transparency Set the transparency for the menu windows Position H Position Move the menu position to the left or right V Position Move the menu position up or down Language Set the menu language A change to the language setting will only be applied to the onscreen menu display It will not be applied to other functions on your PC Display Time The OSD menu will automatically d...

Page 25: ... AMD website to check your graphics driver s version and update it with the latest one While you are using the FreeSync function the screen may flicker due to variation of the output frequency from the graphics card The response rate during the game may fluctuate depending on the resolution A higher resolution generally decreases the response rate The sound quality of the monitor may be degraded I...

Page 26: ...ource Volume C27T55 C32T55 models are not supported Change the Volume setting Eco Saving Plus Reduce energy consumption compared to consumption at the maximum brightness level This option is not available when Picture Mode is in Dynamic Contrast mode This menu is not available when Game Mode is enabled This menu is not available when Eye SaverMode is enabled Off Deactivate the Eco Saving Plus func...

Page 27: ...e Eco Off After The Eco Timer can be set between 10 and180 minutes The product will automatically power off after the specified time has elapsed This option is only available when Eco Timer is set to On PC AV Mode Set PC AV Mode to AV The picture size will be enlarged This option is useful when you view a movie PC Set to PC when connected to a PC AV Set to AV when connected to an AV device DVI PC ...

Page 28: ...t is selected a command responds only once when a button is pressed Power LED On Configure the settings to enable or disable the power LED located at the lower part of the product Working The power LED is on when the product is turned on Stand by The power LED is on when the product is turned off HDMI CEC Activates or deactivates HDMI CEC ...

Page 29: ...otice to improve quality Self Diagnosis 1 Use the Function Key Guide and go to Support Self Diagnosis Self Diagnosis Information Reset All Support Perform this test when you experience a problem with your monitor s picture 2 Select OK when the following screen is prompted OK The test screen will now be shown Please look carefully at the screen for the next 5 seconds Review the test screen Never tu...

Page 30: ...not have a problem If the problem persists follow the steps below Turn off your monitor and any other connected device such as a PC Turn on your monitorfirst and then the other connected device Update the operating system and graphics card driver to the latest version and restart your PC Connect the other device such as a PC to a different input port on your monitor Reset your monitor by pressing ...

Page 31: ...r the installation The Easy Setting Box icon may not appear depending on the PC system and the product specifications If the shortcut icon does not appear press the F5 key Restrictions and Problems with the Installation The Easy Setting Box installation may be affected by the Graphics Card Motherboard and the Networking Environment System Requirements OS Hardware Windows 7 32Bit 64Bit Windows 8 32...

Page 32: ...d ensure the connectors are locked Blank spaces are found on all foursides of the screen when an HDMI orHDMI DVI cable is connected to the product and PC The blank spaces found on the screen have nothing to do with the product Blank spaces on the screen are caused by the PC or graphics card To resolve the problem adjust the screen size in the HDMI or DVI settings for the graphics card If the graph...

Page 33: ... too bright The screen is too dark Adjust Brightness and Contrast Screen colour is inconsistent Change the Color settings The colours on the screen have a shadow and are distorted Change the Color settings White does not really look white Change the Color settings There is no image on the screen and the power LED blinks every 0 5 to1 second The product is operating in power saving mode Press any k...

Page 34: ...en refresh rate under Monitorsettings How can I change the resolution Windows 7 Go to Control Panel Appearance and Personalization Display Screen Resolution Adjust Resolution Windows 8 Windows 8 1 Go to Settings Control Panel Appearance and Personalization Display Adjust Resolution and adjust the resolution Windows 10 Go to Settings System Display Advanced display settings and adjust the resolutio...

Page 35: ...Temperature 10 C 40 C 50 F 104 F Humidity 10 80 non condensing Storage Temperature 20 C 45 C 4 F 113 F Humidity 5 95 non condensing Plug and Play This product can be installed and used with any Plug and Play compatible systems Two way data exchange between the product and PC system optimises the product settings Product installation takes place automatically However you can customise the installat...

Page 36: ...eferring to the graphics card user manual Resolution Horizontal Frequency kHz Vertical Frequency Hz Pixel Clock MHz Sync Polarity H V IBM 720 x 400 31 469 70 087 28 322 VESA 640 x 480 31 469 59 940 25 175 MAC 640 x 480 35 000 66 667 30 240 VESA 640 x 480 37 861 72 809 31 500 VESA 640 x 480 37 500 75 000 31 500 VESA 800 x 600 35 156 56 250 36 000 VESA 800 x 600 37 879 60 317 40 000 VESA 800 x 600 4...

Page 37: ...rizontal frequency is measured in kHz Vertical Frequency Repeating the same picture dozens of times per second allows you to view natural pictures The repeat frequency is called vertical frequency or refresh rate and is indicated in Hz This product can be set to only one resolution for each screen size to obtain the optimum picture quality due to the nature of the panel Using a resolution other th...

Page 38: ...ogramme If customer requests software installation and setup for the product If a service technician removes cleans dusts or foreign materials inside of the product If customer requests an installation additionally after purchasing a product through home shopping or online A Product damage caused by customer s fault Product damage caused by customer s mishandling orwrong repair If a product damage...

Reviews: