background image

1.

Precautions

1.2. Servicing Precautions

CAUTION

Before servicing units covered by this service manual and its supplements, read and follow the Safety Precautions
section of this manual.

NOTE

If unforeseen circumstances create conflict between the following servicing precautions and any of the safety precautions,
always follow the safety precautions. Remember: Safety First.

1.2.1.

General Servicing Precautions

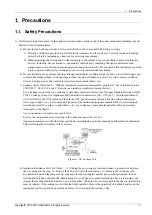
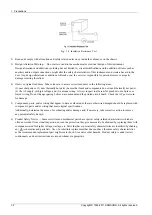
1) a. Always unplug the instrument’s AC powercord from the AC power source before (1) removing or reinstalling any

component, circuit board, module or any other instrument assembly, (2) disconnecting any instrument electrical plug or
other electrical connection, (3) connecting a test substitute in parallel with an electrolytic capacitor in the instrument.

b. Do not damage any plug/socket B+ voltage interlocks with which instruments covered by this service manual
might be equipped.

c. Do not apply AC power to this instrument and or any of its electrical assemblies unless all solid-state device heat
sinks are correctly installed.

d. Always connect a test instrument’s ground lead to the instrument chassis ground before connecting the test instrument
positive lead. Always remove the test instrument ground lead last.

NOTE

Refer to the Safety Precautions section ground lead last.

2) The service precautions are indicated or printed on the cabinet, chassis or components. When servicing, follow the

printed or indicated service precautions and service materials.

3) The components used in the unit have a specified flame resistance and dielectric strength. When replacing components,

use components which have the same. Components identified by shading, in the circuit diagram are important for safety
or for the characteristics of the unit. Always replace them with the exact replacement components.

4) An insulation tube or tape is sometimes used and some components are raised above the printed wiring board for

safety. The internal wiring is sometimes clamped to prevent contact with heating components. Install such elements
as they were.

5) After servicing, always check that the removed screws, components, and wiring have been installed correctly and that

the portion around the serviced part has not been damaged and so on.

Further, check the insulation between the blades of the attachment plug and accessible conductive parts.

1.2.2.

Insulation Checking Procedure

Disconnect the attachment plug from the AC outlet and turn the power ON. Connect the insulation resistance meter (500V)
to the blades of the attachment plug. The insulation resistance between each blade of the attachment plug and accessible
conductive parts(see note) should be more than 1 Megohm.

NOTE

Accessible conductive parts include metal panels, input terminals, earphone jacks, etc.

Copyright© 1995-2011 SAMSUNG. All rights reserved.

1-3

Summary of Contents for BD-D5500

Page 1: ...els BD D5500 BD D5700 BD D5500C BD D5250C Application Area EN HC PE PU SW XD XE XL XM XN XP XS XT XU XZ ZA ZB ZC ZD ZF ZN ZX ZK XY XV ZW SERVICEMANUAL Blu Ray Disc Player Refer to the service manual i...

Page 2: ...Disassembly and Reassembly 3 Disassembly and Reassembly 3 1 Cabinet and PCB CAUTION Connector Must be removed with care 3 1 1 Assy Cover P Top Removal Copyright 1995 2011 SAMSUNG All rights reserved 3...

Page 3: ...3 Disassembly and Reassembly 3 1 2 Assy Front Cabinet Removal 3 2 Copyright 1995 2011 SAMSUNG All rights reserved...

Page 4: ...3 Disassembly and Reassembly 3 1 3 Assy Deck Removal Copyright 1995 2011 SAMSUNG All rights reserved 3 3...

Page 5: ...3 Disassembly and Reassembly 3 1 4 USB PCB Removal 3 4 Copyright 1995 2011 SAMSUNG All rights reserved...

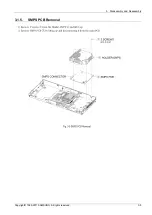
Page 6: ...3 Disassembly and Reassembly 3 1 5 SMPS PCB Removal Copyright 1995 2011 SAMSUNG All rights reserved 3 5...

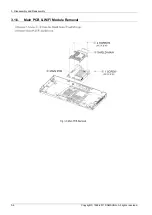
Page 7: ...3 Disassembly and Reassembly 3 1 6 Main PCB WiFi Module Removal 3 6 Copyright 1995 2011 SAMSUNG All rights reserved...

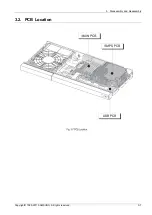
Page 8: ...3 Disassembly and Reassembly 3 2 PCB Location Copyright 1995 2011 SAMSUNG All rights reserved 3 7...

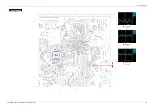
Page 9: ...5 Wiring Diagram 5 Wiring Diagram 5 1 Wiring Diagram Copyright 1995 2011 SAMSUNG All rights reserved 5 1...

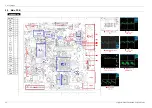
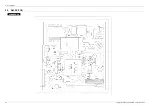
Page 10: ...5 Wiring Diagram 5 2 Main PCB 5 2 Copyright 1995 2011 SAMSUNG All rights reserved...

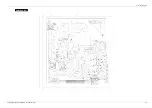
Page 11: ...5 Wiring Diagram Copyright 1995 2011 SAMSUNG All rights reserved 5 3...

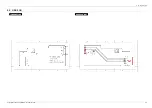
Page 12: ...5 Wiring Diagram 5 3 S M P S PCB 5 4 Copyright 1995 2011 SAMSUNG All rights reserved...

Page 13: ...5 Wiring Diagram Copyright 1995 2011 SAMSUNG All rights reserved 5 5...

Page 14: ...5 Wiring Diagram 5 4 Front PCB 5 6 Copyright 1995 2011 SAMSUNG All rights reserved...

Page 15: ...5 Wiring Diagram 5 5 USB PCB Copyright 1995 2011 SAMSUNG All rights reserved 5 7...

Page 16: ...5 Wiring Diagram 5 6 ITO 5 8 Copyright 1995 2011 SAMSUNG All rights reserved...

Page 17: ...tering system that complies with American National Standard Institute ANSI C101 1 Leakage Current for Appliances and Underwriters Laboratories UL 1270 40 7 With the instrument s AC switch first in the...

Page 18: ...e or frayed wiring Do not change spacing between a component and the printed circuit board Check the AC power cord for damage 5 Components parts and or wiring that appear to have overheated or that ar...

Page 19: ...ecautions are indicated or printed on the cabinet chassis or components When servicing follow the printed or indicated service precautions and service materials 3 The components used in the unit have...

Page 20: ...only a grounded tip soldering iron to solder or unsolder ESD devices 4 Use only an anti static solder removal devices Some solder removal devices not classified as anti static can generate electrical...

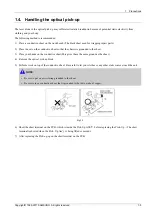
Page 21: ...t This gives them the same ground as the sheet 4 Remove the optical pick up block 5 Perform work on top of the conductive sheet Be careful to let your clothes or any other static sources touch the uni...

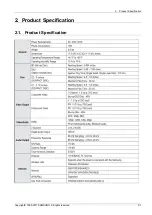
Page 22: ...2 Product Specification 2 Product Specification 2 1 Product Specification Copyright 1995 2011 SAMSUNG All rights reserved 2 1...

Page 23: ...sc Not all discs will have the features described below Video highlights The BD ROM format for movie distribution supports three highly advanced video codecs including AVC VC 1 and MPEG 2 HD video res...

Page 24: ...e audio and video remain playing in the background Interactivity Certain Blu ray Discs may contain Animated menus and Trivia games User Browsable Slideshows With Blu ray Discs you can browse through v...

Page 25: ...l not be playable 2 1 4 Logos of Discs that can be played 2 1 5 Disc types that cannot be played Blu ray Discs outside a regional code DVD VIDEO outside a regional number HD DVD DVD RAM DVD RW VR mode...

Page 26: ...the NTSC color system only When a BD J title is played loading may take longer than a normal title or some functions may perform slowly This product may not respond to all operating commands because...

Page 27: ...d This is not a malfunction of the product DVD RW This product can play back a DVD RW disc recorded and finalized with a DVD video recorder Ability to play back may depend on recording conditions DVD...

Page 28: ...image compressing format Some AVCHD discs use the x v Color format This product can playback AVCHD discs using x v Color format x v Color is a trademark of Sony Corporation AVCHD and the AVCHD logo ar...

Page 29: ...2 Product Specification 2 2 Chassis Product Specification 2 8 Copyright 1995 2011 SAMSUNG All rights reserved...

Page 30: ...2 Product Specification Copyright 1995 2011 SAMSUNG All rights reserved 2 9...

Page 31: ...2 Product Specification 2 3 Option Product Specification 2 10 Copyright 1995 2011 SAMSUNG All rights reserved...

Page 32: ...ent or amended since this drawing was prepared CAUTION Most semiconductor devices are electrostatically sensitive and therefore require the special handling techniques described under the electrostati...

Page 33: ...6 Schematic Diagrams 6 1 All Block Diagram 6 2 Copyright 1995 2011 SAMSUNG All rights reserved...

Page 34: ...r input output d R1S02 Rush current limit resistance at the moment of power cord insertion Without P1S02 the bridge diode might be damaged as the rush current increases 2 SNUBBER Circuit D1S10 C1S10 R...

Page 35: ...r while ICIS01 is active ii Rectify to DIS07 and smooth to CIS09 iii Use the output of transformer as ICIS01 Vcc The loads are different before and after ICIS01 driving Vcc of ICIS01 decreases below O...

Page 36: ...6 Schematic Diagrams 6 2 3 Internal Block Diagram Internal Block Diagram of S M P S Circuit Copyright 1995 2011 SAMSUNG All rights reserved 6 5...

Page 37: ...6 Schematic Diagrams 6 3 S M P S S M P S PCB 6 6 Copyright 1995 2011 SAMSUNG All rights reserved...

Page 38: ...6 Schematic Diagrams 6 4 Analog Audio 2ch Video CVBS Component Main PCB Copyright 1995 2011 SAMSUNG All rights reserved 6 7...

Page 39: ...6 Schematic Diagrams 6 8 Copyright 1995 2011 SAMSUNG All rights reserved...

Page 40: ...6 Schematic Diagrams 6 5 HDMI Main PCB Copyright 1995 2011 SAMSUNG All rights reserved 6 9...

Page 41: ...6 Schematic Diagrams 6 6 NAND Flash Main PCB 6 10 Copyright 1995 2011 SAMSUNG All rights reserved...

Page 42: ...6 Schematic Diagrams 6 7 Boot Strap Main PCB Copyright 1995 2011 SAMSUNG All rights reserved 6 11...

Page 43: ...6 Schematic Diagrams 6 8 7633 Clocks BBS Main PCB 6 12 Copyright 1995 2011 SAMSUNG All rights reserved...

Page 44: ...6 Schematic Diagrams 6 9 7633 Power Decoupling Main PCB Copyright 1995 2011 SAMSUNG All rights reserved 6 13...

Page 45: ...6 Schematic Diagrams 6 10 DDR3 1333 Main PCB 6 14 Copyright 1995 2011 SAMSUNG All rights reserved...

Page 46: ...6 Schematic Diagrams 6 11 Front Micom Main PCB Copyright 1995 2011 SAMSUNG All rights reserved 6 15...

Page 47: ...6 Schematic Diagrams 6 12 FE_MOTOR_DRIVE Main PCB 6 16 Copyright 1995 2011 SAMSUNG All rights reserved...

Page 48: ...6 Schematic Diagrams 6 13 FE_OPU_CONNECTION Main PCB Copyright 1995 2011 SAMSUNG All rights reserved 6 17...

Page 49: ...6 Schematic Diagrams 6 14 Ethernet USB Main PCB 6 18 Copyright 1995 2011 SAMSUNG All rights reserved...

Page 50: ...6 Schematic Diagrams 6 15 Main Power Main PCB Copyright 1995 2011 SAMSUNG All rights reserved 6 19...

Page 51: ...6 Schematic Diagrams 6 16 Core Front PCB 6 20 Copyright 1995 2011 SAMSUNG All rights reserved...

Page 52: ...4 Trouble Shooting 4 Trouble Shooting 4 1 Troubleshooting Copyright 1995 2011 SAMSUNG All rights reserved 4 1...

Page 53: ...4 Trouble Shooting 4 2 Copyright 1995 2011 SAMSUNG All rights reserved...

Page 54: ...4 Trouble Shooting Copyright 1995 2011 SAMSUNG All rights reserved 4 3...

Page 55: ...4 Trouble Shooting 4 4 Copyright 1995 2011 SAMSUNG All rights reserved...

Page 56: ...4 Trouble Shooting Copyright 1995 2011 SAMSUNG All rights reserved 4 5...

Page 57: ...4 Trouble Shooting 4 6 Copyright 1995 2011 SAMSUNG All rights reserved...

Page 58: ...4 Trouble Shooting Copyright 1995 2011 SAMSUNG All rights reserved 4 7...

Page 59: ...4 Trouble Shooting 4 8 Copyright 1995 2011 SAMSUNG All rights reserved...

Page 60: ...4 Trouble Shooting Copyright 1995 2011 SAMSUNG All rights reserved 4 9...

Page 61: ...4 Trouble Shooting 4 10 Copyright 1995 2011 SAMSUNG All rights reserved...

Page 62: ...4 Trouble Shooting Copyright 1995 2011 SAMSUNG All rights reserved 4 11...

Page 63: ...4 Trouble Shooting 4 12 Copyright 1995 2011 SAMSUNG All rights reserved...

Page 64: ...4 Trouble Shooting Copyright 1995 2011 SAMSUNG All rights reserved 4 13...

Page 65: ...4 Trouble Shooting 4 14 Copyright 1995 2011 SAMSUNG All rights reserved...

Page 66: ...4 Trouble Shooting Copyright 1995 2011 SAMSUNG All rights reserved 4 15...

Page 67: ...4 Trouble Shooting 4 16 Copyright 1995 2011 SAMSUNG All rights reserved...

Page 68: ...4 Trouble Shooting Copyright 1995 2011 SAMSUNG All rights reserved 4 17...

Page 69: ...4 Trouble Shooting 4 18 Copyright 1995 2011 SAMSUNG All rights reserved...

Page 70: ...4 Trouble Shooting Copyright 1995 2011 SAMSUNG All rights reserved 4 19...

Page 71: ...4 Trouble Shooting 4 20 Copyright 1995 2011 SAMSUNG All rights reserved...

Page 72: ...4 Trouble Shooting Copyright 1995 2011 SAMSUNG All rights reserved 4 21...

Page 73: ...4 Trouble Shooting 4 22 Copyright 1995 2011 SAMSUNG All rights reserved...

Page 74: ...4 Trouble Shooting Copyright 1995 2011 SAMSUNG All rights reserved 4 23...

Page 75: ...can upgrade the software later using the By Downloaded function 6 If you select Don t Upgrade the player cancels the upgrade NOTE Your player must be connected to the Internet to use the By Internet...

Page 76: ...e upgrade 8 Select By Disc NOTE When the system upgrade is done check the software details in the software Upgrade menu Do not turn off the player during the Software Upgrade It may cause the player m...

Page 77: ...then press the ENTER button 2 Select On or Off OFF If you select Off the player will notify you with a pop up message when new upgrade software is available ON If you select On the player will automa...

Reviews: