Samsung 65

Connecting to Other devices

Using a Power cord with Earth

• In the event of failure, the earth lead may cause electric shock. Make

sure to wire the earth lead in correctly, before connecting the AC power.

When un-wiring the earth lead, make sure to disconnect the AC power

in advance.

• AV input devices such as DVD players, VCRs or camcorders as well as your computer

can be connected to the LCD Display. For detailed information on connecting AV input

devices, refer to the contents under Adjusting Your LCD Display.

• The LCD Display 's configuration at the back may vary slightly depending on the LCD

Display model.

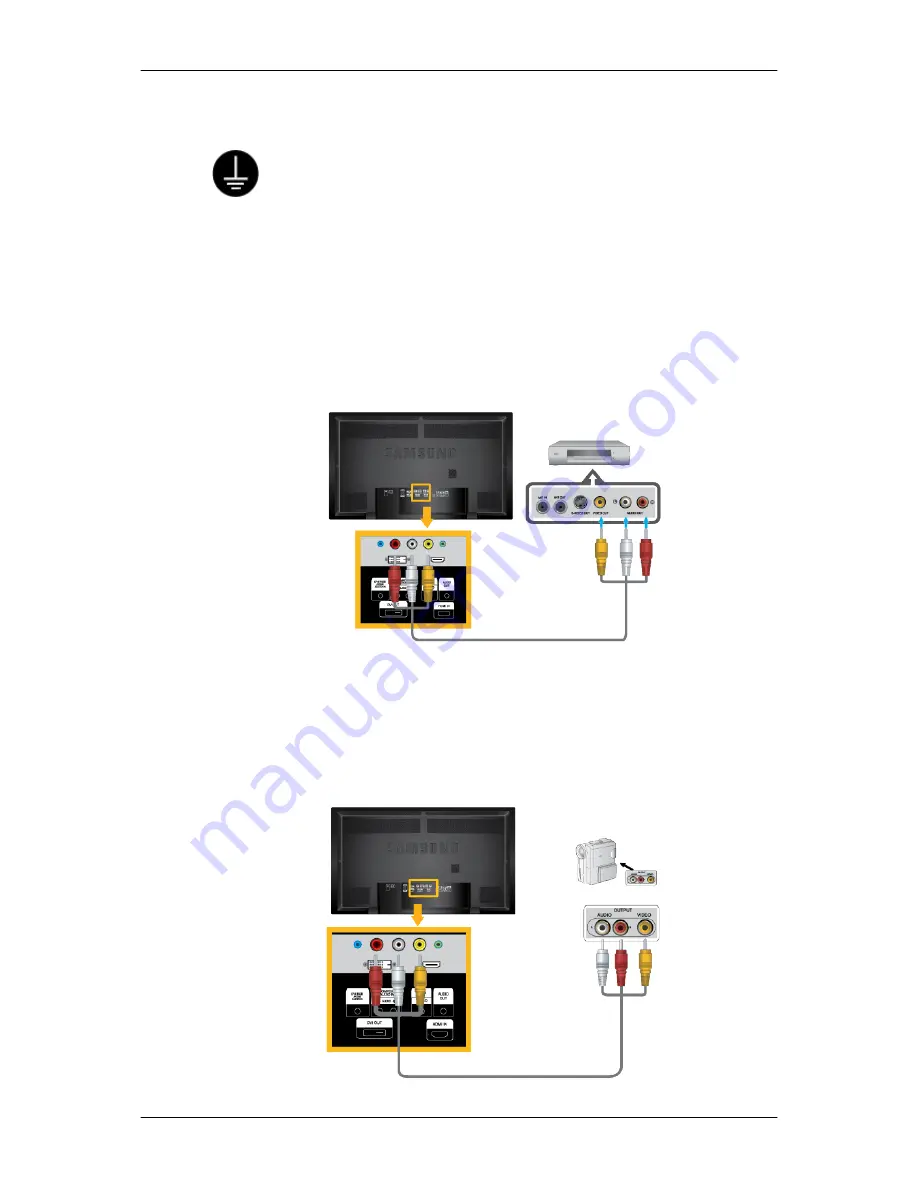
Connecting AV Devices

1. Connect the Video and Audio [AV/COMPONENT AUDIO IN [L-AUDIO-R]] port of the

DVD, VCR or DTV Set-Top Box to the Video and Audio [AV IN [VIDEO]]LCD Display.

2. Play the DVD, VCR or Camcorder with a DVD disc or tape inserted.

3. Select 

AV

 using the SOURCE button on the front of the LCD display or on the remote.

Connecting to a Camcorder

Connections

Summary of Contents for 65" 650TS Interactive Whiteboard LCD

Page 1: ...ii quick start guide 650TS LCD DISPLAY...

Page 2: ...ox as shown in the figure above Lift up the package box by holding the grooves on both sides of the package box Check the contents of the package Remove the Styrofoam and vinyl cover Note After unpack...

Page 3: ...Samsung In teractive whiteboard Cables Power Cord USB Cable D Sub Cable Others Remote Control BP59 00138A Batteries AAA X 2 Not available in all loca tions Stylus pens x3 Sold separately DVI Cable D S...

Page 4: ...m to another horizontally or adjusts selected menu values When OSD is not on the screen press the button to adjust volume ENTER button ENTER Activates a highlighted menu item SOURCE button SOURCE Swit...

Page 5: ...See PowerSaver described in the manual for further information regarding power saving functions For energy conservation turn your LCD Display OFF when it is not needed or when leaving it unattended fo...

Page 6: ...ENT IN port on the monitor to the COMPONENT port on the external device using the D Sub to Component Cable Connect the RGB COMPONENT IN port on the monitor to the BNC port on the PC using the D Sub to...

Page 7: ...V IN VIDEO terminal of your monitor to the video output terminal of the external device using a VIDEO cable AUDIO OUT Headphone External speaker output termi nal HDMI IN Connect the HDMI terminal at t...

Page 8: ...mation regarding cable connections Remote Control Note The performance of the remote control may be affected by a TV or other electronic device operating near the LCD Display causing a malfunction due...

Page 9: ...ions This function does not work for this LCD Display 9 Up Down Left Right but tons Moves from one menu item to another horizontally vertically or adjusts selected menu values 10 INFO Current picture...

Page 10: ...ut temporarily This is dis played on the lower left corner of the screen The audio comes back on if MUTE or VOL is pressed in the Mute mode 16 CH P In TV mode selects TV channels This function does no...

Page 11: ...tion Please contact your nearest SAMSUNG Distributor to place an order After your order is placed installation profes sionals will visit you and install the bracket At least 2 persons are needed in or...

Page 12: ...when the installation is done by the customer This product is for installing on cement walls The product may not stay in place when installed on plaster or wood Components Only use the components and...

Page 13: ...roduct is correct If the length is too short or long loosen all or some of the 4screws on the wall bracket to adjust the length A Length between the two locking holes 3 Check the installation diagram...

Page 14: ...plastic hanger Notice Mount the product on the wall bracket and make sure it is properly fixed to the left and right plastic hangers Be careful when installing the product on the bracket as fingers c...

Page 15: ...e safety pin 3 to securely hold the product to the bracket A LCD Display B Wall Bracket C Wall Wall Bracket Angle Adjustment Adjust the bracket angle to 2 before installing it on the wall 1 Fix the pr...

Page 16: ...Make sure to use the top center and not the left or the right side of the product to adjust the angle Introduction...

Page 17: ...ion on connecting AV input devices refer to the contents under Adjusting Your LCD Display The LCD Display s configuration at the back may vary slightly depending on the LCD Display model There are sev...

Page 18: ...und is only available when connected according to the option that follows Connect the audio cable for your LCD Display to the audio port on the back of the LCD Display To use the touchscreen function...

Page 19: ...e LCD Display For detailed information on connecting AV input devices refer to the contents under Adjusting Your LCD Display The LCD Display s configuration at the back may vary slightly depending on...

Page 20: ...the remote control 4 Then start the Camcorder with a tape inserted Note The audio video cables shown here are usually included with a Camcorder If not check your local electronics store If your camco...

Page 21: ...necting Using a DVI to HDMI Cable 1 Connect the DVI output terminal of a digital output device to the HDMI IN terminal of the LCD Display using a DVI to HDMI cable 2 Connect the red and white jacks of...

Page 22: ...le to the RGB COMPONENT IN ports on the monitor Note Select Component for the connection to a DVD player using the SOURCE button on the front of the LCD Display or on the remote control Then start the...

Page 23: ...sing the SOURCE button on the front of the LCD Display or on the remote control For an explanation of Component video see your Set Top Box owner s manual Connecting to an Audio System 1 Connect a set...

Page 24: ...and reconnect the video cable then turn on both your com puter and the LCD Display If your LCD Display screen remains blank after using the previous procedure check your video controller and computer...

Page 25: ...when booting If it does request service 3 If you installed a new video card or if you assembled the PC check if you installed the Adaptor video 4 Check if the scanning ratio of the video screen is set...

Page 26: ...ly A Check if the signal cable is securely connected Re connect it if necessary Refer to Connecting a Computer Q The image is not clear picture is blurred A Run Frequency Coarse and Fine tuning A Turn...

Page 27: ...tton check the cable connection between the LCD Display and the computer to en sure that the connector is properly connected Problems related to stylus Q My stylus pen is missing A The stylus pen can...

Page 28: ...can I adjust the resolution A Windows XP Set the resolution in the Control Panel Appearance and Themes Display Set tings A Windows ME 2000 Set the resolution in the Control Panel Display Settings Con...

Page 29: ...WMV codecs only Install the corresponding codec to play the video Note that some of the codecs can be incompatible Note Before calling for assistance check the information in this section to see if yo...

Reviews: