background image

35

GB

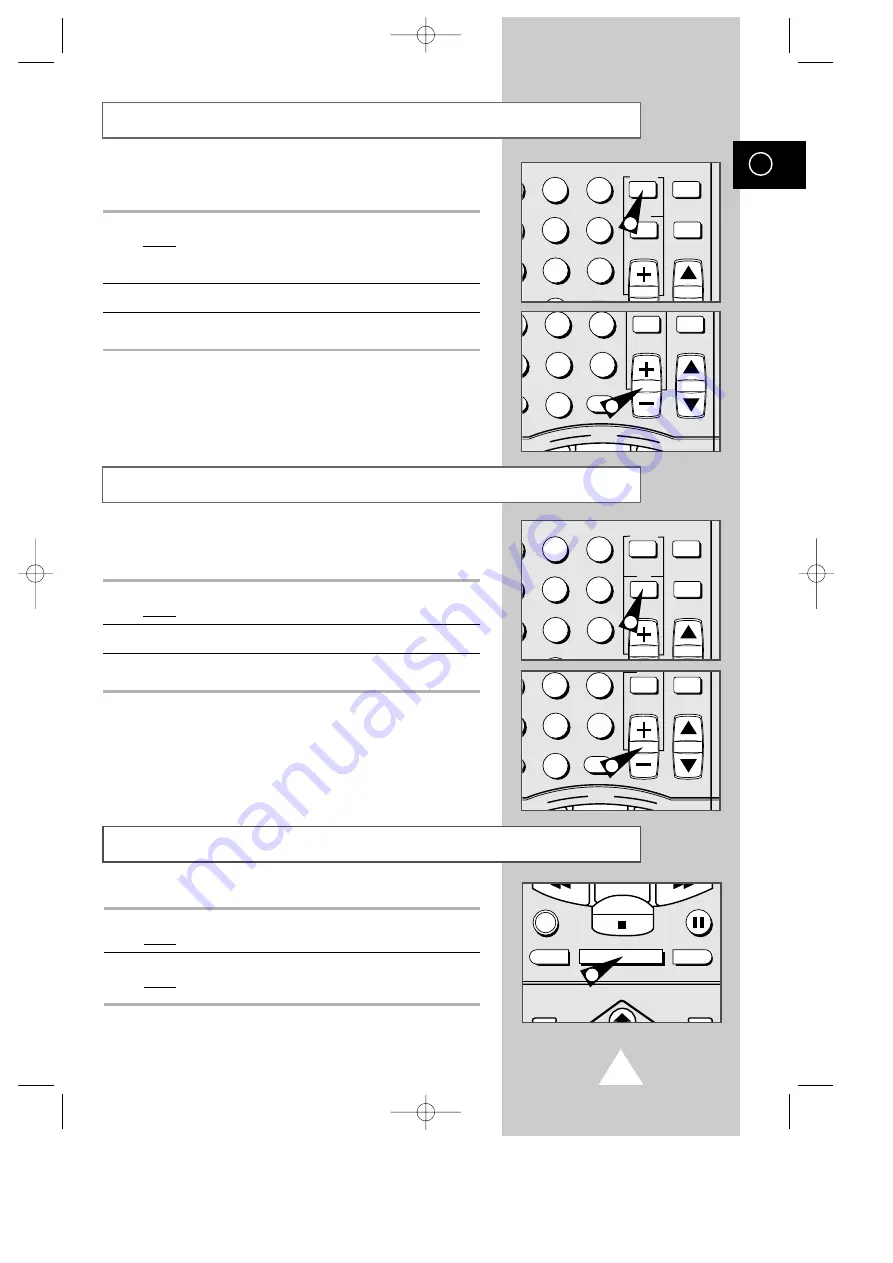
STROBE

You can see still images in succession. 

1

Press the STROBE button during playback. 
Result:

“STROBE” is displayed on the screen. 
A Discrete image is displayed on screen similar to    
SLOW mode. 

2

Press the +/- button to vary the speed of the STROBE mode. 

3

To exit the STROBE mode, press the STROBE button. 

When in the  ART mode, the picture contrast is changed to
resemble artwork. 

1

Press the ART button during PLAY or STROBE mode.  
Result:

The contrast of the image is changed.   

2

Press the +/- button to vary the contrast of the ART mode.  

3

To exit the ART mode, press the ART button.  

ART

ART                INPUT

2

3

5

6

8

9

CLR/RST

CH

STROBE            AUDIO

ART                INPUT

5

6

8

9

0

CLR/RST

CH

REW

PLAY

F.F

1

2

ART                INPUT

2

3

5

6

8

9

CLR/RST

CH

STROBE            AUDIO

ART                INPUT

5

6

8

9

0

CLR/RST

CH

REW

PLAY

F.F

1

2

DISPLAY                         MONITOR                         A.DUB

REC

P/STILL

INPUT
SYSTEM

OUTPUT
SYSTEM

STOP

1

MONITOR

You can see the original input signal during a conversion recording.   

1

Press the MONITOR button during conversion.  
Result:

Original input signal is displayed on screen.    

2

Press the MONITOR button again.   
Result:

The converted output signal is displayed on screen.

SV-5000W/SECA3  4/1/1 12:17 AM  Page 35

Summary of Contents for 5000W - SV - VCR

Page 1: ...JECT INDEX REC SPEED CLK COUNT PICTURE TIMER ART INPUT 1 2 3 4 5 6 7 8 9 0 CLR RST 100 CH REW PLAY F F DISPLAY MONITOR A DUB REC P STILL INPUT SYSTEM OUTPUT SYSTEM AUTO MENU RE V FW D STOP STROBE AUDIO OK TR ACKING SLOW Code No AC68 00402A SV 5000W SECA1 4 1 1 12 14 AM Page 1 ...

Page 2: ...at unauthorized recording of copyrighted TV programs is an infringement of U S copyright laws Certain Canadian programs may be copyrighted and any unauthorized recording in whole or in part may be a violation of these rights To prevent damage which may result in fire or electric shock hazard do not expose this appliance to rain or moisture 1 Read Instructions All the safety and operating instructi...

Page 3: ...u are unable to insert the plug fully into the outlet try reversing the plug If the plug should still fail to fit contact your electrician to replace your obsolete outlet Do not defeat the safety pur pose of the polarized plug 13 Power Cord Protection Power supply cords should be routed so that they are not likely to be walked on or pinched by items placed upon or against them paying particular at...

Page 4: ...hose controls that are covered by the operating instructions as an improper adjustment of other controls may result in damage and will often require extensive work by a qualified technician to restore the product to its normal operation e If the product has been dropped or damaged in any way f When the product exhibits a distinct change in performance this indicates a need for service 21 Replaceme...

Page 5: ...ontrol Insert the cassette Press the TIMER button on the remote control Select the channel by pressing the CH buttons or on the remote control Press REC for at least one second to start recording Enter the Timer program data Then press the MENU button Press REC for at least one second to start recording When you have finished recording press STOP Press REC several times until the required recordin...

Page 6: ...tion on off 17 Setting the VCR RF out System 18 Setting the RF OUT CHANNEL 19 Presetting the Stations Automatically 20 Presetting the Stations Manually 21 RECORDING TELEVISION BROADCASTS Selecting the Cassette Type 22 Selecting the Recording Speed 22 Protecting a Recorded Cassette 22 Recording a Program 23 Stopping a Recording Temporarily 23 Recording a Program with Automatic Stop 24 Using the Tim...

Page 7: ... Other Equipment to Your VCR 39 Recording from Another VCR or Camcorder 40 TV System Conversion 41 Playback Conversion 41 Conversion Recording 42 Hi Fi Audio System 43 Audio Dubbing a Pre recorded Cassette 44 Recording an FM Simulcast Program 45 OTHER FUNCTIONS AND USEFUL RECOMMENDATIONS Locking Your VCR 46 Resetting Your VCR 46 Technical Specifications 47 SOLVING PROBLEMS Troubleshooting Guide 48...

Page 8: ...S Safety Instructions Do NOT expose the VCR to extreme temperature conditions below 5 C 41 F and above 40 C 104 F or to extreme humidity conditions less than 10 and more than 75 Do NOT expose the VCR to direct sunlight Do NOT expose the VCR to any liquids Do NOT place any objects on the VCR or remote control During a storm and or lightning unplug the VCR from the AC outlet and antenna If the remot...

Page 9: ...te control unit to help you find the buttons and understand the symbols displayed Preparing Your Video Cassette Recorder Before being able to play and record video cassettes you must prepare and connect your VCR Insert batteries in the remote control Connect your VCR to the television Set the date and time used to display information on the television screen Preset the stations All these operation...

Page 10: ...UTPUT 2 JACKS RCA AUDIO L R OUTPUT 1 JACKS RCA AUDIO L R INPUT JACKS OUT TO TV RF CONNECTOR AUDIO VIDEO IN OUT SCART EURO 21 JACK SYSTEM STANDARD OUTPUT SELECTION BUTTONS CHANNEL BUTTONS RECORD BUTTON RESET BUTTON RCA VIDEO INPUT JACK RCA AUDIO L R INPUT JACKS REW BUTTON STOP BUTTON PAUSE STILL BUTTON F F BUTTON PLAY BUTTON POWER BUTTON EJECT BUTTON VIDEO CASSETTE COMPARTMENT SV 5000W SECA1 4 1 1 ...

Page 11: ...2 SELECTION BUTTON CH UP DOWN BUTTONS STROBE ART UP DOWN BUTTONS CLR RST BUTTON FAST FORWARD FORWARD SEARCH BUTTON STOP BUTTON PAUSE STILL BUTTON AUDIO DUBBING BUTTON OUTPUT SYSTEM BUTTON MENU SELECTION UP DOWN BUTTONS PICTURE BUTTON REC SPEED BUTTON INDEX BUTTON CLK COUNT BUTTON NUMERIC BUTTONS 100 BUTTON PLAY BUTTON REWIND REVERSE PICTURE SEARCH BUTTON RECORD BUTTON DISPLAY BUTTON MONITOR BUTTON...

Page 12: ... L France region Worldwide Broadcasting system is B G I D K M N L Number of scanning lines Field frequency Line frequency Color signal modulation system Color signal frequency Burst signal NTSC NTSC4 43 PAL M PAL PAL N SECAM MESECAM 525 625 3 579545 MHz Fixed phase Inverted by 1 H DR DB alternation FM modulation 4 433619 MHz 3 575611 MHz 4 433619 MHz 3 582056 MHz DB 4 25MHz DR 4 40625MHz 60Hz 50Hz...

Page 13: ...CR With a Multi System VCR The TV must correspond to the system of the tape being played otherwise a Multi System TV is also required Tape duplication with system conversion eg NTSC to PAL is not possible With the Worldwide VCR Tapes can be played on any TV monitor Recordings can be made in any TV Broadcasting System even if the tape is of a different system Tape duplication with system conversion...

Page 14: ...itally converts scanning lines frequency fields and color signal into the desired system as selected in step ll A When RECORDING The input is the external TV signal or the output from a second VCR or LDP B During PLAYBACK The input comes from the tape loaded for playback The broadcast system of the tape on which the recording is to be made is selected on the VCR output panel Recording in the desir...

Page 15: ...home video camcorder recordings and sending them to friends or relatives abroad NTSC PAL PAL M SECAM MESECAM NTSC PAL PAL M SECAM MESECAM NTSC PAL PAL M SECAM MESECAM NTSC PAL PAL M SECAM MESECAM NTSC PAL PAL M PAL N SECAM MESECAM NTSC NT4 43 PAL PAL N PAL M SECAM Any VHS Tape Any VHS Tape SV 5000W AS A PLAYBACK VCR SAMSUNG Worldwide VCR 2nd VCR AS A RECORDING VCR Any VCR SV 5000W AS A RECORDING V...

Page 16: ...NDBY V HS C Any 8mm Tape 8mm CAMCORDER AS A PLAYBACK VCR Corresponding Camcorder Any VHS Tape SV 5000W AS A RECORDING VCR SAMSUNG Worldwide VCR SV 5000W AS A RECORDING VCR SAMSUNG Worldwide VCR Any VHS C Tape VHS C Tape Adapter 2nd VCR AS A PLAYBACK VCR Corresponding VCR Any VHS Tape SV 5000W SECA1 4 1 1 12 14 AM Page 12 ...

Page 17: ... Audio Video RCA Out Television Other VCR LINE 1 Front Audio Video RCA In Audio system Camcorder Other VCR LINE 2 Rear Audio Video RCA In Audio system Camcorder Satellite receiver Other VCR OUT TO TV Rear 75 Ω Out Television coaxial IN FROM ANT Rear 75 Ω In Antenna coaxial Cable television network Whenever you connect an audio or video system to your VCR ensure that all units are switched off Refe...

Page 18: ...levision 5 Connect one end of the RCA cable supplied to the output jacks OUT1 or OUT2 on the rear of the VCR Respect the color coding of the Audio and Video In Out cable 6 Connect one end of the SCART cable to the EURO AV socket on the rear of the VCR 7 Plug the other end of the RCA cable or SCART cable into the appropriate connector on the television Regardless of the type of connection chosen yo...

Page 19: ...ys the initial setup MENU when the VCR is plugged into the AC outlet for the first time 1 Plug the VCR into the AC outlet Result The LANGUAGE SET is displayed 2 Press the and OK button to select your favorite language Result The COUNTRY SET is displayed 3 Press the button to select your country region Result The country list is displayed 4 Press the and OK button to select your country If your cou...

Page 20: ...U USER SET1 TAPE SELECT E180 T120 CLOCK TYPE 12H PLAY SYSTEM AUTO OSD ON USER SET2 END MENU 1 Press MENU on the remote control Result The programming menu is displayed 2 Press the button to select user set Result The USER SET1 is displayed 3 Press to select the USER SET2 4 Press to select the USER SET2 menu item 5 Check below to change the item USER SET2 USER SET2 Setting ITEM USAGE COMMENT SAP SA...

Page 21: ...rmation on off Your VCR displays most information both on the VCR and television You can choose to display or not to display this information on the television screen except for the Index Timer Programming function Picture which cannot be turned off 1 Press MENU on the remote control Result The programming menu is displayed 2 Press the corresponding or button until the cursor is placed in front of...

Page 22: ...AIN I I U K HONGKONG D K K CHINA CIS If you want to know the broadcast system of your specific country see the World Broadcast Systems page 50 SECAM L FRANCE is not available on this VCR 1 Press the MENU button on the remote control Result The programming menu is displayed 2 Press the or button to select installation Result The INSTALLATION menu is displayed 3 Press the or button to select MANUAL ...

Page 23: ... SET UP menu is displayed 4 Press the button until the cursor is placed in front of RF OUT CHANNEL 5 Press the or button to change the RF OUT CHANNEL Result The RF OUT CH is changed Your VCR RF out channel may need to be changed if there is no picture or the picture suffers from interference For better picture and sound quality connect your VCR to the TV using the RCA cable if the appropriate RCA ...

Page 24: ... OK to start the Auto scanning Result The AUTO indication flashes on the VCR display The number of channels automatically stored by the VCR depends on the number of channels that have been found reception conditions etc 4 To exit AUTO TUNING press the MENU button Once the Auto scanning procedure has finished some channels may have been stored more than once Select the channels with the best recept...

Page 25: ...ress the corresponding or button until the cursor is placed in front of the CH ADD DELETE option 6 Press the or button to select channel that you want to memorize or delete If you wish to store the press OK button to memorize current displayed channel channel wish to delete the press CLR RST button to delete current channel displayed channel 7 Press OK button to memorize Result The selected channe...

Page 26: ...tion 3 Press the button to select this option Result The cursor is set to the TAPE SELECT option 4 Press the or button as many times as required until the correct cassette length is displayed E180 T120 E240 T160 E 300 E260 T180 5 Press MENU twice to exit the menu Selecting the Recording Speed Type Recording Time PAL SECAM NTSC E 180 T120 180 mins 120 mins E 240 T160 240 mins 160 mins E 260 T180 26...

Page 27: ...d to start recording Result The record indicator appears on the television and VCR display An index is recorded on the tape see page 36 7 To stop recording press STOP once If the cassette is ejected when you start recording check that the safety tab is intact or the opening is covered with adhesive tape If you reach the end of the tape while recording the cassette rewinds automatically You can sto...

Page 28: ...start recording Result The record indicator appears on the television screen and VCR display An index is recorded on the tape see page 36 7 Press the REC button several times to increase the recording time in 30 minute intervals up to four hours or 1 hour intervals up to nine hours Result The length is displayed on the VCR and television The selected program is recorded for the length of time requ...

Page 29: ...r button 10 Press to select the recording stop time 11 Select the required recording stop time by pressing the or button following the same procedure as when selecting the recording start time 12 Press to select the REC SYSTEM 13 Select the required recording system value by pressing the or button The default value is THROUGH 14 Press to select the recording speed 15 Select the required recording ...

Page 30: ...rrect any mistakes 3 Press OK to save the code The channel number appears on the left side The start and end recording times recording date and speed also appear 4 Press MENU to finish Check whether there is enough time left on the video tape to record the program 5 To stop a Timer Recording press the VCR POWER button When using a cable decoder box make sure the decoder box is on STANDARD TIMER VC...

Page 31: ... or for the correct receiving channel number For example If receiving channel 23 corresponds to the VCR Plus Guide channel 45 press and until 45 appears in the top row of numbers with the downward pointing arrow directly below Press the and until 23 appears on the bottom row The channel number that changes is always the receiving channel rather than the VCR Plus Guide channel 5 Press or to select ...

Page 32: ...e forgotten which programs will be recorded 1 Press the TIMER button and select STANDARD TIMER Result The preset programs are displayed 2 Press the or button to select the required program 3 Press the button to select the CH 4 Press the or button to select and change any value as required 5 On completion press MENU twice Checking a Preset Recording Cancelling a Preset Recording REC SPEED CLK COUNT...

Page 33: ...ction only needs to be used when there is no color or picture during playback 1 Press MENU on the remote control Result The programming menu is displayed 2 Press the corresponding or button until the cursor is placed in front of the USER SET option 3 Press the button to select this option Result The USER SET1 menu is displayed 4 Press the corresponding or button until the cursor is placed in front...

Page 34: ...When the stereo sound is poor press the AUDIO button to select mono for sound without noise 1 Press MENU on the remote control and select user set 2 Press the and buttons to select USER SET2 3 Press the and buttons to set SAP to ON 4 Press menu key twice to exit MENU 5 To select SAP press the AUDIO button on the remote control until SAP is displayed on the screen SAP will be displayed on the TV sc...

Page 35: ...ne Adjustment feature enables you to adjust the alignment manually to obtain the best possible picture When noise bars or streaks appear during playback adjust alignment manually by pressing the TRACKING or buttons until the picture is clear and stable Result The tracking bar appears The image is adjusted The tracking bar disappears when you release the button Adjusting Picture Alignment Manually ...

Page 36: ...lowing options are available Option Description L Used to listen to the sound on the left Hi Fi channel R Used to listen to the sound on the right Hi Fi channel MIX Used to listen to the mixed sound of the Hi Fi and linear audio For example you can play back Hi Fi audio sound while at the same time listening to narration dubbed onto the normal audio track See pages 43 and 44 for further details of...

Page 37: ...tte is rewound automatically when the end of the tape is reached If you press POWER while a cassette is being rewound the VCR switches off automatically when the beginning of the cassette is reached You can play a cassette in slow motion No sound is heard when playing back a cassette in slow motion 1 Press PLAY to start playing the cassette SLOW or to start slow mode play SLOW or as many times as ...

Page 38: ... vary the playback speed 3 Each time you turn the shuttle ring the speed will change as shown in the following illustration When you activate Variable Speed play there will be no color in some modes This is normal operation Modes with no color are shown below No color modes Variable Speed play of LP recordings on any system X2 and Still Slow play of SLP recordings in PAL M mode If the picture is n...

Page 39: ...nged 2 Press the button to vary the contrast of the ART mode 3 To exit the ART mode press the ART button ART ART INPUT 2 3 5 6 8 9 CLR RST CH STROBE AUDIO ART INPUT 5 6 8 9 0 CLR RST CH REW PLAY F F 1 2 ART INPUT 2 3 5 6 8 9 CLR RST CH STROBE AUDIO ART INPUT 5 6 8 9 0 CLR RST CH REW PLAY F F 1 2 DISPLAY MONITOR A DUB REC P STILL INPUT SYSTEM OUTPUT SYSTEM STOP 1 MONITOR You can see the original in...

Page 40: ...will recognize any indexes marked by other VCRs using the same system and vice versa 1 To search for a specific index press INDEX 2 Enter the number of the index to be found using the numeric buttons When entering a single digit number do not forget to precede it with a zero Example 02 Result The index number is displayed 3 Select the direction in which the VCR is to search REW to search backwards...

Page 41: ... a sequence press DISPLAY twice to display the counter and press CLR RST when you want to set the tape counter to zero 5 To fast forward or rewind to the sequence at which the counter was set to zero simply press REW or F F Result The VCR stops automatically when the counter reaches zero Some VCR information such as the counter can be displayed on the television screen unless you have deactivated ...

Page 42: ...utton at least one second to activate the Assemble Edit function Result The Record symbol flashes on the display 6 Select the source from which you wish to record by pressing the CH or buttons for television channels or the INPUT button for the SC AV LI or L2 input sources Perform necessary hookups and activate source Refer to page 39 7 Press the P STILL button to start recording 8 When you have f...

Page 43: ... systems VIDEO OUT 2 R L AUDIO OUT 1 R AUDIO L VIDEO LINE 2 IN EURO AV VIDEO OUT 2 R L AUDIO OUT 1 R AUDIO L VIDEO LINE 2 IN EURO AV FRONT OF THE VCR You can connect other audio and or video equipment to your VCR in different ways The following illustrations give a few examples of the connection possibilities Camcorder Stereo sound system VCR The EURO AV connector on the rear of the VCR is used fo...

Page 44: ...ur VCR 2 Insert a blank cassette in your VCR 3 Insert the pre recorded cassette in the other video source VCR or camcorder 4 Press the INPUT button to select the appropriate input on your VCR LINE 1 or LINE 2 or AV for the EURO AV 5 Start playing back the cassette to be copied 6 Press the REC button for at least one second to start recording on your VCR 7 When you have finished recording press STO...

Page 45: ...n on the VCR an abnormal signal is outputted 4 Press the PAL output system button on the VCR Result The display panel shows the NTSC input signal and the PAL output signal and the NTSC signal is converted into the PAL signal for output You can perform playback conversion of the signal recorded on the tape into the appropriate format for the country 1 If you wish to convert a PAL system tape into t...

Page 46: ... If you wish to convert from a tape recorded on NTSC to a PAL recorded tape insert the NTSC tape into the other VCR 5 Press the INPUT button on the remote control to select the L1 input Result The display panel shows L1 6 Press the PAL output system button on the front panel to select the PAL system Result The display panel shows PAL 7 Press the PLAY button of the other VCR 8 Press the REC button ...

Page 47: ...the normal audio track provides normal audio The Hi Fi and normal soundtracks are recorded simultaneously and audio dubbing is applicable only to the normal audio track Track Video track Normal audio track Hi Fi audio track INPUT button mono 2 channel TUNER TV picture TV sound from built in tuner CH 10 from built in tuner SIMULCAST TV picture Audio signal from SC from built in tuner audio input co...

Page 48: ...te at which you wish to start dubbing 6 Press P STILL 7 Press A DUB Result Your VCR is now in the Audio Dubbing Pause mode 8 On the sound system locate the point on the CD or cassette at which you wish to start playback Example The track that you wish to record on the cassette 9 Press the pause button on your sound system 10 When you are ready start playback on the sound system and press REC or P ...

Page 49: ...pressing INPUT one or more times until SC is displayed 4 Select the television program by using the CH Up Down buttons 5 Tune the sound system to the appropriate radio station 6 Press the REC button for at least one second when the broadcast starts Result The sound received on the LINE 1 input is recorded with the pictures received on the tuner 7 When you have finished recording press STOP If you ...

Page 50: ...s on your VCR can be locked to prevent the VCR from being used by young children You can still watch television programs via the VCR but you cannot insert or play a cassette 1 To lock the VCR hold down the P STILL button for approximately five seconds Result The lock indicator LOCK is displayed If a cassette is in the VCR when you lock it the cassette will be ejected 2 To unlock the VCR hold down ...

Page 51: ... VHS type video tape S VHS type video tape Play back only Recording time Maximum 8 hours with a T 160 tape E 240 Rewinding time Within 100 Seconds high speed rewinding T 120 or E 180 tape Video input 1 0Vp p unbalanced 75 Ω Video output 1 0Vp p unbalanced 75 Ω Video S N Above 43dB standard recording Resolution Above 220 standard recording NTSC 240 standard recording PAL Audio input 8dBm 47 Kohm un...

Page 52: ...re or the picture Press the TRACKING buttons or is distorted Check to see if you are using a pre recorded tape Check the playback system in the USER SET Menu Check the SQPB in the USER SET2 Menu See page 31 You cannot see normal broadcasts Check that the source selected using the INPUT button is the VCR s tuner Check the TV VCR antenna connections Noise bar or streaks on playback Press the TRACKIN...

Page 53: ... to the frequency of the appropriate channel Station or Channel Frequency assigned to a given broadcasting company to enable them to transmit a series of broadcasts or programs Program Number assigned to a given channel on the tuner in the VCR to help you select it more easily Broadcast transmitted on a given channel Cable TV Coaxial cable network transmitting broadcasts on a subscription basis Th...

Page 54: ...nd Guinea El Salvador Germany Grana Guinea Bissau Greenland Iceland India Guiana Guam Indonesia Israel Hungary Guatemala Italy Jordan Ivory Coast Haiti Konya Kuwait Madagascar Honduras Laos Martinique Jamaica Liechtenstein Mongolia Japan Madeira Poland Korea South Majorca Islands Reunion Mexico Malaysia Malawi Rumania Micronesia Mozambique Slovakia Myanmar Netherlands Tahiti Nicaragua New Zealand ...

Page 55: ...g latin america co Middle East Africa Dubai Tel 971 4 837 700 Saudi Arabia Tel 966 2 651 2111 Kuwait Tel 965 470 6612 South Africa Tel 27 11 463 5678 Web site http www samsung co za Europe U K United Kingdom Tel 44 1952 292 262 Web site http www samsungelectronics co uk France Tel 33 10 4938 6569 Web site http www samsung fr Germany Tel 49 6196 66 1900 Web site http www samsung de Italy Tel 39 2 9...

Page 56: ...ELECTRONICS SV 5000W SECA5 4 1 1 12 20 AM Page 52 ...

Reviews: