background image

2.

Insert the CAM with the CI CARD installed into the common interface slot.

(Insert the CAM in the direction of the arrow, right up to the end so that it is parallel
with the slot.)

3.

Check if you can see a picture on a scrambled signal channel.

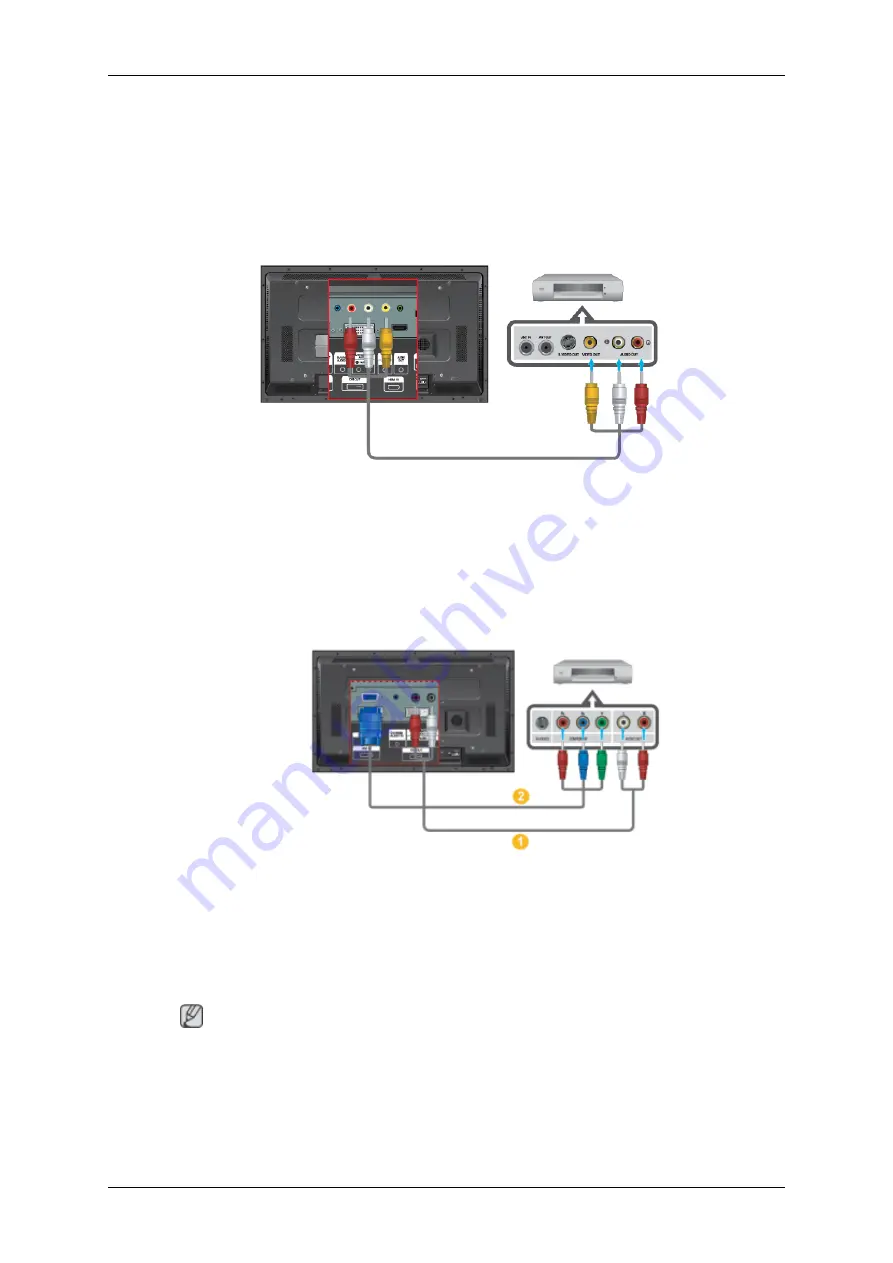
Connecting AV Devices

1.

Connect the Video and [R-AUDIO-L] port of the DVD, VCR or DTV Set-Top Box
to the Video and [R-AUDIO-L] 

port of the LCD Display.

2.

Play the DVD, VCR or Camcorder with a DVD disc or tape inserted.

3.

Select AV using the SOURCE .

Connecting using a Component Cable

1.

Connect a set of audio cables between the AV/COMPONENT AUDIO IN [R-AUDIO-
L] on the LCD Display and the AUDIO OUT jacks on the DVD player or other external
device.

2.

Connect the Component to D-sub cable(sold separately) to the product's RGB/
COMPONENT IN port and the DVD player's COMPONENT - PR, Y, PB ports.

 Note

 " Select Component using the SOURCE button on the front of the LCD Display or on

the remote control.

 " Then, start the DVD Player with a DVD disc inserted.

 " A component cable is optional.

Connections

33

Summary of Contents for 460CX - SyncMaster - 46" LCD TV

Page 1: ...ii LCD DISPLAY quick start guide 400CX 2 400CXN 2 460CX 2 460CXN 2 ...

Page 2: ...nts of the Package Remove the lock from the package box as shown in the figure above Lift up the package box by holding the grooves on both sides of the package box Check the contents of the package Remove the Styrofoam and vinyl cover Note After unpacking the package make sure to check the contents of the package Make sure to keep the package box for transporting the product in the future Unpacki...

Page 3: ... s Guide MagicInfo Software CD MagicInfo Manual CD Applicable to the CXN 2 model only Cables Power Cord Others Remote Control Batteries AAA X 2 Not available in all loca tions Sold separately DVI Cable LAN Cable Applicable to the CXN 2 model only Wall Mount KIT Introduction 10 ...

Page 4: ...other vertically or adjusts selected menu values When OSD is not on the screen press the button to adjust channels Adjust buttons Left Right buttons Volume buttons Moves from one menu item to another horizontally or adjusts selected menu values When OSD is not on the screen press the button to adjust volume ENTER button ENTER Activates a highlighted menu item SOURCE button SOURCE Switches from PC ...

Page 5: ... Power indicator Shows PowerSaver mode by blinking green Note See PowerSaver described in the manual for further information re garding power saving functions For energy conservation turn your LCD Display OFF when it is not needed or when leaving it unattended for long periods Remote Control Sensor Aim the remote control towards this spot on the LCD Display Rear Note For detailed information conce...

Page 6: ... Video Con nection Terminal Use a D Sub Cable 15 pin D Sub PC mode Analog PC Connect the RGB COMPONENT IN port on the monitor to the COMPO NENT port on the external device using the D SUB to COMPONENT cable Connect the RGB COMPONENT IN port on the monitor to the BNC port on the PC using the D SUB to BNC cable DVI IN PC Video Connection Termi nal Use a DVI Cable DVI D to DVI D DVI mode Digital PC I...

Page 7: ... other monitor using the DVI to HDMI cable DVI HDMI and network signals sent via the DVI OUT port are displayed on the second display which has the DVI IN port AV IN VIDEO Connect the VIDEO terminal of your monitor to the video output terminal of the external device using a VIDEO cable AUDIO OUT Headphone External speaker output ter minal HDMI IN Connect the HDMI terminal at the back of your LCD D...

Page 8: ...served terminal used for serv icing ANT IN Connect the CATV cable or TV antenna cable to the ANT IN port on the rear side of the LCD Display Make sure to use a TV antenna cable sold separately as the antenna cable RGB OUT Note Applicable to the CXN 2 model only LAN LAN Connection Terminal Note Applicable to the CXN 2 model only USB USB Connection Terminal Keyboard Mouse Mass Storage Device Compati...

Page 9: ... the Kensington Lock may be different depending on the model Using the Anti Theft Kensington Lock 1 Insert the locking device into the Ken sington slot on the LCD Display and turn it in the locking direction 2 Connect the Kensington Lock cable 3 Fix the Kensington Lock to a desk or a heavy stationary object Note See Connecting Cables for further information regarding cable connections Remote Contr...

Page 10: ...he channel 4 DEL GUIDE but ton The button is used to select Digital channels For example channel 4 1 Electronic Program Guide EPG display This fuction does not work for this LCD Display 5 VOL Adjusts the audio volume 6 SOURCE Press the button to change the input signal SOURCE Changing the SOURCE is only allowed for external de vices that are connected to the LCD Display at the time 7 D MENU DTV me...

Page 11: ...r this LCD Display MTS You can select MTS Multichannel Television Stereo mode Audio Type MTS S_Mode Default FM Stereo Mono Mono Manual Change Stereo Mono Stereo SAP Mono SAP Mono DUAL STEREO MONO DUAL l DUAL ll and MONO NICAM MONO NICAM STEREO can be operated depending on the broadcasting type by using the DUAL button on the remote control while watching TV 14 ENTER PRE CH This button is used to r...

Page 12: ...cal Layout Installation Wall Mount VESA Bracket When installing VESA make sure to comply with the international VESA standards Purchasing VESA Bracket and Installation Information Please contact your nearest SAMSUNG Distributor to place an order At least 2 persons are needed in order to move the LCD Display SAMSUNG is not responsible for any product damage or any injury caused by you installing th...

Page 13: ...ges to the product or persons if you elect to install the unit on your own This product is for installing on cement walls The product may not stay in place when installed on plaster or wood Components Only use the components and accessories shipped with the product Wall Bracket 1 Hinge Left 1 Right 1 Plastic Hanger 4 Screw A 11 Screw B 4 Anchor 11 Wall Bracket Assembly Note There are two hinges le...

Page 14: ...locking holes at the back of the product is correct If the length is too short or long loosen all or some of the 4screws on the wall bracket to adjust the length A Length between the two locking holes 3 Check the installation diagram and mark the drill points on the wall Use the 5 0 mm bit to drill holes deeper than 35 mm Fix each anchor in the corresponding hole Match each of the brackets and hin...

Page 15: ...astic hanger Notice Mount the product on the wall bracket and make sure it is properly fixed to the left and right plastic hangers Be careful when installing the product on the bracket as fingers can be caught in the holes Make sure the wall bracket is securely fixed to the wall or the product may not stay in place after installation 3 Tighten the 4 screws in step 2 plastic hanger screw B to the r...

Page 16: ...safety pin 3 to securely hold the product to the bracket A LCD Display B Wall Bracket C Wall Wall Bracket Angle Adjustment Adjust the bracket angle to 2 before installing it on the wall 1 Fix the product to the wall bracket 2 Hold the product at the top in the center and pull it forward direction of the arrow to adjust the angle Note You can adjust the bracket angle between 2 and 15 Introduction 2...

Page 17: ...ational VESA standards Purchasing VESA Bracket and Installation Information Please contact your nearest SAMSUNG Distributor to place an order After your order is placed installation pro fessionals will visit you and install the bracket At least 2 persons are needed in order to move the LCD Display SAMSUNG Electronics is not responsible for any damage to the product or persons if you elect to insta...

Page 18: ...u elect to install the unit on your own This product is for installing on cement walls The product may not stay in place when installed on plaster or wood Components Only use the components and accessories shipped with the product Wall Bracket 1 Hinge Left 1 Right 1 Plastic Hanger 4 Screw A 11 Screw B 4 Anchor 11 Wall Bracket Assembly Note There are two hinges left and right Use the correct one 1 ...

Page 19: ...roduct is correct If the length is too short or long loosen all or some of the 4screws on the wall bracket to adjust the length A Length between the two locking holes 3 Check the installation diagram and mark the drill points on the wall Use the 5 0 mm bit to drill holes deeper than 35 mm Fix each anchor in the corresponding hole Match each of the brackets and hinge holes to the corresponding anch...

Page 20: ...plastic hanger Notice Mount the product on the wall bracket and make sure it is properly fixed to the left and right plastic hangers Be careful when installing the product on the bracket as fingers can be caught in the holes Make sure the wall bracket is securely fixed to the wall or the product may not stay in place after installation 3 Tighten the 4 screws in step 2 plastic hanger screw B to the...

Page 21: ...safety pin 3 to securely hold the product to the bracket A LCD Display B Wall Bracket C Wall Wall Bracket Angle Adjustment Adjust the bracket angle to 2 before installing it on the wall 1 Fix the product to the wall bracket 2 Hold the product at the top in the center and pull it forward direction of the arrow to adjust the angle Note You can adjust the bracket angle between 2 and 15 Introduction 2...

Page 22: ...Make sure to use the top center and not the left or the right side of the product to adjust the angle Introduction 29 ...

Page 23: ... Display to the power port on the back of the LCD Display Turn on the power switch There are several ways to connect the computer to the monitor Choose one from the following options Using the D sub Analog connector on the video card Connect the D sub to the 15 pin RGB port on the back of your LCD Display and the 15 pin D sub Port on the computer Using the DVI Digital connector on the video card C...

Page 24: ...isplay Note Turn on both your computer and the LCD Display Contact a local SAMSUNG Electronics Service Center to buy optional items Connecting to Other devices Note AV input devices such as DVD players VCRs or camcorders as well as your computer can be connected to the LCD Display For detailed information on connecting AV input devices refer to the contents under Adjusting Your LCD Display The LCD...

Page 25: ...door antenna use a professional for installation if pos sible To connect the RF cable to the antenna input terminal Keep the copper wire portion of the RF cable straight 2 Turn on the LCD Display 3 Select TV using the TV DTV 4 Select a desired TV channel Connecting COMMON INTERFACE Note You can install the CAM anytime whether the TV is ON or OFF Purchase the CI CAM module by visiting your nearest ...

Page 26: ...r Camcorder with a DVD disc or tape inserted 3 Select AV using the SOURCE Connecting using a Component Cable 1 Connect a set of audio cables between the AV COMPONENT AUDIO IN R AUDIO L on the LCD Display and the AUDIO OUT jacks on the DVD player or other external device 2 Connect the Component to D sub cable sold separately to the product s RGB COMPONENT IN port and the DVD player s COMPONENT PR Y...

Page 27: ... camcorder and the AV IN VIDEO on the LCD Display 3 Select AV for the Camcorder connection using the SOURCE button on the front of the LCD Display or on the remote control 4 Then start the Camcorder with a tape inserted Note The audio video cables shown here are usually included with a Camcorder If not check your local electronics store If your camcorder is stereo you need to connect a set of two ...

Page 28: ...ut device and connect the op posite jack to the DVI RGB AUDIO IN terminal of the LCD Display Connecting Using a DVI Cable 1 Connect between the DVI OUT port on the LCD monitor and the input port on an other monitor using a DVI cable 2 Connect between the AUDIO OUT port on the LCD monitor and the audio input port on another monitor using a stereo cable 3 Select DVI using the SOURCE button on the fr...

Page 29: ...y or on the remote control For an explanation of Component video see your Set Top Box owner s manual Connecting to an Audio System 1 Connect a set of audio cables between the AUX L R jacks on the AUDIO SYSTEM and AUDIO OUT on LCD Display Connecting a LAN Cable Note AV input devices such as DVD players VCRs or camcorders as well as your computer can be connected to the LCD Display For detailed info...

Page 30: ...Note Connect the LAN cable Applicable to the CXN 2 model only Connecting a USB device You can connect USB devices such as a mouse or keyboard Applicable to the CXN 2 model only Connections 37 ...

Page 31: ...nd reconnect the video cable then turn on both your computer and the LCD Display If your LCD Display screen remains blank after using the previous procedure check your video controller and computer system your LCD Display is functioning properly Warning Messages You can even view the screen at a resolution of 1920 x 1080 However you will receive the following message for a minute You can choose to...

Page 32: ...if the computer beeps more than 3 times when booting If it does request service 3 If you installed a new video card or if you assembled the PC check if you installed the Adaptor video 4 Check if the scanning ratio of the video screen is set to between 50 Hz 85 Hz Do not exceed 60Hz when using the maximum resolution 5 If you have problems in installing the Adaptor video driver boot the computer in ...

Page 33: ...es Refer to theConnecting a Computer A Ensure that the PC or video sources are turned on Q Not Optimum Mode message A Check the maximum resolution and the frequency of the video Adaptor A Compare these values with the data in the Preset Timing Modes Chart Q The picture rolls vertically A Check if the signal cable is securely connected Re connect it if necessary Refer to Connecting a Computer Q The...

Page 34: ... to the OSD memory Q The screen is blank and the power indicator light blinks every 0 5 or 1 seconds A The LCD Display is using its power management system Press any key on the keyboard Q The screen is blank and it is blinking A If you see the TEST GOOD message on the screen when you pressing the MENU button check the cable connection between the LCD Display and the computer to ensure that the con...

Page 35: ...card support can vary depending on the version of the driver used Refer to the computer or the video card manual for details Q How can I adjustthe resolution A Windows XP Set the resolution in the Control Panel Appearance and Themes Display Settings A Windows ME 2000 Set the resolution in the Control Panel Display Settings Contact the video card manufacturer for details Q How can I set the Power S...

Page 36: ...enter the LCD Display Q How can I play the video A The video supports the MPEG1 and WMV codecs only Install the corresponding codec to play the video Note that some of the codecs can be incompatible Note Before calling for assistance check the information in this section to see if you can remedy any problems yourself If you do need assistance please call the phone number on the Information section...

Reviews: