background image

Select Language

Main Page

Model

The color and appearance of the product may vary depending on the model, and the product specifications are 
subject to change without prior notice for reasons of performance enhancement. 

Troubleshooting 

Self-Test Feature Check


Note

• Check the following items yourself before calling for assistance. Contact a Service Center for problems that 

you cannot solve by yourself. 


Self-Test Feature Check


Your LCD Display provides a self test feature that allows you to check whether your LCD Display is functioning 
properly. 

1)

Turn off both your computer and the LCD Display. 

2)

Unplug the video cable from the back of the computer. 

3)

Turn on the LCD Display. 


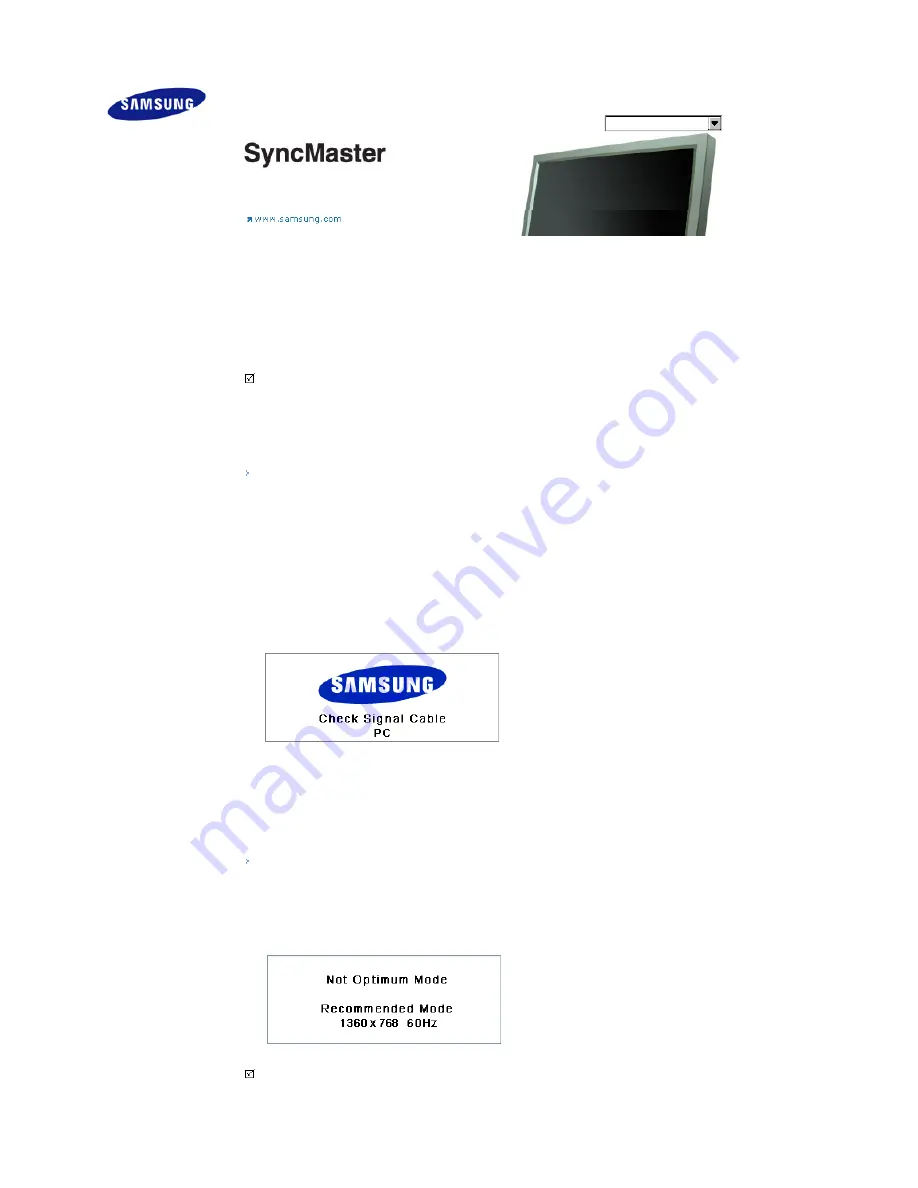
The figure shown below ("Check Signal Cable") appears on a black background when the LCD Display is 
working normally even though no video signal is detected: While in the Self-Test mode, the LED power 
indicator remains green and the figure moves around on the screen.


4)

Turn off your LCD Display and reconnect the video cable; then turn on both your computer and the LCD 
Display 

If your LCD Display screen remains blank after using the previous procedure, check your video controller and 
computer system; 

your LCD Display is functioning properly. 


Not Optimum Mode 


You can even view the screen at a resolution of 1360 x 768. However, you will receive the following message for 
a minute; You can choose to change the screen resolution or stay in the current mode during that time. And if the 
resolution is more than 85Hz, you will see the black screen because the LCD Display does not support over 
85Hz. 


Note

• Refer to 

Specifications

 > 

Preset Timing Modes

 for the resolutions or frequencies supported by the LCD 

Display.

Safety Instructions 

Introduction 

Connections 

Using the Software 

Adjusting the LCD Display  

Troubleshooting 

Self-Test Feature Check


Check List


Q & A


Specifications 

Information 

Appendix 

Summary of Contents for 400DXn - SyncMaster - 40" LCD Flat Panel...

Page 1: ...ii LCD MONITOR quick start guide 400DXn...

Page 2: ...LCD Display If any items are missing contact your dealer Contact a local dealer to buy optional items Note This stand is not for the Floor Standing Type LCD Display Manuals Quick Setup Guide Warranty...

Page 3: ...s Cover Hole BNC to RCA Adaptor Jack Semi Stand Screw 4 EA USB Holder Screw 1EA Sold separately Wall Mount KIT Speaker Set DVI Cable BNC Cable LAN Cable Your LCD Display Front 1 MENU Opens the on scre...

Page 4: ...V S Video Component HDMI Mode BNC AV S Video HDMI Mode DVI AV S Video Component Mode AV S Video PC BNC DVI Mode Component PC DVI Mode HDMI PC BNC Mode 7 Power button Turns the LCD Display On Off 8 Bri...

Page 5: ...f your monitor to the HDMI terminal of your digital output device using a HDMI cable 7 DVI PC HDMI IN RGB PC Video Connection Terminal Using a D Sub Cable 15 pin D Sub PC mode Analog PC 8 DVI PC HDMI...

Page 6: ...mber of LCD Displays that can be connected to loopout may differ depending on the cables signal source etc With cables where there is no degradation or signal source up to ten LCD Displays can be conn...

Page 7: ...Alphanumeric Used to enter the Internet address DEL Functions as the backspace SYMBOL Used to enter the symbols O_ ENTER Used to enter values 6 100 Press to select channels over 100 For example to se...

Page 8: ...Exits from the menu screen 19 Up Down Left Right buttons Moves from one menu item to another horizontally vertically or adjusts selected menu values 20 S MODE When pressing this button the current mod...

Page 9: ...WAP Swaps the contents of the PIP and main image The image in the PIP window will appear on the main screen and the main screen image will appear in the PIP window 29 SIZE Switches the PIP Picture Siz...

Page 10: ...label folded backwards 1 To protect your product a Cover Hole is included as an accessory This protects the hole at the bottom of the monitor where the stand is inserted If you install a wall mount ki...

Page 11: ...ter 1 Connect the power cord for your LCD Display to the power port on the back of the LCD Display Trun on the power switch 2 There are 3 ways to connect the D sub to your LCD Display Choose one of th...

Page 12: ...s VCRs or Camcorders are connected via the AV IN VIDEO or AV IN S VIDEO of the LCD Display using an S VHS or BNC cable 2 Connect the Audio L and Audio R terminals of a VCR or Camcorders to the LCD Dis...

Page 13: ...erted Note A component cable is optional For an explanation of Component video consult your DVD manual Connecting a Camcorder 1 Locate the A V output jacks on the camcorder They are usually found on t...

Page 14: ...ort on the LCD Display and the PR Y PB jacks on the Set Top Box 2 Connect a set of audio cables between the COMPONENT AUDIO IN L AUDIO R on the LCD Display and the AUDIO OUT jacks on the Set Top Box N...

Page 15: ...of the speaker Note Do not move the SET while the SET is connected to the speakers The speaker bracket for connecting the SET speaker my become damaged Connecting to an Audio System Note Connect a se...

Page 16: ...ote Input devices such as digital DVD are connected to the HDMI IN terminal of the monitor using the HDMI cable Note You cannot connect a PC to the HDMI IN terminal Connecting Using a DVI to HDMI Cabl...

Page 17: ...Using a USB Holder When using a small external device such as a portable memory stick and it is connected to the USB terminal at the back of your monitor it is exposed to the possiblity of theft or l...

Page 18: ...ur USB holder with the groove at the bottom of part at the back of your monitor Align part of your USB holder with the bottom of part at the back of your monitor 3 Insert a screw into the groove align...

Page 19: ...ur USB holder with the groove at the bottom of part at the back of your monitor Align part of your USB holder with the bottom of part at the back of your monitor 3 Insert a screw into the groove align...

Page 20: ...While in the Self Test mode the LED power indicator remains green and the figure moves around on the screen 4 Turn off your LCD Display and reconnect the video cable then turn on both your computer a...

Page 21: ...he computer 2 Check if the computer beeps more than 3 times when booting If it does request an a service for the main board of the computer 3 If you installed a new video card or if you assembled the...

Page 22: ...ension cable etc z Set the resolution and frequency to the recommended ranges The picture image is unstable and shakes Ghost images are shown in the picture z Check if the resolution and frequency set...

Page 23: ...is on in the vicinity Problems related to MagicNet Note Making a Bootable USB Flash Disk Problems Solutions Making a Bootable USB Flash Disk 1 You can turn a common 512 MB or bigger USB storage media...

Page 24: ...dows ME 2000 Set the resolution at the Control Panel Display Screen Saver Set the function in the BIOS SETUP of the computer Refer to the Windows Computer Manual How can I clean the outer case LCD Pan...

Reviews: