


3 Alignments and Adjustments
3-5
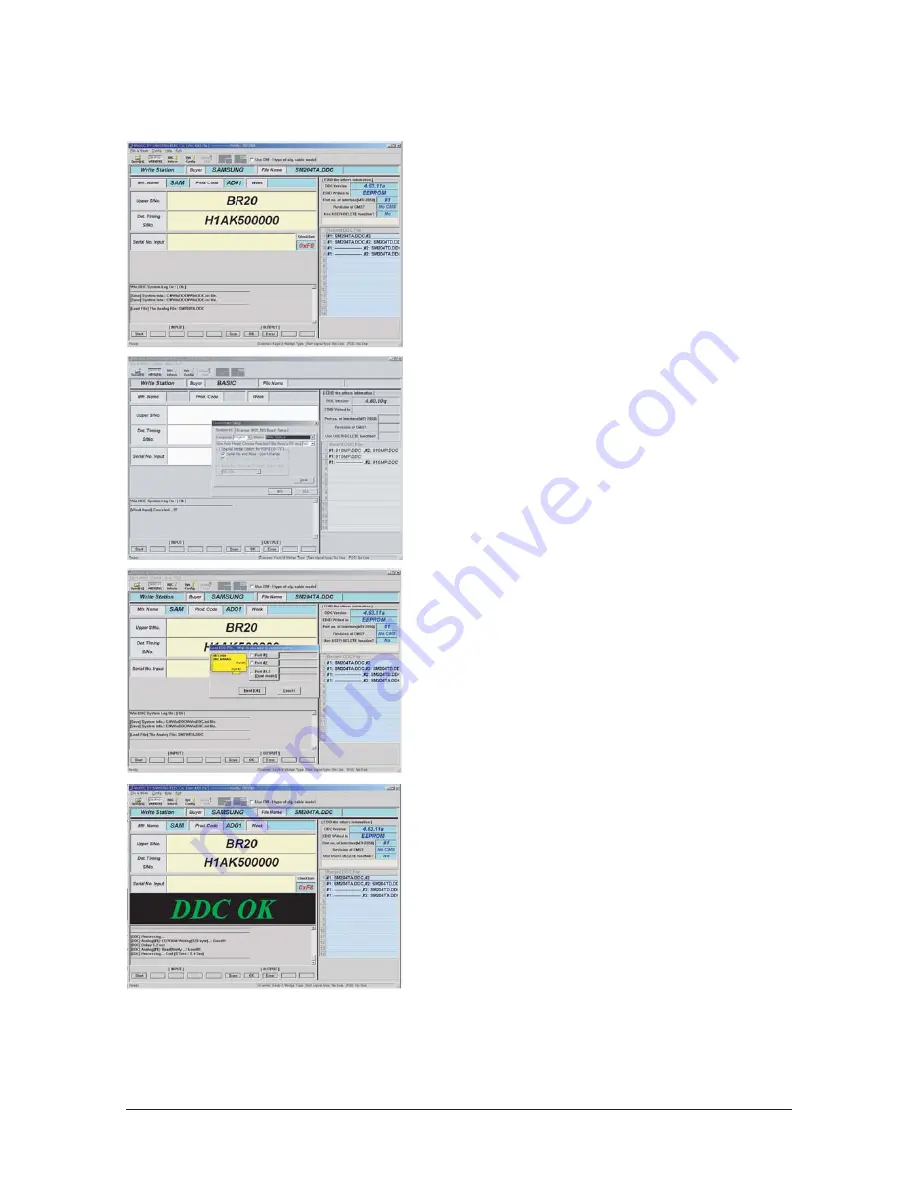
3-8 EDID Installation with Windows Program
1. Execute "WinDDC.exe"
2. Click "Sys Config"
Select "Station : Write station"
Check "Serial No and Week : Don't change"
Click "Save"
3. Click "Open" icon.
Select "Connected Port #1" and Next "OK".
* File Name - SM215TWA.DDC
SM215TWD.DDC
Press enter key on your keyboard.
4. Confirm the "DDC OK".
- After Replacing the Main Board
- EDID Installation (Analog and Digital)
Summary of Contents for 215TW - SyncMaster - 21" LCD Monitor
Page 11: ...3 Alignments and Adjustments 3 3 3 7 Hidden Key list ...
Page 12: ...3 Alignments and Adjustments 3 4 ...
Page 14: ...3 Alignments and Adjustments 3 6 Memo ...
Page 32: ...7 Block Diagrams 7 1 7 Block Diagram ...
Page 33: ...7 Block Diagrams 7 2 Memo ...
Page 34: ...8 Wiring Diagram 8 1 8 Wiring Diagram ...
Page 35: ...8 Wiring Diagram 8 2 Memo ...
Page 37: ...9 Schematic Diagrams 9 2 This Document can not be used without Samsung s authorization ...
Page 38: ...9 Schematic Diagrams 9 3 This Document can not be used without Samsung s authorization ...
Page 39: ...9 Schematic Diagrams 9 4 This Document can not be used without Samsung s authorization ...
Page 40: ...9 Schematic Diagrams 9 5 This Document can not be used without Samsung s authorization ...
Page 41: ...9 Schematic Diagrams 9 6 This Document can not be used without Samsung s authorization ...
Page 51: ...Memo 11 Disassembly and Reassembly 11 4 ...


