Samsung 2 COLOR THERMAL PRINTER SRP-275 User Manual Download Page 10


Rev. 1.03 

- 10 -

SRP-275

2. Connecting the cables 


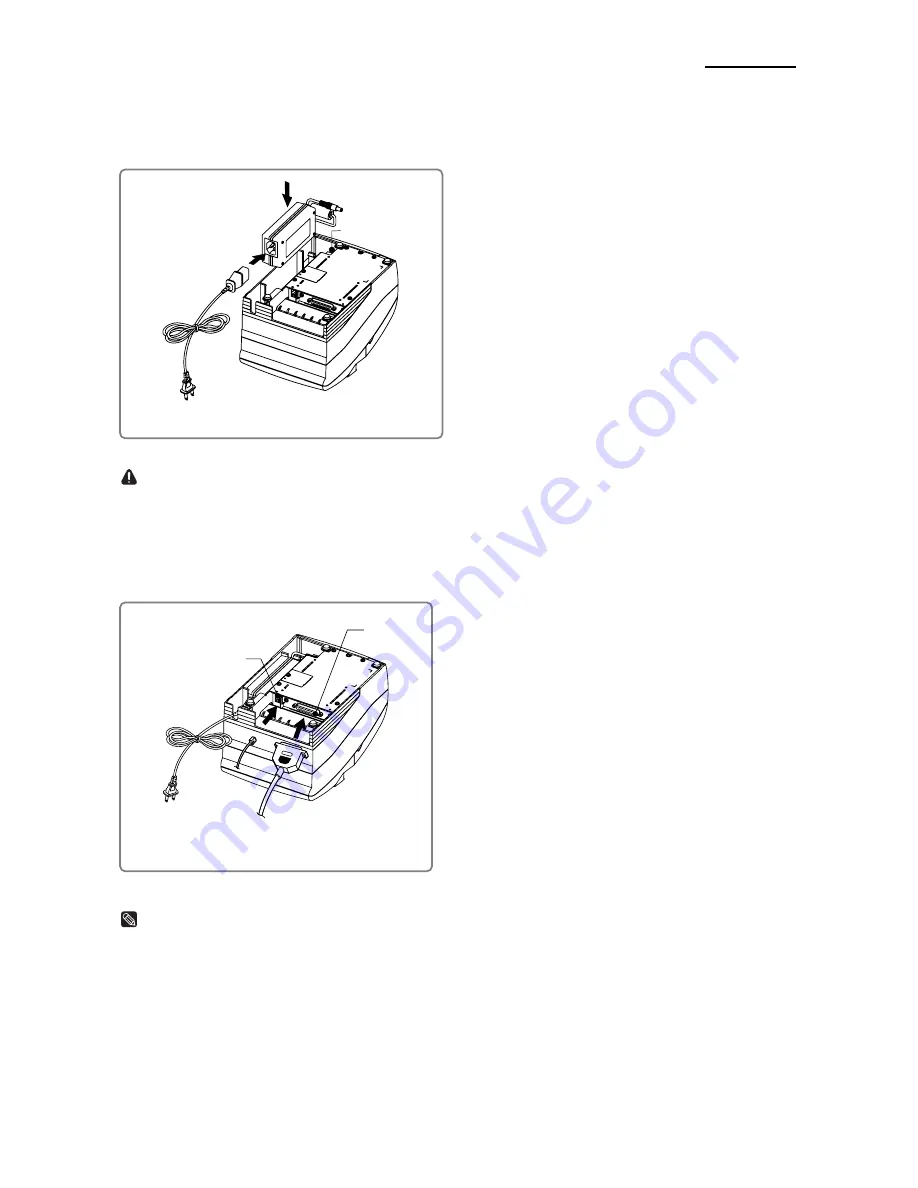
2-1    Connecting the AC Adaptor 


  CAUTION 

Before connecting the printer to the power supply, make sure that the voltage and power specifications 
match the printer’s requirements. Using an incorrect power supply can cause serious damage to the printer. 


2-2    Connecting the Interface cable and Drawer kick-out cable 


  NOTES 

Connect the printer to the host ECR (host computer) though an interface cable matching the specification of 
the printer and the host ECR (host computer). Be sure to use a drawer that matches the printer’s 
specification.  
Depending on the interface your system uses, either connect the serial, parallel, USB or Ethernet 
communication cable to the appropriate connector on the back of the printer. Cables are provided by your 
dealer or system installer. 

• Connect the AC adapter according to the 

following procedure. 

1) Make sure the printer is turned off. 

2) Before inserting the AC adaptor, connect the 

power cord. 

3) Insert the AC adaptor as shown. 

4) Plug the AC adapter cable into the printer’s 

power connector. 

5) Plug the power cord into the outlet, and turn on 

the power. 

AC adaptor

Power connector

Power cord

Drawer kick-out connector

Interface
connector

Serial/ Parallel/ USB/ Ethernet
Interface cable

Drawer kick-out 
cable

• Connect the cables according to the 

following procedure.


1) Turn off printer and the host ECR (host 

computer). 

2) Plug the interface cable into the interface 

connector on the printer then fasten the screw 

on both sides of the connector. 

3) Plug the drawer kick-out cable into the drawer 

kick-out connector on the printer. 

(When removing the drawer kick-out cable, 

press on the connector’s clip while pulling out.)


Summary of Contents for 2 COLOR THERMAL PRINTER SRP-275

Page 1: ...User s Manual SRP 275 Impact Printer Rev 1 03 http www samsungminiprinters com...

Page 2: ...the plastic bag out of children s reach If not a child may put the bag on his head Do not pull the cable to unplug This can damage the cable which is the origin of a fire or a breakdown of the printer...

Page 3: ...mble repair or remodel it for yourself Call your dealer when you need these services Do not touch the blade of auto cutter Install the printer on the stable surface If the printer falls down it can be...

Page 4: ...rmation contained herein Neither BIXOLON nor its affiliates shall be liable to the purchaser of this product or third parties for damages losses costs or expenses incurred by purchaser or third partie...

Page 5: ...2000 EN61000 3 3 1995 A1 2001 Low Voltage Directive 73 23 EEC Safety EN60950 1 2001 Waste Electrical and Electric Equipment WEEE This marking shown on the product or its literature indicates that is s...

Page 6: ...the paper feeding pitch is selectable High general control utility based on the ESC POS TM standard The head can be driven due to the internal drawer interface Character font 7 9 9 9 is selectable Th...

Page 7: ...4 Changing the DIP Switch setting 17 3 2 Setting the Memory Switches 18 3 2 1 Memory Switch setting for Epson ESC POS mode 18 3 2 2 Memory Switch setting for Star mode 22 4 Ribbon Cassette Installati...

Page 8: ...ations that are subject to direct sunlight or excessive heat Avoid using or storing the printer in a place subject to excessive temperature or moisture Do not use or store the printer in a dirty locat...

Page 9: ...printer is out of paper or almost out of paper or the printer covers are open When this light blinking there is an error See ERROR LED blinking pattern in Chapter 11 If you see this light blinking tur...

Page 10: ...the printer Cables are provided by your dealer or system installer Connect the AC adapter according to the following procedure 1 Make sure the printer is turned off 2 Before inserting the AC adaptor c...

Page 11: ...TXD 2 RXD 3 RTS 4 CTS 5 DSR 6 S G 7 DTR 20 1 F G 2 RXD 3 TXD 4 DTR 5 S G 6 DSR 7 RTS 8 CTS PRINTER SIDE 25Pin HOST SIDE 9Pin Pin No Signal name Direction Function 1 FG Frame Ground 2 TxD Output Trans...

Page 12: ...ata 4 7 Host Printer Data 5 Data 5 8 Host Printer Data 6 Data 6 9 Host Printer Data 7 MSB Data 7 MSB 10 Printer nAck PtrClk PtrClk 11 Printer Busy PtrBusy Data3 7 PtrBusy 12 Printer Perror AckDataReq...

Page 13: ...8 1 Interface connector Drawer kick out Connector Pin No Signal name Assignment Color Function 1 TxD White with orange stripe Transmit 2 TxD Solid orange Transmit 3 RxD White with green stripe Receiv...

Page 14: ...end switch Enable Disable OFF 1 8 Print column 42 35 40 33 OFF DIP Switch 2 RS232C serial interface model Switch Function ON OFF Default 2 1 Data receive error Ignore Print OFF 2 2 Reserved OFF 2 3 Ha...

Page 15: ...election 3 Refer to the following table OFF 2 7 Near end switch Enable Disable OFF 2 8 Mechanism type Graphic Character OFF NOTES 1 Emulation Selection DSW 1 1 and 1 2 Emulation 1 1 1 2 EPSON OFF OFF...

Page 16: ...FF 2 8 Baud rate selection 2 Refer to the following table OFF NOTES 1 Emulation Selection DSW 1 1 and 1 2 Emulation 1 1 1 2 EPSON OFF OFF STAR OFF ON CITIZEN ON OFF EPSON KP ON ON EPSON KP EPSON Kitch...

Page 17: ...event an electric short which can damage the printer 1 Make sure the printer is turned off 2 Remove the screw from the DIP Switch cover Then take off the DIP Switch cover which is shown in the illustr...

Page 18: ...ed for Chinese selection Fixed to Off 4 8 Code page selection 1 Refer to the following table NOTES Desired code page can be selected using Memory Switch 2 4 8 by setting as following 1 Code page selec...

Page 19: ...hen Off is selected a bit of the automatic recoverable error in each status that is transmitted from the printer is changed every time the rear cover is open When On is selected a bit of the mechanica...

Page 20: ...FEED button 3 Press the FEED button twice while POWER ERROR and PAPER OUT LEDs are lit 4 Close the cover The printer prints the enabled settings of the Memory Switches and instructions 5 Follow the i...

Page 21: ...S YES YES NO NO YES YES NO NO NO YES YES NO Resetting Buffer full release condition Current setting 640 bytes 69 5 mm 522 bytes NO Resetting Paper width Current setting 76 mm 57mm Resetting Cover open...

Page 22: ...ssible for all Memory Switch settings to become offset to their initial default settings Consider the life of the non volatile memory and avoid over use of this command Function Class m N n1 n2 n3 n4...

Page 23: ...ntries Chinese character specifications DBCS Standard Specifications SBCS Memory Switch Number Ex factory Settings n1 n2 n3 n4 MSW 0 0000 MSW 1 0000 MSW 2 0000 MSW 3 0000 MSW 4 0000 MSW 5 0000 MSW 6 0...

Page 24: ...nting ESC 4 Red white black inversion printing ESC 5 Red white black inversion printing cancelled When using ESC 5 to cancel adornments it returns to the previously set adornments Adornments such as u...

Page 25: ...2 1 0 Near end switch function 3 Refer to the following table NOTES 1 Print Region Width MSW 2 B Paper Width MSW 2 A Selection MSW 2 B MSW 2 A Printing Region Width Paper Width 0 0 400 half dots 76mm...

Page 26: ...1 Page 3 PC860 Portuguese 0 0 1 0 0 Page 4 PC863 Canadian French 0 0 1 0 1 Page 5 PC865 Nordic 0 0 1 1 0 Page 16 WPC1252 Latin1 0 0 1 1 1 Page 17 PC866 Russian 0 1 0 0 0 Page 18 PC852 Latin2 0 1 0 0...

Page 27: ...RS a n command function Only Setting Auto status sent only once 2 1 0 Data reception error serial Prints Ignored Memory Switch 5 Bit Function 0 1 F 0 Reserved Memory Switch 6 Bit Function 0 1 F A 9 BU...

Page 28: ...mation about proper ribbon cassettes 1 Before inserting the ribbon cassette turn the knob clockwise to prevent twisting the ribbon 2 Open the front cover of printer 3 Take out the old ribbon cassette...

Page 29: ...receiving data 2 Open the rear cover by pushing the open button 3 Remove the used paper roll core if there is one 4 Insert the paper roll as shown 5 Be sure to note the correct direction that the pape...

Page 30: ...rear cover 2 Remove the frame paper control by loosing the two screws 3 6 3 Reattach the frame paper control in you want Insert and tighten two screws 3 6 to reattach 4 Close the rear cover 5 Change...

Page 31: ...d attach the Bracket hanger to the Frame base then tighten four screws 2 Attach the Bracket mount to the wall firmly with the eight screws Be sure that the Bracket attached properly to match the direc...

Page 32: ...her equipment or the software not the printer Running the self test 1 Make sure the printer is turned off and the printer cover is closed properly 2 While holding down the FEED button turn on the prin...

Page 33: ...cover of the printer 2 Hold down the FEED button while you turn on the printer 3 Close the rear cover 4 Run any software program that sends data to the printer The printer prints Hexadecimal dump and...

Page 34: ...cs 128 x 25 pages 10 2 Paper specifications Item Description Remark Paper type Paper roll Paper roll width 76 0 5 mm 69 5 0 5 mm 57 5 0 5mm Paper roll diameter Max 83 mm 3 27 Normal paper Thickness 1...

Page 35: ...er kick out driving 10 5 Reliability Item Description Remark Life firing frequency Mechanism Approx 10 million lines Auto cutter Approx 1 million cuts End of life is defined as the point at which the...

Page 36: ...er replace a standard feature or enhance the operation of the printer All optional features are installed at the factory and must be selected when the printer is ordered Auto cutter SRP 275A Exclude a...

Page 37: ...nd error instead If MSW8 8 is off this error is handled as an automatically recoverable error 2 Print head temperature error is not abnormal Recoverable errors When a recoverable error occurs after th...

Page 38: ...k on If the light is still blinking call your supervisor or a service person 11 2 The printer does not start printing Are any of the operation panel lights on If no operation panel lights are on check...

Page 39: ...self test to check that the printer works properly See the self test instructions in Chapter 8 to run the self test If the self test does not work contact your supervisor or a service person If the se...

Reviews: