background image


- 2 -

Chapter 1. Setting Up the Printer 
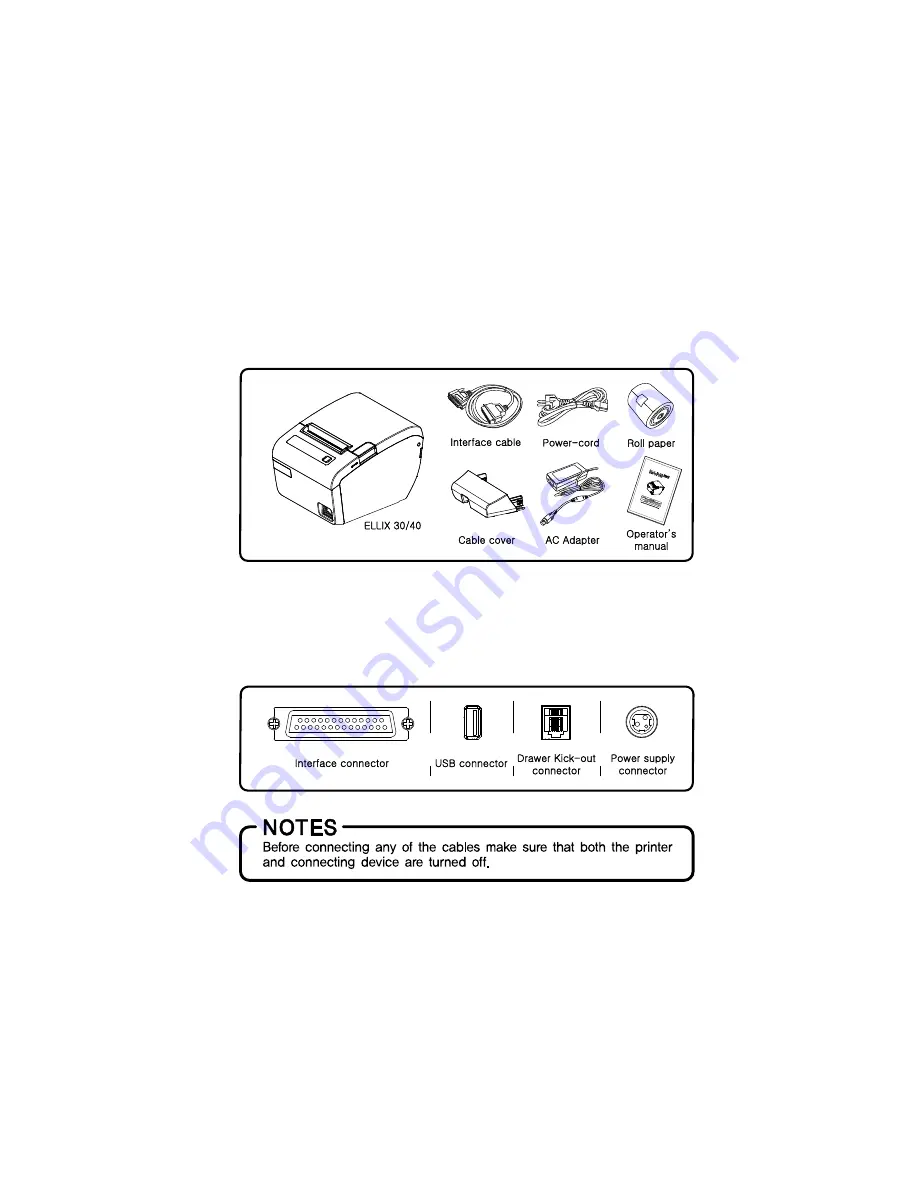
 

1-1. Unpacking 


Your printer box should include these items. If any items are damaged or missing, please 

contact your dealer for assistance. 


1-2. Connecting the Cables   


You can connect up to three cables to the printer. They are all connected to the connector 

panel on the back of the printer, which is shown as below: 


Summary of Contents for ellix 30

Page 1: ...OPERATOR S Manual All specifications are subject to change without notice ...

Page 2: ...and 2 This device must accept any interference received including interference that may cause undesired operation Information to the user NOTE This equipment has been tested and found to comply with the limits for a Class B digital device pursuant to part 15 of the FCC Rules These limits are designed to provide reasonable protection against harmful interference in a residential installation This e...

Page 3: ... ELLIX30 52 lines per second 12X24 Font 220m s 2 Low noise thermal printing 3 Support a variety of interfaces USB default ELLIX30 USB RS 232 Serial USB IEEE1284 ELLIX40 USB Only USB RS 232 Serial USB IEEE1284 USB Ethernet USB WLAN USB Bluetooth 4 Jam free Implementation of automatic return of Cutter Jam 5 Characters can be scaled up to 64 times compared to it s original size 6 The data buffer allo...

Page 4: ...ection recycling and disposal procedure To prevent possible harm to the environment or human health from uncontrolled waste disposal please separate this from other types of wastes and recycle it responsibly to promote the sustainable reuse of material resources Household users should contact either the retailer where they purchased this product or their local government office for details of wher...

Page 5: ...1 ELLIX 30 2 ELLIX 40 ...

Page 6: ...7 1 Serial Interface RS 232C DIP Switch Set 10 1 7 2 Parallel Interface DIP Switch Set 11 1 8 USING THE PRINTER 12 1 8 1 Control Panel LED 12 1 8 2 Feed Button 12 1 8 3 Panel lights LED Color 12 1 8 4 Control Panel LCD 13 1 8 5 Feed Button 13 1 8 6 Function Button 13 1 8 7 Display status LCD 13 1 8 8 Setting mode for LCD Display 14 CHAPTER 2 APPENDIX 16 2 1 ADJUSTING THE PAPER NEAR END SENSOR LOCA...

Page 7: ...ld include these items If any items are damaged or missing please contact your dealer for assistance 1 2 Connecting the Cables You can connect up to three cables to the printer They are all connected to the connector panel on the back of the printer which is shown as below ...

Page 8: ... 1 Plug the cable connector securely into the printer s interface connector 2 Tighten the screws on both sides of the cable connector 3 Attach the other end of the cable to the computer 1 4 Connecting the Drawer To use the drawer you can connect the cable to the connector ...

Page 9: ...plug in the power cord Otherwise you may damage the power supply or the printer 1 Make sure the printer is turned off 2 If it is necessary to connect the interface plug the interface connector into the interface port on the printer 3 Plug the DC cord connector into the power jack on the printer 4 If it is necessary to connect the drawer plug the drawer connector into the drawer port on the printer...

Page 10: ... 5 1 6 Installing or Replacing the Paper Roll ...

Page 11: ...Supply as shown 3 Push the Partition until it locks firmly in place 1 6 2 Wall Mount Installation 1 Drill the wall to make the three holes ø6 5mm depth over 35mm and put the three anchors ⓐ into the each hole Notice the position of the holes 2 Tighten the three screws ⓑ into the each anchor to fix the BRKT Wall to the wall as shown 3 Hang the printer on the three hooks and fix it down ...

Page 12: ... 7 Cut it for the fix wall mount bracket Wall mounting hole data ...

Page 13: ...MEMO ...

Page 14: ... Open the paper roll cover by pressing the cover open button 2 Remove the used paper roll core if there is one 3 Insert the paper roll as shown 4 Pull out a small amount of paper as shown Then close the cover Tear off the paper as shown ...

Page 15: ... DIP switches that allow you to change communication settings such as handshaking and parity check as well as printing density The ELLIX40 has a near end sensor for the paper This can give you a warning when the paper is almost out If you find that there is not enough paper remaining on the roll when the near end detector is triggered See the next page if you need to make any of these changes ...

Page 16: ... 10 1 7 1 Serial Interface RS 232C DIP Switch Set DIP Switch Set 1 Functions Baud rate selection Dip Switch Set 2 Functions Kitchen Bell is option Print Density ...

Page 17: ... 11 1 7 2 Parallel Interface DIP Switch Set Dip Switch Set 1 Functions Dip Switch Set 2 Functions Kitchen Bell is option Print Density ...

Page 18: ...Error Status and Error Resolution Page 21 for information of what to do when this light comes on NO PAPER RED This light indicates the near end of the paper roll Install a new paper roll and the printer will continue printing When the light blinks it indicates the self test printing standby state or macro execution standby state when the macro execution command is used SLEEP MODE When the standby ...

Page 19: ...rinter If printer has an error state or idle state Self Test Macro execution The LCD screen will blink red See 2 3 Error Status and Error Resolution Page 18 for information of what to do when this LCD light RED comes on SLEEP MODE When the standby state is maintained for a period of time the printer automatically switches to sleep mode and the power LED and LCD display are turned off However the p...

Page 20: ...ress button 1 PREV or button 3 NEXT to select items to setting Press button 2 SEL to select a menu item Selected from the list press button 1 or button 3 to change the setting Press FEED button to save and return previous menu Save setting value Feed button to return to the previous menu The first menu button is pressed once more feed will ask whether to save Press button 1 YES to save the setting...

Page 21: ... 15 Setup mode list In Setup mode you can change the list are as follows The list may change depending on the firmware version or interface card ...

Page 22: ...find there is too much paper remaining when the sensor is triggered set the near end sensor to position 4 or 5 3 Decrease the setting if the paper runs out before the sensor is triggered The accuracy of the Near End sensor depends on the adjustment scale setting and the winding core diameter of the roll paper The Near End sensor is set at adjustment 3 This is the appropriate scale for the recommen...

Page 23: ...ver 3 Clean the thermal elements of the printer head using a cotton swab moistened with alcohol solvent ethanol methanol IPA 4 Insert a paper roll and close the printer cover Depending on the paper roll used paper dust may stick to the platen roller and paper roll end sensor To remove the paper dust clean the platen roller and paper roll end sensor with a cotton swab moistened with water ...

Page 24: ...Indicators include Cutter Jam Buzzer and ERROR LED status If buzzer and ERROR LED beeps or blinks as like Beep Beep Beep Beep the printer is on Cutter Jam error status Cutter Jam 1 Open and close the cover2 3times 2 Open the printer cover remove the roll and jammed paper and load a new paper roll 3 Power off and on the printer or send the DLE ENQ n command to reset the printer ...

Page 25: ... Error Buzzer NO PAPER LEC status ELLIX30 40 beeps the buzzer as like Beep Beep and turns on the NO PAPER LED when detecting the paper out Change the paper roll in the ELLIX30 40 then clear the error status after some motor feeds Interface board is not plugged in Buzzer ERROR LED and NO PAPER LED status If the ERROR LED and NO PAPER LED blink as below pattern without power LED on the printer is in...

Page 26: ...on 2 4 2 Paper specification The Following paper can be used instead of the specified paper above TF50KS E Nippon Paper industries Co Ltd PD 160R New Oji Paper Mfg Co Ltd F380 Kansaki Specialty Papers Inc USA Mitsubishi PB670 PB770 are two color mode papers ...

Page 27: ...JK68 60979B ...

Reviews: