


8
GB
INSTALLAING THE CONTROL CENTRE
Select a suitable location for the control centre. The location of the
control centre can greatly affect its performance. If it is located where
air circulation cannot reach, or exposed to direct sun light, it will not
adjust the room temperature properly.
To ensure proper operation, the control centre should be installed
at an inside wall with freely circulating air. Find a place where your
family is usually occupied.
Avoid close proximity to heat generating appliances (e.g. TV, heater,
refrigerator) or exposed to direct sunlight. Do not install near a door
where the thermostat will suffer from vibration.
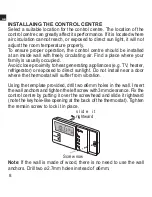
Using the template provided, drill two ø6mm holes in the wall. Insert
the wall anchors and tighten the left screw with 3mm clearance. Fix the
control centre by putting it over the screwhead and slide it rightward
(note the keyhole-like opening at the back of the thermostat). Tighten
the remain screw to lock it in place.
s l i d e i t
rightward
Screw now
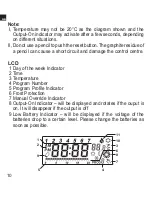
Note
: If the wall is made of wood, there is no need to use the wall
anchors. Drill two ø2.7mm holes instead of ø6mm.
Summary of Contents for 091FLRF
Page 1: ...Programmable Room Thermostat with RF Volt Free Model 091FLRF User s Manual...
Page 2: ......
Page 28: ......
Page 29: ......
Page 30: ......