background image


19 

Foto’s spiegelen


Druk op de navigatietoets naar boven om de foto verticaal te spiegelen. 
Druk op de navigatietoets naar onderen om de foto horizontaal te spiegelen. 


Beelden in- en uitzoomen


Druk op ZOOM om het beeld te verkleinen of vergroten tot 50%, 75%, 100%, 125%, 150% en 
200%. 

OPMERKING:

 als het beeld vergroot is kan u de navigatietoetsen gebruiken om het beeld te 

verschuiven. 


Dia showeffecten


Druk op de PROGRAM toets om de overgangseffecten te kiezen. 
Beschikbare opties: Veeg van boven, veeg van beneden, veeg links, veeg rechts, diagonaal 
vegen linksboven, diagonaal vegen rechtsboven, diagonaal vegen linksonder, diagonaal vegen 
rechtsonder, horizontaal uitrekken vanuit midden, verticaal uitrekken vanuit midden, horizontaal 
samendrukken naar midden, verticaal samendrukken naar midden, horizontaal venster, 
verticaal venster, vegen van rand naar midden en invoegen van boven.


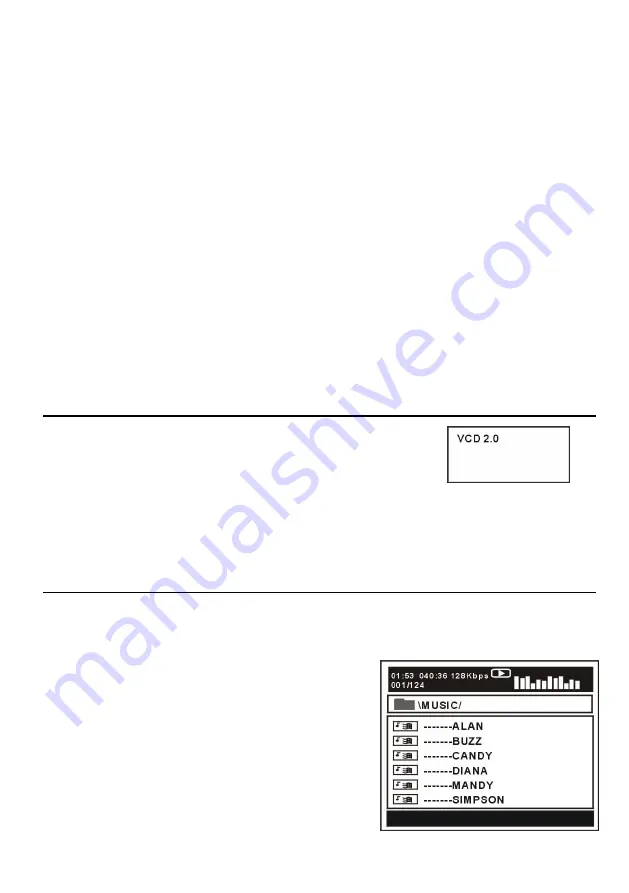
9. Video CD met weergavecontrole 


a) Bij weergave van een VCD met PBC, toont het scherm over 
welke versie het gaat. 
b) Druk op D.MENU om te kiezen tussen PBC AAN of UIT. 
c) Gebruik de numerieke toetsen om het gewenste nummer te 
selecteren. 
Voorbeel: nummer 9, druk 0 en 9, enkele seconden later start de weergave van nummer 
9; nummer 15, druk -/-- en 5 en enkele seconden later start de weergave van nummer 15. 
d) Gebruik 

 of 

 om naar het volgende of vorige nummer te gaan. 


10. USB weergave 


Om het toestel in USB modus te zetten, druk op SETUP en selecteer de bron in het 
menu. Selecteer dan de USB bron met de navigatietoetsen. 

 
a) Breng een USB, die muziek, foto’s of films bevat, in 
het toestel. 
b) Na enkele seconden verschijnen alle folders in de 
USB op het scherm. 
c) Selecteer met de navigatietoetsen de folder die u 
wil gebruiken en druk op OK om te bevestigen. 
d) De inhoud van de folder wordt getoond. Kies het 
gewenste item met de navigatietoetsen en druk op OK 
om de weergave te starten. 

Summary of Contents for LED1926DVX

Page 1: ...GEBRUIKSAANWIJZING Lees de gebruiksaanwijzing alvorens de TV te gebruiken en houd hem bij de hand voor latere referentie...

Page 2: ...N ANDERE AFSTELLINGEN OF PROCEDURES DAN DIE BESCHREVEN IN DEZE HANDLEIDING KAN AANLEIDING GEVEN TOT GEVAARLIJKE BLOOTSTELLING AAN STRALING OPEN HET TOESTEL NIET EN PROBEER HET NIET ZELF TE HERSTELLEN...

Page 3: ...st water Houd rekening met de instructies bij de installatie van het toestel Plaats het toestel niet naast een warmtebron zoals een radiator een verwarmingstoestel een kachel of andere apparaten die w...

Page 4: ...ngen kunnen een gebruiksverbod met zich meebrengen 1 Gebruik toetsen en schakelaars zoals aangegeven in deze gebruiksaanwijzing 2 Controleer alvorens het toestel voor het eerst in te schakelen of de a...

Page 5: ...de in een warme ruimte gebracht wordt kan er zich condens op de disc vormen Verwijder de condens met een zacht droog doekje alvorens hem te gebruiken Onjuiste manier om discs te bewaren De discs kunne...

Page 6: ...DING VAN DE AFSTANDSBEDIENING 10 BASIS AANSLUITINGEN 11 15 BEDIENING BASISBEDIENING 16 25 DVD 16 23 TV 24 25 HOOFDMENU 26 31 TV MODUS 26 30 AV YPBPR HDMI MODUS 30 PC MODUS 31 VOOR REFERENTIE ONDERHOUD...

Page 7: ...UROPESE TELETEKST FUNCTIE USB MULTIMEDIA WEERGAVE IN DVD MODUS ON SCREEN DISPLAY IN MEERDERE TALEN MULTIFUNCTIONELE AFSTANDSBEDIENING INGANGEN CVBS AUDIO R L HDMI SCART PC AUDIO VGA YPBPR UITGANGEN HO...

Page 8: ...zen of om naar boven onder te gaan 9 MENU om in het menu te gaan 10 TV AV om de ingangsbron te kiezen 11 POWER toets om de Tv in uit te schakelen 12 Disclade gleuf om een disc in te brengen 13 USB2 aa...

Page 9: ...it en terug in te schakelen 11 VOL om het volume te regelen 12 CH om naar de vorige of volgende zender te gaan 13 EXIT om uit het menu te gaan 14 MENU om het hoofdmenu weer te geven drukken om naar vo...

Page 10: ...rtitels te selecteren in DVD modus 28 PGDN REPEAT om naar vorige pagina in teletekst te gaan om de herhaling in te stellen in DVD modus 29 INDEX om naar de indexpagina te gaan in TB modus om snel acht...

Page 11: ...ING Laat de afstandsbediening niet vallen en trap er niet op Dit kan schade en slechte werking veroorzaken Verwijder de batterijen als de afstandsbediening gedurende langere tijd niet gebruikt wordt G...

Page 12: ...ere toestellen aan te sluiten AANSLUITEN VAN DE NETSTROOM AANSLUITEN VAN EXTERNE ANTENNE Sluit een externe antenne aan om te genieten van de beste beeldkwaliteit BASIS AANSLUITINGEN Hoofdtoestel Stopc...

Page 13: ...LSUITING COMPONENT YPbPr AANSLUITING Achterkant van DVD VCR AV kabel Voor basisaansluiting gebruik de composiet Audio L R wit rood en CVBS geel kabel voor aansluiting van andere toestellen YPbPr kabel...

Page 14: ...HDMI AANSLUITING SCART AANSLUITING Sluit de HDMI kabel aan andere apparaten aan om een high definition multimedia signaal te ontvangen HDMI kabel SCART kabel Achterkant van DVD VCR Achterkant van DVD...

Page 15: ...COMPOSIET AV UITGANG CVBS UITGANG VOOR DVD MODUS Audio kabel VGA kabel Achterkant van PC Gebruik een VGA kabel en een audio kabel om op de TV een PC aan te sluiten en de TV als monitor te gebruiken AV...

Page 16: ...15 AANSLUITING HOOFDTELEFOON USB AANSLUITING VOOR DVD MODUS Sluit een USB of een SD MMC MS geheugenkaart aan voor de weergave van multimedia documenten Kabel hoofdtelefoon...

Page 17: ...ra de disc in het toestel is start de weergave automatisch c Als er een menu op het scherm verschijnt gebruik dan de navigatietoetsen o de numerieke toetsen om een bepaald nummer te kiezen en druk op...

Page 18: ...der worden getoond Gebruik de navigatietoetsen om een nummer te kiezen en druk op PLAY om de weergave te starten of druk op OK d Gebruik de of toetsen om de volgende of vorige menupagina weer te geven...

Page 19: ...en druk op OK om de weergave te starten Tijdens het scrollen doorheen de file worden thumbnail afbeeldingen getoond Druk op PLAY of op OK om de weergave te starten OPEMRKING de tijd nodig voor het lad...

Page 20: ...r vegen van rand naar midden en invoegen van boven 9 Video CD met weergavecontrole a Bij weergave van een VCD met PBC toont het scherm over welke versie het gaat b Druk op D MENU om te kiezen tussen P...

Page 21: ...nuit verschillende hoeken zijn opgenomen In dat geval kan de hoek gekozen worden door op de ANGLE toets te drukken 12 Herhaling Druk tijdens de weergave op de REPEAT toets Het is mogelijk een hoofdstu...

Page 22: ...om te bevestigen 14 GOTO Druk meerdere malen op GOTO om het item te kiezen dat u wil instellen en breng dan de tijd in het hoofdstuk het nummer enz De weergave zal vanaf dat punt starten 15 DISPLAY D...

Page 23: ...ezen en druk dan op de OK toets Gebruik de navigatietoetsen om de waarden in te stellen en druk dan op OK om te bevestigen Druk op SETUP om het menu te verlaten Gebruik de LINKSE en RECHTSE navigatiet...

Page 24: ...selecteer de taal voor ondertitels bij een disc met meerdere talen 3 4 Disc menu selecteer de taal van het discmenu als deze over meerder talen beschikt 3 5 Ouderlijke controle om het niveau van de ou...

Page 25: ...te schakelen en druk opnieuw om het geluid in te schakelen SELECTIE INGANGSBRON Druk op de TV AV toets om de ingangsbronlijst weer te geven Gebruik de opwaartse of neerwaartse navigatietoetsen om de...

Page 26: ...eschikbaar is Druk op TEXT om de teletekst op te roepen Druk op HOLD om de teletekst pagina vast te houden Druk op PGUP om naar de vorige pagina te gaan Druk op PGDW om naar de volgende pagina te gaan...

Page 27: ...de LINKSE RECHTSE navigatietoetsen om een submenu te selecteren Gebruik de UP DOWN navigatietoetsen om een optie in de lijst te selecteren Druk op OK of RECHTSE navigatietoets om in het submenu te gaa...

Page 28: ...op OK om in het menu te gaan Druk op ROOD om de zender te verwijderen Druk op GROEN om in het menu voor naamverandering te komen Gebruik UP DOWN om de waarden in te stellen gebruik LINKS RECHTS om de...

Page 29: ...helderheid kan ingesteld worden tussen 0 100 2 4 Kleur De waarde van de kleur kan ingesteld worden tussen 0 100 2 5 Tint De waarde van de tint kan ingesteld worden tussen 0 100 OPMERKING dit is allee...

Page 30: ...et uitgangsniveau tussen linker en rechter luidsprekers in te stellen van 50 tot 50 3 5 Automatisch volume Om het automatisch volume in of uit te schakelen 4 TIJD 4 1 Sleep timer Om de tijd in te stel...

Page 31: ...e blauwe achtergrond in of uit te schakelen Het scherm wordt blauw in geval van geen of een zeer zwak signaal als deze functie ingeschakeld is 5 5 Toetsblokkering Druk op OK om de toetsblokkering in o...

Page 32: ...igatietoetsen om de waarde in te stellen Automatische instelling Om het scherm automatisch in te stellen Horizontale positie Om de waarde van de horizontale positie in te stellen tussen 0 100 Vertical...

Page 33: ...k nooit alcohol benzine thinner een reinigingsmiddel of andere chemicali n Gebruik ook geen spuitbus op stof te verwijderen Contacteer een professionele installateur om de TV aan de muur te bevestigen...

Page 34: ...ek van ongeveer 30 tussen de TV en de voet ontstaat Stap 3 Forceer de stand en de TV totdat de TV volledig op de voet rust Stap 4 Draai de voet tegenklokwijs over ongeveer 30 totdat er een lichte klik...

Page 35: ...V mm Levensduur 30 000 uur Film MPEG 1 MPEG 2 MPEG 4 Muziek WMA MULTIMEDIA WEERGAVE FORMATEN DVD MODUS Foto JPEG Ondersteunde discs DVD CD CDR CDRW DVD R DVD R DVD RW DVD RW VCD SVCD VOEDING AC adapt...

Page 36: ...nd dan zes meter Verwijder voorwerpen tussen de afstandsbediening en het toestel Geen enkele toetsbediening op het toestel of afstandbediening heeft effect Ontkoppel de stroomadapter en sluit hem teru...

Page 37: ...hoek kan niet gewijzigd worden Deze functie is afhankelijk van de software Zelfs al heeft een disc deze functie dan kan die slechts bij bepaalde sc nes gebruikt worden Paswoord voor instellen van de...

Page 38: ...INSTRUCTION MANUAL Read all of the instructions before using this TV and keep the instruction manual in a safe place for future reference...

Page 39: ...UNLESS THE BLADES CAN BE FULLY INSERTED TO PREVENT BLADE EXPOSURE TO PREVENT FIRE OR SHOCK HAZARD DO NOT EXPOSE THIS APPLIANCE TO RAIN OR MOISTURE CAUTION LASER RADIATION WHEN OPEN DO NOT STARE INTO B...

Page 40: ...ts such as speakers at a distance from the player LASER SAFETY This set employs an optical laser beam system in the CD mechanism designed with built in safeguards Do not attempt to disassemble Exposur...

Page 41: ...led Wipe gently with a soft damp water only cloth When wiping discs always move the cloth from the center hole toward the outside which will not cause distortion If you wipe the discs using a circular...

Page 42: ...CONTROL 7 8 REMOTE CONTROL PREPARATION 9 BASIC CONNECTION 10 14 OPERATIONS BASIC OPERATIONS 15 24 DVD 15 22 TV 23 24 MAIN MENU 25 30 TV MODE 25 29 AV YPBPR HDMI MODE 29 PC MODE 30 FOR REFERENCE MAINTE...

Page 43: ...TELETEXT EUROPE FUNCTION SUPPORT USB MULTIMEDIA PLAYBACK IN DVD MODE SUPPORT MULTI LANGUAGES ON SCREEN DISPLAY SUPPORT FULL FUNCTION REMOTE CONTROL SUPPORT CVBS AUDIO R L HDMI SCART PC AUDIO VGAAND YP...

Page 44: ...utton To enter menu setting page 10 TV AV button To select the input source 11 POWER button To switch ON OFF the TV 12 Disc slot To insert a disc according to the silk screen on the side of this slot...

Page 45: ...turn up down the volume 12 CH To play next previous channel 13 EXIT To exit the menu page 14 MENU To display the main menu press it again to return to previous menu page 15 UP DOWN LEFT RIGHT navigat...

Page 46: ...8 PGDN REPEAT Page down of available teletext to change the repeat mode in DVD mode 29 INDEX To display the index of teletext in TV mode to play fast backward in DVD mode 30 SIZE To switch teletext si...

Page 47: ...pact the remote control This may damage the parts or lead to malfunction If the remote control is not going to be used for a long time remove the batteries REMOTE CONTROL OPERATION Point the remote co...

Page 48: ...ns before connecting other equipments CONNECTING TO AC POWER SOURCE CONNECT EXTERNAL ANTENNA TO UNIT Install external antenna into antenna jack for best picture BASIC CONNECTION Main unit To power out...

Page 49: ...CVBS CONNECTION COMPONENT YPbPr CONNECTION Back of DVD VCR AV cable For basic connection use the composite Audio L R white red and CVBS yellow cable to connect the unit with other devices Back of DVD...

Page 50: ...12 HDMI CONNECTION SCART CONNECTION Use HDMI cable to connect the unit with other devices to receive high definition multimedia signal HDMI cable Back of DVD VCR SCART cable Back of DVD VCR...

Page 51: ...N COMPOSITE AV OUT CVBS OUTPUT FOR DVD MODE CONNECTION Audio cable VGA cable Back of PC Use VGA cable and Audio cable to connect the unit with TV or PC and use this product as a monitor AV cable Exter...

Page 52: ...14 CONNECT EARPHONE TO THE UNIT USB2 CONNECTION FOR DVD MODE Insert a USB or SD MMC MS memory device for multimedia files playback EARPHONE cable...

Page 53: ...enter the disc into the disc compartment b Once the disc is in the disc compartment the player starts to read the disc immediately c When a menu screen appears on the unit press the navigation buttons...

Page 54: ...tton to start playback d In file selecting page press or button to turn the current menu page to the next or previous menu page e Press REPEAT button on remote control to change play mode SINGLE play...

Page 55: ...e file name Then press the PLAY or OK button to start playback NOTE The time of loading and displaying a picture depends on its size During playback press D MENU button to return to file selecting pag...

Page 56: ...sion b Press D MENU button on remote control repeatedly to set PBC ON or OFF c Press number buttons to select corresponding track Example Track 9 press 0 and 9 several seconds later it will automatica...

Page 57: ...different angles For these discs the same scene can be viewed from each of these different angles using the ANGLE button 12 Repeat play Press REPEAT button during playback it will repeat play one chap...

Page 58: ...elect the item you want to set and enter a time number chapter number track number etc Accordingly the disc will be played from the selected point 15 DISPLAY Press DISPLAY button to display the playin...

Page 59: ...l Use the navigation buttons to select preferred item and press OK button each screen for setting the value is displayed Then move the navigation buttons to set the item and press OK button to confirm...

Page 60: ...sired subtitle language if your disc contains multiple subtitle languages 3 4 Disc Menu Select desired language of your disc menu if your disc menu contains multiple MENU languages 3 5 Parental Select...

Page 61: ...or DOWN navigation button to select desired input source and then press OK button to confirm selection Available options TV AV SCART YPBPR HDMI PC DVD PICTURE MODE Press PICTURE button on remote cont...

Page 62: ...s PGUP button on remote control to display previous page Press PGDW button on remote control to display next page Press INDEXT button on remote control to display the index Press SIZE button on remote...

Page 63: ...ress LEFT RIGHT navigation button to select submenus Press UP DOWN navigation button to select the option that you want to adjust Press OK or RIGHT navigation button to enter submenu page Press naviga...

Page 64: ...enter it Press RED button to delete highlighted channel Press GREEN button to enter Rename mode Then press UP DOWN navigation button to adjust the value press LEFT RIGHT navigation button to move the...

Page 65: ...htness can be adjusted from 0 100 2 4 Color The value of color saturation can be adjusted from 0 100 2 5 Tint The value of tint can be adjusted from 0 100 NOTE This item is available only in NTSC syst...

Page 66: ...s item is used to adjust the audio output between left and right speakers from 50 to 50 3 5 Auto Volume This item is used to turn on off Auto Volume function 4 TIME 4 1 Sleep Timer This item is used t...

Page 67: ...sent 5 4 Blue Screen This item is used to set the blue background ON or OFF The screen background will turn blue at very weak or no signal condition if BLUE SCREEN is ON 5 5 Key Lock Press OK button r...

Page 68: ...ress LEFT or RIGHT navigation button to adjust the value Auto Adjust This item is used to adjust the value of screen automatically Horizontal Pos This item is used to adjust the value of horizontal po...

Page 69: ...en wipe again with a dry cloth Never use alcohol benzene thinner cleaning fluid or other chemicals And do not use compressed air to remove dust Contact a professional for assistance when wall mounting...

Page 70: ...make an angle about 30 degrees between the TV and Stand Step 3 Force the stand and TV until the TV is fully seated on the stand Step 4 Rotate the Stand counterclockwise about 30 degrees until a sligh...

Page 71: ...8 H 230 4 V mm Life Time 30 000 Hrs Movie MPEG 1 MPEG 2 MPEG 4 Music WMA MULTIMEDIA PLAYBACK FORMAT DVD MODE Photo JPEG Supported discs DVD CD CDR CDRW DVD R DVD R DVD RW DVD RW VCD SVCD POWER SOURCE...

Page 72: ...ct the power adaptor and then reconnect it The player may not be operating properly due to lightning static electricity or some other factors Symptom TV Remedy No or poor picture Adjust antenna or use...

Page 73: ...CD Remedy No menu play This function works only for Video CDs with playback control Symptom USB Remedy My player does not recognize my USB key or my external hard disk when plugged to the DVD player...

Page 74: ...MANUEL D INSTRUCTION Lisez le manuel d utilisation avant d utiliser le TV et gardez le pour consultation ult rieure...

Page 75: ...UR AFIN D EVITER UN FEU OU DES CHOCS ELECTRIQUES NE PAS EXPOSER L APPAREIL A LA PLUIE OU HUMIDITE ATTENTION RADIATION LASER QUAND OUVERT NE PAS REGARDER DANS LE RAYON AVERTISSEMENT VENTILATION NE PAS...

Page 76: ...il comporte dans le m chanisme CD un syt me optique rayon laser pourvu des l ments de s curit n cessaires N essayez pas de d sassembler L exposition la lumi re laser invisible peut endommager l oeil h...

Page 77: ...rface Utilisez un chiffon doux l g rement humide uniquement eau Frottez du centre vers le bord pour ne pas cr er de la distorsion Si vous frottez d une fa on circulaire vous risquez de faire des griff...

Page 78: ...ECOMMANDE 7 8 PREPARATION DE LA TELECOMMANDE 9 CONNEXTIONS DE BASE 10 14 COMMANDES OPERATION DE BASE 15 24 DVD 15 22 TV 23 24 MENU PRINCIPAL 25 30 MODE TV 25 29 MODE AV YPBPR HDMI 29 MODE PC 30 REFERE...

Page 79: ...YNTONISATION AUTOMATIQUE DES EMETTEURS FONCTION TELETEXTE LECTURE USB MULTIMEDIA MODE DVD AFFICHAGE ECRAN MULTI LANGUES TELECOMMANDE MULTI FONCTIONS ENTREES CVBS AUDIO L R HDMI SCART PC AUDIO VGA YPBP...

Page 80: ...r l metteur suivant ou pr c dent ou pour bouger en haut en bas 9 MENU pour entrer dans le menu 10 Bouton TV AV s lection d entr e 11 POWER pour mettre le TV en hors fonction 12 Compartiment disc 13 Co...

Page 81: ...CH Pour aller vers l metteur suivant pr c dant 13 EXIT Pour quiter le menu 14 MENU Pour afficher le menu principal ou pour retourner vers le menu pr c dant 15 Boutons de navigation 16 OK Pour confirme...

Page 82: ...page pr c dente en t l texte s lection r p tition en mode DVD 29 INDEX Pour aller vers la page index en t l texte avancement rapide en arri re en mode DVD 30 SIZE Pour changer le format des lettres en...

Page 83: ...commande ou ne marchez pas au dessus Ceci peut endommager la t l commande et causer des malfonctionnements Enlevez les piles si vous n utilisez pas la t l commande pendant un certain temps UTILISATION...

Page 84: ...es autres appareils CONNEXION COURANT SECTEUR CONNEXION ANTENNE EXTERIEURE Connectez l antenne ext rieur pour obtenir une r ception optimale CONNEXIONS DE BASE Appareil Prise courant secteur Antenne A...

Page 85: ...OSITE AV CVBS CONNEXION COMPOSANTS YPbPr Dos du DVD VCR C ble AV Pour connexion de base utilisez le c ble composite Audio L R blanc rouge et CVBS jaune pour connexion avec d autres appareils Dos du DV...

Page 86: ...CONNEXION HDMI CONNEXION SCART Utilisez un c ble HDMI pour connecter d autres appareils et pour recevoir des signaux multim dia en haute d finition C ble HDMI Dos du DVD VCR C ble SCART Dos du DVD VC...

Page 87: ...NNECXION PC VGA CONNEXION SORTIE AV SORTIE CVBS EN MODE DVD C ble audio C ble VGA Dos du PC Utilisez un c ble VGA et audio pour connecter le PC et utiliser l appareil comme moniteur C ble AV Ecran ext...

Page 88: ...ONNEXION CASQUE D ECOUTE CONNEXION USB MODE DVD Ins rez le USB ou la carte m moire SD MMC MS dans la prise pr vue sur l appareil ASSUREZ VOUS QUE TOUS LES APPAREILS ET L ADAPTATEUR C ble du casque d c...

Page 89: ...il commence automatiquement avec la lecture c Quand un menu appara t sur l cran utilisez les boutons de navigation ou utilisez les boutons num riques pour s lectionner le num ro pr f r et poussez OK p...

Page 90: ...d Dans les pages de s lection utilisez ou pour aller vers la page suivante ou la pae pr c dante e Poussez le bouton REPEAT sur la t l commande pour choisir entre SINGLE lecture d un num ro REPEAT ONE...

Page 91: ...our commencer la lecture REMARQUE le temps d affichage d une photo d pend du format Pendant le lecture poussez D MENU pour retourner vers la page de s lection Poussez REPEAT pour choisir entre SINGLE...

Page 92: ...9 Video CD avec contr le de lecture a Pendant la lecture de VCD 2 0 avec PBC Play Back Control l cran affiche la version VCD b Poussez D MENU pour mettre le PBC en ou hors fonction c Utilisez les bou...

Page 93: ...es sc nes enregistr es sous diff rents angles Avec ce discs vous pouvez choisir l angle avec le bouton ANGLE 12 Fonction de r p tition Pendant la lecture poussez REPEAT Vous pouvez r p ter un chapitre...

Page 94: ...ensuite OK pour confirmer 14 GOTO Poussez plusiers fois GOTO pour d terminer o vous voulez aller Vous pouvez entrer un num ro temps un num ro chapitre un num ro etc La lecture commence au point introd...

Page 95: ...lectionner l item voulu et poussez le bouton OK Dans chaque cran vous pouvez effectuer les r glages avec les boutons de navigation et poussez OK pour confirmer Poussez SETUP pour quitter le menu Util...

Page 96: ...ctionner la langue des sous titres si le disque contient plusieurs langues 3 4 Menu disc pour s lectionner la langue pour le menu disc si le disque contient plusieurs langues 3 5 Parental pour r gler...

Page 97: ...CTION SOURCE D ENTREE Poussez TV AV pour afficher la liste des sources d entr es Utilisez les boutons de navigation UP DOWN pour s lectionner l entr e et poussez OK pour confirmer Options TV AV SCART...

Page 98: ...uer une page t l texte Poussez PGUP pour aller vers la page pr c dente Poussez PGDW pour aller vers la page suivante Poussez INDEX pour aller vers la page index Poussez REVEAL pour afficher le texte c...

Page 99: ...ns de navigation GAUCHE DROITE pour s lectionner les sous menus Utilisez les boutons de navigation UP DOWN pour s lectionner l option que vous voulez r gler Poussez OK ou DROITE pour entrer dans le so...

Page 100: ...ur Poussez le bouton VERT pour alle dans le mode pour renommer l metteur Ensuite utilisez les boutons UP DOWN pour changer la valeur Utilisez les boutons GAUCHE DROITE pour d placer le curseur Poussez...

Page 101: ...re 0 100 2 3 Luminosit La valeur peut tre r gl e entre 0 100 2 4 Couleurs La valeur peut tre r gl e entre 0 100 2 5 Teinte La valeur peut tre r gl e entre 0 100 REMARQUE ceci est uniquement disponible...

Page 102: ...ce entre les haut parleurs gauche et droite entre 50 50 3 5 Volume automatique Pour mettre le volume automatique en hors fonction 4 TEMPS 4 1 Sleep timer Pour r gler le temps apr s lequel l appareil d...

Page 103: ...eu Pour mettre la fonction cran bleu en ou hors fonction L cran bleu appara t en cas d un signal faible ou pas de signal quand cette option est en fonction 5 5 Bloquage boutons Poussez OK pour mettre...

Page 104: ...les sous menu Utilisez les boutons GAUCE DROITE pour effectuer le r glage R glage automatique Pour effectuer un r glage automatique de l cran Position horizontale La valeur de la position horizontale...

Page 105: ...ssence thinner liquides de nettoyage ou autres produits chimiques Ne pas utiliser des a rosols pour enlever la poussi re Contactez un professionnel quand vous voules monter l appareil au mur Nous ne s...

Page 106: ...tre pour cr er un angle environ 30 entre le Tv et le pied Point 3 Forcez le pied et le TV jusqu au moment o le TV se trouve bien sur le pied Point 4 Tournez le pied vers la gauche pour environ 30 jusq...

Page 107: ...0 4 V Dur e de vie 30 000 heures Film MPEG 1 MPEG 2 MPEG 4 Musique WMA FORMAT DE LECTURE MULTIMEDIA MODE DVD Photo JPEG DVD CD CDR CDRW DVD R DVD R Discs support s DVD RW DVD RW VCD SVCD ALIMENTATION...

Page 108: ...z le L appareil ne peut pas fonctionner cause d clairs lecricit statique ou autres facteurs Probl mes TV Solution Pas d image ou mauvaise image R glez l antenne ou utilisez une antenne ext rieure Plac...

Page 109: ...t de passe Contactez votre revendeur Probl mes Video CD Solution Pas de reproduction par menu Cette fonction est uniquement disponible sur disques avec PBC Play Back Control Probl mes USB Solution Mon...

Reviews: