background image

Station


Informatie

 va

n

 d

e

 DAB 

Radio


en

 FM Radi

o


DAB 

Radio


Druk


meerdere


keren


o

p d

e

 “I

nfo

/

menu

” 

knop

 (R

ef.

6) 

om

 d

e


informatie

 t

e


verkr

i

jgen

 va

n

 d

e


verschillende


programma

s.


Bit Rate

:  G

eeft

 d

e


snelhe

id 

weer

 waa

rmee

 data w

ordt


verzon

d

en.


Bit Error Rate (BER):


Geeft


informatie


met

 b

etrekk

i

n

g t

o

t d

e

 BER 

waarden.


Kanaal en Frequen

ti

e

: G

eeft


he

uitzendnummer

 va

n


he

station


weer


en

 d

e


frequentie.


PTY (Programma Type):


Toont


he

t typ

e


en


omschri

j

ving

 va

n


het


programma,


verstrekt


door


het


DAB+ 

station.


Tijd en Datum

: G

eeft

 d

e


tij

en

 dat

um


weer


zoals

 d

eze

 w

or

dt 

doorgegeven


door


het


station.


DAB Indic

ati

e

: g

eeft

 d

e

 DAB 

modus

 w

eer.


Dynamic Label Segment (DLS):

 D

e


zen

d

er


lever

informatie

 di

e

 a

ls


scrollende


tekst


o

p d

e

 di

splay


w

or

dt 

weer

g

egeven.


Summary of Contents for CRU628DAB

Page 1: ...Instruction Manual CRU628DAB IMPORTANT Please read all instructions carefully before use and keep for future reference DAB FM Alarm Clock Radio...

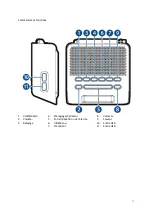
Page 2: ...Instructions Guide Controls and Functions 1 Standyby Mode 2 Volume 3 Scan 4 Preset Dimmer 5 Enter Snooze 6 Info Menu 7 Previous 8 Volume 9 Next 10 USB Out 11 USB Out 3 4 6 7 9 1 10 2 8 5 16 11...

Page 3: ...Instructions Guide Controls and Functions 12 13 DC In 14 Earphone Jack 15 Antenna 16 LCD Screen 17 Back Up Battery 9 13 14 17 8 12 15 3 4 6 7 9 1 13 14 17 2 8 5 12 15 16 9 13 14 17 8 12 15...

Page 4: ...otate to get the best FM signal Press the Standby Mode button Ref 1 to turn the unit on The system should go straight to DAB Radio mode and automatically start scanning for stations The display will s...

Page 5: ...that have a good signal Please note if you aren t in a good DAB signal area then your signal may be very weak The radio will automatically save all the stations with a strong signal To listen to all s...

Page 6: ...ber you want to store the station as Then press Enter Snooze button Ref 5 to save The display will then show Preset 1 stored How to play a preset radio station Press the Preset Ref 4 Press Prev button...

Page 7: ...up the bandwidth quickly and Prev button Ref 7 to search down quickly It will stop searching when the button is released To search slowly press the Next Ref 9 and Prev button Ref 7 multiple times rath...

Page 8: ...Empty Press Prev Ref 7 or Next Ref 9 button to change the 1 to the number you want to store the station as Press Enter Snooze button Ref 5 to save The display will then show Preset 1 stored How to pl...

Page 9: ...u button Ref 6 To make your choice use the Prev Next buttons Ref 7 9 to choose your option Choose FM SENSITIVITY and press the Enter button Ref 5 To make your choice use the Prev Next buttons Ref 7 9...

Page 10: ...s details of the signal error rate Channel and Frequency Displays the station s transmission channel number and frequency PTY Programme Type Shows the type and description of the programme provided by...

Page 11: ...and Date Displays the time and the date Frequency Displays the station s transmission frequency Audio Type Displays the audio type of the station you are listening to It will either be Stereo or Mono...

Page 12: ...buttons Ref 7 9 to choose your option Choose SET TIME DATE and press the Enter button Ref 5 T Using the Prev Ref 7 or Next Ref 9 button press until the required year is displayed T Ref 5 button T Usin...

Page 13: ...changed straight after changing the date T Using the Prev Ref 7 or Next Ref 9 buttons press until the required hour is displayed T Ref 5 button T Using the Prev Ref 7 or Next Ref 9 button press until...

Page 14: ...9 to change the hour and press Enter Snooze button Ref 5 Press the Prev or Next buttons Ref 7 9 to change the minutes and press the Enter Snooze button Ref 5 Press the Prev or Next buttons Ref 7 9 to...

Page 15: ...lly When alarm sounds press the Enter Snooze button Ref 5 to snooze for 9 minutes You can keep snoozing every 9 minutes for up to an hour If ALARM 1 is snoozed then ALARM 2 will also be snoozed T Ref...

Page 16: ...SLEEP and press the Enter Snooze button Ref 5 Using the Prev Next buttons Ref 7 9 choose from OFF 10mins 20mins 30mins 40mins 50mins 60mins 70mins 80 mins or 90mins When your choice is displayed press...

Page 17: ...ess and hold Info Menu button Ref 6 Use the Prev Ref 7 or Next Ref 9 buttons to choose your option Choose SYSTEM RESET and press the Enter Snooze button Ref 5 The display will show Press enter key to...

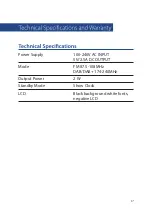
Page 18: ...Power Supply 100 240V AC INPUT 5V 2 5A DC OUTPUT Mode FM 87 5 108MHz DAB DAB 174 240MHz Output Power 2 W Standby Mode Show Clock LCD Black background white fonts negative LCD...

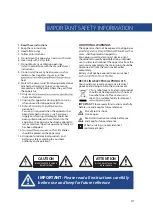
Page 19: ...atus 14 Dispose of used electrical products and batteries safely according to your local authority and regulations ADDITIONAL WARNINGS The apparatus shall not be exposed to dripping or vases shall be...

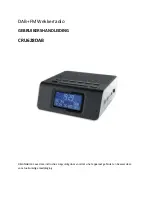
Page 20: ...DAB FM Wekkerradio GEBRUIKERSHANDLEIDING CRU628DAB BELANGRIJK Lees deze instructies zorgvuldig door voordat u het apparaat gebruikt en bewaar deze voor toekomstige raadpleging...

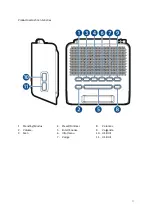
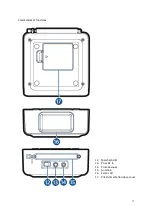
Page 21: ...Productoverzicht en Functies 1 Stand by Modus 4 Preset Dimmer 8 Volume 2 Volume 5 Enter Snooze 9 Volgende 3 Scan 6 Info menu 10 USB Uit 7 Vorige 11 USB Uit...

Page 22: ...12 Aan Uit 13 DC In 14 Ingang Hoofdtelefoon 15 Antenne 16 LCD Scherm 17 Back up batterij...

Page 23: ...nop ref 1 om het apparaat aan te zetten Het apparaat schakelt direct in de DAB radio modus in en zal automatisch de stations gaan zoeken Op het display verschijnt Searching dit duurt enkele minuten Dr...

Page 24: ...op indien u zich in een gebied bevindt waar geen goed DAB signaal is zal het signaal erg zwak zijn Het apparaat zal automatisch alle stations met een sterk signaal opslaan Nadat alle stations zijn ge...

Page 25: ......

Page 26: ...uisteren houdt u de Volgende knop Ref 9 om snel de frequentieband naar boven of de Vorige knop Ref 7 om snel de frequentieband naar beneden af te zoeken Zodra u de knop loslaat zal het zoeken worden g...

Page 27: ...k op de Vorige en Volgende Ref 7 9 om het nummer 1 te wijzigen naar het nummer waarin u het wilt wijzigen Druk daarna op de Enter Snooze knop Ref 5 om op te slaan Op het display verschijnt Preset 1 st...

Page 28: ...nt door middel van de Vorige Volgende knoppen Ref 7 9 uw keuze selecteren Kies FM SENSITIVITY en druk op de Enter knop Ref 5 Om uw keuze te maken drukt u op de Vorige Volgende knoppen Ref 7 9 om deze...

Page 29: ...rmatie met betrekking tot de BER waarden Kanaal en Frequentie Geeft het uitzendnummer van het station weer en de frequentie PTY Programma Type Toont het type en omschrijving van het programma verstrek...

Page 30: ...ven op een signaal balk Tijd en Datum Toont de tijd en datum Frequentie Toont de frequentie van het huidige station Audio Type Toont naar welke audiotype u dit moment aan het luisteren bent Er zijn tw...

Page 31: ...display Druk op de Vorige Ref 7 of Volgende Ref9 knop tot het juiste jaartal op de display verschijnt Om te bevestigen drukt u op de Enter Snooze knop Ref 5 De maand zal knipperen op de display Druk...

Page 32: ...rige Ref 7 of Volgende Ref9 knop tot het juiste uur op de display verschijnt Om te bevestigen drukt u op de Enter Snooze knop Ref 5 De minuten zullen knipperen op de display Druk op de Vorige Ref 7 of...

Page 33: ...nooze knop Ref 5 om te bevestigen Druk op de Volgende en Vorige knoppen Ref 9 7 om de minuten te wijzigen en druk op de Enter Snooze knop Ref 5 om te bevestigen Druk op de Volgende en Vorige knoppen R...

Page 34: ...druk op de Enter Snooze knop Ref 5 waarna het alarm na 9 minuten opnieuw zal afgaan U kunt de snooze iedere 9 minuten tot maximaal en uur gebruiken Indien u de snooze heeft geactiveerd voor Alarm 1 z...

Page 35: ...ngesteld begint zal aan de rechterzijde van de display het aftellen worden weergegeven Bijvoorbeeld indien u heeft ingesteld op 10 minuten zal S10 knipperen en aftellen naar S0 Hierna zal de radio in...

Page 36: ...apparaat voor een langere periode niet zal worden gebruikt 12 Voor onderhoud en reparaties dient u zich altijd te wenden tot een gekwali ceerd onderhoudsmonteur Reparatie is noodzakelijk indien het ap...

Page 37: ...NGRIJK lees deze in zorgvuldig door en bewaar deze voor eventuele latere raadpleging Risico op elektrische schok Niet openen lees deze inst zorgvuldig door en bewaar deze voor eventuele latere raadple...

Page 38: ...Radio R veil DAB FM Manuel d instructions CRU628DAB Important Veuillez lire avant utilisation et conserver ces instructions de s curit pour r f rence future...

Page 39: ...Commandes et fonctions 1 Veille Mode 4 Pr r glage Variateur 8 Volume 2 Volume 5 Entrer R p tition de l alarme 9 Suivant 3 Balayage 6 Info Menu 10 Sortie USB 7 Pr c dent 11 Sortie USB...

Page 40: ...Commandes et fonctions 12 Marche Arr t 13 Prise DC In 14 Prise Casques 15 Antenne 16 cran LCD 17 Piles Alimentation de secours...

Page 41: ...e Appuyez sur le bouton Veille Mode Standby Mode Ref 1 pour mettre en marche l appareil Automatiquement l appareil se met en mode Radio DAB et commencera une recherche automatique de stations L cran a...

Page 42: ...tes les stations avec un bon signal seront sauvegard es Noti cation Si vous vous trouvez dans un environnement que n o re pas un signal DAB le signal pourrait tre faible La radio sauvegarde toutes les...

Page 43: ...er le 1 de votre choix Puis appuyez sur le bouton Entrer R p de l alarme Enter Snooze Ref 5 pour m moriser L cran a che Preset 1 stored Pr r glage 1 m moris Comment couter une sta on radio pr r gl e A...

Page 44: ...pour une recherche vite en haut ou le bouton Pr c dent Prev Ref 7 pour une recherche vite en bas de la bande fr quence Lorsque vous rel chez le bouton la recherche s arr t Pour une recherche moins vi...

Page 45: ...dent Prev Ref 7 ou Suivant Next Ref 9 pour changer le 1 de votre choix Puis appuyez sur le bouton Entrer R p tition de l alarme Enter Snooze Ref 5 pour m moriser L cran a che Preset 1 stored Pr r gla...

Page 46: ...Menu Ref 6 Pour onner votre choix ez les boutons Pr c dent Suivant Prev Next Ref 7 9 ez FM SENSITIVITY et appuyez sur le bouton Entrer Enter Ref 5 Pour onner les boutons Pr c dent Suivant Prev Next Re...

Page 47: ...signal A che l erreur de signal capt par la radio Canal et Fr quence A che le num ro et la fr quence de la station Type de programme A che le type et le description de programme mise disposition par...

Page 48: ...tuelle Heure et Date A che l information de l heure et le date Fr quence A che la fr quence de la radio di us e Type d audio A che le type d audio de la station vous coutez Le type d audio est St r o...

Page 49: ...f 7 9 appuyez jusqu ce que l an correct s a che sur l cran Pour con rmer l an appuyez sur le bouton Entrer R p tition de l alarme Enter Snooze Ref 5 Le mois clignote sur l cran En utilisant les bouton...

Page 50: ...correcte s a che sur l cran Pour con rmer l heure appuyez sur le bouton Entrer R p tition de l alarme Enter Snooze Ref 5 Les minutes clignotent sur l cran En utilisant les boutons Pr c dent Suivant P...

Page 51: ...n rmer Appuyez sur les boutons Pr c dent Prev ou Suivant Next Ref 7 9 pour changer les minutes et appuyez sur le bouton Entrer R p tition de l alarme Enter Snooze Ref 5 pour con rmer Appuyez sur les b...

Page 52: ...p tition de l Alarme D sactiver l Alarme Lorsque l alarme retentit appuyez sur le bouton Entrer R p tition de l alarme Enter Snooze Ref 5 pour une r p tition apr s 9 minutes Vous pouvez r p ter jusqu...

Page 53: ...mpte rebours commence et s il est z ro l appareil s teindra automatiquement Par exemple si vous avez pr r gl 10 minutes S10 clignote et le compte rebours commence jusqu S0 L appareil se met en mode ve...

Page 54: ...d entretien Il est n cessaire d e ectuer un entretien lorsque l appareil a subi un dommage quelle qu en soit la nature l appareil peut par exemple avoir t endommag au niveau du cordon d alimentation o...

Page 55: ...ectrique N ouvrir pas lisez n vement tous les instruc avant usage et tenez les pour r f rence future pour l entre en ez exclusivement les pi ces de rechange originaux iden es ATTENTION RISQUE DE CHOC...

Reviews: