background image

5

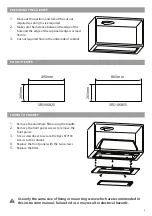
PREPARING THE CABINET

1.

Mark out the position and size of the cut out 
required accoring to size required

2.

Make sure the distance between the edge of the 
hole and the edge of the cupboard edge is at least 
35mm.

3.

Cut out required hole in the underside of cabinet.

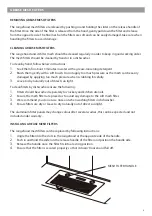
FIXING TO CABINET

1.

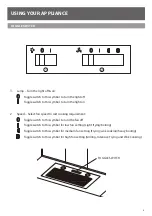
Remove the aluminum filter using the handle.

2.

Remove the front panel screws to remove the 
front panel.

3.

Use a screwdriver to secure the 8pcs ST4*18 
screws to the cabinet.

4.

Replace the front panel with the two screws

5.

Replace the filter.

865mm

265mm

SRU-0685S

265mm

490mm

SRU-0682S

CUT-OUT SIZES

Use only the same size of fixing or mounting screw which are recommended in 

this instruction manual, failure to do so may result in electrical hazards. 

Summary of Contents for SRU-0682S

Page 1: ...UNDERMOUNT RANGEHOOD User Manual Installation SRU 0682S SRU 0685S WWW SALINI COM AU...

Page 2: ...12 Installation of the appliance must only be undertaken by a licensed electrician This manual contains important information including safety operational installation information which will enable y...

Page 3: ...pean safety legislation and designed to operate safely in normal domestic use Appliance shall only be used with rated voltage and frequency Before installation and usage read all the instructions and...

Page 4: ...ny maintenance or cleaning Cleaning should be carried out in accordance with the Cleaning and Maintenance section to avoid possible hazards This appliance is not intended for use by persons including...

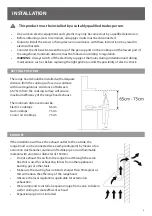
Page 5: ...ncluded The range hood should be installed with adequate distance from the cooking surface in accordance with local regulations A distance of between 65 75cm from the cooking surface will ensure maxim...

Page 6: ...FIXING TO CABINET 1 Remove the aluminum filter using the handle 2 Remove the front panel screws to remove the front panel 3 Use a screwdriver to secure the 8pcs ST4 18 screws to the cabinet 4 Replace...

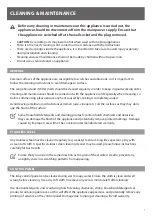
Page 7: ...peed Select fan speed to suit cooking requirement Toggle switch to this symbol to turn the fan off Toggle switch to this symbol for low fan setting Light frying boiling Toggle switch to this symbol fo...

Page 8: ...y during installation and cleaning Cleaning and user maintenance shall not be made by children without supervision Do not use a steam cleaner on appliance GENERAL Any stainless steel must be cleaned r...

Page 9: ...too much pressure when scrubbing forcefully 3 Leave to dry naturally out of direct sun light To clean filters by dishwasher ensure the following 1 Filters should be washed separately to crockery and k...

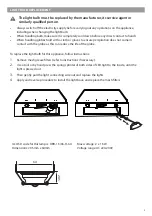
Page 10: ...he mesh filters The light bulb must be replaced by the manufacturer its service agent or similarly qualified person Always switch off the electricity supply before carrying out any operations on the a...

Page 11: ...s not work Power cord loose or disconnected Refit cord to power outlet Switch power outlet on House fuses blown Reset Replace fuses Oil leakage One way valve and the outlet are not tightly sealed Take...

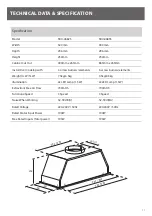
Page 12: ...r less burners elements 6 or less burners elements Weight G W N W 7 5kg 6 5kg 9 5kg 8 5kg Illumination 2x LED Lamp 1 5W 2x LED Lamp 1 5W Extraction Max Air Flow 700m3 h 700m3 h Functions Speed 3 Speed...

Page 13: ...quirements for Domestic Electrical Cooking Appliances This appliance is SAA certified Installation of the appliance must be only be undertaken by a licensed electrician who can provide a compliance ce...

Page 14: ...duct specifications in this booklet apply to the specific products and models described at the date of issue these specifications or recommendations may change at any time The information and graphics...

Reviews: