background image

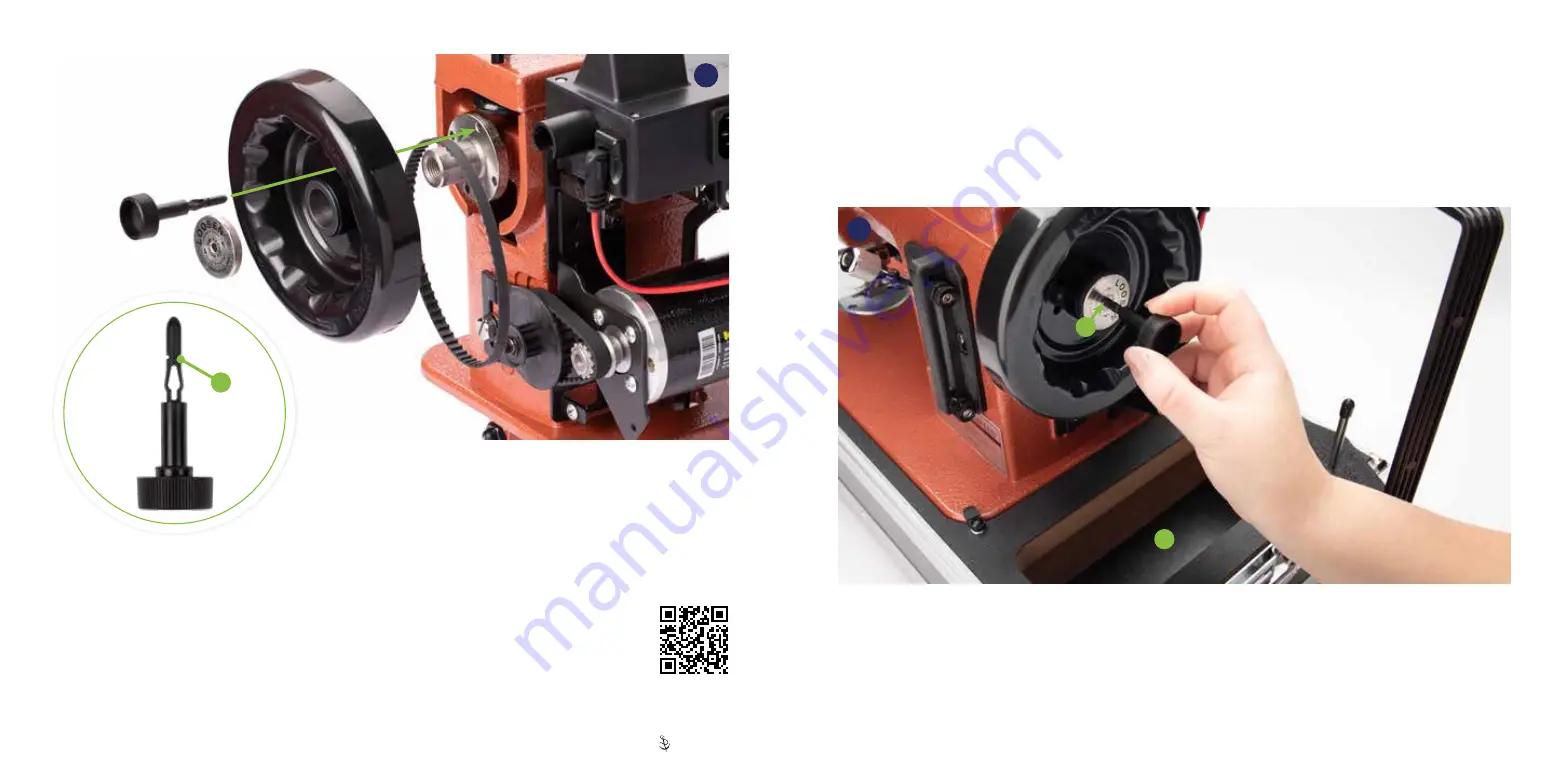
The Posi-Pin Safety Shear is a sacrificial pin that fits through a hole in the 

balance wheel face and into a mating hole in the balance wheel bushing� It 

locks these components together to operate the machine and power the needle� 

Why Is the Posi-Pin So Important? 

This revolutionary piece of sewing machine technology is patented by Sailrite

®


and can only be found on Sailrite sewing machines� Its main purpose is to prevent 

internal damage in the event that the machine jams, the needle collides with 

something impenetrable or a bind occurs� Turn to the next page to learn more about 

how the Posi-Pin protects your Ultrafeed Sewing Machine�

What Is the Posi-Pin

®

 Safety Shear?

Designed to Protect Your Machine

In the event of a bind or machine jam, the pin will break at the shear point (

A

), preventing the machine from operating, 

when there is too much resistance on the machine� This prevents internal damage or misalignment� If the Posi-Pin 

breaks, simply remove the broken pin, replace it with a new one and check the cap spring for damage (p� 38, 

56

)� Then 

install a new needle (p� 7) and verify that the needle bar height has not shifted (p� 45)� You can then continue sewing 

without issue�

NOTE: When the Ultrafeed is not being used, remove the Posi-Pin and place it in the Posi-Pin Keeper (

B

) or the storage cubby 

(

C

)� This is to prevent the compression shaft from enduring unnecessary deformity over time�

17

18

Scan to watch a 

video on how the 

Posi-Pin works�

A

B

C

11  |    

Sailrite�com

Ultrafeed

®

 LS Guidebook 

   |  12

Summary of Contents for ULTRAFEED LS

Page 1: ...ULTRAFEED LS GUIDEBOOK USE MAINTENANCE TROUBLESHOOTING SCHEMATICS ...

Page 2: ...Foot 26 Ultrafeed Maintenance 27 Lubrication 27 30 Troubleshooting the Ultrafeed 31 Proper Needle Orientation Installation 32 Replacing the Take Up Spring 33 Material Surface Is Being Damaged 34 If Posi Pin Safety Shear Breaks 35 Removing the Hook to Clean the Shuttle Race Guide Shaft Free Thread Jams 36 Skipped Stitches 37 38 Thread Issues 39 42 Needle Issues 43 Bobbin Winding Issues 44 Ultrafeed...

Page 3: ... work on inverter generator of 400W or more of the Modified Sine Wave or Square Wave types Pure or Digital Synthesized Wave Inverters generators will not work B C 1 3 2 4 A D Turn off the motor when servicing changing needle or feet or leaving the machine unattended Do not operate in conditions where you or the machine are or may become wet Operate the machine on a firm level surface with adequate...

Page 4: ...you are using the correct size combinations Needle and thread recommendations for sewing specialty fabrics are available online in our Thread Needle Recommendation Guide Search 300032XHT at Sailrite com to learn more 1 Turn on the power pack A 2 Adjust the speed setting by rotating the dial a Turn the dial toward the sign for the slowest setting b Turn the dial toward the sign for the fastest sett...

Page 5: ...ong stitches Twist Point needles have oval shaped cutting points that are twisted 45 degrees from the needle eye They are best for sewing short to medium stitches in light to medium hard leather These needles produce decorative seams of slanted slightly elevated stitches that closely mimic the look of hand stitching Perpendicular Point needles have wide flat cutting points that are perpendicular t...

Page 6: ... bar C Needle screw C Scan to watch a video on how to install a needle 9 Ultrafeed needles are round on top unlike home sewing machine needles As a result proper installation must be exercised carefully The needles have two sides the long channel side with a groove running the needle length and the side with a short scarf A i e a carved out area above the needle eye 1 Push the needle all the way u...

Page 7: ...hten the screw A 5 Lower the foot and rotate the balance wheel until the needle is in its highest position Firmly tighten the screw A How to Install a Feed Dog 1 Unscrew and remove the needle plate C from the machine bed This will expose the feed dog D 2 Unscrew E and remove the old feed dog from the machine bed 3 Install the new feed dog F and loosely tighten the screws The feed dog should be abl...

Page 8: ...t Is the Posi Pin Safety Shear Designed to Protect Your Machine In the event of a bind or machine jam the pin will break at the shear point A preventing the machine from operating when there is too much resistance on the machine This prevents internal damage or misalignment If the Posi Pin breaks simply remove the broken pin replace it with a new one and check the cap spring for damage p 38 56 The...

Page 9: ...move the bobbin from the winder post by pushing the post to the left and pulling the bobbin off Cut the thread Engage the Clutch To continue sewing push the Posi Pin A through one of the holes in the balance wheel I any will work While maintaining light pressure on the Posi Pin rotate the balance wheel J until the Posi Pin locks into one of the holes in the bushing that the balance wheel rides on ...

Page 10: ... thread around front and down again through the leftmost hole F 5 Thread through upper tension assembly shown without cover knob G Make sure lift lever H is raised up to release tension plates I so thread can pass through Be sure to catch the hooked spring end J with the thread last 6 Pass through take up arm right to left K and then under the end cover L Make sure the thread goes behind the small...

Page 11: ...se is pushed all the way on The finger of the bobbin case will drop into the notch in the hook s retaining ring H Bobbin thread should loosely dangle B H E 22 F Installing Bobbin in Bobbin Case 1 Insert a threaded bobbin A into the bobbin case B as shown 23 2 Hold the tail of the thread while pushing the bobbin into the bobbin case 3 Pull the thread through the slit C in the edge of the bobbin cas...

Page 12: ...Pack 2 Insert the Posi Pin Safety Shear into a hole in the balance wheel Maintain light pressure on the Posi Pin and rotate the balance wheel toward you until the Posi Pin locks into a mating hole in the balance wheel bushing 30 3 Push the Posi Pin all the way in until the shoulder is flush against the balance wheel face 4 Use the lift lever 29 to raise A and lower B the presser foot onto the mate...

Page 13: ...t When the machine is operating at 1 4 speed or faster reverse can be engaged on the fly DO NOT rotate the balance wheel in the wrong direction Always rotate the balance wheel by grabbing the top of the wheel and rotating down toward you 32 Turning Corners Turn the balance wheel toward you until the needle is at its lowest point and then rises about 1 8 inch 3mm Then lift the presser foot p 20 29 ...

Page 14: ...CH 35 36 34 NOTE Decorative cap removed Excessive tension shown Knots visible on bottom Knots pulled to top 37 38 Advanced Thread Tension Adjustment Before moving on please reference p 4 to ensure proper needle and thread size are being used for your application Tension changes to the bobbin thread should only be made when upper tension changes alone do not solve stitch tension In general bobbin t...

Page 15: ...l it comes free of the machine and then rethread it about three complete rotations for the lightest spring setting 40 Removing Material From Under the Presser Foot 1 Stop the machine after the take up arm B reaches its uppermost position and then starts to descend 2 Raise the feet with the lift lever C 3 Remove the material from under the foot 43 It may be helpful to rock the balance wheel forward...

Page 16: ...ill help your machine operate more smoothly last longer and sew more quietly LS Lubrication Points Top side lubrication points Speed Reduction Pulley Under Belt Cover 44 45 Marine Use Potential for Rust If the machine will be used or stored in a harsh environment lubricate the working parts of the machine with Sailrite Sewing Machine Oil prior to storage and before each use We also recommend using...

Page 17: ...Left end and back side lubrication points 46 47 Underside lubrication points NOTE Retaining ring removed Ultrafeed LS Guidebook 30 29 Sailrite com ...

Page 18: ...trafeed needles are round on top unlike home sewing machine needles As a result proper installation must be exercised carefully The needles have two sides the long channel side with a groove running the needle length and the side with a short scarf A i e a carved out area above the needle eye 1 Push the needle all the way up into the needle bar B 2 Rotate the needle so the scarf A faces the right ...

Page 19: ...position Push the spring in all the way 6 Spin the arm of the spring clockwise past the slot in the plastic core 7 While holding the spring arm in place slide the keyway washer G back onto the core with the pip facing in so the take up spring arm rests on the metal pip of the washer 8 Replace the first tension disk F with the convex side facing out Add the second tension disk E with the concave si...

Page 20: ... from internal damage or timing issues when you hit something you shouldn t while sewing The pins are intended to be sacrificial and replacing a broken one is easy F E B 54 Scan to watch a video on how to clean the shuttle 53 Scan to watch a video on how to replace the Posi Pin Gib Hook Axle 1 Remove the broken Posi Pin and discard it 52 2 Insert a new Posi Pin into one of the holes in the balance...

Page 21: ... badly tensioned corner stitches and reduce the chance of a skipped stitch 3 Not Enough Foot Pressure Heavy dense material like closely woven marine canvas and sailcloth or vegetable tanned leather can make the withdrawal of the needle from the material difficult If the presser foot is being lifted as the needle comes out of the material the loop that the needle forms will be too small Increase th...

Page 22: ...ble Needle Size Thread Weight If the thread is too thick or thin for the needle it will not pass through the needle eye to form a loop and will instead ball at the needle Check the compatibility of the needle size and thread weight p 4 6 Burred Gib Hook or Retaining Ring Cap Spring A machine bind or needle strike to the shuttle gib hook A or retaining ring cap spring B may result in a burr or dama...

Page 23: ...o right p 15 O Then pull out a longer thread tail and trap it with your finger to the bed of the sewing machine A Release the thread tail after the first few stitches A rat s nest forms in the first few inches of sewing and then clears up Eliminate this issue by trapping the thread tails A from the needle and the bobbin as you start to sew 59 A When stopping to turn a corner the machine skips a st...

Page 24: ...ch thread on the top or bottom Locate the bobbin tensioner D and loosen the screw E just under the tensioner on the front of the machine Move the tensioner down if the bobbin is filling with too much thread on the top Move the tensioner up if there is too much thread on the bottom Tighten the screw after correct positioning The bobbin winder stops before the bobbin is full or after the bobbin has ...

Page 25: ...lock the needle bar from the drive collar C by loosening the set screw that can be accessed through a hole in the machine casting D Use a 2 5mm hex key to loosen 3 With the needle bar at the bottom of its stroke reposition the needle bar so the score on the needle bar just disappears under the top surface of the upper needle bar guide B Gently twist the needle bar up or down to position the mark m...

Page 26: ...g machines have loose tolerances between the shuttle gib hook and the shuttle driver This play between the parts is intentional and allows the Ultrafeed to sew a wide variety of thread sizes The typical play between parts is 0 04 inch A 67 C B G D A F E 68 Adjust the Driver The driver C is secured to the lower shaft with two set screws H Loosen the screws and gently twist the shuttle driver to mat...

Page 27: ... the gib hook A swings past the needle the hook should be as close as possible to the right side of the needle without deflecting it B If the gap between the needle and the hook is too large the hook must be moved to the left to close the gap See p 51 to make adjustment If the needle is being deflected by the hook then the hook must be moved to the right See p 51 to make adjustment 69 B A For the ...

Page 28: ... Tighten the two collar screws There should be practically no side to side play in the center shaft H To move the hook away from the needle 1 Loosen the two screws in the right collar G and move it to the left on its shaft and move the shuttle assembly D to the right 2 Move the assembly D to position the hook as close to the needle E as possible without deflecting the needle 3 Holding the correct ...

Page 29: ... Guide Shaft 1 Determine that there is no more than 1 64 inch of play in the left right movement of the lower shaft C If there is more than 1 64 inch of play reset the left right positioning of the shuttle gib hook p 51 2 Rotate the balance wheel until the needle enters the shuttle 73 3 With left hand grab the shuttle race guide shaft D hold to the right and maintain light pressure 4 With right ha...

Page 30: ...097 15 EZ Set Stitch Length Plate 105511 16 Stitch Length Plate Screw 103263 17 Needle Plate W032 18 Needle Plate Screw A052 19 Slide Plate 120346 20 Three Hole Thread Guide W029 21 Upper Tension Assembly includes 24 8511 22 Thread Guard Screw 103253 23 Top Plate Set Screw E072 24 Thread Take Up Spring included in 21 533211 25 Tension Release Pin W184 2 26 Shuttle Race Slide Spring A049 27 Shuttle...

Page 31: ...7 Presser Regulating Thumbscrew Socket W010 18 Presser Bar Spring A032 19 Needle Bar Support B016 20 Needle Bar Zigzag Connecting Rod Set Screw D097 21 Zigzag Connecting Rod W015 22 Needle Bar Connecting Joint Pin B099 23 Needle Bar W066 24 Needle Thread Guide W067 25 Needle 20 135x17 7010 26 Presser Foot Screw A036 27 Inside Presser Foot W012 28 Presser Bar A035 1 29 Presser Bar Lower Bushing B02...

Page 32: ...nk With Slide Block B179 2 9 Lower Shaft Collar B177 10 Compressible Timing Clamp B155 11 Compressible Timing Clamp Pin A084 12 Compressible Timing Clamp Screw B153 13 Shuttle Race Guide Shaft B170 14 Lower Shaft B172 15 Shuttle Driver W172 16 Shuttle Gib Hook 960122 17 Bobbin 123100 18 Bobbin Case Assembly 1232 19 Screw B139 2 20 Retaining Ring Cap Spring 160311 21 Retaining Ring Clip Set 123011 ...

Page 33: ...ud A069A 10 Forked Rod B103 11 Oscillating Shaft Set Screw Nut A023 12 Driving Crank W046 13 Feed Rock Shaft Crank A071B 14 Feed Rock Shaft A071A 15 Feed Bar Center Screw Nut A076 16 Feed Bar A075 17 Feed Dog Screw A078 18 Sawtooth Feed Dog W011 19 Driving Crank Guide Nut W046 1 20 Driving Crank Guide Screw A061 21 Feed Lifting Rock Shaft A072 22 Feed Lifting Rock Shaft Crank A073 23 Screw B139 2 ...

Page 34: ...et W017 16 Screw B010 17 Sawtooth Outside Presser Foot W013 18 Presser Bar Actuator W024 19 Presser Bar Actuator Feed Screw W020 1 20 End Plate W041 21 End Plate Set Screw W041 1 22 Presser Foot Bracket Limiter W014 23 Screw C097 24 Presser Bar Feed Rod W036 25 Presser Bar Actuator Spacer W024 1 26 Bearing Bracket Bushing W021 27 Lift Crank Rod Bearing Plate W023 28 Rocker End Set Ring W052 29 Pre...

Page 35: ...0 Speed Reduction Pulley Washer W061 6 11 Speed Reduction Pulley Set Nut W061 2 12 Pulley Bracket W059 13 Motor Bracket Set Washer LT 2M 4 14 Motor Bracket Lock Washer LT 2M 3 15 Motor Bracket Bolt LT 2M 2 16 Belt Cover With Hex Bolt Gasket 123315 17 Machine Screw M4 x 0 7 8mm 122894 18 Machine Screw 10 32 12mm 122895 19 WorkerB Motor 90VDC 122808 20 WorkerB Control Box 122680 110V 122813 100 230V...

Page 36: ...ack Specifications 110V North America 100 230V North America International Machine Part Number 311502 300500 Maximum Sewing Speed 260 stitches minute with Monster ll Balance Wheel 550 stitches minute with WorkerB Balance Wheel Input Voltage 100 120 VAC 50 60 Hz 100 230 VAC 50 60 Hz Input Watts 375 Included Power Cord s Motor RPM 4 500 5 000 Motor Power 1 4 hp 90 VDC Output Watts 350 Max On Off Swi...

Page 37: ...ge will not go through the repair process we will contact you so you can file a claim with your shipper Customer is responsible for cost and shipment fees of a replacement machine head box if the original was discarded Such packaging is available upon request only The Ultrafeed limited warranty does not cover any damage that results from improper installation or storage accident abuse misuse natur...

Page 38: ...ovide you with everything you need to successfully maintain and repair your Ultrafeed Sewing Machine Your purchase comes with personalized support for the lifetime of your machine We will do our best to satisfy every support request accurately completely and in a timely manner Customer Service Questions To start a support case go to Sailrite com support and fill out the online form One of our supp...

Reviews: