Sailfish 240 WAC Owner'S Manual Download Page 36

02/23/2015 

Sailfish 270 WAC Owner’s Manual  |  sailfishboats.com 
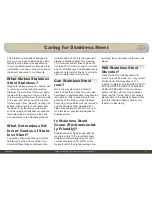
35

Gel Coat

Your Boat’s


Gel Coat Finish

Congratulations! You are the proud owner 

of a new power or sail boat. You are also 

the owner of a new Integrity® gel coat 

finish on the hull and/or topside, and we 

would like you to be as proud of it as we 

are. That beautiful, shiny new color you 

love is the result of many years of gel coat 

research, testing and development.

But as proud as we are of the gel coat, no 

finish is totally impervious to chemicals 

and weathering. Imagine what a brand 

new car could look like if allowed to sit at 

a marina for years with no cover and no 

washing or waxing. With the same min-

imum maintenance you would ordinarily 

give your new automobile’s finish, your 

boat’s gel coat finish will retain its depth of 

color and gloss for years.

Overall Maintenance

Normal maintenance of your gel coated 

fiberglass boat is similar to the care you 

would give your automobile. Overall, 

automotive cleaners and waxes work fine, 

as well as the marine cleaners and waxes.

Note: Do not use caustic or highly alkaline 

(high pH) cleaners or those containing 

ammonia. These type of cleaners may 

darken white or off-white weathered 

gel coat surfaces. A chemical reaction 

producing staining occurs if these type of 

cleaners are used on weathered gel coat. 

However, the stain may be removed with 

a rubbing compound or by lightly sanding 

with 400 grit sandpaper followed by an 

application of rubbing compound and a 

thorough waxing.

Cleaning

We recommend general washing to avoid 

soil build-up and staining. The soil to your 

gel coat is the result of regular use and 

environmental pollutants such as soot 

and smog. Periodic cleaning with a mild 

detergent is necessary to remove normal 

deposits of soil.

Waxing

From constant exposure over time to 

our natural environment and undesired 

pollutants, the gel coat begins to lose its 

gloss. To restore your finish to the original 

gloss and color requires your special 

attention. After washing with a mild soap 

or detergent, give the surface a good 

polishing with a self-cleaning marine or 

automotive wax. Waxing in the fall and 

spring is generally recommended to main-

tain and restore most of the original gloss. 

If the surface has not been maintained and 

has weathered badly, and if cleaning and 

waxing does not restore the finish satisfac-

torily, compounding will be required.

Compounding

Please see your marine dealer for advice. 

Polishing and compound (fine abrasive) or 

rubbing compound (coarser abrasive) is 

recommended for use on fiberglass boats 

to remove scratches, stains, or a severely 

weathered surface. Polishing or rubbing 

compound can be applied by hand or by 

pneumatic buffer. After the scratched, 

stained or weathered surface has been 

moved, it should be waxed to enhance the 

gloss and color while providing a seal to 

retard staining or new soil accumulation.

Discoloration Removal

Your marine dealer is best equipped and 

trained to do this work. If regular washing 

and waxing has been neglected, discolor-

ation of the gel coated fiberglass surface 

may occur. 

Summary of Contents for 240 WAC

Page 1: ...10 15 2014 Sailfish 270CC Owner s Manual sailfishboats com 1 02 23 2015 Sailfish 270 WAC Owner s Manual sailfishboats com 1 Sailfish 270 WAC Title Demand The Difference Sailfish 270 WAC Owner s Manual...

Page 2: ...el Water Separator Yamaha 14 Cabin Head Area 15 VSR Battery System 16 Bilge Access and Explanation 17 Bilge Pumps 18 Raw Water Washdown System 19 Freshwater Washdown and Shower System 20 Livewell Oper...

Page 3: ...eavy Duty w Indicator Switch Built In Retract Feature 30 Gallon Livewell w LED Lighting Inset Toe Hold Rail NBT Vinyl Protection Stain Resistant Mildew Inhibitor UV Protector Cabin Amenities Cabin But...

Page 4: ...n 2100 BB 88 in 66 in 37 in 10 5 in 99 5 in 220 in 240 in 24 in 220 CC WAC 87 in 59 in 31 in 14 5 in 102 5 in 216 5 in 243 in 32 in 240 CC WAC 92 in 59 in 31 in 15 in 107 in 241 in 272 in 30 in 270 CC...

Page 5: ...r Fresh Water Fill 2 Bilge Access 3 Fuel Sender and Pick up Access under optional cooler 4 30 Gallon Livewell 5 Built in Rod Storage 6 Bait Prep Station Key Description 7 Fuel Fill 8 In Floor Fish Box...

Page 6: ...02 23 2015 Sailfish 270 WAC Owner s Manual sailfishboats com 5 Battery Selector Panel and Wiring Back View With Wiring Front View...

Page 7: ...02 23 2015 Sailfish 270 WAC Owner s Manual sailfishboats com 6 Breaker Panel Schematic...

Page 8: ...02 23 2015 Sailfish 270 WAC Owner s Manual sailfishboats com 7 Switch Panel Schematic...

Page 9: ...70 WAC Owner s Manual sailfishboats com 8 Fuel System Layout Key Description 1 Primer Bulbs Yamaha Only 2 Fuel Filter Access Yamaha Only 3 Fuel Tank Location 4 Fuel Pickups 5 Fuel Sender 6 Fuel Fill y...

Page 10: ...02 23 2015 Sailfish 270 WAC Owner s Manual sailfishboats com 9 Plumbing Diagram 270 WAC...

Page 11: ...om 10 Helm Area Key Description 1 Compass 2 Stereo Remote 3 Brand Specific Motor Guages 4 Switch Panel 5 Trim Tab Actuator Switches 6 Optional Windlass Control 7 Tilt Helm w Stainless Wheel and Power...

Page 12: ...tandard with a full stainless steel shaft cylinders are built with carbon steel pistons coupled with extra large end caps to prevent leakage All of their connection materials are 304 stainless steel t...

Page 13: ...helm controls the lanyard will pull out causing the en gine to shut down Make sure the lanyard is not attached to a part of your clothing that could be easily torn free caus ing the switch not to pull...

Page 14: ...ese filters can be accessed in the bilge access door located at the aft of the boat For more information on these filters please review your Yamaha Owner s Manual Plug and Play Wiring Deutsch Connecto...

Page 15: ...ntrol 2 Electric Marine Head 3 Stereo 4 Cabin Breaker Panel 5 CO2 Alarm 6 120 Volt AC Power Panel Shore Power Cabin Accessory Switch es 7 Waste Holding Tank Control 8 Air Conditioning Panel 9 Console...

Page 16: ...means that both batteries now discharge independently How a VSR changes real world boating Let s say that a fishing boat has a two battery setup As is often the case one of the batteries is dedicated...

Page 17: ...h the large door in the aft of the boat In Sailfish Walk Around models the battery switches are also located in this door This large door allows easy access too many of the boats components You may al...

Page 18: ...main switch panel These pumps are wired into your boat bypassing the battery switch so that they have power at all times this allows the automatic feature to work while you are away from the boat and...

Page 19: ...h down pump can be accessed through the bilge access door in the aft of the boat The raw water wash down system uses the same seacock as the livewell it is accessed through the hatch under the transom...

Page 20: ...pressurized the pump will shut down until more pressure is needed All of the freshwater systems on the boat will operate on this system once the freshwater switch is engaged You should allow a few se...

Page 21: ...red flow if your model has a livewell in the leaning post you can adjust the aerator to pump water into the transom livewell or the leaning post livewell or both In order to fill the livewell reach in...

Page 22: ...ainless steel must be kept clean and free of all these contaminants NOTE LENCO RECOMMENDS AN ACID AND WATER SOLUTION TO CLEAN THE TRIM TAB BLADES MARYKATE S ON OFF PRODUCT IS A GOOD CHOICE RINSE THOR...

Page 23: ...xamined on a reg ular basis because it is a high wear item The Gypsy is designed for short scopes of chain and will last longer if properly used Troubleshooting Anchor Rode pays out independently whil...

Page 24: ...reverse Control switch is defective Yes q No u Replace Motor Sluggish Operation Troubleshoot Chart Is windlass overloaded Ease the load and ensure the battery is well charged Yes q No u Check the vol...

Page 25: ...02 23 2015 Sailfish 270 WAC Owner s Manual sailfishboats com 24 Optional Marine Head with Waste Tank Type III MSD Waste Management System...

Page 26: ...Waste Tank Key Description 1 Battery 2 Fuse 3 Waste Management System 4 Master Switch 5 Controller for Waste Management System q w e r t Key Description 1 Vent 2 Inlet 3 Toilet 4 Deck 5 Pumpout 6 Was...

Page 27: ...plete protection for your system Storage When Storing the system for more than two weeks thor oughly clean toilet and hoses by flushing with Thetford s Aqua Kem EcoSmart or Aqua Clean Seasonal Start u...

Page 28: ...he supply line No power to water pump Check that fuse circuit breaker has not tripped Ensure all electrical connectors to water pump are fully mated Water supply has been turned off Open water supply...

Page 29: ...tying This compen sates for the boat s movement when the tank is filling and still allows an accurate reading when emptying Fail Safe Feature If no fluid movement is sensed 20 seconds after the pump i...

Page 30: ...ins 1 x 1 deck pump out evacuation pickup tube Install to dockside pump out deck plate 1 X 1 inlet port from toilet system 1 x 3 O ring sealed inspiration hatch 1 x 1 vent connect to vent outlet usual...

Page 31: ...r cleaners may void your warranty damage your vinyl Do s Don ts Do s Vinyl Finish Vinyl Cleaner Dish Soap Dawn Ivory Fantastik 303 Aerospace Protectant Don ts Formula 409 Murphy s Oil Soap Simple Gree...

Page 32: ...to protect it as much as possible from pitting When the anodized coating is broken and raw aluminum is exposed corrosion will take place Damage from other abrasive impacts can break the anodized coati...

Page 33: ...ctive they are not one time solutions Metal protec tors must be reapplied on a regular basis How often a protector should be used varies according to the protector you choose the types of exposure you...

Page 34: ...and 8 Nickel while 316 Contains 16 Chromium and 10 Nickel and 2 Molybdenum The Molybdenum is added to help resist corrosion to chlorides like sea water and de icing salts Can Stainless Steel rust Not...

Page 35: ...ield first with lukewarm water to avoid scratching the surface WINDOW CHANNELS Clean window channels with mild deter gent only Channels can be sprayed with silicon aerosol while sliding the glass back...

Page 36: ...n application of rubbing compound and a thorough waxing Cleaning We recommend general washing to avoid soil build up and staining The soil to your gel coat is the result of regular use and environment...

Page 37: ...e dealer Scratches If the scratch is in the gel coat surface not penetrating the fiberglass use an automotive polishing compound and rub it out Apply the compound by hand using a damp rag or by using...

Reviews: