Sagem MF 3850 User Manual Download Page 82

6-8  

Maintenance

Date en cours : 11 juin 2001
\\Sct31nt3\doc 31nt3 mac\SAGEM FM\DOC EN COURS\MFC 23260972-6_38xx Sagem GB\Maintenance.fm

&

/($1,1*

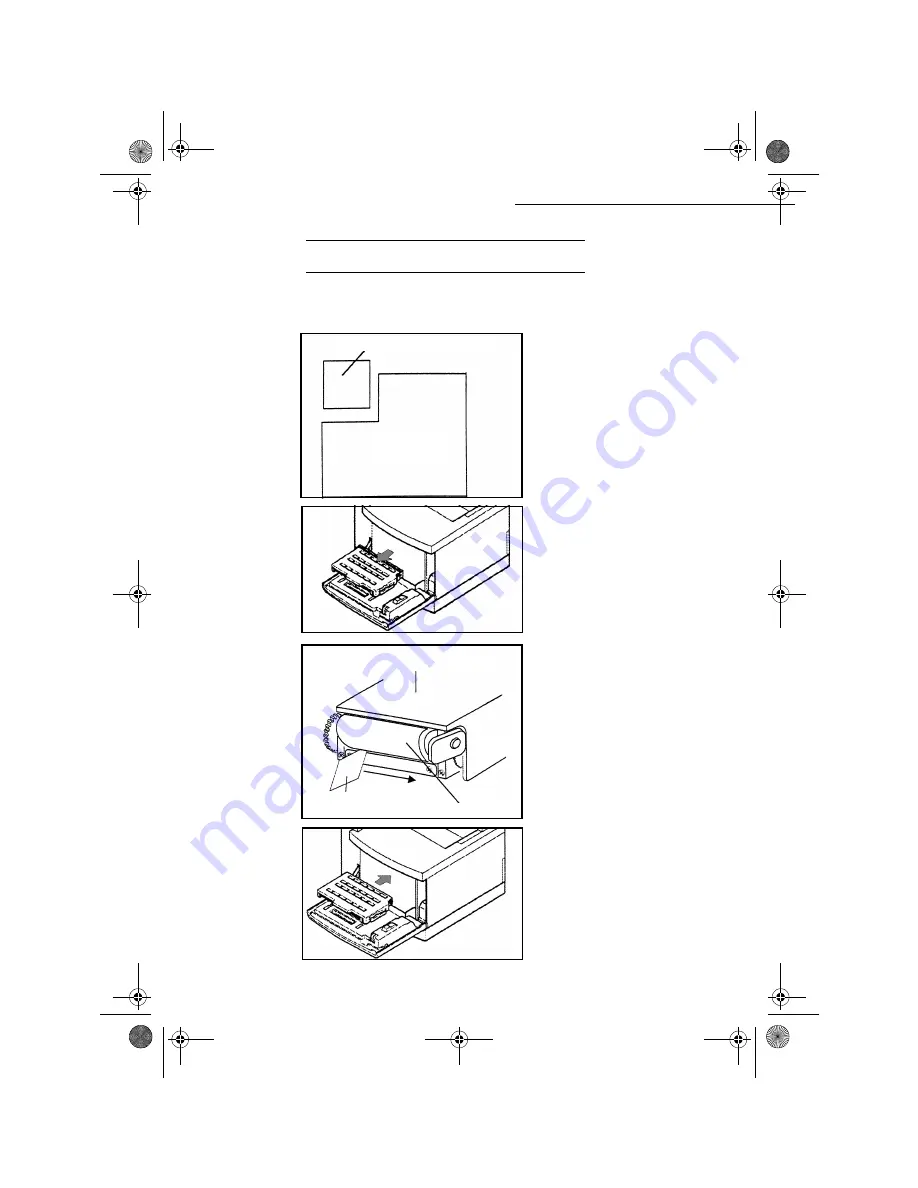
&OHDQLQJWKHGHYHORSPHQWUROOHU

If vertical or irregular colour lines appear on the sheet during printing, do the following steps in 
order to clean the development roller.  

+

Prepare a piece of transparency of
about 5 x 5 cm.

+

keep this piece of transparency away
from foreign objects, like dust.

+

Open the front cover of the printer,
remove the cartridge to be cleaned
and avoid spilling the toner.
Do not remove two cartridges at the
same time.

+

Insert a piece of about 1 cm of the
transparency under the development
roller, on its left-hand side.

+

Slide the transparency to the
right-hand side of the roller.

+

Do it once only.

+

Place the cartridge back in its
housing and close the front cover.

Piece of transparency

Transparency

Toner cartridge

Development roller

Piece of transparency

Maintenance.fm  Page 8  Lundi, 11. juin 2001  5:43 17

Summary of Contents for MF 3850

Page 1: ...cours 11 juin 2001 Sct31nt3 doc 31nt3 mac SAGEM FM DOC EN COURS MFC 23260972 6_38xx Sagem GB 1 COUV38xx fm User s manual 6 0 0 70 F xTM colour laser F xTM Internet COUV 23260972 6 book Page 1 Lundi 11 juin 2001 5 30 17 ...

Page 2: ...glass Printer front cover Printer paper tray Unit Outlet for printed sheets Printer upper cover Scanning cover Flat scanner access cover Adjusting paper guide Ingoing documents tray Chip card reader Outgoing documents feeder Open button of the printer front cover HQHUDO YLHZ COUV 23260972 6 book Page 3 Lundi 11 juin 2001 5 30 17 ...

Page 3: ...several call numbers 16 Key manual transmission 17 Key automatic recall of last number dia led 18 Key ECO ecomomy period transmission 19 Numeric keypad 20 Key stop current operation 21 Key transmission for fax black and white and local copy 22 Key tansmission for fax Internet 23 Key colour copy or transmission for internet 24 Key OK validation of selection displayed on screen 25 Key MENU access to...

Page 4: ...Date en cours 11 juin 2001 Sct31nt3 doc 31nt3 mac SAGEM FM DOC EN COURS MFC 23260972 6_38xx Sagem GB Légende COUV38xx fm LIASSE 23260972 6 book Page 2 Lundi 11 juin 2001 5 31 17 ...

Page 5: ... 1 7 Setting the detachable items 1 7 RQQHFWLRQV 1 8 Printer connection 1 8 Telephone and lan connection 1 9 Power line connection and switch on 1 9 Updating the consumables 1 9 48 86 1DYLJDWLRQ PHWKRGV 2 1 Presentation 2 1 The navigator 2 1 The display screen 2 3 Access to functions 2 3 Step by step function access 2 3 Direct access by number 2 4 XQFWLRQV OLVW 2 4 6 77 1 6 0DLQ VHWWLQJV 3 1 Befor...

Page 6: ...rameters 3 11 Access to connection and mailbox parameters 3 12 Access to servers parameters 3 12 Settings 3 12 Standard settings 3 13 Mail sorting 3 14 Internet Connection 3 15 Immediate connection to the Internet 3 16 Programmed connection 3 16 Deactivate the Internet function 3 16 5 725 UHDWLQJ VXEVFULEHU UHFRUGV 4 1 Adding a record 4 2 UHDWLQJ VXEVFULEHUV OLVWV 4 2 Adding a list 4 3 Adding or d...

Page 7: ...ddress 5 6 Transmission waiting queues 5 7 Consult or modify the waiting queue 5 8 Immediately perform transmission from the waiting queue 5 8 Printing a document in waiting or in deposit 5 8 Print the waiting queue 5 9 Deleting a transmission on hold 5 9 Cancelling transmission in progress 5 9 5HFHSWLRQ 5 9 Reception via the Public Switched Telephone Network PSTN 5 9 Reception via the Internet 5 ...

Page 8: ...2 Replacing the toner cartriges 6 2 Replacing the oil cartridge and the cleaning roller 6 4 Installation Reinstallation the oil cartridge 6 5 Replacing the toner bin 6 7 Cleaning 6 8 Cleaning the development roller 6 8 Cleaning the loading unit 6 9 Cleaning the scanner s reading devices 6 10 Scanner calibration 6 11 QFLGHQWV 6 11 Communication errors 6 11 Transmission from the feeder 6 12 Transmis...

Page 9: ...ork PSTN In case of any problems first contact your Supplier The mark CE attests that the products comply with the essential requirements of Directive R TTE 1999 5 EC for user safety in accordance with Directives 73 23 EC for electroma gnetic interference in accordance with Directive 89 336 EC And that it makes efficient use of the radio spectrum allocated to terrestrial communications The manufac...

Page 10: ...he two models in the range It combines power user friendliness and simplicity thanks to its navigator its multitask access and direct access directory The colour laser printer lets you print and receive colour documents Its two scanners sheet feed and flat bed let you send a colour document and use your machine as a true black white and colour copier The flat bed scanner lets you send portions of ...

Page 11: ...PHQWV When choosing the place to install your printer please consider the following points The telephone and earth sockets must be less than 2 meters from the printer otherwise an extension cord will be required To access the printer easily leave a space of about 10 cm at each side and in the rear of the machine The front of the printer must always remain clear 4 toner cartridges Black K Yellow Y ...

Page 12: ... toner cartridges Cyan Magenta Yellow and Black To install the starting cartridges Open the front cover of the printer Remove the cartridges from their packaging Repeat the following steps for each colour toner cartridge Caution A colour label identifies each cartridge Place the cartridge in the housing with the corresponding colour label Exert no pressure when you insert the cartridge in the hous...

Page 13: ...lightly the cartridges forward and leave a space to install the OPC cartridge If the front cover is not completely open you may damage the OPC cartridge Open the upper cover of the printer Proceed in order to the following steps Pivot both lever locks upward one on each side before setting up the OPC cartridge Remove the protective sheet R from the OPC cartridge and pull out both bolts S Hold the ...

Page 14: ...the printer has a shortest lifetime than the next ones Turn both lever locks Insert the oil bottle in its housing taking care to place a sheet below it Remove it when the cartridge is at housing level The tab of the oil bottle must be on the right hand side Install the cleaning roll in its housing The visible side must face the oil bottle Turn off both lever locks Installation fm Page 4 Lundi 11 j...

Page 15: ... sheets of 80g m2 On the left hand side of the tray a line indicates the maximum amount of paper to stack Do not overload it Place the paper with its print side on top An arrow on the paper packaging generally indicates the sheets printable side Remove the paper tray from the printer Adjust the paper guides according to the paper size you wish to load Press on the sheets compression plate inside t...

Page 16: ...ay Place the two metal plates on the right and left hand side of the printer Affix them using the two screws Remove the connector cover from the rear of the printer and connect the tray connector Remove the tray connector cover and attach it on the printer connector Position the right and left covers on the machine sides Connector Connector cover Locating pins Printer Paper tray Printer basis Pape...

Page 17: ...KH VFDQQHU VXSSRUW QVWDOODWLRQ RI WKH RXWOHW WUD IRU RXWJRLQJ GRFXPHQW Scanner Scanner support Outlet tray for out going document Mainpower cord Printer connection cord Printer main power connection cord Telephone line cord Starting gauge card chipcard Check that the upper cover of printer is closed Place the scanner support on the printer Place the scanner on its support Set the outlet tray on th...

Page 18: ...ion cord 3 into the jack of the fax machine F and the other end into the printer s jack C Plug end of the main power cord 2 into its jack on the fax machine A and the other end into the printer s jack D Caution Plug only the power pack supplied with your machine into the port A by means of the main power cord 2 A B C D E F G H 1 2 3 4 Installation fm Page 8 Lundi 11 juin 2001 5 42 17 ...

Page 19: ...ures in the Safety Chapter Plug end of the main power cord 1 into the jack of the fax B and the other end in the wall outlet Set the switch G depending on model to position 1 On After a few seconds when the printer has warmed up the date and time will appear 83 7 1 7 21680 6 A chip card is delivered with the consumables This card initializes the system which enables you to know at any time the ton...

Page 20: ...ns appear on the screen of the scanner unit Press key OK the display indications are As soon as the reading operation is over remove the card The operation is over the card is no more necessary INIT OF CONSUMABLES CONFIRM OK CANCEL C OPERATION IN PROGRESS PLEASE WAIT INIT OF CONSUMABLES RECORDED REMOVE CARD Installation fm Page 10 Lundi 11 juin 2001 5 42 17 ...

Page 21: ...c 31nt3 mac SAGEM FM DOC EN COURS MFC 23260972 6_38xx Sagem GB PriseEnMains fm 4 8 86 1 9 7 21 0 7 2 6 3 5 6 17 7 21 The navigator gives you access to the menus visible on screen 7KH QDYLJDWRU This navigator has 5 keys and allows you to move around within the menus of your machine LIASSE 23260972 6 book Page 1 Lundi 11 juin 2001 5 31 17 ...

Page 22: ...line in the menu 6 Select the previous line in the menu 5 Go to the following menu OK Return to the previous menu C Confirm and exit from the current menu Exit without confirming from the current menu 7R 8VH NH 6 PERO Moving left or right 3 4 Confirm your entry OK Delete a character by moving the cursor to the left Ì Delete a character on the left of the cursor without moving the cursor C LIASSE 2...

Page 23: ...e achieved in two ways Step by step function access Direct function access 6WHS E VWHS IXQFWLRQ DFFHVV You may print the function list key to know the number of a function The following example describes how to enter your name so that it prints out as a header on your fax name of this function SETUP YOUR NAME Press the MENU key the functions list appears move the cursor with the 5 or 6 navigator a...

Page 24: ...nter the broadcasting list p 4 3 MENU 13 SEE OR MODIFY Name modification in the directory p 4 3 MENU 14 CANCEL Name delection in the directory p 4 4 MENU 15 PRINT Directory printing p 4 5 MENU 16 SAVE LOAD Store the directory on a chip card p 4 1 161 SAVE Save the directory on a chip card p 4 1 162 LOAD Load the directory from a chip card p 4 1 MENU 17 IMPORT Enable disable e mail import p 4 6 MEN...

Page 25: ...RINT Print settings list see MENU 54 MENU 29 TECHNICAL Technical parameters p 3 7 MENU 20 GEOGRAPHIC Geographical settings a 201 COUNTRY The country you select will set the network language and corresponding keyboard a p 3 2 202 NETWORK Sets the network individually a p 3 2 203 LANGUAGE Sets the language individually a p 3 3 a Depending on model MAIN MENU 2 SETUP XQFWLRQV XQFWLRQ HVFULSWLRQ 3DJH M...

Page 26: ... 5 20 MENU 72 POLLING TX Storing a document in a Mailbox p 5 21 MENU 73 PRINT Print content of a Mailbox p 5 21 MENU 74 CANCEL Suppress an empty mailbox p 5 21 MENU 75 PRINT LIST Print list of MBX p 5 21 MAIN MENU 8 ADVANCED FUNCTIONS XQFWLRQV XQFWLRQ HVFULSWLRQ 3DJH MENU 80 CALIBRATION Scanner calibration MENU 82 LOCK Interlocking activation 821 LOCKING CODE Entering interlock code p 5 18 822 LOC...

Page 27: ...12 922 M ESS SERVICE Setting the E_mail address p 3 12 923 S ERVERS Setting the SMTP POP3 and DNS p 3 12 M ENU 93 I MMED A CCESS Immediate access to supplier p 3 16 M ENU 94 S ETTINGS Internet settings 941 C ONNECT T YPE Select type of connection p 3 13 942 TX T YPE Select type of transmission p 3 13 943 S ET TIMES or P ERIOD Change connection times p 3 13 or p 3 13 944 D EPOSIT N OTICE Printing o...

Page 28: ...2 8 Quick usage Date en cours 11 juin 2001 Sct31nt3 doc 31nt3 mac SAGEM FM DOC EN COURS MFC 23260972 6_38xx Sagem GB PriseEnMains fm LIASSE 23260972 6 book Page 8 Lundi 11 juin 2001 5 31 17 ...

Page 29: ...PH At any moment you may change the date and time of your fax machine To change the date and time M ENU 21 S ETUP D ATE T IME Enter one after another the numbers of the required time and date for example for november 8 2001 at 9h33 press 0 8 1 1 0 1 0 9 3 3 then validate by pressing key O K RXU ID QXPEHU Your fax offers to print out your fax number on every document it transmits if you saved this ...

Page 30: ...TYPE Select option PABX or PSTN then validate your choice with OK HRJUDSKLFDO VHWWLQJV GHSHQGLQJ RQ PRGHO These settings will enable you to use your terminal in different preset countries and in different languages RXQWU By choosing a country you initialise the settings for its public telephone network its default language its default type of keyboard To select the country MENU 201 SETUP GEOGRAPHI...

Page 31: ... the company s telephone network This prefix will automatically be added as soon as an external number is dialled Caution If you define a local prefix do not add it to the numbers stored in the directory it will be dialled with each number HILQLQJ WKH PLQLPDO VL H MENU 831 ADVANCED FUNCTIONS PREFIX NUMBER SIZE You can change the default value for the minimal size of the company s outside numbers a...

Page 32: ...6 00 P M to 8 00 A M Nevertheless you may change this time slot 0RGLI LQJ WKH HFRQRP SHULRG MENU 243 SETUP SEND ECO PERIOD Enter the hours of the new economy period and validate your selection with the key OK 8VLQJ WKH HFRQRP SHULRG To transmit in economy period you just have to press the ECO key instead of the key The fax will automatically be transmitted during the economy period RFXPHQW IHHG W ...

Page 33: ...3 FAX TAD ANSWER CODE or MENU 256 SETUP RECEPTION ANSWER CODE Enter the code 4 digits and validate with the key OK FWLYDWH RU GHDFWLYDWH WKH DQVZHULQJ PDFKLQH MENU 42 FAX TAD ACTIVATION or MENU 255 SETUP RECEPTION FAX TAD Select the required option WITH or WITHOUT and validate your choice with OK If you saved an access code for your Fax answering enter it and validate with OK Your Fax answering is...

Page 34: ...he relay function To relay you need to supply the remote fax with the document and the relay list number The remote fax will then transmit this document to all subscribers belonging to the list Once the relay is activated by your fax and as soon as the document is received by the remote fax this document is first printed before relay to all subcribers on the list To activate relay from your fax ma...

Page 35: ...h OK With the keys 5 or 6 modify the parameter settings by following the table below and press OK 3DUDPHWHU 6HWWLQJ 6LJQLILFDWLRQ 1 SCANNING MODE 1 NORMAL 2 FINE 3 SFINE 4 PHOTO Default value of the scan mode resolution for the documents to be transmitted 2 SENDING HEADER 1 WITH 2 WITHOUT If this parameter is on your header will appear on all documents sent to your subscribers with your name numbe...

Page 36: ... speed for some calls 12 NBR OF RINGS 2 Í9 Number of rings to automatically start your machine 20 CORRECTION MODE 1 WITH 2 WITHOUT ON this parameter helps correct the calls made on disturbed telephone lines It is used when the lines are weak or too noisy Transmission times may be longer 70 INTERNET VALID 6H01 Í21H59 This menu is used to define the period of time for which periodical connections ar...

Page 37: ...administrated by anyone in your company we recommend you ask that person for the settings described below 2 1 7 25 6 77 1 6 XWRPDWLF FRQILJXUDWLRQ We recommend you to carry out a manual configuration of your Internet F x machine The automatic configuration of the local network settings may be considered if your local network features a DHCP or BOOTP server that can dynamically assign addresses to ...

Page 38: ...KS LOCAL NETWORK CONFIGURATION Choose MANUAL and press OK to confirm 3 DGGUHVV MENU 2622 SETUP NETWORKS LOCAL NETWORK IP ADDRESS Enter the IP address of your Internet F x and press OK to confirm 6XE QHWZRUN PDVN MENU 2623 SETUP NETWORKS LOCAL NETWORK SUBNET MASK Enter the sub network mask of your Internet F x and press OK to confirm DWHZD DGGUHVV MENU 2624 SETUP NETWORKS LOCAL NETWORK GATEWAY Ente...

Page 39: ...ring an Internet connection 17 51 7 5 675 7 21 Your machine is delivered ready to use and preset with an Internet registration and ISP To take advantage of this offer and create your own E mail address all you have to do is return the registration form complete the Internet registration form provided with your machine insert this form in the feeder as for a document transmission select MENU 991 IN...

Page 40: ... INTERNET INIT CONNECTION enter the CALLING NUMBER press OK enter connection IDENTIFIER 1 press OK enter connection PASSWORD press OK MENU 922 INTERNET INIT MESS SERVICE enter Email IDENTIFIER press OK enter Email PASSWORD press OK enter E MAIL ADDRESS press OK FFHVV WR VHUYHUV SDUDPHWHUV MENU 923 INTERNET INIT SERVERS enter SMTP Server press OK enter POP3 Server press OK enter PRIMARY DNS press O...

Page 41: ... at 9 00 12 00 and 17 00 default values Modify periodic connection period MENU 943 INTERNET SETTINGS PERIOD having selected the PERIODIC mode enter to new connection period with the numeric keypad value between 00h01 and 23h59 and press OK An internet connection is established every three hours default value FFHVV WR WUDQVPLVVLRQ W SH VHOHFWLRQ MENU 942 INTERNET SETTINGS TX TYPE Select one of the ...

Page 42: ...ve two different addresses transfer all mail or only those with attachments to a PC if PC and fax share the same address use the fax as a printer for E mails for the PC 0RGH RQO MENU 96 INTERNET SORT MESSAGES select option F X ONLY press OK All E mails are polled and printed 0RGH RQO 3 MENU 96 INTERNET SORT MESSAGES select option PC ONLY press OK The E mails are neither polled nor printed and they...

Page 43: ...nter the subscriber s Set transmission mode MENU 243 SETUP SEND ECO PERIOD OR MENU 373 SEND SETUP ECO FUNCTION Select the desired option FAX or AUTOMATIC and press key OK to validate 17 51 7 211 7 21 An Internet connection is made with an ISP It allows both document sending and reception while connected A connection takes place the following way send to one or more of your subcriber s Internet mai...

Page 44: ...our machine PPHGLDWH FRQQHFWLRQ WR WKH QWHUQHW There are two methods to immediately connect to the Internet Access by the Menu MENU 93 INTERNET IMMED ACCESS Direct access Press twice on key 3URJUDPPHG FRQQHFWLRQ An automatic connection to the Internet depends on how your machine is programmed and more particularly on the standard settings refer to paragraph Standard settings page 3 13 7 9 7 7 17 5...

Page 45: ...ber list is made from the subscriber records already stored For all subscriber records or subscriber lists you may create consult modify contents delete print the directory You may save and if needed load your directory To proceed you need to contact your distributor and purchase the optional kit Save This gives you access to functions 161 and 162 refer to paragraph Functions list page 2 4 5 7 1 6...

Page 46: ...ur subscriber your subscriber s ID number will automatically appear on the screen if you wish to modify this number you may do so by choosing another free number and validate with OK select the appropriate fax transmission speed then validate with OK If need be select the appropriate transmission speed to send your correspondents faxes and confirm your choice by pressing the OK key 5 7 1 68 6 5 56...

Page 47: ...th OK The cursor being on LIST COMPOSITION press the 4key The empty line ENTER ELEMENTS appears you must fill in the ID numbers assigned to the subscriber records included in this list There are three ways detailled in the table below to choose and add one or more subscribers to your list Then validate your choice by pressing OK for every subscriber included in this list repeat the above step then...

Page 48: ...wish to modify and validate with OK modify the line or lines in the subscriber record or subscriber list and validate each modification with OK Remark You may validate your modification by pressing key but you will exit the menu and may not be able to modify the following lines 7 1 5 25 25 67 MENU 14 DIRECTORY CANCEL The directory appears in alphabetical order select the subscriber record or subsc...

Page 49: ...and processed as an e mail attachment Caution Importing a new directory completely overwrites any existing directory entries 7 6758 785 The electronic file containing the data in the directory must be structured into lines or records each comprising five fields separated from one another by a unique character a tab stop a comma or a semi colon The lines themselves are separated by a carriage retur...

Page 50: ...e example above which uses a semi colon as a separator the entry for Jones lacks both e mail address and shortcut key 352 85 To import a directory MENU 17 DIRECTORY IMPORT Select WITH to authorise the importation of a directory Shortcut key A capital letter A to Z unique in the directory which is associated with a specific contact and enables quick selection of the latter As with the two previous ...

Page 51: ...faxes on your network with the same directory Caution Importing a new directory completely overwrites any existing directory entries on the fax machine Once your fax machine has a complete directory we advise you to disable importing in order to protect the data already on the fax To disable importing M ENU 17 D IRECTORY I MPORT Select WITHOUT to prevent users from importing a directory 3257 1 5 7...

Page 52: ...4 8 Directory Date en cours 11 juin 2001 Sct31nt3 doc 31nt3 mac SAGEM FM DOC EN COURS MFC 23260972 6_38xx Sagem GB Répertoire fm LIASSE 23260972 6 book Page 8 Lundi 11 juin 2001 5 31 17 ...

Page 53: ...rst memorized and sent at the time of Internet connection Via the telephone network all your faxes are sent in black and white Via the Internet you can sent black and white documents TIFF format or colour 1 documents JPEG format 3 26 7 21 1 7 2 80 17 Your fax is composed of a scanner including two modes of reading original documents the flat bed scanner and the sheet feed scanner The flat bed scan...

Page 54: ...screen To be used for good quality documents without drawings or small details Place your original documents in the document feeder face down first page under the stack Set the paper guide to the document width Once the operation is over take your original documents back on the scanned document receptacle Flat bed scanner top view Open the access cover of the flat bed scanner Put your original doc...

Page 55: ...u can set the contrast if your document is too light or too dark If the document is light you must raise the contrast and if it is dark you must reduce it To set the contrast Press as many times as necessary to choose the desired contrast A g icon on the screen indicates the selected contrast 1 URP WKH GLUHFWRU LDOOLQJ DOSKDEHWLFDOO Enter the first letters of your subscriber s name with the alphan...

Page 56: ...This may be achieved only if the machine is parametered to send from the memory refer to paragraph Document feed types page 3 4 enter the fax or E mail address or use the Directory or key refer to above paragraphs press key and enter the number of the second subscriber or second subscribers list repeat this last step for all subscribers or subscriber lists maximum 10 subscribers or subscriber list...

Page 57: ...essing key Your document is stored and will be sent at the new time 7UDQVPLVVLRQ ZLWK GLDOOLQJ IROORZ XS This function allows you to hear thanks to the machine speaker the dialling operation during a fax transmission In that case the maximum transmission rate will be 14400 bps This function allows for example to hear if the subscriber s fax is engaged and so choose the moment when the line is clea...

Page 58: ...tioning the document page 5 1 Enter the addressee s E mail address or choose your dialling mode refer to paragraph Dialling page 5 3 adjust the contrast and the resolution if necessary refer to paragraph Choosing the resolution the contrast page 5 2 Press key The document is scanned and memorized it will be sent at the next Internet connection If your subscriber is equipped with a PC he will recei...

Page 59: ... key Then you can choose between two options Send directly the keypad mail Press O K the mail is memorized and will be sent at the next Internet connection Your subscriber will receive an E mail Add an attachment scanned document to your mail Place the document to be attached in the sheet feed scanner face down first page under the stack or on the flat bed scanner scan side facing the machine Pres...

Page 60: ...t transmission from the memory delayed transmission deposit number of pages of the document document size percentage of space stored in memory cancel a transmission request in the waiting queue RQVXOW RU PRGLI WKH ZDLWLQJ TXHXH MENU 62 COMMANDS SEE OR MODIFY in the waiting queue select the required document and validate your choice with OK you may now modify the parameters of the given document th...

Page 61: ... a multi call number only the call number in progress at the time of the cancellation is erased from the transmission queue To cancel transmission in progress press key A message will ask you to confirm cancellation by pressing a second time on key appears on the screen press key to confirm cancellation in progress If your machine is set to print a transmission report refer to paragraph Transmissi...

Page 62: ...RS Positon the document face down refer to paragraph Positioning the document page 5 1 Press key twice You obtain a black and white copy of your original 6RSKLVWLFDWHG FRS Positon the document face down refer to paragraph Positioning the document page 5 1 Press key Enter the desired number of copies and press OK to validate Choose the FAST QUALITY or PHOTO resolution with keys 3 or 4 then press OK...

Page 63: ...nt page 5 1 Press key twice You obtain a black and white copy of your original 6RSKLVWLFDWHG FRS Position the document refer to paragraph Positioning the document page 5 1 Press key Enter the desired number of copies and press OK to validate Choose the FAST QUALITY or PHOTO resolution with keys 3 or 4 then press OK to validate Set the desired zoom value with keys 3 or 4 and the digital keypad and ...

Page 64: ... machine which paper tray shoud be used by default L R MARGINS to shift the margins of your document to the left or to the right Caution All the settings performed through this menu will become the machine s default settings To access to the settings MENU 87 ADVANCED FUNCTIONS SCAN AND PRINT Select the scanner CIS SCANNER for the sheet feed scanner CCD SCANNER for the flat bed scanner or the PRINT...

Page 65: ...h keys 3 or 4 Validate your setting by pressing key O K Remark This setting is only valid for the copy function 5 The maximum value for each colour RGB is 255 Select the colour to be modified with keys 3 or 4 validate with key O K Set the colour with the numerical keypad or 5 and 6 Validate your setting by pressing key O K ULJKWQHVV Set desired brightness with keys 3 or 4 validate your setting by ...

Page 66: ...ing by pressing key OK 1LJKW VWDQGE If you want your printer to automatically switch to standby mode for the selected time slot Select YES or NO for standby with keys3 or 4 if you chose NO the switching to standby will be automatic all day long Validate your setting by pressing key OK 27 5 81 7 216 2 6 The incoming and outgoing logs list the last 30 subscribers ingoing and outgoing made by your fa...

Page 67: ...our fax s parameter settings to control any changes possibly made to the default parameters Printing the machine settings MENU 54 PRINT SETUP Your fax prints the list of stored parameters 0 025 1 6 48 1 2 6 You may memorize a sequence of keys for example to send directly a fax to one or multiple subscribers to call this subscriber or to get access to a specific menu etc This sequence is registered...

Page 68: ...o get access to the counters of the machine MENU 84 ADVANCED FUNCTIONS COUNTERS These counters indicate the number of printed pages MENU 841 ADVANCED FUNCTIONS COUNTERS PRINTED PAGES local copies MENU 842 ADVANCED FUNCTIONS COUNTERS LOCAL COPIES transmitted pages MENU 843 ADVANCED FUNCTIONS COUNTERS SENT PAGES received pages MENU 844 ADVANCED FUNCTIONS COUNTERS RECEIVED PAGES 326 7 1 32 1 You may ...

Page 69: ...ey 3ROOLQJ D GHSRVLWHG GRFXPHQW MENU 32 SEND POLLING RX Enter the number of the party whose document you want to poll or choose your dialling mode refer to paragraph Dialling page 5 3 Remark You can poll several documents using the key Depending on type of poll you should 0HQX 3URFHGXUH SIMPLE select FEEDER or MEMORY select the black and white mode and validate with OK if necessary adjust the cont...

Page 70: ... time Press OK to validate Remark When a code is already registered the machine asks you first to give the former code before allowing you to modify it H SDG LQWHUORFNLQJ This function allows you to prevent access to non authorised persons An access code must be entered each time a person wants to use the machine To access the keypad unlocking menu MENU 822 ADVANCED FUNCTIONS LOCK LOCK KEYBOARD En...

Page 71: ...y pressing OK Use the 5 or 6 keys to select WITH Confirm by pressing OK Remark if you have already set an access code the unit will first prompt you to key in that code prior to letting you modify it 0 2 0 There are 32 mailboxes MBX enabling you to transmit documents in complete confidence thanks to an access code named code MBX to all subscribers equipped with a fax compatible to yours MBW 00 is ...

Page 72: ...r the number of a free MBX and validate with OK select option MAILBOX CODE and press OK Value 0000 is always displayed enter the code of your choice if needed and press OK select option S I D and press OK enter this MBX s S I D 20 characters max and press OK The MBX is initialised If you wish to initialise another press C and repeat the same procedure To exit this menu MAILBOXES press 0RGLI LQJ WK...

Page 73: ...eted and will appear as a free MBX in the list 3ULQW WKH 0 OLVW MENU 75 MAILBOXES PRINT LIST The list gives the status of each MBX 0 GHSRVLW LQ RXU ID insert the document in the fax machine s feeder select MENU 72 MAILBOXES POLLING TX and validate with OK select one MBX out of the 31 MBX or enter directly the number of this MBX validate your choice with OK The document is placed in the feeder and ...

Page 74: ... in the memory and sent at the requested time 0 SROOLQJ IURP D UHPRWH ID MENU 35 SEND MBX POLLING enter your subscriber s number for MBX deposit or choose your dialling mode refer to paragraph Dialling page 5 3 and validate with OK enter the subscriber MBX number and press OK enter this MBX access code and press OK if you wish to delay the poll time enter the departure time next to the current tim...

Page 75: ...egularly clean the inside For normal usage please respect the following rules Never leave the cover open unless required Protect the machine from direct sunlight Do not attempt to oil the machine Always gently close the cover and avoid vibrations Do not open the cover while printing Never try to dismantle the machine Do not use paper that has stayed in the machine to long in the paper tray Report ...

Page 76: ...idges After replacing a consumable in the printer you need to inform the machine about its features Open the front cover of the printer and take out the cartridge to be replaced taking care not to spill the toner Do not take out both toner cartridges at the same time Unpack the new cartridge Spread in the toner by shaking the cartridge Remove the protection bar Install the new cartridge inserting ...

Page 77: ...p is oriented as shown in the drawing below The display of the scanner keypad shows the following assuming black toner cartridge Press OK The display shows Once the SmartCard has been read the display shows Remove the SmartCard Caution If the following is displayed make sure you have properly inserted the chipcard supplied with the consumable Otherwise contact your supplier RENEW BLACK B TONER CON...

Page 78: ...gle drop spilled on one of the printer elements could result in irremediable damages Insert the new oil cartridge in its housing always taking care to put a sheet of paper under it Remove the paper when the cartridge is at its new position The tongue situated on the bottle must be on the right hand side Install the ribbon in its housing the visible part of the ribbon must be in front of the oil bo...

Page 79: ...ODWLRQ WKH RLO FDUWULGJH If after the preheating period the display shows Open the upper cover of the printer REINSTALL THE OIL BOTTLE To release the oil cartridge turn both locking levers Extract the oil cartridge taking care to place a sheet of paper under it and shake it lightly once or twice A single drop spilled on one of the printer elements could result in irremediable damages Maintenance f...

Page 80: ...ys taking care to put a sheet of paper under it Remove the paper when the cartridge is at its new position The tongue situated on the bottle must be on the right hand side Turn both locking levers to put them in closed position Close the upper cover of the printer Reinstall the scanner support on the printer Reinstall the scanner Maintenance fm Page 6 Lundi 11 juin 2001 5 43 17 ...

Page 81: ...rs on the fax display do the following steps in order to replace the toner bin Open the front cover of the printer by pressing the two buttons situated on each sides refer to paragraph Printer incidents page 6 14 Remove the toner bin from its housing Peel off the sticker from the toner bin and stick it on its opening Place the toner bin in the plastic bag Install the new toner bin in its housing C...

Page 82: ...ransparency away from foreign objects like dust Open the front cover of the printer remove the cartridge to be cleaned and avoid spilling the toner Do not remove two cartridges at the same time Insert a piece of about 1 cm of the transparency under the development roller on its left hand side Slide the transparency to the right hand side of the roller Do it once only Place the cartridge back in it...

Page 83: ...tridge loading system Switch off the machine Remove the scanner and its support Open the printer upper cover and remove the OPC cartrige Place the OPC cartridge on a sta ble surface preferably covered with paper to avoid spilling the toner Place a clean black protection sheet on the photosensitive ribbon to protect it from light Use the brush to clean the loading unit corona This brush is fixed un...

Page 84: ...bbon As much as possible avoid to expose the OPC belt OHDQLQJ WKH VFDQQHU V UHDGLQJ GHYLFHV 6KHHW IHHG VFDQQHU When one or more vertical lines appear on transmitted copies or faxes do the following steps After cleaning put the OPC cartridge back into its housing Close the system cover Reinstall the scanner support Reinstall the scanner Toner bin Cover Toner bin Brush Open the scanning cover of the...

Page 85: ...o longer satisfactory MENU 80 ADVANCED FUNCTIONS CALIBRATION Insert a blank page into the sheet feed scanner and press OK to confirm Remark Since the page you insert will be used to define the quality of subsequent copies it must be free from any visible defects 1 176 20081 7 21 55256 If the communication fails the fax advises you of an automatic retry later Example of what is displayed Clean the ...

Page 86: ...5 automatic redials Message GIVE UP DIALING This message is displayed when transmission failed 12 times in a row All the documents on hold for transmission are then automatically cleared from the memory of the fax machine To clear the message GIVE UP DIALING from the screen press RPPXQLFDWLRQ HUURU FRGHV The communication error codes appear in the logs and transmission reports HQHUDO FRGHV Code 01...

Page 87: ...ubscriber who called you to check the length of his document it is too long to be completely received Code 0D Transmission failed Ask the sender to retransmit the document Code 13 Memory full Your fax can no longer receive since its memory is full there are too many received unprinted documents or too many documents in the transmission line Print the received documents and delete or transmit immed...

Page 88: ...o the POP3 server for mail reception the service is temporarily unavailable If the errors always occurs check the Internet e mail and server parameters Code 45 Provider disconnected The service is temporarily unavailable try again later Code 46 Trans server disconnected The SMTP server for sending mail is disconnected The service is temporarily unavailable try again later Code 47 Reception server ...

Page 89: ...ollowing paragraph Replacing the oil cartridge and the cleaning roller p 6 4 REPLACE BLACK TONER BLACK YELLOW MAGENTA OR CYAN INSERT GAUGE CARD Replace the toner cartridge To proceed refer to paragraph Replacing the toner cartriges page 6 2 CLOSE FRONT COVER Close the front cover of the printer CLOSE UPPER COVER Close the upper cover of the printer CLOSE REAR COVER Close the back cover of the prin...

Page 90: ...YELLOW MAGENTA CYAN Check the indicated cartridge installation To proceed refer to paragraph Setting the four colour toner cartridges page 1 2 CHECK PAPER TYPE Check paper meets the requirements The paper used must respect the following features 60 to 80 g m2 standard paper special transparencies for laser printers 90 to 160 g m2 thick paper Caution Never use ink jet paper SEE TONER BIN Toner bin ...

Page 91: ...ridges attachment unit C M J and N The paper track is indicated by the bold line ending with an arrow 3ULQWHU WUD MDP VROXWLRQ Remove the printer paper tray Remove the jammed paper Make sure the sheet is not crumpled and the tray is not overloaded Place the tray back in the printer Remark To avoid damaging the ribbons remove the jammed paper without tearing it up If you leave a peace of paper insi...

Page 92: ... the paper pull it forward from the back outlet and not from the upper outlet To prevent the ribbons from being stained by the unfixed toner Put both levers in their initial position Close the printer upper cover then the printer back cover Reinstall the scanner and its support on the printer Maintenance fm Page 18 Lundi 11 juin 2001 5 43 17 ...

Page 93: ...FDQQHU SDSHU MDP When a paper jam occurs the following message appears on the control panel screen REMOVE DOCUMENT If jams often occur in a specific part of the unit the latter needs to be checked cleaned or repaired Open the scanning cover of the sheet feed scanner by pressing key A Remove the jammed paper B without tearing it up Then close the scanning cover of the sheet feed scanner A B Mainten...

Page 94: ...press key Check the thickness of the document 30 sheets of paper of 80 g m2 Iron out the sheets if needed Help the sheets along The fax machine does not receive any faxes Check that the telephone line cable is correctly plugged in and that there is a tone signal on the telephone line If the message NO PRINTER is displayed on the screen check if it is switched on and check that the printer connecti...

Page 95: ...ight 5 mm i e 50 sheets typically 80g m2 Reception format A4 Width 210 mm Length 297 mm Paper reception Plain paper copier type 80g m2 Paper tray capacity 260 sheets max 80g m2 Additional tray optional 1 additional tray 250 sheets Transmission procedures In accordance with UIT T recommendations for group 3 fax machines Possible phone line connections To all Public Switched Telephone Networks or eq...

Page 96: ...rnet general specifications TCP IP PPP protocols SMTP POP3 MIME protocols for e mail TIFF F and JPEG file format OPC belt Up to 50 000 plans Colour toner cartridge Approximately 6000 pages at 5 Black toner cartridge Approximately 16 000 pages letter ITU 01 Storage of consumable drum and toner Temperature Humidity 5 to 35 C 24 months in original packaging 20 à 85 RH no condensation Maintenance fm P...

Page 97: ... following the manufacturer s instructions Depending on the model the unit s mains plug may be the only way to disconnect the unit from the power network Therefore you must respect the following Your unit must be connected to a mains outlet located nearby The mains outlet must remain easily accessible Your unit is delivered with a power cord including a plug which depending on the model may be wit...

Page 98: ...7 2 Safety Date en cours 11 juin 2001 Sct31nt3 doc 31nt3 mac SAGEM FM DOC EN COURS MFC 23260972 6_38xx Sagem GB Sécurité fm LIASSE 23260972 6 book Page 2 Lundi 11 juin 2001 5 31 17 ...

Page 99: ...Sagem GB 3 COUV38xx fm 21680 5 5 1 6 Black Toner cartridge 23332523 8 Magenta Toner cartridge 23332525 9 Yellow Toner cartridge 23332526 2 Cyan Toner cartridge 23332524 1 Maintenance Consumable Kit 23332520 9 BELT Consumable Kit 23332521 7 COUV 23260972 6 book Page 1 Lundi 11 juin 2001 5 30 17 ...

Page 100: ...Sct31nt3 doc 31nt3 mac SAGEM FM DOC EN COURS MFC 23260972 6_38xx Sagem GB 4 COUV38xx fm 27 rue Leblanc 75512 PARIS CEDEX 15 FRANCE http www sagem com 23260972 6 User s guide COUV 23260972 6 book Page 1 Lundi 11 juin 2001 5 30 17 ...

Reviews: