background image


DOK451 rev.2 


Page 22 of 26 


7.6 

Measure panel 


Panel content 

Functionality and description 

Measure button 

Starts a measurement series 

Samples box 

Defines the number of samples to be collected (max 50 MS) 

Save to file button 

Saves data from a completed measurement series to a result file. The file path 
defined in the active parameter file is proposed 

X-, Y- and Z-axis check boxes  Selects which axis data to present in the graph area (up to 3 axes can be plotted 

simultaneously) 

Relative and absolute toggle 
switch 

When set to ‘Absolute’, all results are plotted as received. When set to ‘Relative’ 
the curves are translated so that the first measurement is shown in the plot as zero 

Active device indicator 

Indicates active gyro module. Corresponding COM port is specified in the active 
parameter file 

CRC and DG-ID LEDS 

Status on all CRC checks and DG-IDs. GREEN = OK, RED = FAIL 

Data box 

Selects which datagram content to be shown. Several options are available, 
depending on the active datagram type. Left click inside box to display available 
selections. The plot updates immediately if a measurement series has been done 

Scale box 

Enables user to change Y-axis scaling (Full range, User defined, or Auto). Left click 
inside box to display available selections 

Sample rate box 

Displays the sample rate used in measurement 

Unit box 

Displays the output unit for all measurements (Angular Rate, Incremental Angle, 
etc.) 

DG type box 

Displays the type of datagram received 

Save to disk icon 

Saves the plot to a .JPG file 

Print icon 

Prints a picture of the plot to the default printer 

1:1 icon 

Resets zoom level to 1:1 (if ZOOM is active. See below) 

Zoom icon 

Enables a custom zoom of the presented results in the strip chart (graph area) 
according to placement of the cursors 

Cursors (On/Off) switch 

Enables usage of cursors (default is Off) 

Cursor 1 

Shows the location of cursor no 1 

Cursor 2 

Shows the location of cursor no 2 

Delta 

Shows the delta between the two cursor locations (X and Y values) 

Progress bar 

A blue continuous line above plot area shows the measurement series progress 

Lower bar on panel 

Shows the INI-file in use and the active mode (INTERACTIVE MEASUREMENTS) 

Table 7:

 Measure panel description 

 
Saved data: 
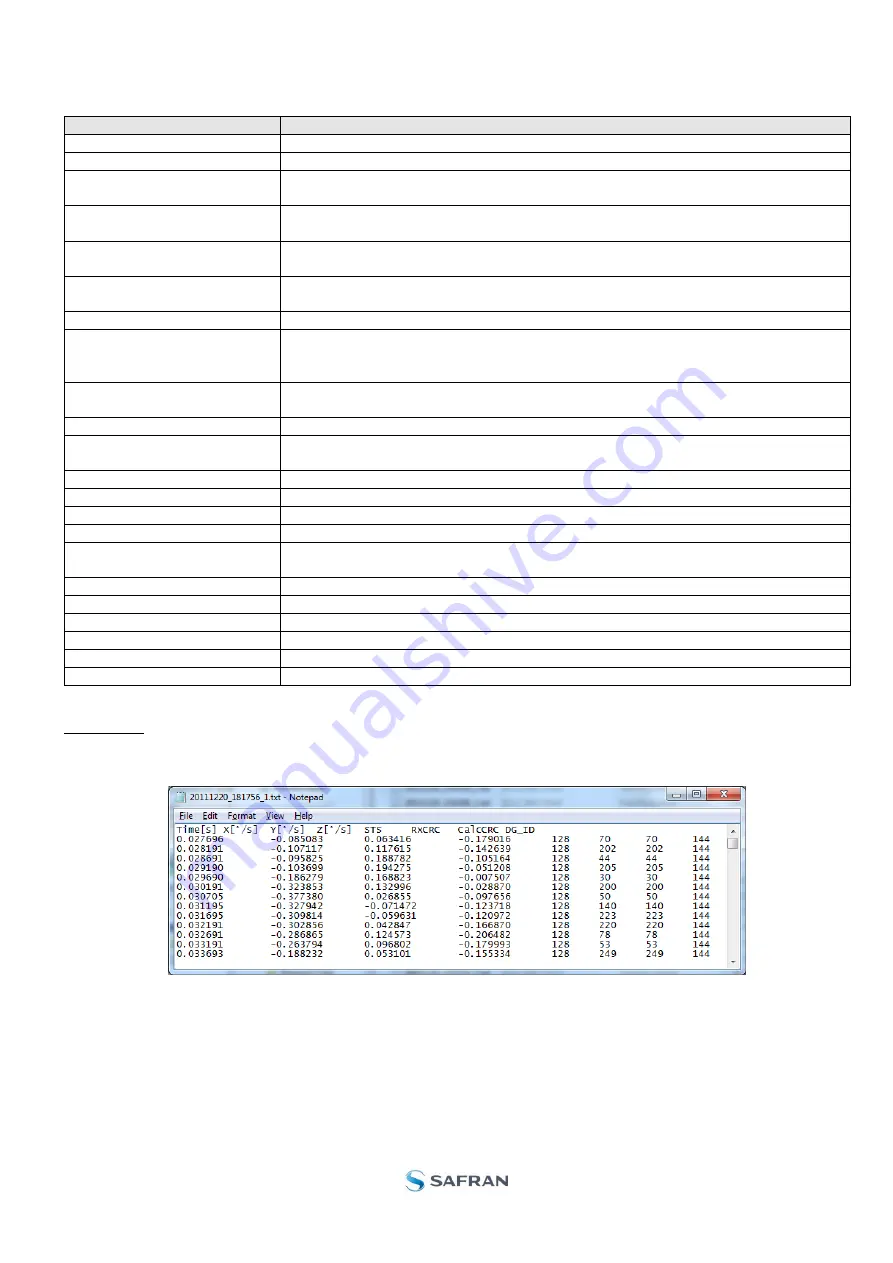
An example of a result file is shown in Figure 28, for a standard datagram measurement series of gyro module # 1. A 
description of each of the columns of the data log file is found in Table 8. 


Figure 28: Result file example 


Summary of Contents for STIM277H

Page 1: ...DOK451 rev 2 Page 1 of 26 STIM210 STIM277H Evaluation kit User Manual...

Page 2: ...4 2 1 Installation of FTDI serial driver 9 4 2 2 Verification and configuration of serial driver 9 4 3 INSTALLATION OF PC SOFTWARE 11 5 CONNECTING THE STIM210 STIM277H TO YOUR PC 11 6 USING PC SOFTWA...

Page 3: ...criteria for measurements available Manually No of samples or Time elapsed Measurements of up to 4 gyro modules simultaneously supported requires additional cable 1 1 General description The evaluati...

Page 4: ...AUX GND AUX AUX TOV ExtTrig 4 RxD 5 RxD 9 TxD 8 TxD 10 RxD 2 RxD 1 TxD 9 TxD 15 GND 8 VSUP 13 GND 7 AUX 4 TOV 11 ExtTrig 6 AUX_GND 14 AUX D SUB P USB Break out Micro D PPS 12 PPS CRS 3 CRS 1 GND Figu...

Page 5: ...of Validity TOV and external trigger functionalities of STIM210 STIM277H are not supported by the EVK PC software 2 Kit contents PCI PCIe kit o PCI PCIe to RS422 interface card o STIM210 STIM277H com...

Page 6: ...he memory stick included in the kit This procedure is self instructive Follow the on screen messages without doing any configuration changes Figure 4 and Figure 5 show two of the messages that appear...

Page 7: ...of 26 Figure 5 NI serial driver 4 1 2 Installation of PCI PCIe card Disconnect power from your computer prior to installation Following your computer manufacturer s directions insert the card into a...

Page 8: ...nd Printers Device Manager Verify that the serial driver installation has completed successfully An example is shown in Figure 6 Make a note of the assigned COM port value s information This will be n...

Page 9: ...most Windows versions will silently connect to the Windows Update website and install a suitable driver In the event that no automatic installation takes place please refer to the set up guide from F...

Page 10: ...SB cable in Windows 7 Make a note of the assigned COM port value s information This will be needed later for connecting to the STIM210 STIM277H from the PC software Right click USB Serial Port COM n a...

Page 11: ...etup exe found on the included memory stick or downloaded from the STIM product support web page Follow the on screen instructions to complete the installation The PC software can also be downloaded f...

Page 12: ...DOK451 rev 2 Page 12 of 26 Micro D P USB USB RS422 Figure 11 Connecting the STIM210 STIM277H to the computer via USB...

Page 13: ...TIM210 STIM277H EVK to start the PC software For full functionality the computer user should have Local Administrator rights Figure 12 Starting PC software from Windows 10 start menu 2 A pop up window...

Page 14: ...enable the EVK software to have full functionality Figure 14 EULA confirmation window 4 A pop up box for software registration appears Fill in the open fields and press Submit The default email client...

Page 15: ...If needed port setting needs to be changed do this by double clicking on the value and enter correct value The default password for editing is stim Figure 17 Edit the INI file in order to verify corr...

Page 16: ...the power supply cable at this point The pop up message asking for confirmation of bitrate appears Press OK Figure 19 Confirm bitrate 9 A pop up message telling Connect power cable to voltage supply...

Page 17: ...ta arriving from device n indicates that data is received from the gyro module s Verify the communication to module by clicking on the Request serial DG button An example of such a result is shown in...

Page 18: ...duction to PC software 7 1 Panels overview In addition to the Normal mode and Parameters panel other panels are also available 7 1 1 Service mode panel Figure 22 Service mode panel 7 1 2 Utility mode...

Page 19: ...DOK451 rev 2 Page 19 of 26 7 1 3 Measure panel Figure 24 Measure panel 7 1 4 Logging panel Figure 25 Logging panel for saving data to file...

Page 20: ...ts to interface hardware Opens COM port according to settings specified in active parameter file LED Indicator for hardware connection A GREEN light indicates the COM port is opened Disconnect from HW...

Page 21: ...yro module configuration and supports the same functionality as the Service mode however the protocol is optimized for machine to machine communication Utility mode is entered by clicking on the Utili...

Page 22: ...one Scale box Enables user to change Y axis scaling Full range User defined or Auto Left click inside box to display available selections Sample rate box Displays the sample rate used in measurement U...

Page 23: ...e elapsed for stopping a measurement series Samples box Used for defining number of samples when logging a finite number of samples Average box Used for specifying how many samples should be averaged...

Page 24: ...0 Type of power supply used External power supply optional Default None not in use Agilent E3631A E3633A and E3644A are supported Interface that the power is connected with Interface type for externa...

Page 25: ...e special datagrams on power on the power supply must be applied exactly when instructed as described in previous chapters 14 Unexpected DG ID received When waiting for datagrams unexpected datagrams...

Page 26: ...lication or otherwise under any patent or patent rights of Safran Trademarks and registered trademarks are the property of their respective owners Safran products are not intended for any application...

Reviews: